GMC CANYON 2016 Get To Know Guide
Manufacturer: GMC, Model Year: 2016, Model line: CANYON, Model: GMC CANYON 2016Pages: 16, PDF Size: 1.15 MB
Page 11 of 16
11
Audio Steering Wheel ControlsF
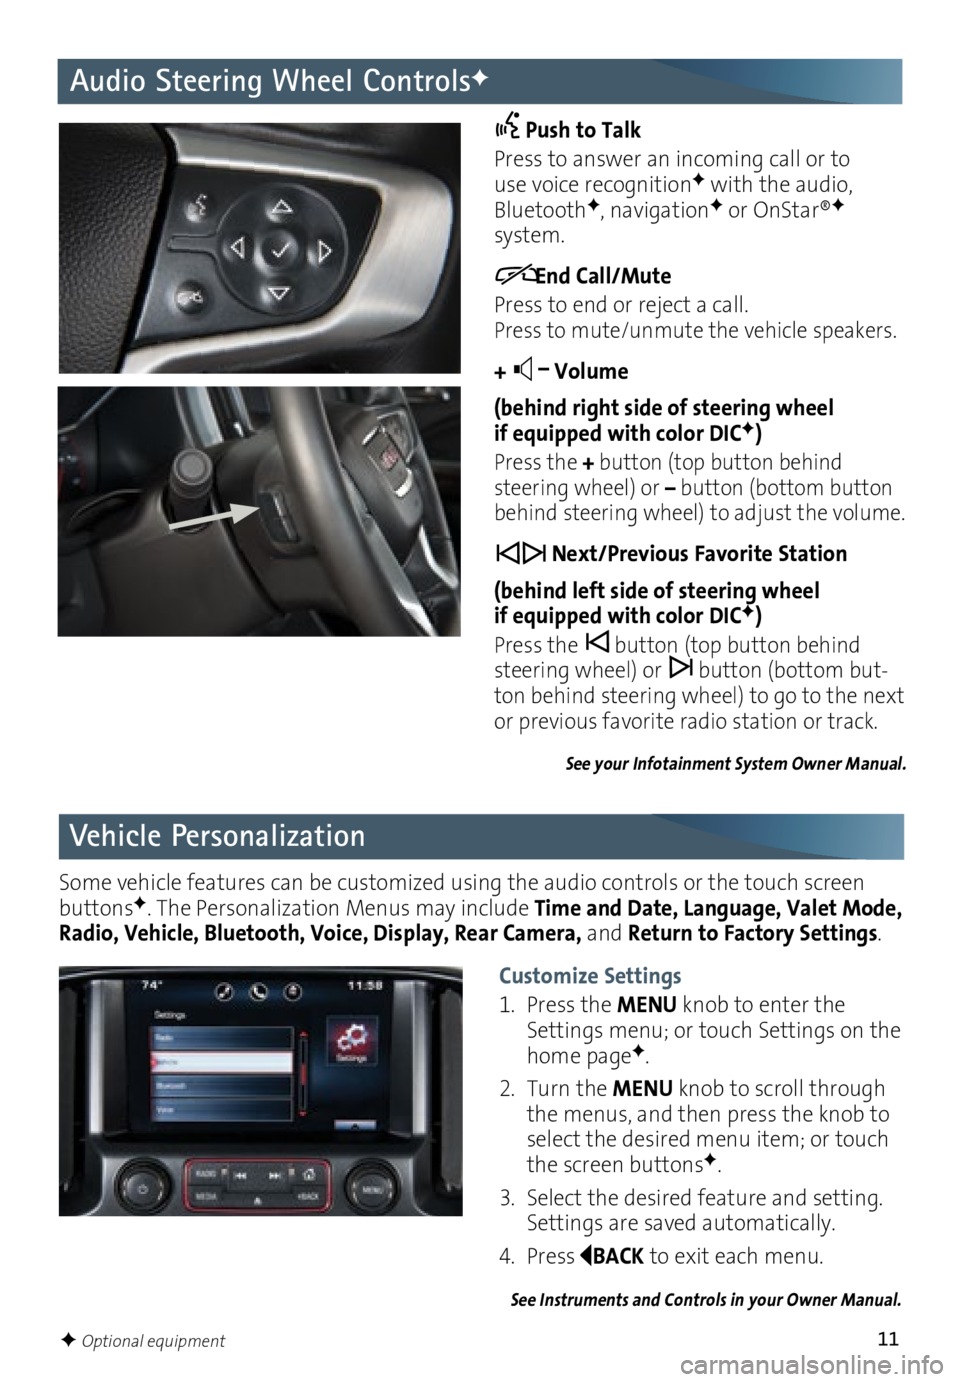
Push to Talk
Press to answer an incoming call or to use voice recognitionF with the audio, BluetoothF, navigationF or OnStar®F system.
End Call/Mute
Press to end or reject a call.
Press to mute/unmute the vehicle speakers.
+ –
Volume
(behind right side of steering wheel
if equipped with color DIC
F)
Press the + button (top button behind
steering wheel) or – button (bottom button
behind steering wheel) to adjust the volume.
Next/Previous Favorite Station
(behind left side of steering wheel
if equipped with color DIC
F)
Press the button (top button behind
steering wheel) or button (bottom but-ton behind steering wheel) to go to the next
or previous favorite radio station or track.
See your Infotainment System Owner Manual.
Vehicle Personalization
Some vehicle features can be customized using the audio controls or the touch screen
buttonsF. The Personalization Menus may include Time and Date, Language, Valet Mode,
Radio, Vehicle, Bluetooth, Voice, Display, Rear Camera, and Return to Factory Settings.
See Instruments and Controls in your Owner Manual.
Customize Settings
1. Press the MENU knob to enter the
Settings menu; or touch Settings on the
home page
F.
2. Turn the MENU knob to scroll through
the menus, and then press the knob to
select the desired menu item; or touch
the screen buttons
F.
3. Select the desired feature and setting.
Settings are saved automatically.
4. Press
BACK to exit each menu.
F Optional equipment
Page 12 of 16
12
Climate Controls
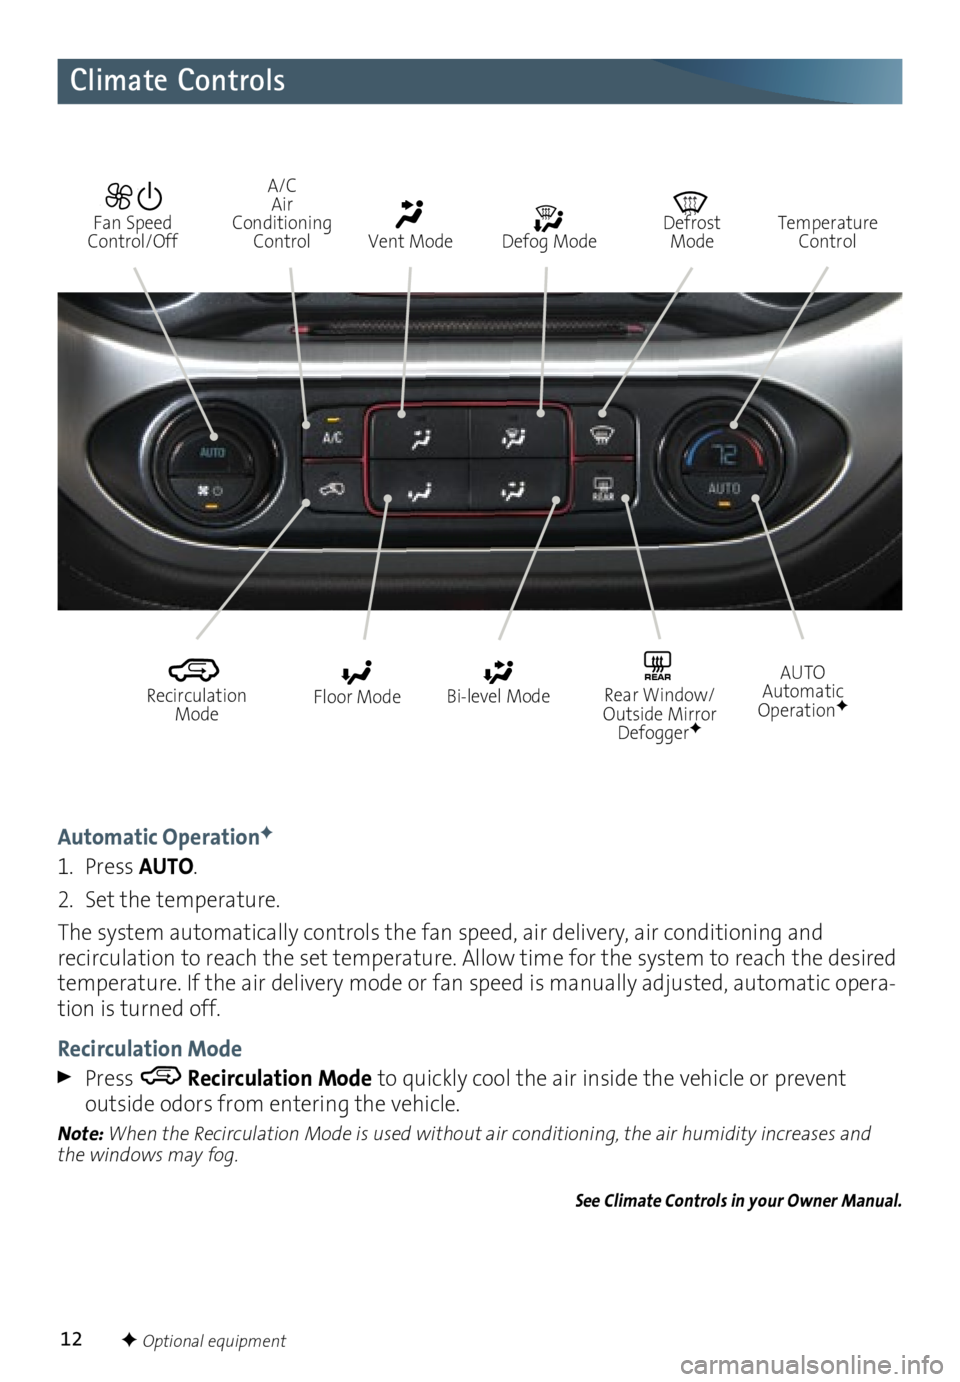
Automatic OperationF
1. Press AUTO.
2. Set the temperature.
The system automatically controls the fan speed, air delivery, air conditioning and
recirculation to reach the set temperature. Allow time for the system to reach the desired
temperature. If the air delivery mode or fan speed is manually adjusted, automatic opera
-tion is turned off.
Recirculation Mode
Press Recirculation Mode to quickly cool the air inside the vehicle or prevent
outside odors from entering the vehicle.
Note: When the Recirculation Mode is used without air conditioning, the air humidity
increases and
the windows may fog.
See Climate Controls in your Owner Manual.
Defog Mode
Defrost Mode Temperature
Control
Recirculation Mode Floor Mode AUTO Automatic
OperationF
Bi-level ModeREAR Rear Window/
Outside Mirror Defogger
F
Fan Speed
Control/Off Vent Mode
A/C
Air
Conditioning Control
F Optional equipment
Page 13 of 16
13
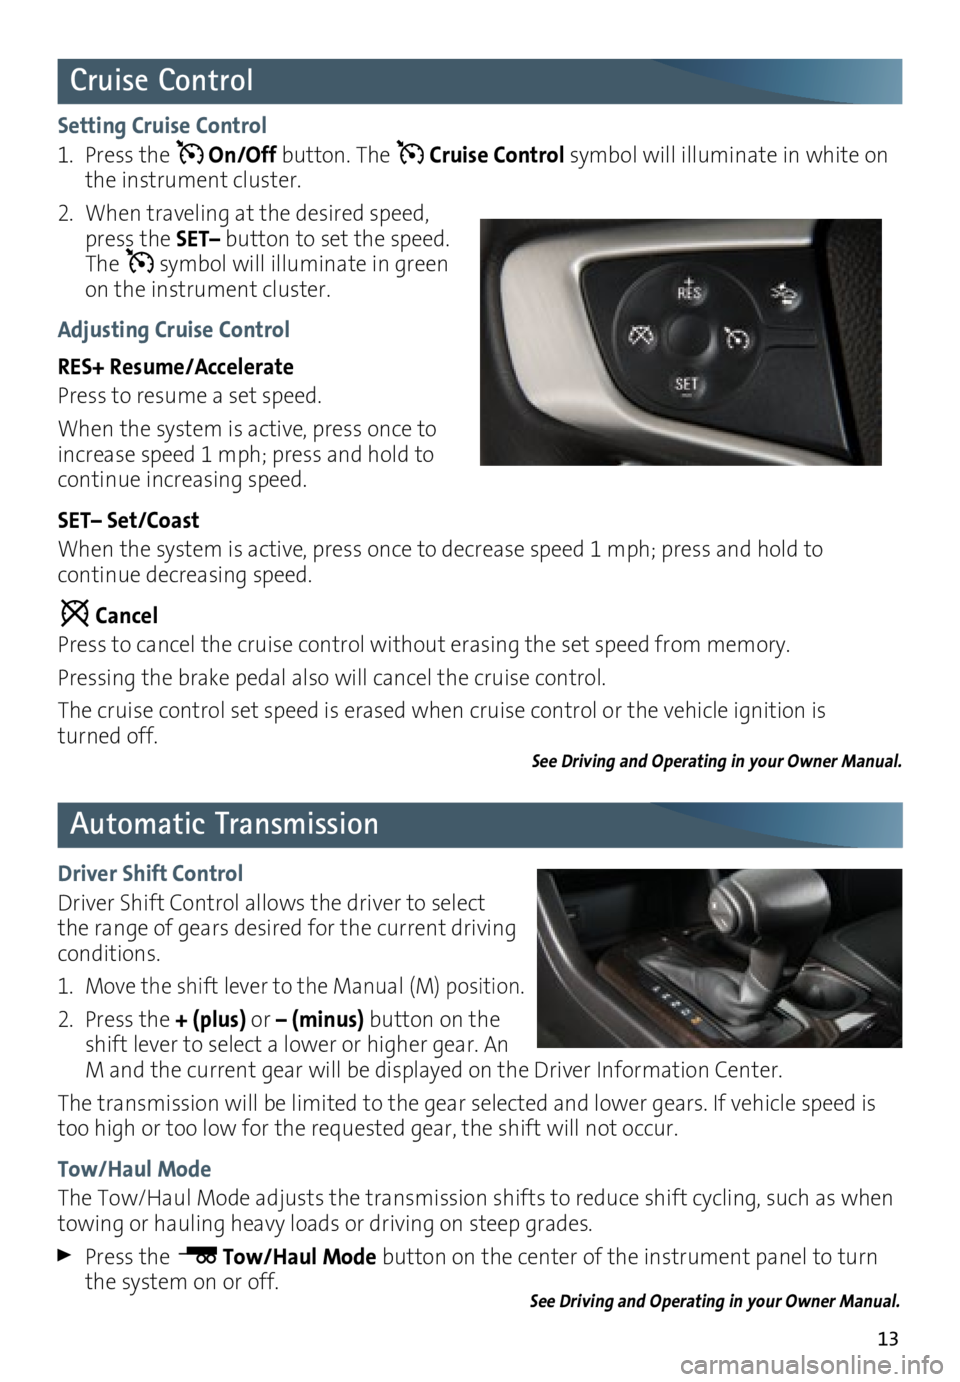
Setting Cruise Control
1. Press the
On/Off button. The Cruise Control symbol will illuminate in white on
the instrument cluster.
2. When traveling at the desired speed,
press the SET– button to set the speed.
The
symbol will illuminate in green
on the instrument cluster.
Adjusting Cruise Control
RES+ Resume/Accelerate
Press to resume a set speed.
When the system is active, press once to
increase speed 1 mph; press and hold to
continue increasing speed.
SET– Set/Coast
When the system is active, press once to decrease speed 1 mph; press and hold to
continue decreasing speed.
Cancel
Press to cancel the cruise control without erasing the set speed from memory.
Pressing the brake pedal also will cancel the cruise control.
The cruise control set speed is erased when cruise control or the vehicle ignition is
turned off.
See Driving and Operating in your Owner Manual.
Cruise Control
Automatic Transmission
Driver Shift Control
Driver Shift Control allows the driver to select
the range of gears desired for the current driving
conditions.
1. Move the shift lever to the Manual (M) position.
2. Press the + (plus) or – (minus) button on the
shift lever to select a lower or higher gear. An
M and the current gear will be displayed on the Driver Information Center.
The transmission will be limited to the gear selected and lower gears. If vehicle speed is
too high or too low for the requested gear, the shift will not occur.
Tow/Haul Mode
The Tow/Haul Mode adjusts the transmission shifts to reduce shift cycling, such as when
towing or hauling heavy loads or driving on steep grades.
Press the Tow/Haul Mode button on the center of the instrument panel to turn
the system on or off.
See Driving and Operating in your Owner Manual.
Page 14 of 16
14
Driver Assistance Systems
Traction Control and StabiliTrak Systems
The driver assistance systems use advanced technologies to help avoid collisions by
providing visual and audible alerts under some imminent collision conditions.
Forward Collision Alert
F – The Vehicle Ahead indicator will illuminate in green on the
instrument cluster when a vehicle is detected and will illuminate in amber when follow-ing a vehicle ahead too closely.
If your vehicle approaches another vehicle too rapidly, the
will flash, red lights will
flash on the windshield and rapid beeps will sound.
Press the Collision Alert button on the left side of the steering wheel to set the
alert sensitivity to Far, Medium, Near, or Off. The setting is displayed in the Driver
Information Center.
Lane Departure Warning
F – When crossing a detected lane marking, without using a
turn signal, the system flashes an amber visual alert on the instrument cluster and
beeps sound on the left or right side of the vehicle.
Press the Lane Departure Warning button on the center of the instrument panel to
turn the system on or off.
Rear Vision Camera
F – Provides a view directly behind the vehicle when backing up.
To turn the Rear Vision Camera Guidelines on or off, go to Settings > Rear Camera.
See Driving and Operating in your Owner Manual.
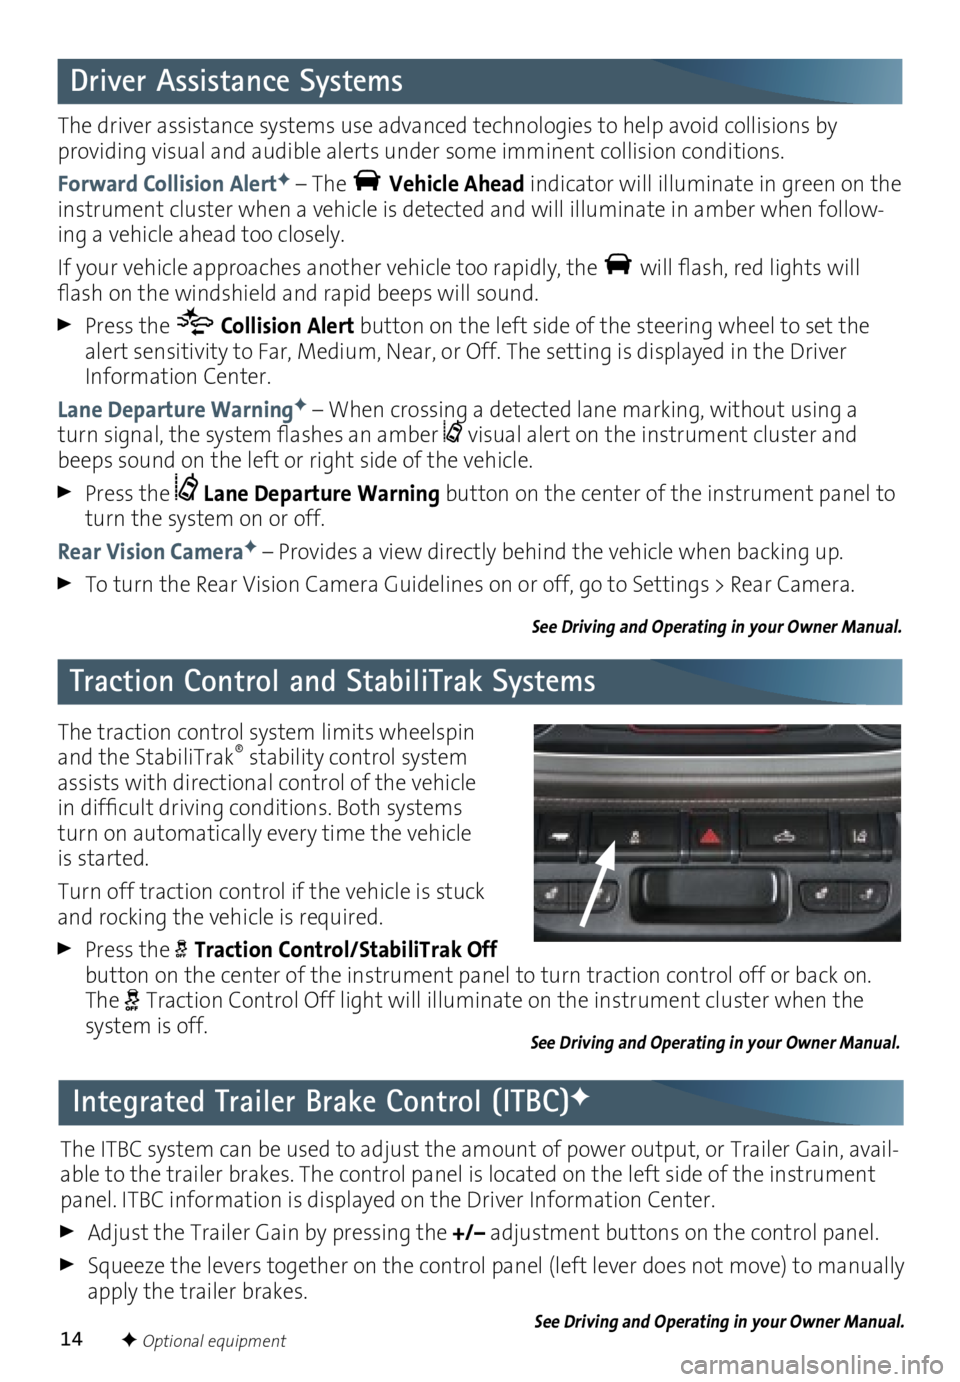
The traction control system limits wheelspin
and the StabiliTrak® stability control system
assists with directional control of the vehicle
in difficult driving conditions. Both systems
turn on automatically every time the vehicle
is started.
Turn off traction control if the vehicle is stuck
and rocking the vehicle is required.
Press the Traction Control/StabiliTrak Off
button on the center of the instrument panel to turn traction control off or back on.
The
Traction Control Off light will illuminate on the instrument cluster when the
system is off.
See Driving and Operating in your Owner Manual.
F Optional equipment
Integrated Trailer Brake Control (ITBC)F
The ITBC system can be used to adjust the amount of power output, or Trailer Gain, avail-able to the trailer brakes. The control panel is located on the left side of the instrument
panel. ITBC information is displayed on the Driver Information Center.
Adjust the Trailer Gain by pressing the +/– adjustment buttons on the control panel.
Squeeze the levers together on the control panel (left lever does not move) to manually
apply the trailer brakes.
See Driving and Operating in your Owner Manual.
Page 15 of 16
15
Hill Descent ControlF
Four-Wheel Drive
F
Tire Pressure Monitor
Hill Descent Control sets and maintains vehicle speed from 3–19 mph while descending a
steep incline in a forward or reverse gear.
1. Press the
Hill Descent Control button on the center of the instrument panel.
Vehicle speed must be below 37 mph to enable the system. The Hill Descent Control
symbol will illuminate on the instrument cluster.
2. Increase or decrease speed by applying the accelerator or brake pedal. The adjusted
speed becomes the new set speed. The
symbol flashes when the system is actively
applying the brakes to maintain vehicle speed.
See Driving and Operating in your Owner Manual.
The Low Tire Pressure warning light on the instrument cluster illuminates when one
or more of the vehicle’s tires is significantly underinflated. Fill the tires to the proper tire
pressures listed on the Tire and Loading Information label, located below the driver’s door
latch. Current tire pressures can be viewed in the Driver Information Center.
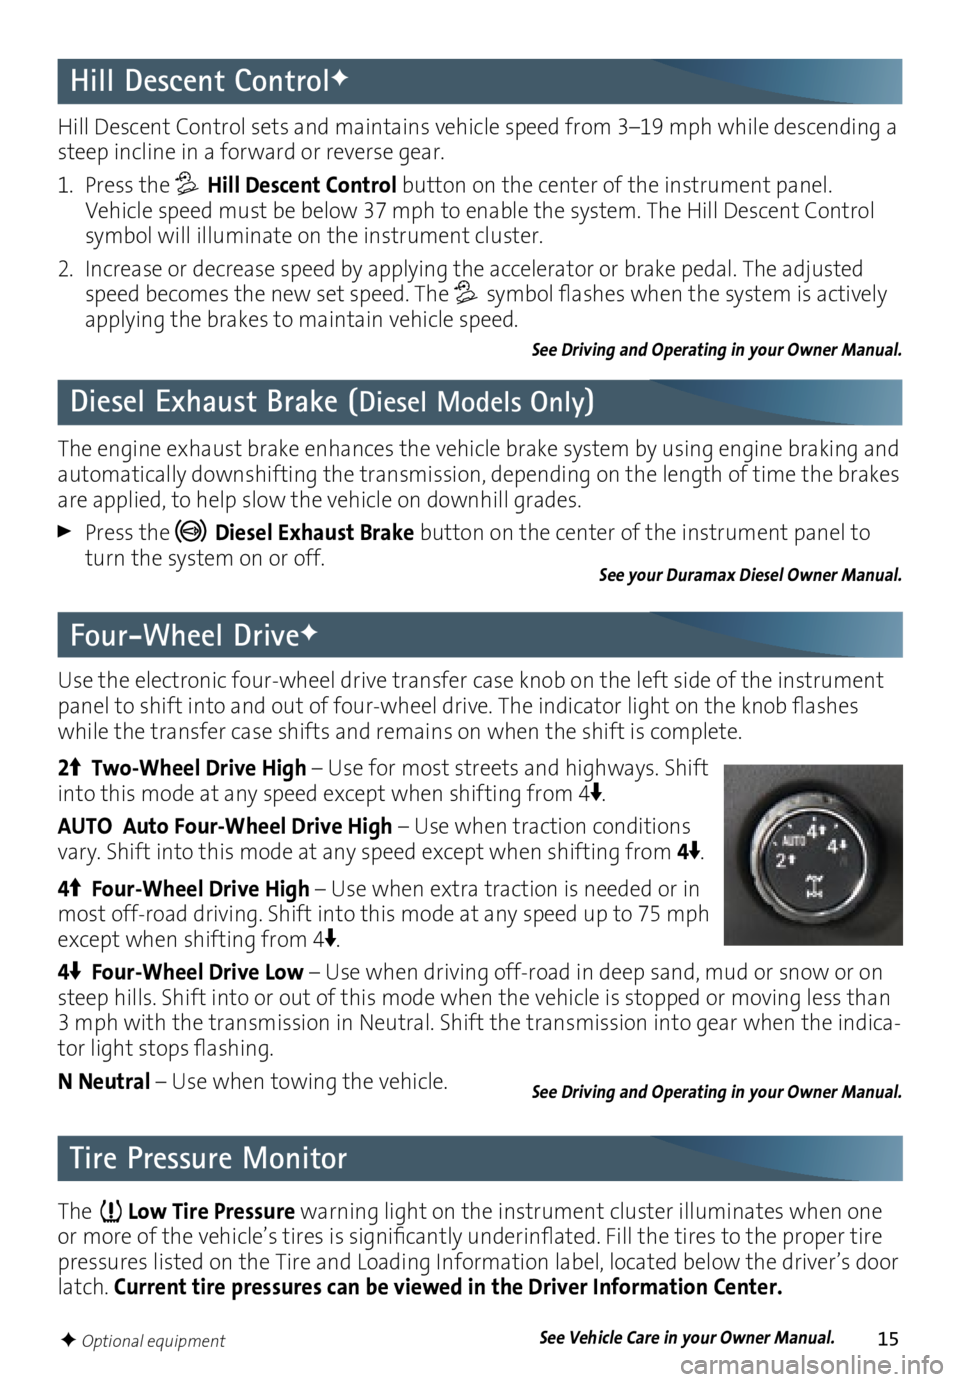
Use the electronic four-wheel drive transfer case knob on the left side of the instrument
panel to shift into and out of four-wheel drive. The indicator light on the knob flashes
while the transfer case shifts and remains on when the shift is complete.
2
Two-Wheel Drive High
– Use for most streets and highways. Shift
into this mode at any speed except when shifting from 4.
AUTO Auto Four-Wheel Drive High – Use when traction conditions
vary. Shift into this mode at any speed except when shifting from 4
.
4
Four-Wheel Drive High – Use when extra traction is needed or in
most off-road driving. Shift into this mode at any speed up to 75 mph
except when shifting from 4
.
4
Four-Wheel Drive Low – Use when driving off-road in deep sand, mud or snow or on
steep hills. Shift into or out of this mode when the vehicle is stopped or moving less than
3 mph with the transmission in Neutral. Shift the transmission into gear when the indica
-tor light stops flashing.
N Neutral – Use when towing the vehicle.
See Driving and Operating in your Owner Manual.
F Optional equipment
Diesel Exhaust Brake (Diesel Models Only)
The engine exhaust brake enhances the vehicle brake system by using engine braking and
automatically downshifting the transmission, depending on the length of time the brakes
are applied, to help slow the vehicle on downhill grades.
Press the Diesel Exhaust Brake button on the center of the instrument panel to
turn the system on or off.
See your Duramax Diesel Owner Manual.
See Vehicle Care in your Owner Manual.
Page 16 of 16
16
The myGMC mobile app connects owners to a variety of vehicle
information and services, such as a searchable Owner Manual, real-time
fuel information and Roadside Assistance.
OnStar RemoteLink Key Fob Services include Remote Start, Remote Door
Lock and Remote Horn and Lights (on equipped vehicles). Services are
available for five years from date of vehicle delivery. To learn more about OnStar services,
press the OnStar button, refer to your Owner Manual, call 1-888-466-7827 or visit
onstar.com.
Download the mobile apps from your compatible mobile device’s app store.
23219335 A
!23219335=A!
Roadside Assistance
1-800-GMC-8782 TTY Users: 1-888-889-2438
(1-800-462-8782)
As the owner of a new GMC, you are automatically enrolled in the GMC Roadside
Assistance program for up to 5 years/60,000 miles, whichever occurs first, at no expense
to you. GMC’s Roadside Assistance toll-free number is staffed by a team of trained advi
-sors who are available 24 hours a day, 365 days a year, to contact a service provider for
light services (fuel delivery, jump-starts, flat tire and lock-outs) or make arrangements to
tow your vehicle to the nearest GMC dealer for any repairs.
Roadside Assistance and OnStar®
If you require roadside service and have a current OnStar subscription, press the OnStar
button and the vehicle will send your current GPS location to an OnStar Advisor who
will speak to you, assess your problem, contact Roadside Assistance and relay your exact
location so you will get the help you need.
GMC Owner Center
The GMC Owner Center, a complimentary service for GMC owners, is a one-stop resource
designed to enhance your GMC ownership experience. Exclusive member benefits include
online service reminders, vehicle maintenance tips, online owner manual, special privi
-leges and more. Sign up today at my.gmc.com.
Certain restrictions, precautions and safety procedures apply to your ve\
hicle. Please read your Owner Manual
for complete instructions. All information contained herein is based on \
the latest information available at the
time of printing and is subject to change without notice. Copyright 2015 General Motors. All rights reserved.
We recommend always using ACDelco or genuine GM service parts.
Mobile Apps