ECO mode GMC JIMMY 2005 User Guide
[x] Cancel search | Manufacturer: GMC, Model Year: 2005, Model line: JIMMY, Model: GMC JIMMY 2005Pages: 432, PDF Size: 2.65 MB
Page 164 of 432
Compass Variance
Variance is the difference between magnetic north and
geographic north. In some areas, the difference
between the two can be great enough to cause false
compass readings. If this happens, follow these
instructions to set the variance for your particular
location:
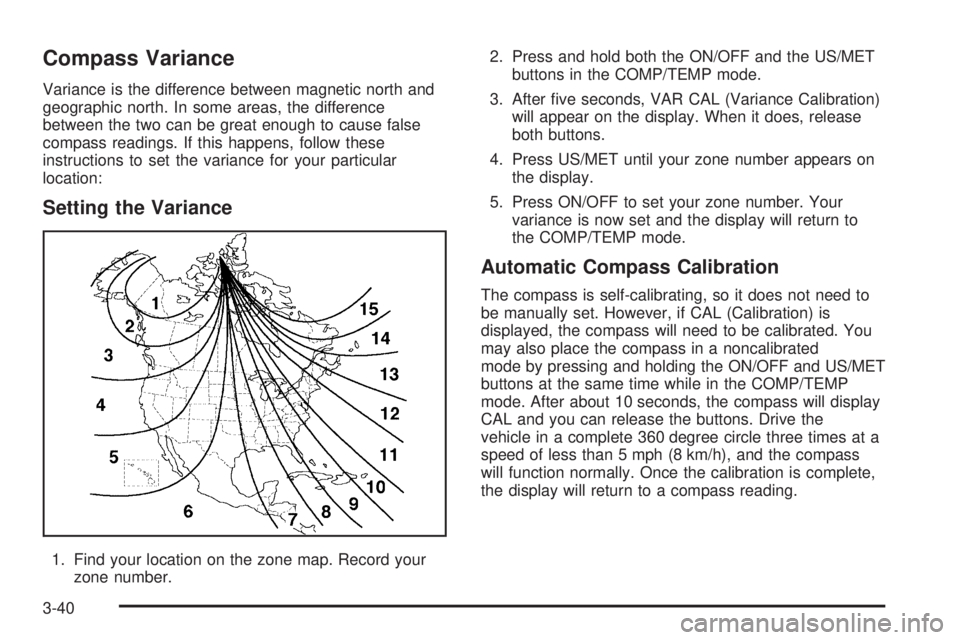
Setting the Variance
1. Find your location on the zone map. Record your
zone number.2. Press and hold both the ON/OFF and the US/MET
buttons in the COMP/TEMP mode.
3. After �ve seconds, VAR CAL (Variance Calibration)
will appear on the display. When it does, release
both buttons.
4. Press US/MET until your zone number appears on
the display.
5. Press ON/OFF to set your zone number. Your
variance is now set and the display will return to
the COMP/TEMP mode.
Automatic Compass Calibration
The compass is self-calibrating, so it does not need to
be manually set. However, if CAL (Calibration) is
displayed, the compass will need to be calibrated. You
may also place the compass in a noncalibrated
mode by pressing and holding the ON/OFF and US/MET
buttons at the same time while in the COMP/TEMP
mode. After about 10 seconds, the compass will display
CAL and you can release the buttons. Drive the
vehicle in a complete 360 degree circle three times at a
speed of less than 5 mph (8 km/h), and the compass
will function normally. Once the calibration is complete,
the display will return to a compass reading.
3-40
Page 165 of 432
Trip Computer
Once in the TRIP mode, press the ON/OFF button to
display the following trip functions:
AVG ECON (Average Economy):The average fuel
economy since the last reset is displayed.
INST ECON (Instantaneous Economy):Instantaneous
fuel economy for the last second of driving is displayed.
RANGE:The display indicates the estimated distance
that can be travelled with the remaining fuel in the tank,
based on the fuel economy for the last few hours of
driving.
FUEL USED:The fuel used since the last reset is
displayed.
AVG SPEED (Average Speed):The average speed
since the last reset is displayed.
Resetting the Trip Computer
To reset the trip computer, press the ON/OFF and
US/MET buttons simultaneously for at least
two seconds. All functions will be displayed brie�y once
the system is reset. Reset can only be performed in
the AVG ECON, FUEL USED and AVG SPEED modes.
All three modes are reset at the same time.
Audio System(s)
Notice:Before adding any sound equipment to
your vehicle, like a tape player, CB radio, mobile
telephone, or two-way radio, make sure that it can
be added by checking with your dealer. Also,
check federal rules covering mobile radio and
telephone units. If sound equipment can be added,
it is very important to do it properly. Added
sound equipment may interfere with the operation
of your vehicle’s engine, radio, or other systems,
and even damage them. Your vehicle’s systems may
interfere with the operation of sound equipment
that has been added improperly.
Figure out which audio system is in your vehicle, �nd
out what your audio system can do, and how to operate
all of its controls.
Your vehicle has a feature called Retained Accessory
Power (RAP). With RAP, the audio system can be
played even after the ignition is turned off. SeeRetained
Accessory Power (RAP) on page 2-23for more
information.
3-41
Page 166 of 432
Setting the Time for Radios without
Radio Data Systems (RDS)
Press and hold HR until the correct hour appears on the
display. Press and hold MIN until the correct minute
appears on the display. There is an initial two-second
delay before the clock goes into time-set mode.
Display the time with the ignition off, by pressing RCL,
HR, or MIN.
Setting the Time for Radios with
Radio Data Systems (RDS)
The radio may have a button marked with an H or HR to
represent hours and an M or MN to represent minutes.
Press and hold the hour button until the correct hour
appears on the display. Press and hold the minute
button until the correct minute appears on the display.
The time can be set with the ignition on or off.
To synchronize the time with an FM station broadcasting
Radio Data System (RDS) information, press and hold
the hour and minute buttons at the same time until RDS
TIME appears on the display. To accept this time, press
and hold the hour and minute buttons, at the same time,
for another two seconds. If the time is not available from
the station, NO UPDAT will appear on the display.
RDS time is broadcast once a minute. After tuning to an
RDS broadcast station, it may take a few minutes for
the time to update.
3-42
Page 168 of 432
Setting Preset Stations
Up to 18 stations (six FM1, six FM2, and six AM) can be
programmed on the six numbered pushbuttons, by
performing the following steps:
1. Turn the radio on.
2. Press AM FM to select FM1, FM2, or AM.
3. Tune in the desired station.
4. Press and hold one of the six numbered
pushbuttons until you hear a beep. Whenever that
numbered pushbutton is pressed, the station
that was set will return.
5. Repeat the steps for each pushbutton.
Setting the Tone (Bass/Treble)
AUDIO:To adjust bass and treble, press and release
AUDIO until BAS or TRE appears on the display.
Then press and hold the up or the down arrow to
increase or to decrease. If a station is weak or noisy,
decrease the treble.
To adjust bass or treble to the middle position, select
BAS or TRE. Then press and hold AUDIO for more than
two seconds until you hear a beep. B and a zero or T
and a zero will appear on the display.
To adjust both tone controls and both speaker controls
to the middle position, �rst end out of audio mode
by pressing another button, causing the radio to perform
that function or by waiting �ve seconds for the display
to return to time of day. Then press and hold AUDIO for
more than two seconds until you hear a beep. CEN
will appear on the display.
3-44
Page 169 of 432
Adjusting the Speakers (Balance/Fade)
AUDIO:To adjust the balance between the right
and the left speakers, press and release AUDIO until
BAL appears on the display. Then press and hold the up
or the down arrow to move the sound toward the right
or the left speakers.
To adjust the fade between the front and the rear
speakers, press and release AUDIO until FAD appears
on the display. Then press and hold the up or the
down arrow to move the sound toward the front or the
rear speakers.
To adjust balance or fade to the middle position, select
BAL or FAD. Then press and hold AUDIO for more
than two seconds until you hear a beep. L (balance) and
a zero or F and a zero will appear on the display.
To adjust both tone controls and both speaker controls
to the middle position, �rst end out of audio mode
by pressing another button, causing the radio to perform
that function or by waiting �ve seconds for the display
to return to time of day. Then press and hold AUDIO for
more than two seconds until you hear a beep. CEN
will appear on the display.
Fade may not be available if the vehicle is a regular
cab model.
Radio Messages
CAL (Calibrated):The audio system has been
calibrated for your vehicle from the factory. If CAL
appears on the display it means that the radio has not
been con�gured properly for your vehicle and must
be returned to your GM dealer for service.
LOC (Locked):This message is displayed when the
THEFTLOCK
®system has locked up. Take the vehicle
to your GM dealer for service.
If any error occurs repeatedly or if an error cannot be
corrected, contact your GM dealer.
3-45
Page 174 of 432
SCAN:Scan the stations within a PTY by performing
the following:
1. Press the TYPE button to activate program type
select mode. TYPE and the last selected PTY will
appear on the display.
2. Turn the TYPE knob or press and release the
TYPE button to select a PTY.
3. Once the desired PTY is displayed, press and
hold either the TYPE or the SCAN arrows for
two seconds, and the radio will begin scanning the
stations in the PTY.
4. Press either the TYPE or the SCAN arrows to stop
at a station.
BAND (Alternate Frequency):Alternate frequency
allows the radio to switch to a stronger station with the
same program type. To turn alternate frequency on,
press and hold BAND for two seconds. AF ON will
appear on the display. The radio may switch to stations
with a stronger frequency.
To turn alternate frequency off, press and hold BAND
again for two seconds. AF OFF will appear on the
display. The radio will not switch to other stations.Setting Preset PTYs (RDS Only)
These buttons have factory PTY presets. Up to 12 PTYs
(six FM1 and six FM2), can be programmed on the
six numbered pushbuttons, by performing the
following steps:
1. Press BAND to select FM1 or FM2.
2. Press the TYPE button to activate program type
select mode. TYPE and the last selected PTY will
appear on the display.
3. Turn the TYPE knob or press and release the
TYPE button to select a PTY.
4. Press and hold one of the six numbered
pushbuttons until you hear a beep. Whenever that
numbered pushbutton is pressed, the PTY that
was set will return.
5. Repeat the steps for each pushbutton.
3-50
Page 182 of 432
4. To go to another station within that PTY and the
PTY is displayed, press either the TYPE or the
SEEK arrows once. If the PTY is not displayed, go
back to Step 1.
5. Press either the TYPE or the SEEK arrows to exit
program type select mode.
If the radio cannot �nd the desired program type, NONE
will appear on the display and the radio will return to
the last station you were listening to.
SCAN:Scan the stations within a PTY by performing
the following:
1. Press the TYPE button to activate program type
select mode. TYPE and the last selected PTY will
appear on the display.
2. Turn the TYPE knob or press and release the
TYPE button to select a PTY.
3. Once the desired PTY is displayed, press and
hold either the TYPE or the SCAN arrows for
two seconds, and the radio will begin scanning the
stations in the PTY.
4. Press either the TYPE or the SCAN arrows to stop
at a station.
BAND (Alternate Frequency):Alternate frequency
allows the radio to switch to a stronger station with the
same program type. To turn alternate frequency on,
press and hold BAND for two seconds. AF ON will
appear on the display. The radio may switch to stations
with a stronger frequency.To turn alternate frequency off, press and hold BAND
again for two seconds. AF OFF will appear on the
display. The radio will not switch to other stations.
This function does not apply for XM™ Satellite Radio
Service.
Setting Preset PTYs (RDS Only)
These buttons have factory PTY presets. Up to 12 PTYs
(six FM1 and six FM2), can be programmed on the
six numbered pushbuttons, by performing the
following steps:
1. Press BAND to select FM1 or FM2.
2. Press the TYPE button to activate program type
select mode. TYPE and the last selected PTY will
appear on the display.
3. Turn the TYPE knob or press and release the
TYPE button to select a PTY.
4. Press and hold one of the six numbered
pushbuttons until you hear a beep. Whenever that
numbered pushbutton is pressed, the PTY that
was set will return.
5. Repeat the steps for each pushbutton.
3-58
Page 186 of 432
Playing a Cassette Tape
The tape player is built to work best with tapes that are
up to 30 to 45 minutes long on each side. Tapes
longer than that are so thin they may not work well in
this player. The longer side with the tape visible should
face to the right. If you hear nothing or hear a garbled
sound, the tape may not be in squarely. Press the eject
button to remove the tape and start over.
If the ignition and radio are off, press the eject button or
the INFO knob to insert and to begin play of a tape.
If the ignition is on and the radio is off, the tape can be
inserted and will begin playing.
While the tape is playing, use the VOL, AUDIO, and
SEEK controls just as you do for the radio. The cassette
tape symbol will appear on the display and an arrow
showing which side of the tape is playing. The tape
player will play the other side of the tape when it
reaches the end.
Cassette tape adapter kits for portable CD players will
work in the cassette tape player. See “CD Adapter Kits”
later for more information.
The tape bias is set automatically when a metal or
chrome tape is inserted.
If an error appears on the display, see “Cassette Tape
Messages” later in this section.1 PREV (Previous):The tape must have at least
three seconds of silence between each selection for
previous to work. Press this pushbutton to go to
the previous selection on the tape if the current selection
has been playing for less than three seconds. If
pressed when the current selection has been playing
from three to 13 seconds, it will go to the beginning
of the previous selection or the beginning of the current
selection, depending on the position on the tape. If
pressed when the current selection has been playing for
more than 13 seconds, it will go to the beginning of
the current selection.
SEEK and a negative number will appear on the display
while the cassette player is in the previous mode.
Pressing this pushbutton multiple times will increase the
number of selections to be searched back, up to−9.
2 NEXT:The tape must have at least three seconds of
silence between each selection for next to work.
Press this pushbutton to go to the next selection on the
tape. Pressing this pushbutton multiple times, in next
mode, will increase the number of selections to be
searched forward. SEEK and a positive number
will appear on the display.
3-62
Page 195 of 432
SCAN:Scan the stations within a PTY by performing
the following:
1. Press the TYPE button to activate program type
select mode. P-TYPE and the last selected PTY
will appear on the display.
2. Turn the TYPE knob or press and release the
TYPE button to select a PTY.
3. Once the desired PTY is displayed, press and
hold either the TYPE or the SCAN arrows for
two seconds, and the radio will begin scanning the
stations in the PTY.
4. Press either the TYPE or the SCAN arrows to stop
at a station.
BAND (Alternate Frequency):Alternate frequency
allows the radio to switch to a stronger station with the
same program type. To turn alternate frequency on,
press and hold BAND for two seconds. AF ON will
appear on the display. The radio may switch to stations
with a stronger frequency.
To turn alternate frequency off, press and hold BAND
again for two seconds. AF OFF will appear on the
display. The radio will not switch to other stations.Setting Preset PTYs (RDS Only)
These pushbuttons have factory PTY presets. Up to
12 PTYs (six FM1 and six FM2), can be programmed on
the six numbered pushbuttons, by performing the
following steps:
1. Press BAND to select FM1 or FM2.
2. Press the TYPE button to activate program type
select mode. P-TYPE and the last selected PTY
will appear on the display.
3. Turn the TYPE knob or press and release the
TYPE button to select a PTY.
4. Press and hold one of the six numbered
pushbuttons until you hear a beep. Whenever that
numbered pushbutton is pressed, the PTY that
was set will return.
5. Repeat the steps for each pushbutton.
3-71
Page 199 of 432
AUTO EQ (Automatic Equalization):Press AUTO EQ
to select the equalization setting while playing a CD.
The equalization will be stored whenever a CD is played.
For more information on AUTO EQ, see “AUTO EQ”
listed previously in this section.
©SEEK¨:Press the left arrow to go to the start of the
current track, if more than ten seconds have played.
Press the right arrow to go to the next track. If either
arrow is held or pressed more than once, the player will
continue moving backward or forward through the CD.
©SCAN¨:To scan one CD, press and hold either
SCAN arrow for more than two seconds until SCAN
appears on the display and you hear a beep. The radio
will go to the next track, play for 10 seconds, then go
on to the next track. Press either SCAN arrow again, to
stop scanning.
To scan all loaded CDs, press and hold either SCAN
arrow for more than four seconds until CD SCAN
appears on the display and you hear a beep. Use this
feature to listen to 10 seconds of the �rst track of
each loaded CD. Press either SCAN arrow again, to
stop scanning.INFO (Information):Press this knob to see how long
the current track has been playing. To change the
default on the display, track or elapsed time, press the
knob until you see the display you want, then hold
the knob until the display �ashes. The selected display
will now be the default.
BAND:Press this button to listen to the radio when a
CD is playing. The inactive CD(s) will remain safely
inside the radio for future listening.
Using Song List Mode
The six-disc CD changer has a feature called song list.
This feature is capable of saving 20 track selections.
To save tracks into the song list feature, perform
the following steps:
1. Turn the CD player on and load it with at least
one CD. See “LOAD CD” listed previously in this
section for more information.
2. Check to see that the CD changer is not in song list
mode. S-LIST should not appear on the display. If
S-LIST is present, press the SONG LIST button
to turn it off.
3. Select the desired CD by pressing the numbered
pushbutton and then use the SEEK or TYPE right
arrow to locate the track to be saved. The track will
begin to play.
3-75