seat adjustment GMC SAVANA 2009 Owner's Manual
[x] Cancel search | Manufacturer: GMC, Model Year: 2009, Model line: SAVANA, Model: GMC SAVANA 2009Pages: 404, PDF Size: 2.35 MB
Page 28 of 404

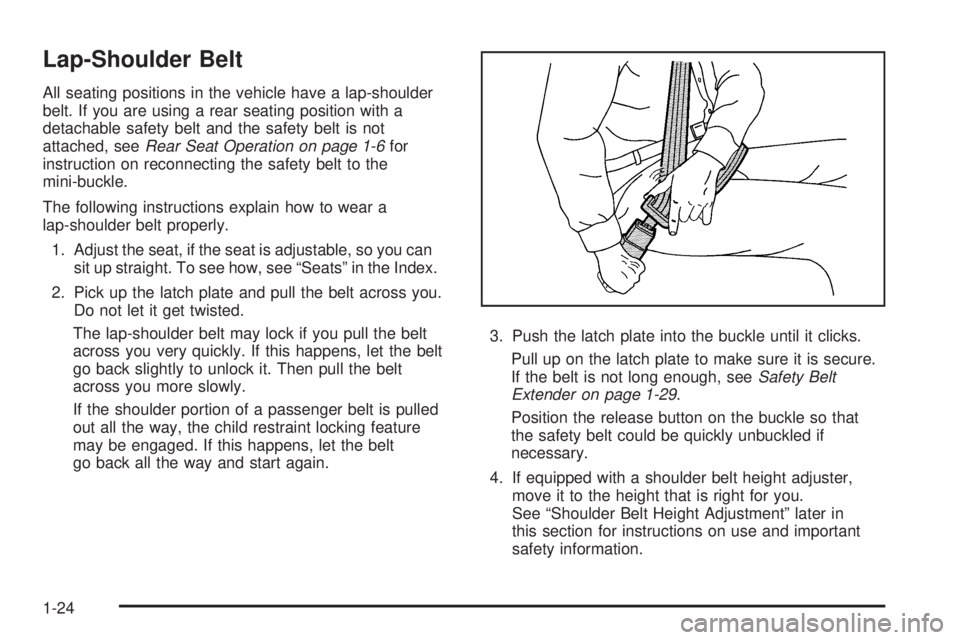
Lap-Shoulder Belt
All seating positions in the vehicle have a lap-shoulder
belt. If you are using a rear seating position with a
detachable safety belt and the safety belt is not
attached, seeRear Seat Operation on page 1-6for
instruction on reconnecting the safety belt to the
mini-buckle.
The following instructions explain how to wear a
lap-shoulder belt properly.
1. Adjust the seat, if the seat is adjustable, so you can
sit up straight. To see how, see “Seats” in the Index.
2. Pick up the latch plate and pull the belt across you.
Do not let it get twisted.
The lap-shoulder belt may lock if you pull the belt
across you very quickly. If this happens, let the belt
go back slightly to unlock it. Then pull the belt
across you more slowly.
If the shoulder portion of a passenger belt is pulled
out all the way, the child restraint locking feature
may be engaged. If this happens, let the belt
go back all the way and start again.3. Push the latch plate into the buckle until it clicks.
Pull up on the latch plate to make sure it is secure.
If the belt is not long enough, seeSafety Belt
Extender on page 1-29.
Position the release button on the buckle so that
the safety belt could be quickly unbuckled if
necessary.
4. If equipped with a shoulder belt height adjuster,
move it to the height that is right for you.
See “Shoulder Belt Height Adjustment” later in
this section for instructions on use and important
safety information.
1-24
Page 139 of 404

Rear Window Defogger
For vehicles with a rear window defogger, a warming
grid is used to remove fog or frost from the rear window.
It only works when the ignition is in ON/RUN.
<(Rear Window Defogger):Press to turn the rear
window defogger on or off.
The rear window defogger turns off several minutes after
the button is pressed. If turned on again, the defogger will
run for several more minutes before turning off. The
defogger can also be turned off by turning off the engine.
Do not drive the vehicle until all the windows are clear.
Notice:Do not use a razor blade or sharp object to
clear the inside rear window. Do not adhere anything
to the defogger grid lines in the rear glass. These
actions may damage the rear defogger. Repairs
would not be covered by your warranty.
Outlet Adjustment
Use the outlets located near the center and on the sides
of the instrument panel to change the direction of airflow.
Operation Tips
•Clear away any ice, snow or leaves from the air
inlets at the base of the windshield that may
block the flow of air into your vehicle.
•Use of non-GM approved hood deflectors may
adversely affect the performance of the system.
•Keep the path under the front seats clear of objects
to help circulate the air inside of your vehicle more
effectively.
3-21
Page 142 of 404

9:Turns the system off.
9(Fan Control):Turn clockwise or counterclockwise
to increase or decrease the fan speed in the
rear-seating area.
Temperature Control:Turn clockwise or
counterclockwise to increase or decrease the
temperature in the rear-seating area.
The air-conditioning system on the main climate control
panel must be turned on to direct cooled air to the
rear of the vehicle. If it is not on, then the temperature
in the rear of the vehicle remains at cabin temperature.
Air Delivery Mode Control:Turn clockwise or
counterclockwise to change the direction of the airflow
in the rear seating area.
To change the current mode, select one of the following:
H(Vent):Air is directed to the upper outlets, with
some directed to the floor outlets.
2(Floor):Air is directed to the floor outlets.
Be sure to keep the area under the front seats clear of
any objects so that the air inside of the vehicle can
circulate effectively.For information on how to use the main climate control
system, seeClimate Control System on page 3-19.
For information on ventilation, seeOutlet Adjustment on
page 3-21.
Warning Lights, Gages, and
Indicators
Warning lights and gages can signal that something is
wrong before it becomes serious enough to cause
an expensive repair or replacement. Paying attention to
the warning lights and gages could prevent injury.
Warning lights come on when there may be or is a
problem with one of the vehicle’s functions. Some
warning lights come on briefly when the engine is started
to indicate they are working.
Gages can indicate when there may be or is a problem
with one of the vehicle’s functions. Often gages and
warning lights work together to indicate a problem with
the vehicle.
When one of the warning lights comes on and stays on
while driving, or when one of the gages shows there
may be a problem, check the section that explains what
to do. Follow this manual’s advice. Waiting to do
repairs can be costly and even dangerous.
3-24
Page 395 of 404

Child Restraints (cont.)
Securing a Child Restraint in the
Right Front Seat Position..................1-50, 1-54
Where to Put the Restraint...........................1-39
Cigarette Lighter.............................................3-19
Cleaning
Aluminum Wheels......................................5-101
Exterior Lamps/Lenses.................................5-99
Fabric/Carpet..............................................5-97
Finish Care...............................................5-100
Instrument Panel, Vinyl, and Other
Plastic Surfaces.......................................5-98
Interior.......................................................5-96
Tires........................................................5-101
Underbody Maintenance.............................5-102
Washing Your Vehicle...................................5-99
Weatherstrips..............................................5-98
Windshield and Wiper Blades......................5-100
Climate Control System...................................3-19
Outlet Adjustment........................................3-21
Rear Air Conditioning and Heating System.........3-23
Rear Heating System...................................3-22
Clock, Setting.................................................3-66
Collision Damage Repair..................................7-11
Compass.......................................................3-48
Control of a Vehicle.......................................... 4-3
Coolant
Engine.......................................................5-25
Engine Temperature Gage............................3-35
Cooling System..............................................5-24Cruise Control................................................3-10
Cruise Control Light........................................3-41
Customer Assistance Information
Courtesy Transportation................................7-10
Customer Assistance for Text
Telephone (TTY) Users............................... 7-6
Customer Assistance Offices........................... 7-6
Customer Satisfaction Procedure..................... 7-2
GM Mobility Reimbursement Program............... 7-7
Reporting Safety Defects to
General Motors........................................
7-15
Reporting Safety Defects to the
Canadian Government..............................7-15
Reporting Safety Defects to the
United States Government.........................7-14
Roadside Assistance Program......................... 7-7
Service Publications Ordering Information........7-15
D
Daytime Running Lamp...................................3-15
Defensive Driving............................................. 4-2
Delayed Locking............................................... 2-7
DIC Compass.................................................3-48
Disc, MP3......................................................3-79
Doing Your Own Service Work........................... 5-4
Dome Lamp Override......................................3-16
Dome Lamps .................................................3-16
3