phone GMC SIERRA 2010 Owner's Manual
[x] Cancel search | Manufacturer: GMC, Model Year: 2010, Model line: SIERRA, Model: GMC SIERRA 2010Pages: 630, PDF Size: 4.65 MB
Page 32 of 630
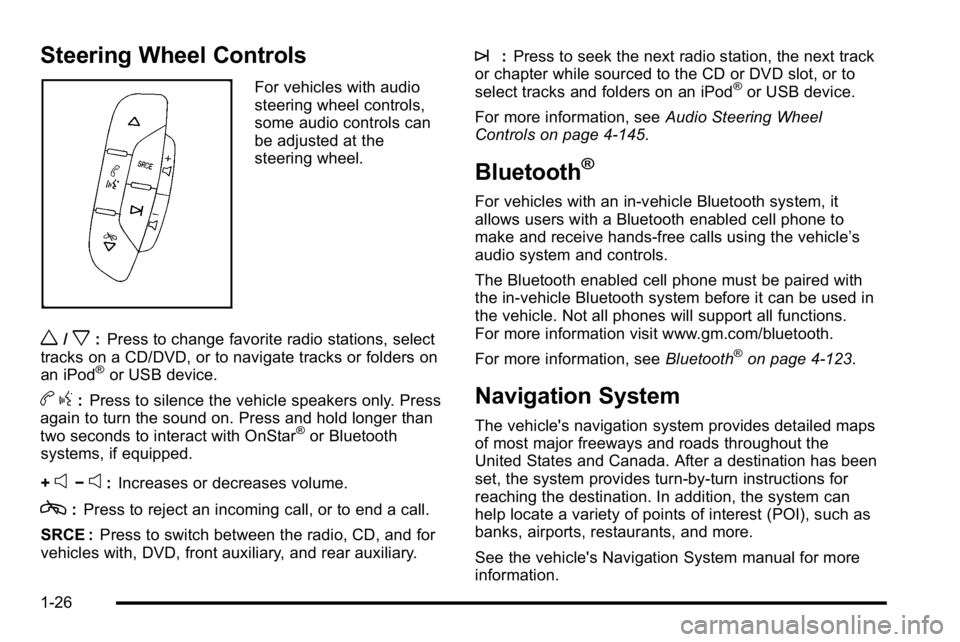
Steering Wheel Controls
For vehicles with audio
steering wheel controls,
some audio controls can
be adjusted at the
steering wheel.
w/x:Press to change favorite radio stations, select
tracks on a CD/DVD, or to navigate tracks or folders on
an iPod
®or USB device.
b g:Press to silence the vehicle speakers only. Press
again to turn the sound on. Press and hold longer than
two seconds to interact with OnStar
®or Bluetooth
systems, if equipped.
+
e−e: Increases or decreases volume.
c:Press to reject an incoming call, or to end a call.
SRCE : Press to switch between the radio, CD, and for
vehicles with, DVD, front auxiliary, and rear auxiliary.
¨: Press to seek the next radio station, the next track
or chapter while sourced to the CD or DVD slot, or to
select tracks and folders on an iPod
®or USB device.
For more information, see Audio Steering Wheel
Controls on page 4‑145.
Bluetooth®
For vehicles with an in-vehicle Bluetooth system, it
allows users with a Bluetooth enabled cell phone to
make and receive hands-free calls using the vehicle’s
audio system and controls.
The Bluetooth enabled cell phone must be paired with
the in-vehicle Bluetooth system before it can be used in
the vehicle. Not all phones will support all functions.
For more information visit www.gm.com/bluetooth.
For more information, see Bluetooth
®on page 4‑123.
Navigation System
The vehicle's navigation system provides detailed maps
of most major freeways and roads throughout the
United States and Canada. After a destination has been
set, the system provides turn-by-turn instructions for
reaching the destination. In addition, the system can
help locate a variety of points of interest (POI), such as
banks, airports, restaurants, and more.
See the vehicle's Navigation System manual for more
information.
1-26
Page 35 of 630
Rear Vision Camera (RVC)
The rear vision camera displays a view of the area
behind the vehicle when the vehicle is shifted into
R (Reverse) on the inside rear view mirror or the
navigation screen, if equipped.
To clean the camera lens, located in the bezel for the
tailgate handle, rinse it with water and wipe it with a
soft cloth.
For more information, seeRear Vision Camera (RVC)
on page 3‑63.
Ultrasonic Parking Assist
This feature uses sensors on the rear bumper to detect
objects while parking the vehicle. URPA comes on
automatically when the shift lever is moved into
R (Reverse) and operates at speeds less than 8 km/h
(5 mph). URPA uses audio beeps to provide distance
and system information.
Keep the sensors on the vehicle's rear bumper clean to
ensure proper operation.
The system can be disabled by pressing the rear park
aid disable button located next to the radio.
SeeUltrasonic Rear Parking Assist (URPA)
on
page 3‑60for more information.
Power Outlets
Accessory power outlets can be used to connect
auxiliary electrical equipment, such as a cellular
telephone.
The vehicle may have two accessory power outlets
located below the climate control system, or may have
one accessory power outlet and one cigarette lighter.
The cigarette lighter is designed to fit only in the
receptacle closest to the driver.
There may be another accessory power outlet in the
rear cargo area. If the vehicle has a floor console, there
is an accessory power outlet inside the storage bin and
one on the rear of the floor console.
The accessory power outlets are powered, even when
the ignition is in LOCK/OFF. Continuing to use power
outlets while the ignition is in LOCK/OFF may cause the
vehicle's battery to run down.
See Accessory Power Outlet(s) on page 4‑17.
1-29
Page 41 of 630
Crisis Assist, Stolen Vehicle Assistance, Vehicle
Diagnostics, Remote Door Unlock, Roadside
Assistance, Turn‐by‐Turn Navigation and Hands‐Free
Calling are available on most vehicles. Not all OnStar
services are available on all vehicles. For more
information see the OnStar Owner's Guide or visit
www.onstar.com (U.S.) or www.onstar.ca (Canada),
contact OnStar at 1-888-4-ONSTAR (1‐888‐466‐7827)
or TTY 1‐877‐248‐2080, or press
Qto speak with an
OnStar advisor 24 hours a day, 7 days a week.
For a full description of OnStar services and system
limitations, see the OnStar Owner's Guide in the
glove box.
OnStar service is subject to the OnStar terms and
conditions included in the OnStar Subscriber
Information.
OnStar service cannot work unless the vehicle is in a
place where OnStar has an agreement with a wireless
service provider for service in that area. OnStar service
also cannot work unless the vehicle is in a place where
the wireless service provider OnStar has hired for that
area has coverage, network capacity and reception
when the service is needed, and technology that is
compatible with the OnStar service. Not all services are
available everywhere, particularly in remote or enclosed
areas, or at all times. The OnStar system can record and transmit vehicle
information. This information is automatically sent to an
OnStar call center when
Qis pressed,]is pressed,
or if the airbags or ACR system deploy. This information
usually includes the vehicle's GPS location and, in the
event of a crash, additional information regarding the
crash that the vehicle was involved in (e.g. the direction
from which the vehicle was hit). When the virtual
advisor feature of OnStar hands-free calling is used, the
vehicle also sends OnStar the vehicle's GPS location
so they can provide services where it is located.
Location information about the vehicle is only available
if the GPS satellite signals are unobstructed and
available.
The vehicle must have a working electrical system,
including adequate battery power, for the OnStar
equipment to operate. There are other problems OnStar
cannot control that may prevent OnStar from providing
OnStar service at any particular time or place. Some
examples are damage to important parts of the vehicle
in a crash, hills, tall buildings, tunnels, weather or
wireless phone network congestion.
1-35
Page 42 of 630
OnStar Steering Wheel Controls
This vehicle may have a Talk/Mute button that can
be used to interact with OnStar hands-free calling.
SeeAudio Steering Wheel Controls
on page 4‑145for
more information.
On some vehicles, the mute button can be used to
dial numbers into voice mail systems, or to dial phone
extensions. See the OnStar Owner's Guide for more
information.
Your Responsibility
Increase the volume of the radio if the OnStar advisor
cannot be heard.
If the light next to the OnStar buttons is red, the system
may not be functioning properly. Press
Qand request a
vehicle diagnostic. If the light appears clear (no light is
appearing), your OnStar subscription has expired and
all services have been deactivated. Press
Qto confirm
that the OnStar equipment is active.
1-36
Page 134 of 630
seat heater or a comfort enhancing pad or device,
installed under or on top of the seat fabric, could
also interfere with the operation of the passenger
sensing system. This could either prevent proper
deployment of the passenger airbag(s) or prevent
the passenger sensing system from properly turning
off the passenger airbag(s). SeePassenger Sensing
System on page 2‑85.
If you have any questions about this, you should
contact Customer Assistance before you modify
your vehicle. The phone numbers and addresses
for Customer Assistance are in Step Two of the
Customer Satisfaction Procedure in this manual.
See Customer Satisfaction Procedure on page 8‑2.
If the vehicle has rollover roof-rail airbags, see
Different Size Tires and Wheels
on page 6‑85for
additional important information. Q: What if I added a snow plow? Will it keep the
airbags from working properly?
A: We have designed our airbag systems to work
properly under a wide range of conditions, including
snow plowing with vehicles that have the optional
Snow Plow Prep Package (RPO VYU). But do not
change or defeat the snow plow's “tripping
mechanism.” If you do, it can damage your snow
plow and your vehicle, and it may cause an airbag
inflation.
Q: Because I have a disability, I have to get my vehicle modified. How can I find out whether this
will affect my airbag system?
A: If you have questions, call Customer Assistance.
The phone numbers and addresses for Customer
Assistance are in Step Two of the Customer
Satisfaction Procedure in this manual. See
Customer Satisfaction Procedure on page 8‑2.
In addition, your dealer/retailer and the service manual
have information about the location of the airbag
sensors, sensing and diagnostic module and airbag
wiring.
2-92
Page 211 of 630
Reprogramming Universal Home
Remote Buttons
Any of the three buttons can be reprogrammed by
repeating the instructions.
Erasing Universal Home Remote
Buttons
The programmed buttons should be erased when the
vehicle is sold or the lease ends.
To erase either Rolling Code or Fixed Code on the
Universal Home Remote device:1. Press and hold the two outside buttons at the same time for approximately 20 seconds, until the
indicator lights, located directly above the buttons,
begin to blink rapidly.
2. Once the indicator lights begin to blink, release both buttons. The codes from all buttons will be
erased.
For help or information on the Universal Home Remote
System, call the customer assistance phone number
under Customer Assistance Offices on page 8‑6.
Storage Areas
Glove Box
Lift up on the glove box lever to open it.
Cupholders
Vehicles with cupholders have them located on and
behind the center console and in the rear seat armrest.
Pull the loop down on the rear seat armrest to access
the cupholders.
Pull downward on the cover to access the cupholders
behind the center console.
3-75
Page 235 of 630
Accessory Power Outlet(s)
Accessory power outlets can be used to connect
auxiliary electrical equipment, such as a cellular
telephone.
The vehicle may have two accessory power outlets
located below the climate control system, or may have
one accessory power outlet and one cigarette lighter.
The cigarette lighter is designed to fit only in the
receptacle closest to the driver.
There may be another accessory power outlet in the
rear cargo area. If the vehicle has a floor console, there
is an accessory power outlet inside the storage bin and
one on the rear of the floor console.
To use an accessory power outlet, remove the
protective cap. When not in use, always cover the
accessory power outlet with the protective cap.
Notice:Leaving electrical equipment plugged in for
an extended period of time while the vehicle is off
will drain the battery. Power is always supplied to
the outlets. Always unplug electrical equipment
when not in use and do not plug in equipment that
exceeds the maximum 20 ampere rating. Certain power accessory plugs may not be compatible
to the accessory power outlet and could result in blown
vehicle or adapter fuses. If you experience a problem,
see your dealer/retailer for additional information on the
accessory power plugs.
The accessory power outlets are powered, even when
the ignition is in LOCK/OFF. Continuing to use power
outlets while the ignition is in LOCK/OFF may cause the
vehicle's battery to run down.
Notice:
Adding any electrical equipment to the
vehicle can damage it or keep other components
from working as they should. The repairs would not
be covered by the vehicle warranty. Do not use
equipment exceeding maximum amperage rating of
20 amperes. Check with your dealer/retailer before
adding electrical equipment.
When adding electrical equipment, be sure to follow the
proper installation instructions included with the
equipment.
Notice: Improper use of the power outlet can cause
damage not covered by the vehicle warranty. Do not
hang any type of accessory or accessory bracket
from the plug because the power outlets are
designed for accessory power plugs only.
4-17
Page 282 of 630
Compass Calibration
The compass can be manually calibrated. Only calibrate
the compass in a magnetically clean and safe location,
such as an open parking lot, where driving the vehicle
in circles is not a danger. It is suggested to calibrate
away from tall buildings, utility wires, manhole covers,
or other industrial structures, if possible.
If CAL should ever appear in the DIC display,
the compass should be calibrated.
If the DIC display does not show a heading, for
example, N for North, or the heading does not change
after making turns, there may be a strong magnetic field
interfering with the compass. Such interference may be
caused by a magnetic CB or cell phone antenna mount,
a magnetic emergency light, magnetic note pad holder,
or any other magnetic item. Turn off the vehicle, move
the magnetic item, then turn on the vehicle and calibrate
the compass.To calibrate the compass, use the following procedure:Compass Calibration Procedure
1. Before calibrating the compass, make sure the
compass zone is set to the variance zone in which
the vehicle is located. See “Compass Variance
(Zone) Procedure” earlier in this section.
Do not operate any switches such as window,
sunroof, climate controls, seats, etc. during the
calibration procedure.
2. Press the vehicle information button until PRESS
VTO CALIBRATE COMPASS displays. Or, if the
vehicle does not have DIC buttons, press the trip
odometer reset stem until CALIBRATE COMPASS
displays.
3. Press the set/reset button to start the compass calibration. Or, if the vehicle does not have DIC
buttons, press and hold the trip odometer reset
stem for two seconds to start the compass
calibration.
4. The DIC will display CALIBRATING: DRIVE IN CIRCLES. Drive the vehicle in tight circles at less
than 5 mph (8 km/h) to complete the calibration.
The DIC will display CALIBRATION COMPLETE
for a few seconds when the calibration is complete.
The DIC display will then return to the
previous menu.
4-64
Page 302 of 630
Audio System(s)
Determine which radio the vehicle has and read the
following pages to become familiar with its features.
{WARNING:
Taking your eyes off the road for extended periods
could cause a crash resulting in injury or death to
you or others. Do not give extended attention to
entertainment tasks while driving.
This system provides access to many audio and non
audio listings.
To minimize taking your eyes off the road while driving,
do the following while the vehicle is parked:
.Become familiar with the operation and controls of
the audio system.
.Set up the tone, speaker adjustments, and preset
radio stations.
For more information, see Defensive Driving
on
page 5‑2. Notice:
Contact your dealer/retailer before adding
any equipment.
Adding audio or communication equipment could
interfere with the operation of the vehicle's engine,
radio, or other systems, and could damage them.
Follow federal rules covering mobile radio and
telephone equipment.
The vehicle has Retained Accessory Power (RAP).
With RAP, the audio system can be played even after
the ignition is turned off. See Retained Accessory
Power (RAP)
on page 3‑23for more information.
Setting the Clock
AM-FM Radio
To set the time:
1. Turn the ignition key to ACC/ACCESSORY or ON/RUN, then press the
Obutton to turn the
radio on.
2. Press the
Hbutton until the hour numbers begin to
flash, then turn the
fknob to increase or decrease
the hour.
4-84
Page 323 of 630
Stopping and Resuming Playback
To stop playing a DVD without turning off the system,
press the
cbutton on the remote control, or press the
softkey located under the stop or the play/pause symbol
tags displayed on the radio. If the radio head is sourced
to something other than DVD-V, press the DVD/CD
AUX button to make DVD-V the active source.
To resume DVD playback, press the
r/jbutton on
the remote control, or press the softkey located under
the play/pause symbol tag displayed on the radio. The
DVD should resume play from where it last stopped if
the disc has not been ejected and the stop button has
not been pressed twice on the remote control. If the
disc has been ejected or the stop button has been
pressed twice on the remote control, the disc resumes
playing at the beginning of the disc.
Ejecting a Disc
Press theZbutton on the radio to eject the disc.
If a disc is ejected from the radio, but not removed,
the radio reloads the disc after a short period of time.
The disc is stored in the radio. The radio does not
resume play of the disc automatically. If the RSA
system is sourced to the DVD, the movie when
reloaded into the DVD player begins to play again.
In case loading and reading of a DVD or CD cannot be completed (unknown format, etc.), and the disc fails to
eject, press and hold the DVD
Zbutton more than
five seconds to force the disc to eject.
DVD Radio Error Messages
Player Error : This message displays when there are
disc load or eject problems.
Disc Format Error : This message displays, if the disc
is inserted with the disc label wrong side up, or if the
disc is damaged.
Disc Region Error : This message displays, if the disc
is not from a correct region.
No Disc Inserted : This message displays, if no disc is
present when the
Zor DVD/CD AUX button is
pressed on the radio.
Using the Auxiliary Input Jack
The radio system has an auxiliary input jack located on
the lower right side of the faceplate. This is not an audio
output; do not plug the headphone set into the front
auxiliary input jack. An external audio device such as an
iPod, laptop computer, MP3 player, CD player, etc. can
be connected to the auxiliary input jack for use as
another source for audio listening.
4-105