ECO mode GMC YUKON 2018 Owner's Guide
[x] Cancel search | Manufacturer: GMC, Model Year: 2018, Model line: YUKON, Model: GMC YUKON 2018Pages: 431, PDF Size: 6.08 MB
Page 185 of 431
GMC Yukon/Yukon XL/Denali Owner Manual (GMNA-Localizing-U.S./
Canada/Mexico-11349262) - 2018 - CRC - 11/3/17
184 Climate Controls
Climate Controls
Climate Control Systems
Dual Automatic ClimateControl System . . . . . . . . . . . . . 184
Rear Climate Control System . . . . . . . . . . . . . . . . . . . . . . 188
Air Vents
Air Vents . . . . . . . . . . . . . . . . . . . . . 189
Maintenance
Passenger Compartment AirFilter . . . . . . . . . . . . . . . . . . . . . . . . 190
Service . . . . . . . . . . . . . . . . . . . . . . . 191
Climate Control
Systems
Dual Automatic Climate
Control System
With this system the heating,
cooling, and ventilation in the
vehicle can be controlled. Some
climate control settings can be
changed. See “Climate and Air
Quality” underVehicle
Personalization 0162.
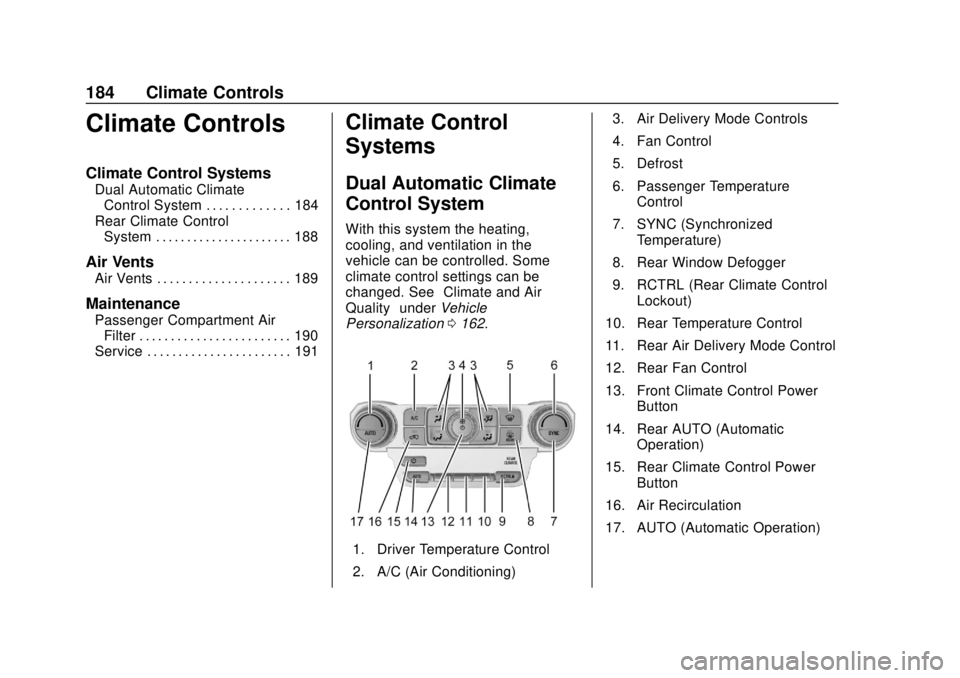
1. Driver Temperature Control
2. A/C (Air Conditioning) 3. Air Delivery Mode Controls
4. Fan Control
5. Defrost
6. Passenger Temperature
Control
7. SYNC (Synchronized Temperature)
8. Rear Window Defogger
9. RCTRL (Rear Climate Control Lockout)
10. Rear Temperature Control
11. Rear Air Delivery Mode Control
12. Rear Fan Control
13. Front Climate Control Power Button
14. Rear AUTO (Automatic Operation)
15. Rear Climate Control Power Button
16. Air Recirculation
17. AUTO (Automatic Operation)
Page 187 of 431
GMC Yukon/Yukon XL/Denali Owner Manual (GMNA-Localizing-U.S./
Canada/Mexico-11349262) - 2018 - CRC - 11/3/17
186 Climate Controls
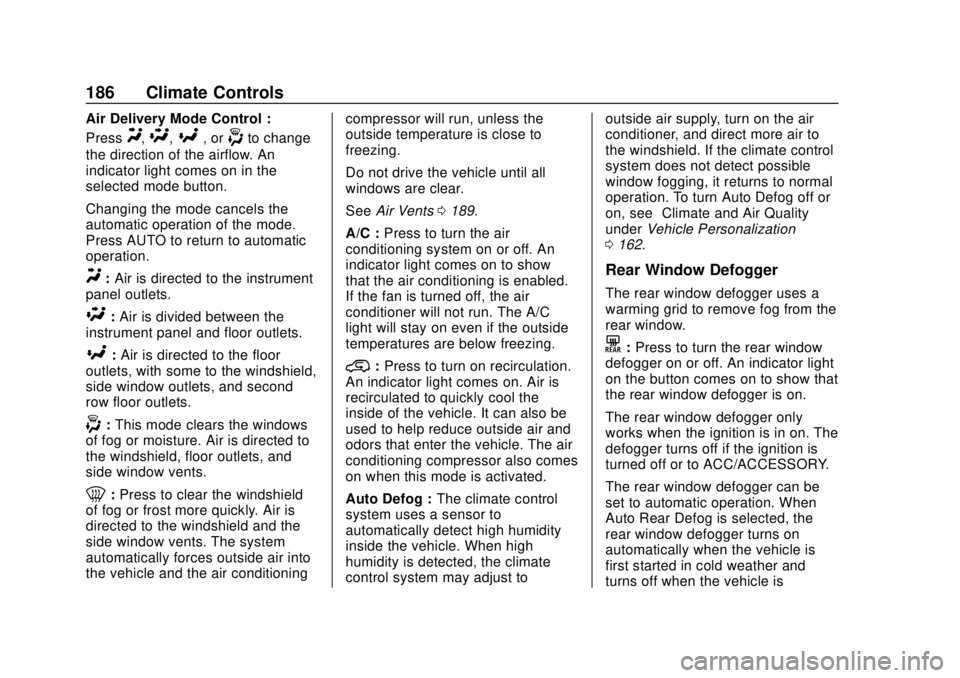
Air Delivery Mode Control :
Press
Y,\,[, or-to change
the direction of the airflow. An
indicator light comes on in the
selected mode button.
Changing the mode cancels the
automatic operation of the mode.
Press AUTO to return to automatic
operation.
Y: Air is directed to the instrument
panel outlets.
\: Air is divided between the
instrument panel and floor outlets.
[: Air is directed to the floor
outlets, with some to the windshield,
side window outlets, and second
row floor outlets.
-: This mode clears the windows
of fog or moisture. Air is directed to
the windshield, floor outlets, and
side window vents.
0: Press to clear the windshield
of fog or frost more quickly. Air is
directed to the windshield and the
side window vents. The system
automatically forces outside air into
the vehicle and the air conditioning compressor will run, unless the
outside temperature is close to
freezing.
Do not drive the vehicle until all
windows are clear.
See
Air Vents 0189.
A/C : Press to turn the air
conditioning system on or off. An
indicator light comes on to show
that the air conditioning is enabled.
If the fan is turned off, the air
conditioner will not run. The A/C
light will stay on even if the outside
temperatures are below freezing.
@: Press to turn on recirculation.
An indicator light comes on. Air is
recirculated to quickly cool the
inside of the vehicle. It can also be
used to help reduce outside air and
odors that enter the vehicle. The air
conditioning compressor also comes
on when this mode is activated.
Auto Defog : The climate control
system uses a sensor to
automatically detect high humidity
inside the vehicle. When high
humidity is detected, the climate
control system may adjust to outside air supply, turn on the air
conditioner, and direct more air to
the windshield. If the climate control
system does not detect possible
window fogging, it returns to normal
operation. To turn Auto Defog off or
on, see
“Climate and Air Quality”
under Vehicle Personalization
0 162.
Rear Window Defogger
The rear window defogger uses a
warming grid to remove fog from the
rear window.
K:Press to turn the rear window
defogger on or off. An indicator light
on the button comes on to show that
the rear window defogger is on.
The rear window defogger only
works when the ignition is in on. The
defogger turns off if the ignition is
turned off or to ACC/ACCESSORY.
The rear window defogger can be
set to automatic operation. When
Auto Rear Defog is selected, the
rear window defogger turns on
automatically when the vehicle is
first started in cold weather and
turns off when the vehicle is
Page 189 of 431
GMC Yukon/Yukon XL/Denali Owner Manual (GMNA-Localizing-U.S./
Canada/Mexico-11349262) - 2018 - CRC - 11/3/17
188 Climate Controls
There is also an exterior
temperature sensor behind the front
grille. This sensor reads the outside
air temperature and helps maintain
the temperature inside the vehicle.
Any cover on the front of the
vehicle, including a snowplow, could
cause a false reading in the
displayed temperature.
The climate control system uses the
information from these sensors to
maintain comfort settings by
adjusting the outlet temperature, fan
speed, and air delivery mode. The
system may also supply cooler air to
the side of the vehicle facing the
sun. The recirculation mode will also
be used as needed to maintain cool
outlet temperatures.
Rear Climate Control
System
The rear climate control system is
located on the rear of the center
console storage. The rear climate
settings can be adjusted with this
system.
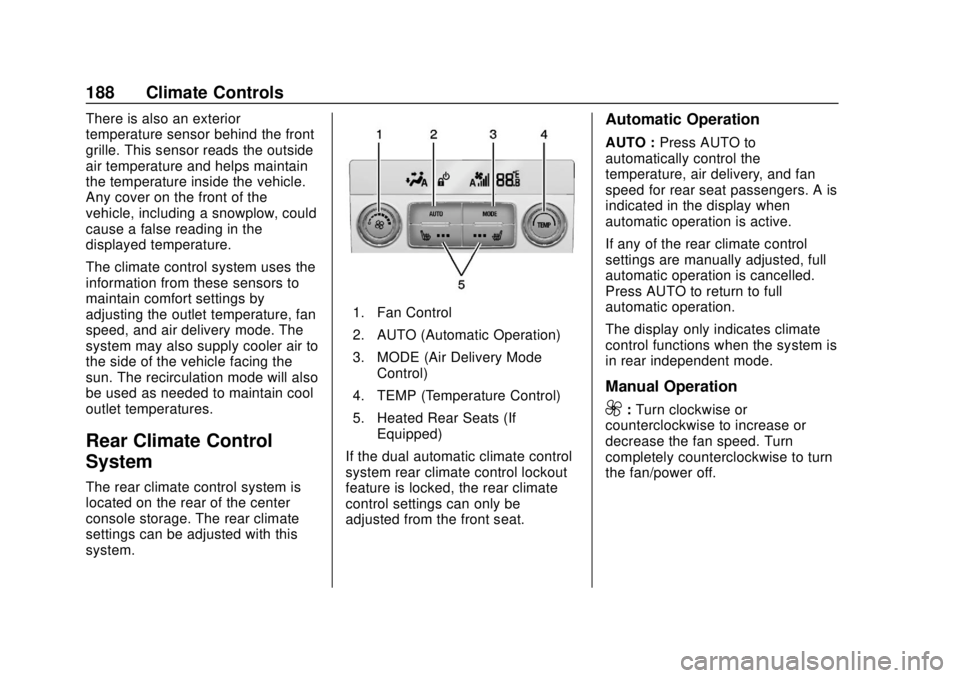
1. Fan Control
2. AUTO (Automatic Operation)
3. MODE (Air Delivery ModeControl)
4. TEMP (Temperature Control)
5. Heated Rear Seats (If Equipped)
If the dual automatic climate control
system rear climate control lockout
feature is locked, the rear climate
control settings can only be
adjusted from the front seat.
Automatic Operation
AUTO : Press AUTO to
automatically control the
temperature, air delivery, and fan
speed for rear seat passengers. A is
indicated in the display when
automatic operation is active.
If any of the rear climate control
settings are manually adjusted, full
automatic operation is cancelled.
Press AUTO to return to full
automatic operation.
The display only indicates climate
control functions when the system is
in rear independent mode.
Manual Operation
9: Turn clockwise or
counterclockwise to increase or
decrease the fan speed. Turn
completely counterclockwise to turn
the fan/power off.
Page 193 of 431
GMC Yukon/Yukon XL/Denali Owner Manual (GMNA-Localizing-U.S./
Canada/Mexico-11349262) - 2018 - CRC - 11/3/17
192 Driving and Operating
Driving and
Operating
Driving Information
Distracted Driving . . . . . . . . . . . . 193
Defensive Driving . . . . . . . . . . . . . 194
Drunk Driving . . . . . . . . . . . . . . . . . 194
Control of a Vehicle . . . . . . . . . . . 194
Braking . . . . . . . . . . . . . . . . . . . . . . . 194
Steering . . . . . . . . . . . . . . . . . . . . . . 195
Off-Road Recovery . . . . . . . . . . . 195
Loss of Control . . . . . . . . . . . . . . . 196
Off-Road Driving . . . . . . . . . . . . . 196
Driving on Wet Roads . . . . . . . . 201
Hill and Mountain Roads . . . . . 202
Winter Driving . . . . . . . . . . . . . . . . 202
If the Vehicle Is Stuck . . . . . . . . 203
Vehicle Load Limits . . . . . . . . . . . 204
Starting and Operating
New Vehicle Break-In . . . . . . . . . 209
Adjustable Throttle and BrakePedal . . . . . . . . . . . . . . . . . . . . . . . 209
Ignition Positions (Keyless Access) . . . . . . . . . . . . . . . . . . . . . 210
Ignition Positions (Key Access) . . . . . . . . . . . . . . . . . . . . . 212
Starting the Engine . . . . . . . . . . . 213 Engine Heater . . . . . . . . . . . . . . . . 215
Retained Accessory
Power (RAP) . . . . . . . . . . . . . . . . 216
Shifting Into Park . . . . . . . . . . . . . 217
Shifting out of Park . . . . . . . . . . . 218
Parking over Things That Burn . . . . . . . . . . . . . . . . . . . 218
Active Fuel Management . . . . . 218
Extended Parking . . . . . . . . . . . . 219
Engine Exhaust
Engine Exhaust . . . . . . . . . . . . . . 219
Running the Vehicle While Parked . . . . . . . . . . . . . . . . . . . . . . 220
Automatic Transmission
Automatic Transmission . . . . . . 220
Manual Mode . . . . . . . . . . . . . . . . . 223
Tow/Haul Mode . . . . . . . . . . . . . . . 225
Drive Systems
Four-Wheel Drive . . . . . . . . . . . . . 226
Brakes
Antilock BrakeSystem (ABS) . . . . . . . . . . . . . . . 231
Parking Brake . . . . . . . . . . . . . . . . 232
Brake Assist . . . . . . . . . . . . . . . . . . 233
Hill Start Assist (HSA) . . . . . . . . 233
Ride Control Systems
Traction Control/Electronic Stability Control . . . . . . . . . . . . . 234
Hill Descent Control (HDC) . . . 236
Magnetic Ride Control . . . . . . . . 236
Locking Rear Axle . . . . . . . . . . . . 237
Automatic Level Control . . . . . . 237
Cruise Control
Cruise Control . . . . . . . . . . . . . . . . 237
Adaptive Cruise Control . . . . . . 240
Driver Assistance Systems
Driver Assistance Systems . . . 247
Assistance Systems for Parking or Backing . . . . . . . . . . 248
Assistance Systems for Driving . . . . . . . . . . . . . . . . . . . . . . 250
Forward Collision Alert (FCA) System . . . . . . . . . . . . . . . . . . . . . . 250
Forward Automatic Braking (FAB) . . . . . . . . . . . . . . . 253
Side Blind Zone Alert (SBZA) . . . . . . . . . . . . . . . . 254
Lane Change Alert (LCA) . . . . . 255
Lane Departure Warning (LDW) . . . . . . . . . . . . . 256
Lane Keep Assist (LKA) . . . . . . 257
Page 212 of 431
GMC Yukon/Yukon XL/Denali Owner Manual (GMNA-Localizing-U.S./
Canada/Mexico-11349262) - 2018 - CRC - 11/3/17
Driving and Operating 211
If the vehicle must be shut off in an
emergency:1. Brake using a firm and steady pressure. Do not pump the
brakes repeatedly. This may
deplete power assist, requiring
increased brake pedal force.
2. Shift the vehicle to N (Neutral). This can be done while the
vehicle is moving. After shifting
to N (Neutral), firmly apply the
brakes and steer the vehicle to
a safe location.
3. Come to a complete stop, shift to P (Park), and turn the
ignition off. On vehicles with an
automatic transmission, the
shift lever must be in P (Park)
to turn the ignition off.
4. Set the parking brake. See Parking Brake 0232.{Warning
Turning off the vehicle while
moving may cause loss of power
assist in the brake and steering
systems and disable the airbags.
While driving, only shut the
vehicle off in an emergency.
If the vehicle cannot be pulled over,
and must be shut off while driving,
press and hold ENGINE START/
STOP for longer than two seconds,
or press twice in five seconds.
ACC/ACCESSORY (Amber
Indicator Light) : This mode allows
some electrical accessories to be
used when the engine is off.
With the ignition off, pressing the
button one time without the brake
pedal applied will place the ignition
system in ACC/ACCESSORY.
The ignition will switch from ACC/
ACCESSORY to off after
five minutes to prevent battery
rundown. ON/RUN/START (Green Indicator
Light) :
This mode is for driving and
starting. With the ignition off, and
the brake pedal applied, pressing
the button once will turn the ignition
on. Once engine cranking begins,
release the button. Engine cranking
will continue until the engine starts.
See Starting the Engine 0213.
Service Mode
This power mode is available for
service and diagnostics, and to
verify the proper operation of the
malfunction indicator lamp as may
be required for emission inspection
purposes. With the vehicle off, and
the brake pedal not applied,
pressing and holding the button for
more than five seconds will place
the vehicle in Service Mode. The
instruments and audio systems will
operate as they do when the ignition
is on, but the vehicle will not be able
to be driven. The engine will not
start in Service Mode. Press the
button again to turn the ignition off.
Page 219 of 431
GMC Yukon/Yukon XL/Denali Owner Manual (GMNA-Localizing-U.S./
Canada/Mexico-11349262) - 2018 - CRC - 11/3/17
218 Driving and Operating
to pull the shift lever out of P (Park).
This is called torque lock. To
prevent torque lock, set the parking
brake and then shift into P (Park)
properly before you leave the
driver seat.
When you are ready to drive, move
the shift lever out of P (Park) before
you release the parking brake.
If torque lock does occur, you may
need to have another vehicle push
yours a little uphill to take some of
the pressure from the parking pawl
in the transmission. You will then be
able to pull the shift lever out of
P (Park).
Shifting out of Park
This vehicle is equipped with an
electronic shift lock release system.
The shift lock release system is
designed to prevent movement of
the shift lever out of P (Park), unless
the ignition is on and the brake
pedal is applied.The shift lock release is always
functional except in the case of an
uncharged or low voltage (less than
9 volt) battery.
If the vehicle has an uncharged
battery or a battery with low voltage,
try charging or jump starting the
battery. See
Jump Starting - North
America 0356.
To shift out of P (Park): 1. Apply the brake pedal.
2. Move the shift lever to the desired position.
If you still are unable to shift out of
P (Park): 1. Ease the pressure on the shift lever.
2. While holding down the brake pedal, push the shift lever all
the way into P (Park).
3. Move the shift lever to the desired position.
If you are still having a problem
shifting, then have the vehicle
serviced soon.
Parking over Things
That Burn
{Warning
Things that can burn could touch
hot exhaust parts under the
vehicle and ignite. Do not park
over papers, leaves, dry grass,
or other things that can burn.
Active Fuel Management
Vehicles with V8 engines may have
Active Fuel Management. This
system allows the engine to operate
on either all or half of its cylinders,
depending on the driving conditions.
When less power is required, such
as cruising at a constant vehicle
speed, the system will operate in
the half cylinder mode, allowing the
vehicle to achieve better fuel
economy. When greater power
demands are required, such as
accelerating from a stop, passing,
Page 224 of 431
GMC Yukon/Yukon XL/Denali Owner Manual (GMNA-Localizing-U.S./
Canada/Mexico-11349262) - 2018 - CRC - 11/3/17
Driving and Operating 223
L :This position allows selection of
a range of gears appropriate for
current driving conditions.
If equipped, see “Range Selection
Mode” underManual Mode 0223.
Caution
Spinning the tires or holding the
vehicle in one place on a hill
using only the accelerator pedal
may damage the transmission.
The repair will not be covered by
the vehicle warranty. If the vehicle
is stuck, do not spin the tires.
When stopping on a hill, use the
brakes to hold the vehicle in
place.
Normal Mode Grade Braking
This mode is enabled when the
vehicle is started, but is not enabled
in Range Selection Mode. It assists
in maintaining desired vehicle
speeds when driving on downhill
grades by using the engine and
transmission to slow the vehicle. The first time the system engages
for each ignition cycle, a DIC
message will be displayed.
To disable or enable Normal Mode
Grade Braking within the current
ignition cycle, press and hold the
Tow/Haul button for five seconds.
When the button is released, the
requested mode change is made.
A DIC message displays.
For other forms of grade braking,
see
Tow/Haul Mode 0225 and
Cruise Control 0237.
Kickdown Mode
The accelerator pedal provides an
additional downshift after pressing
through the kickdown feature.
It requires extra pedal pressure near
the end of its travel to engage.
Manual Mode
Range Selection Mode
If equipped, Range Selection Mode
helps control the vehicle's
transmission and vehicle speed
while driving downhill or towing a
trailer by letting you select a desired
range of gears.
To use this feature:
1. Move the shift lever to L (Manual Mode).
2. Press the plus/minus buttons on the shift lever to select the
desired range of gears for
current driving conditions.
Hold the plus/minus buttons on the
shift lever to select the highest or
lowest range available for the
current vehicle speed.
Page 227 of 431
GMC Yukon/Yukon XL/Denali Owner Manual (GMNA-Localizing-U.S./
Canada/Mexico-11349262) - 2018 - CRC - 11/3/17
226 Driving and Operating
control, and enhanced transmission
and engine cooling when driving
down steep hills or mountain
grades, towing, or hauling heavy
loads.
The selector button is on the end of
the shift lever. Turn the Tow/Haul
Mode on and off by pressing the
button. When the Tow/Haul Mode is
enabled, a light on the instrument
cluster will come on.
SeeTow/Haul Mode Light 0149 and
Hill and Mountain Roads 0202.
Also see “Tow/Haul Mode” under
Towing Equipment 0271.
Tow/Haul Mode Grade Braking
Tow/Haul Mode Grade Braking is
only enabled while the Tow/Haul
Mode is selected and the vehicle is
not in the Range Selection Mode.
See “Tow/Haul Mode” listed
previously and Manual Mode0223. Tow/Haul Mode Grade Braking
assists in maintaining desired
vehicle speeds when driving on
downhill grades by using the engine
and transmission to slow the
vehicle.
To disable or enable Tow/Haul
Grade Braking within the current
ignition cycle, press and hold the
Tow/Haul button for five seconds.
When the button is released, the
requested mode change is made.
A DIC message is displayed.
See
Towing Equipment 0271.
For other forms of grade braking,
see Automatic Transmission 0220
and Cruise Control 0237.
Drive Systems
Four-Wheel Drive
If equipped, four-wheel drive
engages the front axle for extra
traction.
Caution
Do not drive on clean, dry
pavement in 4
mand 4n(if
equipped) for an extended period
of time. These conditions may
cause premature wear on the
vehicle’s powertrain.
Driving on clean, dry pavement in
4
mor 4nmay:
. Cause a vibration to be felt in
the steering system.
. Cause tires to wear faster.
. Make the transfer case harder to
shift, and cause it to run noisier.
Page 229 of 431
GMC Yukon/Yukon XL/Denali Owner Manual (GMNA-Localizing-U.S./
Canada/Mexico-11349262) - 2018 - CRC - 11/3/17
228 Driving and Operating
AUTO (Automatic Four-Wheel
Drive) :Use when road surface
traction conditions are variable.
When driving in AUTO, the front
axle is engaged, and the vehicle's
power is sent to the front and rear
wheels automatically based on
driving conditions. This setting
provides slightly lower fuel economy
than 2
m.
Do not use AUTO mode,
if equipped, to park on a steep
grade with poor traction such as ice,
snow, mud, or gravel. In AUTO
mode only the rear wheels will hold
the vehicle from sliding when
parked. If parking on a steep grade,
use 4
mto keep all four wheels
engaged.
4
m(Four-Wheel Drive High) : Use
this position when extra traction is
needed, such as when driving on
snowy or icy roads, when
off-roading, or when plowing snow. 4
n(Four-Wheel Drive Low) :
This
setting engages the front axle and
delivers extra torque. Choose 4
n
when driving off-road in deep sand,
deep mud, or deep snow, and while
climbing or descending steep hills.
Shifting into 4
nwill turn Traction
Control and StabiliTrak off. See
Traction Control/Electronic Stability
Control 0234.
Shifting Into 4
mor AUTO
Turn the knob to the 4
mor AUTO
position at any speed, except from
4
n. The indicator light will flash
while shifting and will remain on
when the shift is completed.
Shifting Into 2
m
Turn the knob to 2mat any speed,
except when shifting from 4
n. The
indicator light will flash while shifting
and will remain on when the shift is
completed. Shifting Into 4
n
When 4nis engaged, keep vehicle
speed below 72 km/h (45 mph).
To shift:
1. The ignition must be on and the vehicle must be stopped
or moving less than
5 km/h (3 mph) with the
transmission in N (Neutral). It is
best for the vehicle to be
moving
1.6 to 3.2 km/h (1 to 2 mph).
2. Turn the knob to 4
n. Wait for
the 4
nindicator light to stop
flashing before shifting the
transmission into gear.
Caution
Shifting the transmission into gear
before the requested mode
indicator light has stopped
flashing could damage the
transfer case.
Page 230 of 431
GMC Yukon/Yukon XL/Denali Owner Manual (GMNA-Localizing-U.S./
Canada/Mexico-11349262) - 2018 - CRC - 11/3/17
Driving and Operating 229
If the transmission is in gear and/or
moving more than 5 km/h (3 mph),
the 4
nindicator light will flash for
30 seconds and not complete the
shift. After 30 seconds the transfer
case will shift to 4
m. Turn the knob
to 4
mto display the indicator. With
the vehicle moving less than 5 km/h
(3 mph), and the transmission in
N (Neutral), attempt the shift again.
Shifting Out of 4
n
To shift:
1. The vehicle must be stopped or moving less than 5 km/h
(3 mph) with the transmission
in N (Neutral) and the ignition
on. It is best for the vehicle to
be moving
1.6 to 3.2 km/h (1 to 2 mph).
2. Turn the knob to 4
m, AUTO,
or 2
m. Wait for the 4m, AUTO,
or 2
mindicator light to stop
flashing before shifting the
transmission into gear.
Caution
Shifting the transmission into gear
before the requested mode
indicator light has stopped
flashing could damage the
transfer case.
If the transmission is in gear and/or
moving more than 5 km/h (3 mph),
the 4
m, AUTO, or 2mindicator light
will flash for 30 seconds but will not
complete the shift. With the vehicle
moving less than 5 km/h (3 mph),
and the transmission in N (Neutral),
attempt the shift again.
Shifting Into N (Neutral)
To shift into N (Neutral):
1. Park the vehicle on a level surface.
2. Set the parking brake and press and hold the brake
pedal. See Parking Brake
0 232.
3. Start the vehicle or turn the ignition on. 4. Shift the transmission to
N (Neutral).
5. Shift the transfer case to 2
m.
6. Turn the transfer case knob clockwise to N (Neutral) until it
stops and hold it there until the
N (Neutral) light starts blinking.
This will take at least
10 seconds. Then slowly
release the knob to the 4
n
position. The N (Neutral) light
will come on when the transfer
case shift to N (Neutral) is
complete.
7. With the engine running, verify that the transfer case is in
N (Neutral) by shifting the
transmission to R (Reverse),
then shift the transmission to
D (Drive). There should be no
movement of the vehicle while
shifting the transmission.
8. Turn the engine off, and the ignition to ACC/ACCESSORY.