HONDA ACCORD 2017 9.G Quick Guide
Manufacturer: HONDA, Model Year: 2017, Model line: ACCORD, Model: HONDA ACCORD 2017 9.GPages: 83, PDF Size: 6.77 MB
Page 21 of 83
34 || 35
V
EHICLE CONTROLSVEHICLE CONTROLS
Interior and Exterior Lights
operate interior and exterior lights when the vehicle is on or off.
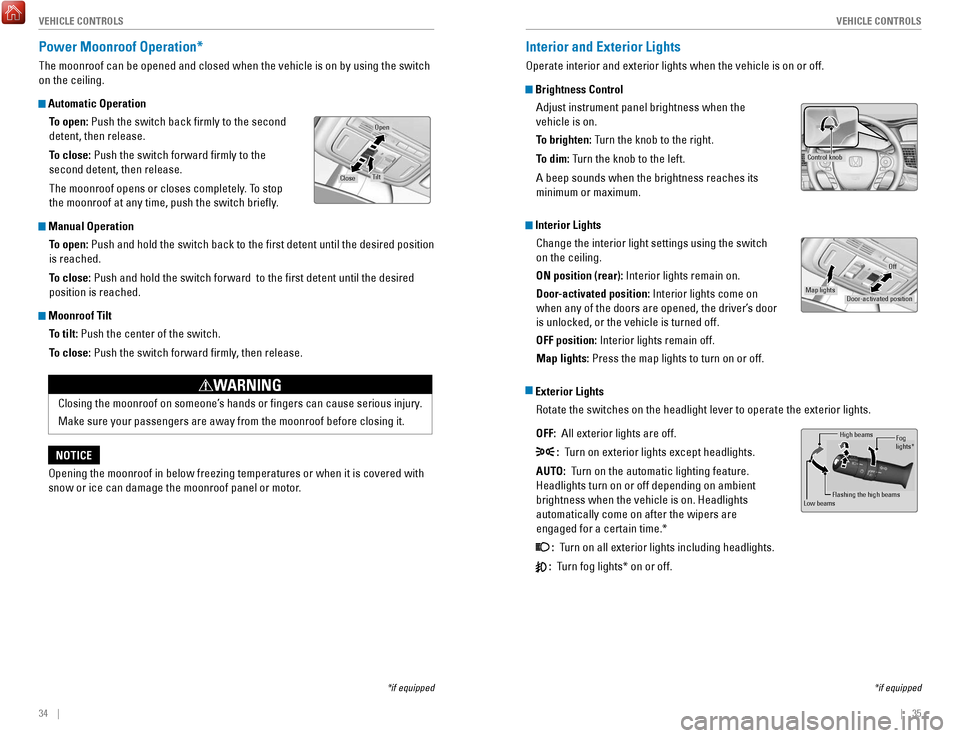
Brightness Control
Adjust instrument panel brightness when the
vehicle is on.
To brighten: Turn the knob to the right.
To dim: Turn the knob to the left.
A beep sounds when the brightness reaches its
minimum or maximum.
Interior LightsChange the interior light settings using the switch
on the ceiling.
ON position (rear): Interior lights remain on.
Door-activated position: Interior lights come on
when any of the doors are opened, the driver’s door
is unlocked, or the vehicle is turned off.
OFF position: Interior lights remain off.
Map lights: Press the map lights to turn on or off.
Exterior Lights
rotate the switches on the headlight lever to operate the exterior lights\
.
OFF:
All exterior lights are off.
: Turn on exterior lights except headlights.
AUTO: Turn on the automatic lighting feature.
Headlights turn on or off depending on ambient
brightness when the vehicle is on. Headlights
automatically come on after the wipers are
engaged for a certain time.*
: Turn on all exterior lights including headlights.
: Turn fog lights* on or off.
*if equipped
Control knob
Door-activated position
Off
Map lights
High beams
Flashing the high beams
Low beamsFog
lights *
Power Moonroof Operation*
The moonroof can be opened and closed when the vehicle is on by using th\
e switch
on the ceiling.
Automatic Operation
To open: Push the switch back firmly to the second
detent, then release.
To close: Push the switch forward firmly to the
second detent, then release.
The moonroof opens or closes completely. To stop
the moonroof at any time, push the switch briefly.
Manual OperationTo open: Push and hold the switch back to the first detent until the desired p\
osition
is reached.
To close: Push and hold the switch forward to the first detent until the desir\
ed
position is reached.
Moonroof TiltTo tilt: Push the center of the switch.
To close: Push the switch forward firmly, then release.
*if equipped
Open
CloseTilt
opening the moonroof in below freezing temperatures or when it is covered\
with
snow or ice can damage the moonroof panel or motor.
NOTICE Closing the moonroof on someone’s hands or fingers can cause serious injury.
Make sure your passengers are away from the moonroof before closing it.
WARNING
Page 22 of 83
36 || 37
V
EHICLE CONTROLSVEHICLE CONTROLS
Wiper Operation
The windshield wipers and washers can be used when the vehicle is on.
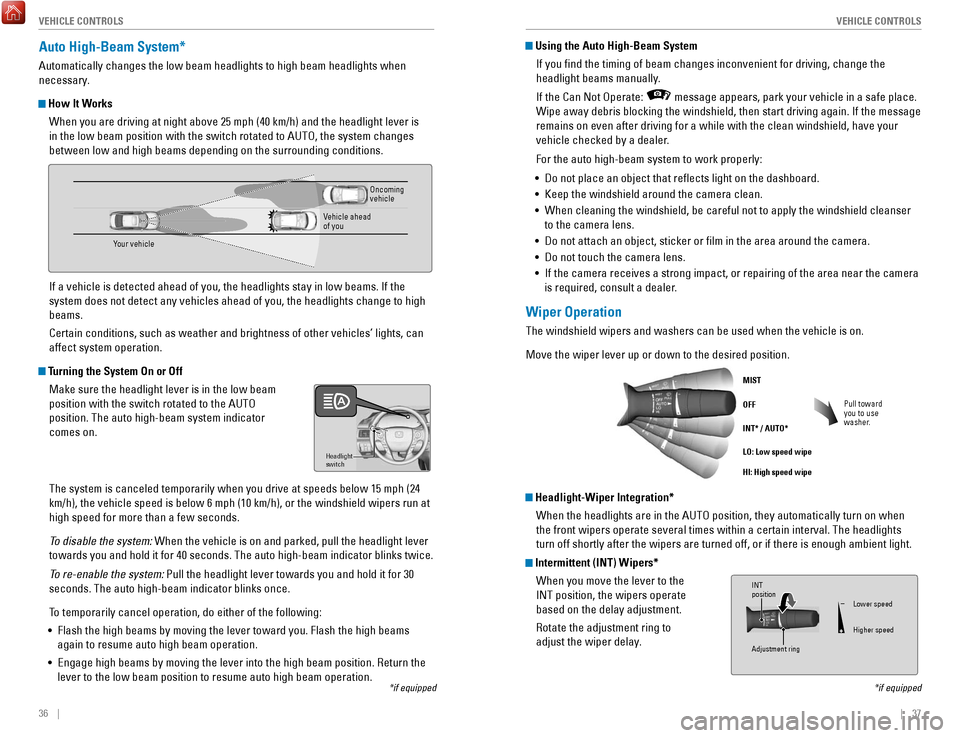
Move the wiper lever up or down to the desired position.
Pull toward
you to use
washer.
MIST
OFF
INT* / AUTO*
LO: Low speed wipe
HI: High speed wipe
*if equipped
Intermittent (INT) Wipers*
When you move the lever to the
INT position, the wipers operate
based on the delay adjustment.
rotate the adjustment ring to
adjust the wiper delay
.
Headlight-Wiper Integration*When the headlights are in the AUT
o position, they automatically turn on when
the front wipers operate several times within a certain interval. The he\
a
dlights
turn off shortly after the wipers are turned off, or if there is enough \
ambient light.
Adjustment ring
INT
position
Lower speed
Higher speed
Using the Auto High-Beam System
If you find the timing of beam changes inconvenient for driving, chang\
e the
headlight beams manually.
If the Can Not
operate: message appears, park your vehicle in a safe place.
Wipe away debris blocking the windshield, then start driving again. If t\
he message
remains on even after driving for a while with the clean windshield, hav\
e your
vehicle checked by a dealer.
For the auto high-beam system to work properly:
•
Do not place an object that reflects light on the dashboard.
•
Keep the windshield around the camera clean.
•
When cleaning the windshield, be careful not to apply the windshield cle\
anser
to the camera lens.
•
Do not attach an object, sticker or film in the area around the camera\
.
•
Do not touch the camera lens.
•
If the camera receives a strong impact, or repairing of the area near th\
e camera
is required, consult a dealer.
Auto High-Beam System*
Automatically changes the low beam headlights to high beam headlights wh\
en
necessary.
How It Works
When you are driving at night above 25 mph (40 km/h) and the headlight\
lever is
in the low beam position with the switch rotated to AUT
o, the system changes
between low and high beams depending on the surrounding conditions.
If a vehicle is detected ahead of you, the headlights stay in low beams.\
If the
system does not detect any vehicles ahead of you, the headlights change \
to high
beams.
Certain conditions, such as weather and brightness of other vehicles’\
lights, can
affect system operation.
Turning the System On or Off
Make sure the headlight lever is in the low beam
position with the switch rotated to the AUT
o
position. The auto high-beam system indicator
comes on.
The system is canceled temporarily when you drive at speeds below 15
mph (24
km/h), the vehicle speed is below 6 mph (10 km/h), or the windshield \
wipers run at
high speed for more than a few seconds.
To disable the system: When the vehicle is on and parked, pull the headlight lever
towards you and hold it for 40 seconds. The auto high-beam indicator bli\
nks twice.
To re-enable the system: Pull the headlight lever towards you and hold it for 30
seconds. The auto high-beam indicator blinks once.
To temporarily cancel operation, do either of the following:
•
Flash the high beams by moving the lever toward you. Flash the high beam\
s
again to resume auto high beam operation.
•
engage high beams by moving the lever into the high beam position. return the
lever to the low beam position to resume auto high beam operation.
Headlight
switch
*if equipped
Your vehicle
oncoming
vehicle
vehicle ahead
of you
Page 23 of 83
38 || 39
V
EHICLE CONTROLSVEHICLE CONTROLS
Adjusting the Seats
Make seat adjustments before driving to ensure the best comfort and safe\
ty.
Adjusting the Front Seats
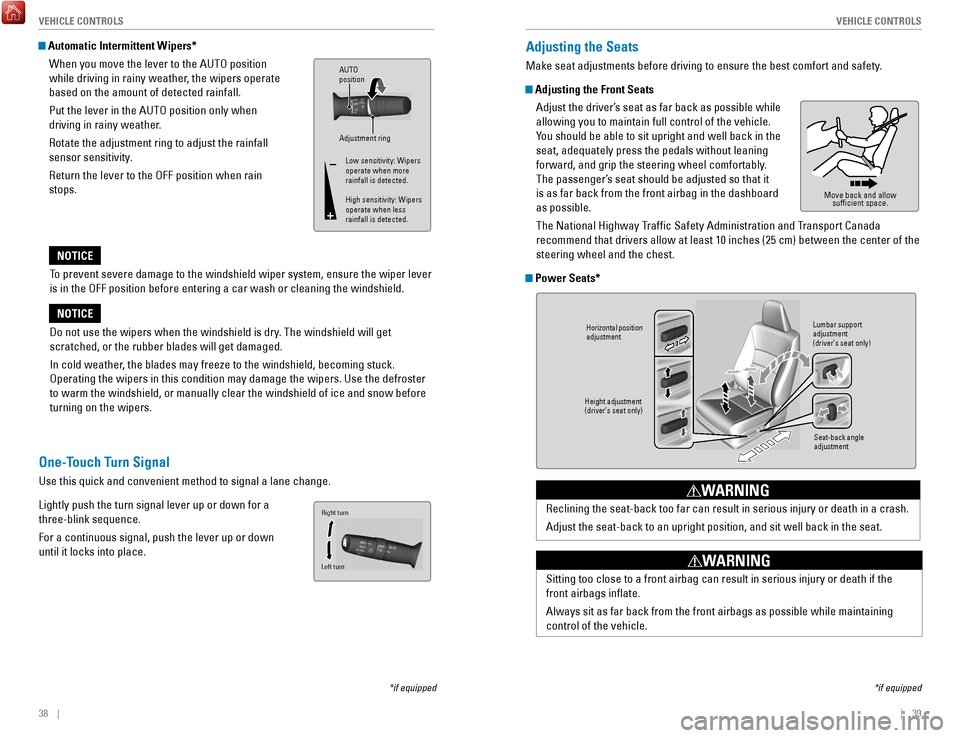
Adjust the driver’s seat as far back as possible while
allowing you to maintain full control of the vehicle.
You should be able to sit upright and well back in the
seat, adequately press the pedals without leaning
forward, and grip the steering wheel comfortably.
The passenger’s seat should be adjusted so that it
is as far back from the front airbag in the dashboard
as possible.
The National Highway Traffic Safety Administration and Transport Canada
recommend that drivers allow at least 10 inches (25 cm) between the ce\
nter of the
steering wheel and the chest.
Power Seats*
Move back and allow sufficient space.
*if equipped
Horizontal position
adjustment
Height adjustment
(driver’s seat only) Seat-back angle
adjustment
Lumbar support
adjustment
(driver’s seat only)
reclining the seat-back too far can result in serious injury or death in \
a crash.
Adjust the seat-back to an upright position, and sit well back in the se\
at.
WARNING
Sitting too close to a front airbag can result in serious injury or deat\
h if the
front airbags inflate.
Always sit as far back from the front airbags as possible while maintain\
ing
control of the vehicle.
WARNING
To prevent severe damage to the windshield wiper system, ensure the wiper lever
is in the
oFF position before entering a car wash or cleaning the windsh
ield.
NOTICE
Do not use the wipers when the windshield is dry. The windshield will get
scratched, or the rubber blades will get damaged.
In cold weather, the blades may freeze to the windshield, becoming stuck.
operating the wipers in this condition may damage the wipers. Use the def\
roster
to warm the windshield, or manually clear the windshield of ice and snow before
turning on the wipers.
NOTICE
Automatic Intermittent Wipers*
When you move the lever to the AUT
o position
while driving in rainy weather
, the wipers operate
based on the amount of detected rainfall.
Put the lever in the AUT
o position only when
driving in rainy weather
.
rotate the adjustment ring to adjust the rainfall
sensor sensitivity
.
return the lever to the oFF position when rain
stops.
Adjustment ring
AUTO
position
Low sensitivity: Wipers
operate when more
rainfall is detected.
High sensitivity: Wipers
operate when less
rainfall is detected.
*if equipped
One-Touch Turn Signal
Use this quick and convenient method to signal a lane change.
Lightly push the turn signal lever up or down for a
three-blink sequence.
For a continuous signal, push the lever up or down
until it locks into place.
Right turn
Left turn
Page 24 of 83
40 || 41
V
EHICLE CONTROLSVEHICLE CONTROLS
Adjusting the Head Restraints
Your vehicle is equipped with head restraints in all seating positions. H\
ead
restraints are most effective for protection against whiplash and other \
rear-impact
crash injuries.
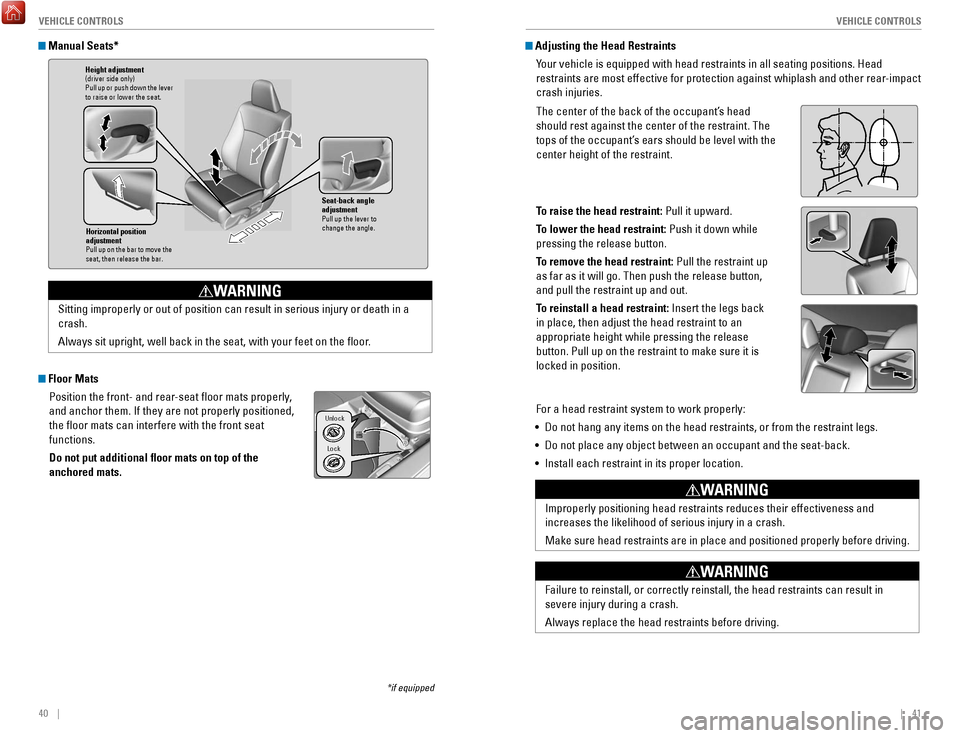
The center of the back of the occupant’s head
should rest against the center of the restraint. The
tops of the occupant’s ears should be level with the
center height of the restraint.
To raise the head restraint: Pull it upward.
To lower the head restraint: Push it down while
pressing the release button.
To remove the head restraint: Pull the restraint up
as far as it will go. Then push the release button,
and pull the restraint up and out.
To reinstall a head restraint: Insert the legs back
in place, then adjust the head restraint to an
appropriate height while pressing the release
button. Pull up on the restraint to make sure it is
locked in position.
For a head restraint system to work properly:
•
Do not hang any items on the head restraints, or from the restraint legs\
.
•
Do not place any object between an occupant and the seat-back.
•
Install each restraint in its proper location.
Position head in the
center of the head
restraint.
Improperly positioning head restraints reduces their effectiveness and
increases the likelihood of serious injury in a crash.
Make sure head restraints are in place and positioned properly before dr\
iving.
WARNING
Failure to reinstall, or correctly reinstall, the head restraints can re\
sult in
severe injury during a crash.
Always replace the head restraints before driving.
WARNING
Manual Seats*
Floor Mats Position the front- and rear-seat floor mats properly,
and anchor them. If they are not properly positioned,
the floor mats can interfere with the front seat
functions.
Do not put additional floor mats on top of the
anchored mats.
*if equipped
Horizontal position
adjustment
Pull up on the bar to move the
seat, then release the bar.
Height adjustment(driver side only)
Pull up or push down the lever
to raise or lower the seat .
Seat-back angle
adjustment
Pull up the lever to
change the angle.
Sitting improperly or out of position can result in serious injury or de\
ath in a
crash.
Always sit upright, well back in the seat, with your feet on the floor\
.
WARNING
Lock
Unlock
Page 25 of 83
42 || 43
V
EHICLE CONTROLSVEHICLE CONTROLS
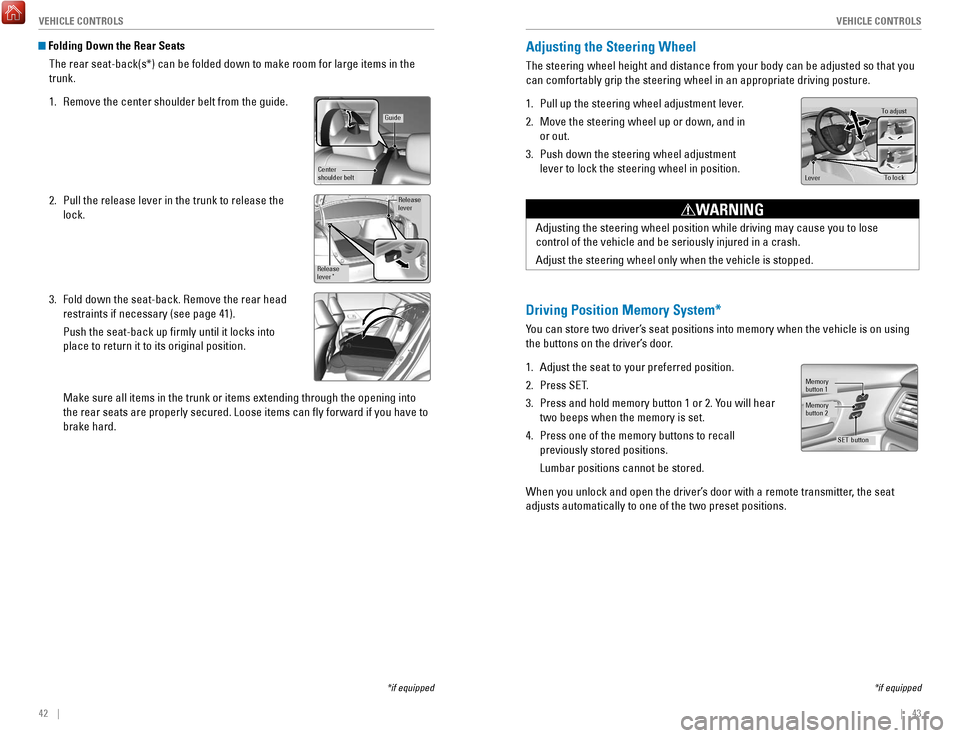
Adjusting the Steering Wheel
The steering wheel height and distance from your body can be adjusted so\
that you
can comfortably grip the steering wheel in an appropriate driving postur\
e.
1.
Pull up the steering wheel adjustment lever.
2.
Move the steering wheel up or down, and in
or out.
3.
Push down the steering wheel adjustment
lever to lock the steering wheel in position.
To adjus t
To lock
Lever
Adjusting the steering wheel position while driving may cause you to los\
e
control of the vehicle and be seriously injured in a crash.
Adjust the steering wheel only when the vehicle is stopped.
WARNING
Driving Position Memory System*
You can store two driver’s seat positions into memory when the vehicle is on using
the buttons on the driver’s door.
1.
Adjust the seat to your preferred position.
2.
Press SeT
.
3.
Press and hold memory button 1 or 2. You will hear
two beeps when the memory is set.
4.
Press one of the memory buttons to recall
previously stored positions.
Lumbar positions cannot be stored.
When you unlock and open the driver’s door with a remote transmitter
, the seat
adjusts automatically to one of the two preset positions.
Memory
button 1
Memory
button 2
SET button
*if equipped
Folding Down the Rear Seats
The rear seat-back(s*) can be folded down to make room for large items\
in the
trunk.
1.
remove the center shoulder belt from the guide.
2.
Pull the release lever in the trunk to release the
lock.
3.
Fold down the seat-back. remove the rear head
restraints if necessary (see page 41).
Push the seat-back up firmly until it locks into
place to return it to its original position.
Make sure all items in the trunk or items extending through the opening \
int
o
the rear seats are properly secured. Loose items can fly forward if yo\
u have to
brake hard.
*if equipped
Guide
Center
shoulder belt
Release
lever
Release
lever*
Page 26 of 83
44 || 45
V
EHICLE CONTROLSVEHICLE CONTROLS
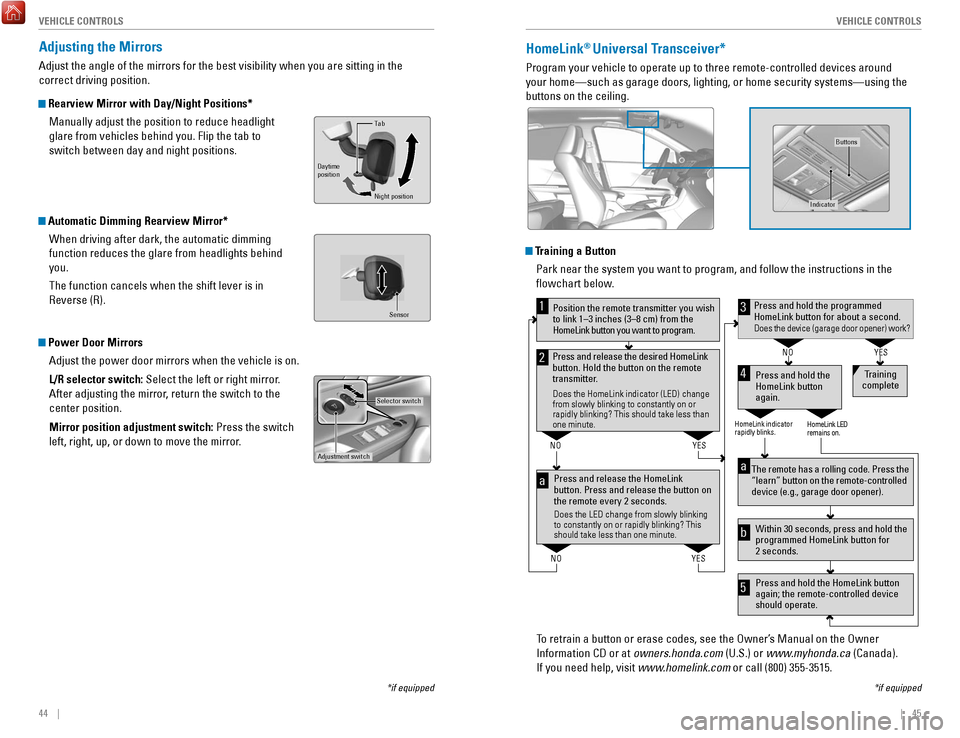
HomeLink® Universal Transceiver*
Program your vehicle to operate up to three remote-controlled devices ar\
ound
your home—such as garage doors, lighting, or home security systems—\
using the
buttons on the ceiling.
Training a Button
Park near the system you want to program, and follow the instructions in\
the
flowchart below.
To retrain a button or erase codes, see the
owner’
s Manual on the
owner
Information CD or at
owners.honda.com (U.S.) or www.myhonda.ca (Canada).
If you need help, visit www.homelink.com or call (800) 355-3515.
Press and release the HomeLink
button. Press and release the button on
the remote every 2 seconds.
Does the LED change from slowly blinking
to constantly on or rapidly blinking? This
should take less than one minute.
Press and hold the
HomeLink button
again. Training
complete
YES
NO
HomeLink indicator
rapidly blinks. HomeLink LED
remains on.
YES
NO
YES
NO
Position the remote transmitter you wish
to link 1–3 inches (3–8 cm) from the
HomeLink button you want to program.1
Press and release the desired HomeLink
button. Hold the button on the remote
transmitter.
Does the HomeLink indicator (LED) change
from slowly blinking to constantly on or
rapidly blinking? This should take less than
one minute.
2
aThe remote has a rolling code. Press the
“learn” button on the remote-controlled
device (e.g., garage door opener) .
Press and hold the HomeLink button
again; the remote-controlled device
should operate. Within 30 seconds, press and hold the
programmed HomeLink button for
2 seconds.a
Press and hold the programmed HomeLink button for about a second.Does the device (garage door opener) work?
3
b
4
5
*if equipped
Indicator
Buttons
Adjusting the Mirrors
Adjust the angle of the mirrors for the best visibility when you are sit\
ting in the
correct driving position.
Rearview Mirror with Day/Night Positions* Manually adjust the position to reduce headlight
glare from vehicles behind you. Flip the tab to
switch between day and night positions.
Automatic Dimming Rearview Mirror*When driving after dark, the automatic dimming
function reduces the glare from headlights behind
you.
The function cancels when the shift lever is in
reverse (r).
Power Door MirrorsAdjust the power door mirrors when the vehicle is on.
L/R selector switch: Select the left or right mirror.
After adjusting the mirror, return the switch to the
center position.
Mirror position adjustment switch: Press the switch
left, right, up, or down to move the mirror.
Selector switch
Adjustment switch
Tab
Daytime
position
Night position
Sensor
*if equipped
Page 27 of 83
46 || 47
V
EHICLE CONTROLSVEHICLE CONTROLS
*if equipped
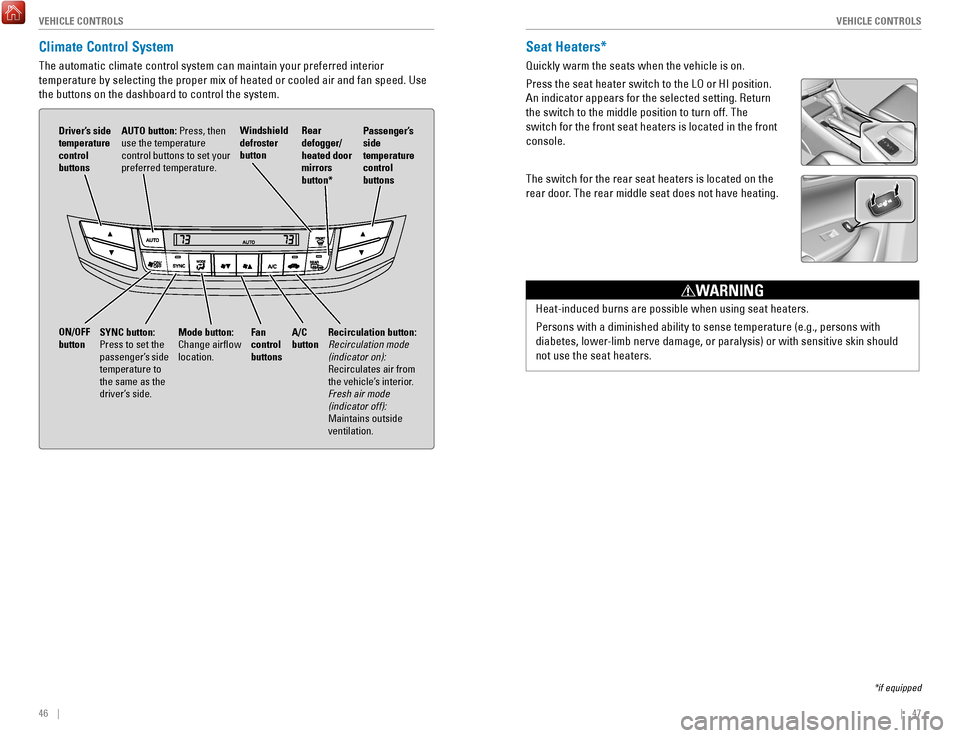
Seat Heaters*
Quickly warm the seats when the vehicle is on.
Press the seat heater switch to the L
o or HI position.
An indicator appears for the selected setting.
return
the switch to the middle position to turn off. The
switch for the front seat heaters is located in the front
console.
The switch for the rear seat heaters is located on the
rear door
. The rear middle seat does not have heating.
Heat-induced burns are possible when using seat heaters.
Persons with a diminished ability to sense temperature (e.g., persons w\
ith
diabetes, lower-limb nerve damage, or paralysis) or with sensitive skin should
not use the seat heaters.
WARNING
Climate Control System
The automatic climate control system can maintain your preferred interio\
r
temperature by selecting the proper mix of heated or cooled air and fan \
speed. Use
the buttons on the dashboard to control the system.
AUTO button: Press, then
use the temperature
control buttons to set your
preferred temperature.
Driver’s side
temperature
control
buttons
A/C
button
Fan
control
buttons Recirculation button:
Recirculation mode
(indicator on):
recirculates air from
the vehicle’
s interior.
Fresh air mode
(indicator off):
Maintains outside
ventilation.
Rear
defogger/
heated door
mirrors
button*
Windshield
defroster
button
ON/OFF
button
Mode button:
Change airflow
location.
Passenger’s
side
temperature
control
buttons
SYNC button:
Press to set the
passenger’s side
temperature to
the same as the
driver’s side.
Page 28 of 83
48 || 49
V
EHICLE CONTROLSVEHICLE CONTROLS
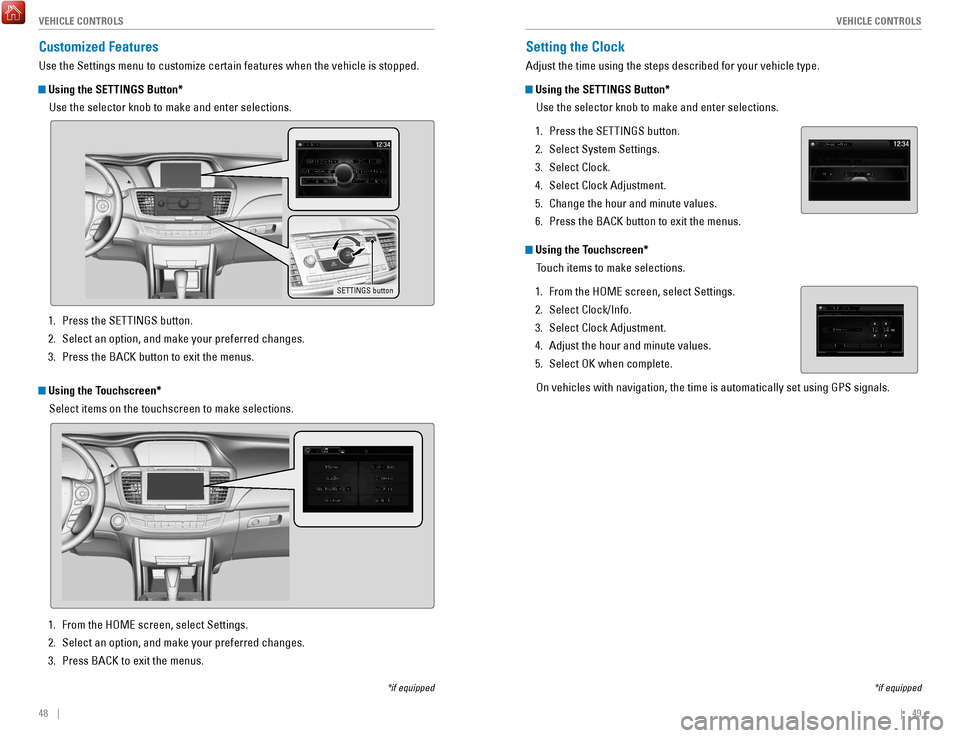
Setting the Clock
Adjust the time using the steps described for your vehicle type.
Using the SETTINGS Button*
Use the selector knob to make and enter selections.
1.
Press the SeTTINGS button.
2.
Select System Settings.
3.
Select Clock.
4.
Select Clock Adjustment.
5.
Change the hour and minute values.
6.
Press the BACK button to exit the menus.
Using the Touchscreen* Touch items to make selections.
1.
From the HoMe screen, select Settings.
2.
Select Clock/Info.
3.
Select Clock Adjustment.
4.
Adjust the hour and minute values.
5.
Select oK when complete.
on vehicles with navigation, the time is automatically set using GPS sign\
als.
*if equipped
Customized Features
Use the Settings menu to customize certain features when the vehicle is \
stopped.
Using the SETTINGS Button*Use the selector knob to make and enter selections.
SETTINGS button
*if equipped
Using the Touchscreen*Select items on the touchscreen to make selections.
1.
Press the SeTTINGS button.
2.
Select an option, and make your preferred changes.
3.
Press the BACK button to exit the menus.
1.
From the HoMe screen, select Settings.
2.
Select an option, and make your preferred changes.
3.
Press BACK to exit the menus.
Page 29 of 83
50 || 51
AUDIO AND CONNECTIVITY
AUDIO AND CONNECTIVITY
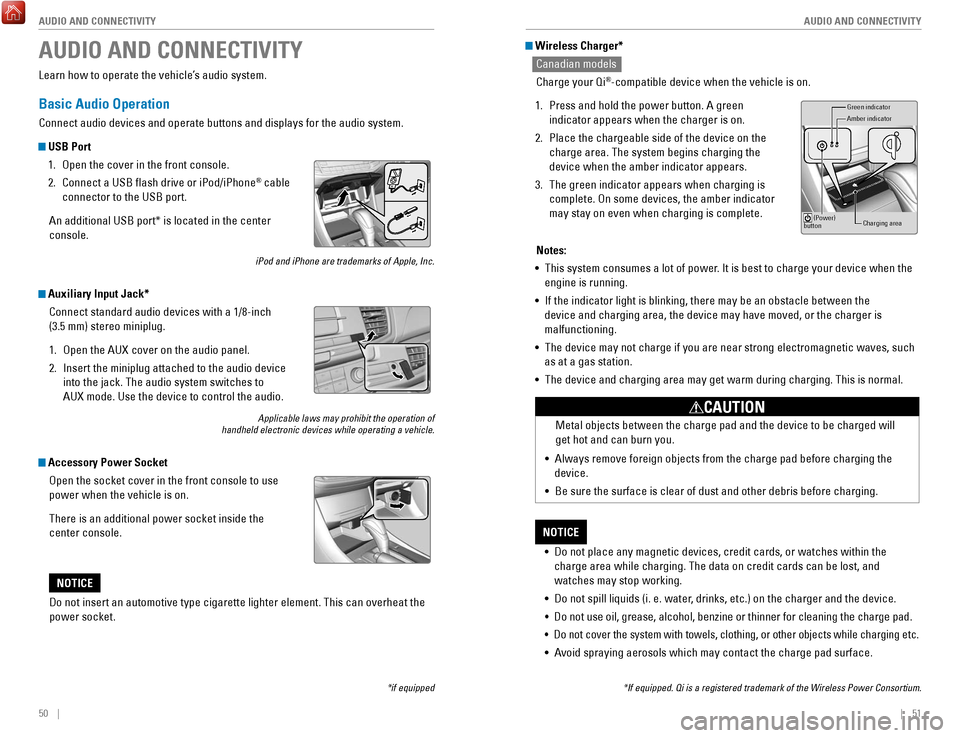
Wireless Charger*
Canadian models
Charge your Qi
®-compatible device when the vehicle is on.
1.
Press and hold the power button. A green
indicator appears when the charger is on.
2.
Place the chargeable side of the device on the
charge area. The system begins charging the
device when the amber indicator appears.
3.
The green indicator appears when charging is
complete.
on some devices, the amber indicator
may stay on even when charging is complete.
Gr een indicator
Amber indicator
Charging area
(Power)
button
Notes:
•
This system consumes a lot of power. It is best to charge your device when the
engine is running.
•
If the indicator light is blinking, there may be an obstacle between the\
device and charging area, the device may have moved, or the charger is
malfunctioning.
•
The device may not charge if you are near strong electromagnetic waves, \
such
as at a gas station.
•
The device and charging area may get warm during charging. This is norma\
l.
•
Do not place any magnetic devices, credit cards, or watches within the
charge area while charging. The data on credit cards can be lost, and
watches may stop working.
•
Do not spill liquids (i. e. water, drinks, etc.) on the charger and the device.
• Do not use oil, grease, alcohol, benzine or thinner for cleaning the cha\
rge pad.
• Do not cover the system with towels, clothing, or other objects while ch\
arging etc.
• Avoid spraying aerosols which may contact the charge pad surface.
NOTICE Metal objects between the charge pad and the device to be charged will
get hot and can burn you.
•
Always remove foreign objects from the charge pad before charging the
device.
•
Be sure the surface is clear of dust and other debris before charging.
CAUTION
*If equipped. Qi is a registered trademark of the Wireless Power Consort\
ium.
AUDIO AND CONNECTIVITY
*if equipped
Learn how to operate the vehicle’s audio system.
Basic Audio Operation
Connect audio devices and operate buttons and displays for the audio sys\
tem.
USB Port 1.
open the cover in the front console.
2.
Connect a USB flash drive or iPod/iPhone® cable
connector to the USB port.
An additional USB port* is located in the center
console.
iPod and iPhone are trademarks of Apple, Inc.
Auxiliary Input Jack* Connect standard audio devices with a 1/8-inch
(3.5 mm) stereo miniplug.
1.
open the AUX cover on the audio panel.
2.
Insert the miniplug attached to the audio device
into the jack. The audio system switches to
AUX
mode. Use the device to control the audio.
Applicable laws may prohibit the operation of
handheld electronic devices while operating a vehicle.
Accessory Power Socket
open the socket cover in the front console to use
power when the vehicle is on.
There is an additional power socket inside the
center console.
Do not insert an automotive type cigarette lighter element. This can ove\
rheat the
power socket.
NOTICE
Page 30 of 83
52 || 53
AUDIO AND CONNECTIVITY
AUDIO AND CONNECTIVITY
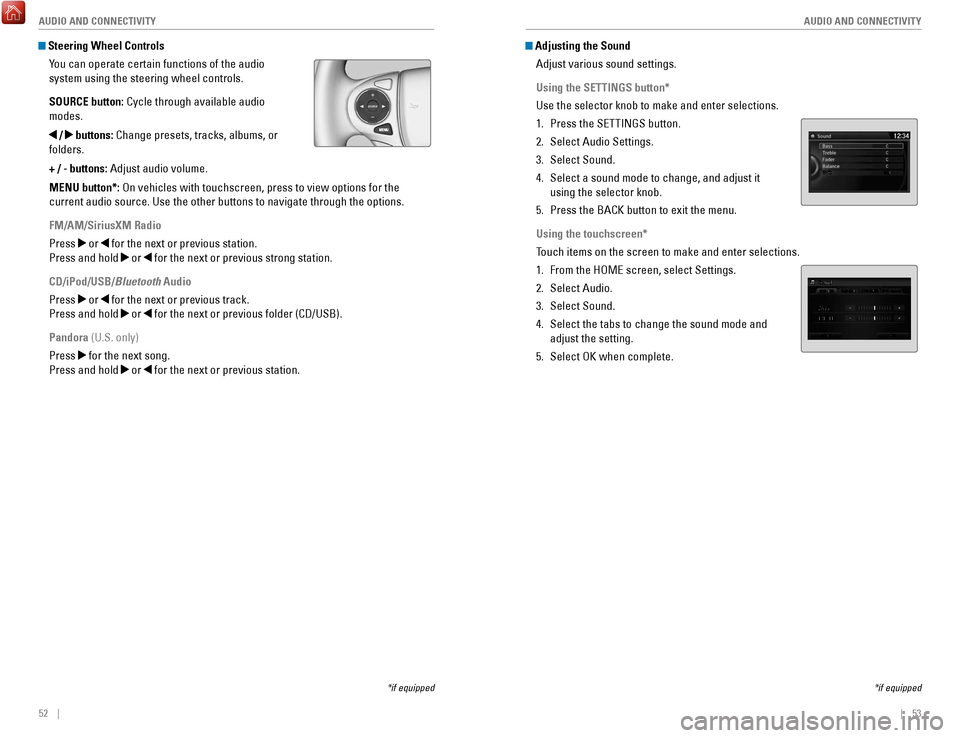
Adjusting the Sound
Adjust various sound settings.
Using the SETTINGS button*
Use the selector knob to make and enter selections.
1.
Press the SeTTINGS button.
2.
Select Audio Settings.
3.
Select Sound.
4.
Select a sound mode to change, and adjust it
using the selector knob.
5.
Press the BACK button to exit the menu.
Using the touchscreen*
Touch items on the screen to make and enter selections.
1.
From the HoMe screen, select Settings.
2.
Select Audio.
3.
Select Sound.
4.
Select the tabs to change the sound mode and
adjust the setting.
5.
Select oK when complete.
*if equipped
Steering Wheel Controls You can operate certain functions of the audio
system using the steering wheel controls.
SOURCE button: Cycle through available audio
modes.
/ buttons: Change presets, tracks, albums, or
folders.
+ / - buttons: Adjust audio volume.
MENU button*:
on vehicles with touchscreen, press to view options for the
current audio source. Use the other buttons to navigate through the opti\
ons.
FM/AM/SiriusXM Radio
Press
or for the next or previous station.
Press and hold
or for the next or previous strong station.
CD/iPod/USB/Bluetooth Audio
Press
or for the next or previous track.
Press and hold
or for the next or previous folder (CD/USB).
Pandora (U.S. only)
Press
for the next song.
Press and hold
or for the next or previous station.
*if equipped