jacking HONDA CR-V 2005 RD4-RD7 / 2.G Owners Manual
[x] Cancel search | Manufacturer: HONDA, Model Year: 2005, Model line: CR-V, Model: HONDA CR-V 2005 RD4-RD7 / 2.GPages: 274, PDF Size: 4.34 MB
Page 225 of 274

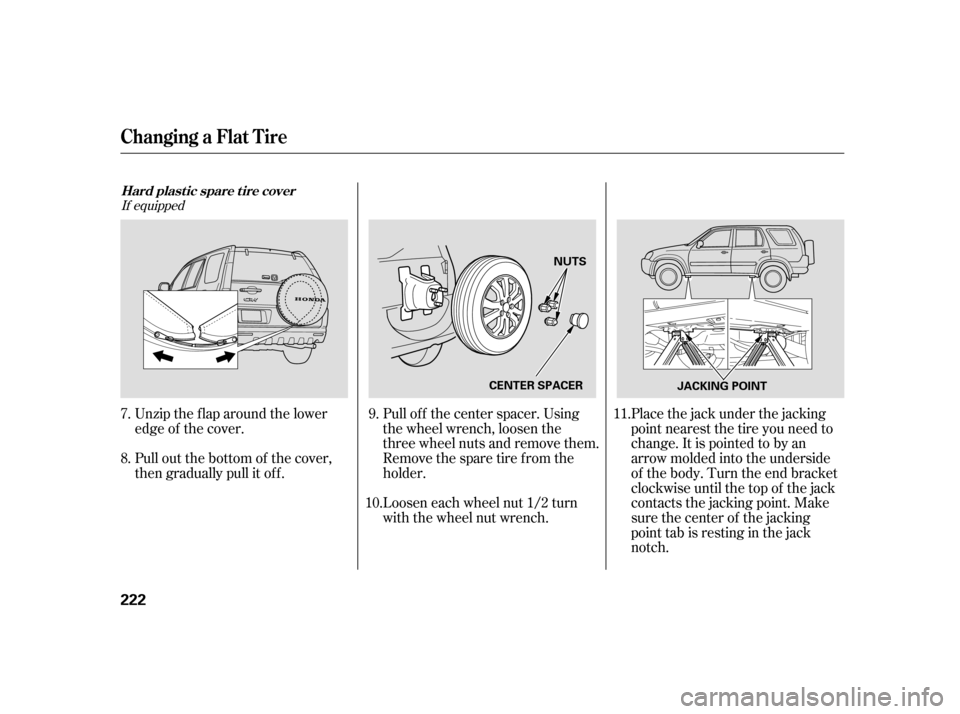
Pull of f the center spacer. Using
the wheel wrench, loosen the
three wheel nuts and remove them.
Remove the spare tire from the
holder.
Unzip the flap around the lower
edge of the cover.
Pull out the bottom of the cover,
then gradually pull it of f .
Loosen each wheel nut 1/2 turn
with the wheel nut wrench.
Place the jack under the jacking
point nearest the tire you need to
change. It is pointed to by an
arrow molded into the underside
of the body. Turn the end bracket
clockwise until the top of the jack
contacts the jacking point. Make
sure the center of the jacking
point tab is resting in the jack
notch.
9. 11.
10.
7.
8.
If equipped
Changing a Flat T ire
Hard plastic spare tire cover
222
CENTER SPACER JACKING POINT
NUTS
Page 268 of 274

CONT INUED
Indicators......
ABS (Anti-Lock Brake) . 57,168
Brake (Parking and Brake ............................
System) .56, 235
................
Charging System . 56,233
...........................
Check Fuel Cap .63
.............................
Cruise Control .58
DRL (Daytime Running ......................................
Lights) .59
...................................
High Beam .59
........
Key (Immobilizer System) . 57
......................................
Low Fuel .59
................
Low Oil Pressure . 56,233
.................
Passenger Airbag Of f . 30
...........................
Side Airbag Of f .57
...............................................
SRS .57
Turn Signal and Hazard ...................................
Warning .59
VSA (Vehicle Stability ..............................
Assist) .58, 170
..............................
Washer Level .60
.........
Indicators, Instrument Panel . 55
...............................
Inf ant Restraint .37
......................................
Inf ant Seats .37
............
Tether Anchorage Point . 45...................
Inf lation, Proper Tire . 212
........
Recommended Pressures . 213
...................................
Inside Mirror .88
.............................
Inspection, Tire .213
....................
Installing a Child Seat .40
............................
Instrument Panel .55
........
Instrument Panel Brightness . 67
..............
Instruments and Controls . 53
.................................
Interior Lights .95
........................................
Introduction .i
.................
Jacking up the Vehicle . 222
.......................................
Jack, Tire .220
................................
Jump Starting .229
..................................................
Keys .70
.......................
Label, Certif ication .244
.................
Lane Change, Signaling . 66
..................
Lap/Shoulder Belts . 14,18 ...........
LATCH Anchorage System . 41
Lights ....................
Bulb Replacement .203
.......................................
Indicator .55
.........................................
Parking .66
..................................
Turn Signal .66
....................................
Load Limits .151
......
LOCK (Ignition Key Position) . 72
Locks .......
Anti-thef t Steering Column . 72
..........................
Childproof Door .73
............................
Fuel Fill Door .143
....................................
Glove Box .93
.................................
Power Door .73
........................................
Tailgate .74
........................
Low Coolant Level .146
.........................
Low Fuel Indicator .59
...
Low Oil Pressure Indicator . 56,233
................................
Lower Anchors .41
...
Lubricant Specif ications Chart . 246
...........
Luggage, Storing (Cargo) . 150
...........
Luggage Net (Cargo Net) . 153
Index
L K JINDEX
V