battery HONDA CR-V 2020 (in English) Repair Manual
[x] Cancel search | Manufacturer: HONDA, Model Year: 2020, Model line: CR-V, Model: HONDA CR-V 2020Pages: 671, PDF Size: 33.11 MB
Page 611 of 671
609
Maintenance
Accessories and Modifications
Accessories
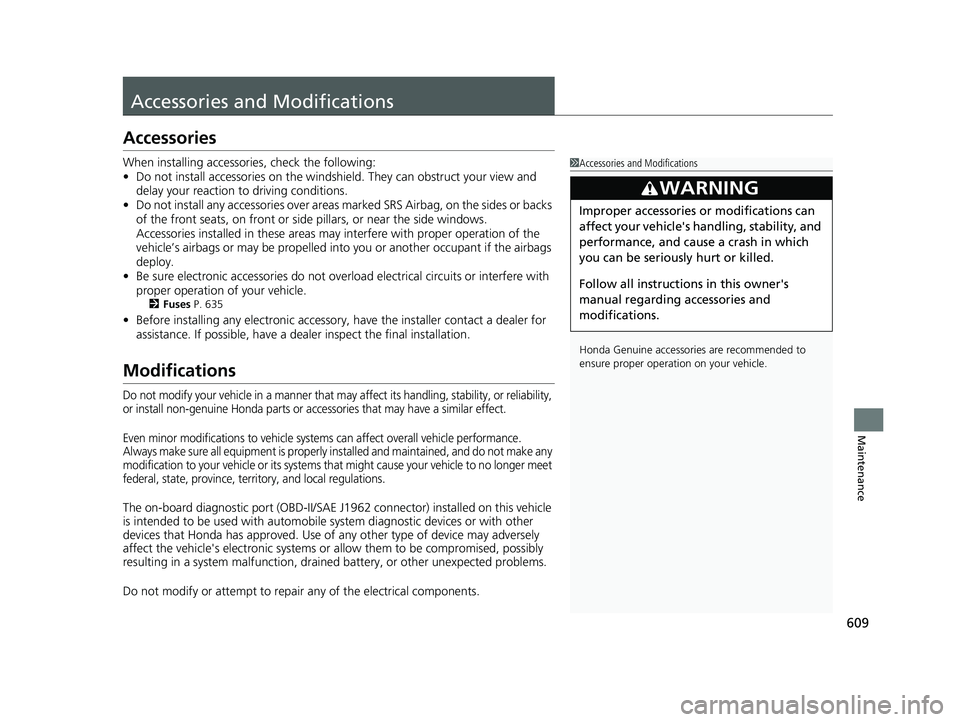
When installing accessories, check the following:
• Do not install accessories on the windsh ield. They can obstruct your view and
delay your reaction to driving conditions.
• Do not install any accessories over areas marked SRS Airbag, on the sides or backs
of the front seats, on front or side pillars, or near the side windows.
Accessories installed in these areas may interfere with proper operation of the
vehicle’s airbags or may be propelled into you or another occupant if the airbags
deploy.
• Be sure electronic accessories do not overload electrical circuits or interfere with
proper operation of your vehicle.
2 Fuses P. 635
•Before installing any electro nic accessory, have the installer contact a dealer for
assistance. If possible, have a deal er inspect the final installation.
Modifications
Do not modify your vehicle in a manner that may affect its handling, stability, or reliability,
or install non-genuine Honda parts or accessories that may have a similar effect.
Even minor modifications to vehicle systems can affect overall vehicle performance.
Always make sure all equipment is properly installed and maintained, and do not make any
modification to your vehicle or its systems that might cause your vehicle to no longer meet
federal, state, province, territory, and local regulations.
The on-board diagnostic port (OBD-II/SAE J1 962 connector) installed on this vehicle
is intended to be used with automobile system diagnostic devices or with other
devices that Honda has approved. Use of any other type of device may adversely
affect the vehicle's electronic systems or allow them to be compromised, possibly
resulting in a system malfunction, drained battery, or other unexpected problems.
Do not modify or attempt to repair any of the electrical components.
1Accessories and Modifications
Honda Genuine accessor ies are recommended to
ensure proper operati on on your vehicle.
3WARNING
Improper accessories or modifications can
affect your vehicle's handling, stability, and
performance, and cause a crash in which
you can be seriously hurt or killed.
Follow all instruction s in this owner's
manual regarding accessories and
modifications.
20 CR-V PET ELP_MAP_HMIN_HCM_J-31TLA6310.book 609 ページ 2019年10月3日 木曜日 午後4時55分
Page 613 of 671
611
Handling the Unexpected
This chapter explains how to handle unexpected troubles.
ToolsTypes of Tools .................................. 612
If a Tire Goes Flat Changing a Flat Tire ......................... 613
Engine Does Not Start Checking the Engine ........................ 620
If the Smart Entry Remote Battery is Weak .......................................... 621
Emergency Engine Stop ................... 622
Jump Starting .................................... 623
Shift Lever Does Not Move .............. 626
Overheating How to Handle Overheating ............. 627 Indicator, Coming On/Blinking
If the Low Oil Pressu
re Indicator Comes
On................................................ 629
If the Charging System Indicator Comes
On ................................................. 629
If the Malfunction Indicator Lamp Comes On or Blinks ................................... 630
If the Brake System Indicator (Red) Comes On or Blinks ....................................... 631
If the Brake System Indicator (Red) Comes On or
Blinks at the Same Time When the Brake
System Indicator (Amber) Comes On ..... 632
If the Electric Power Steering (EPS) System Indicator Comes On ........................... 633
If the Low Tire Pressure/TPMS Indicator Comes On or Blinks ....................... 634
Fuses Fuse Locations ................................. 635
Inspecting and Changing Fuses ........ 639
Emergency Towing ........................... 640
When You Cannot Open the Tailgate.. 641Refueling................................................. 642
20 CR-V PET ELP_MAP_HMIN_HCM_J-31TLA6310.book 611 ページ 2019年10月3日 木曜日 午後4時55分
Page 622 of 671
620
Handling the Unexpected
Engine Does Not Start
Checking the Engine
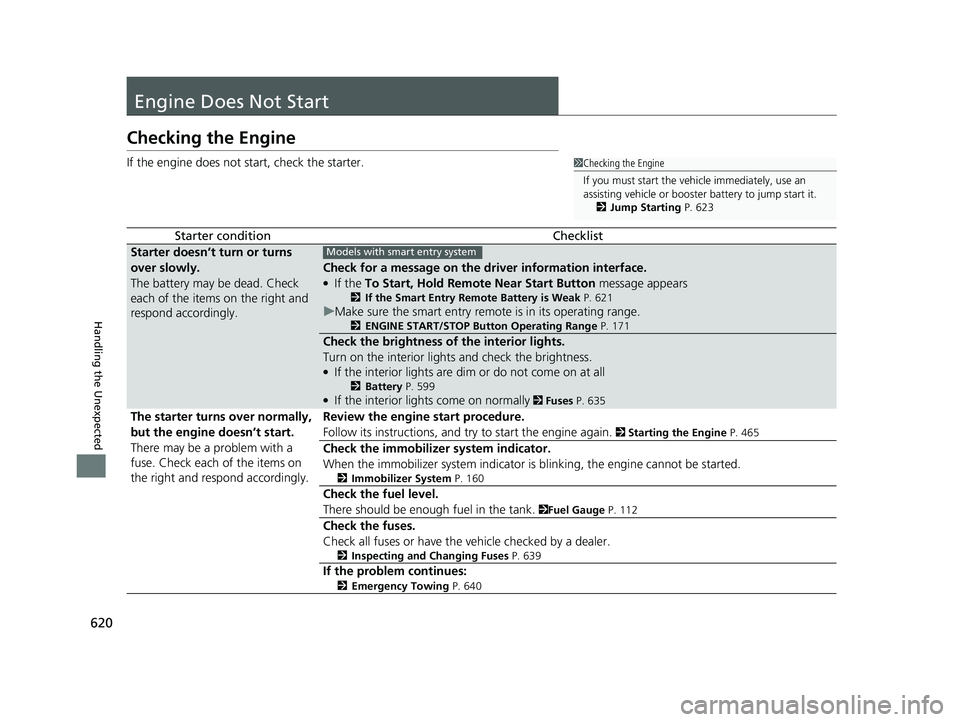
If the engine does not start, check the starter.
Starter conditionChecklist
Starter doesn’t turn or turns
over slowly.
The battery may be dead. Check
each of the items on the right and
respond accordingly.
Check for a message on the dr iver information interface.
●If the To Start, Hold Remote Near Start Button message appears
2If the Smart Entry Remote Battery is Weak P. 621
uMake sure the smart entry remote is in its operating range.
2 ENGINE START/STOP Button Operating Range P. 171
Check the brightness of the interior lights.
Turn on the interior lights and check the brightness.
●If the interior lights are dim or do not come on at all
2Battery P. 599●If the interior lights come on normally 2 Fuses P. 635
The starter turns over normally,
but the engine doesn’t start.
There may be a problem with a
fuse. Check each of the items on
the right and respond accordingly. Review the engine start procedure.
Follow its instructions, and try to start the engine again.
2
Starting the Engine P. 465
Check the immobilizer system indicator.
When the immobilizer system indicator is blinking, the engine cannot be started.
2Immobilizer System P. 160
Check the fuel level.
There should be enough fuel in the tank.
2Fuel Gauge P. 112
Check the fuses.
Check all fuses or have the vehicle checked by a dealer.
2Inspecting and Changing Fuses P. 639
If the problem continues:
2Emergency Towing P. 640
1Checking the Engine
If you must start the vehi cle immediately, use an
assisting vehicle or booster battery to jump start it.
2 Jump Starting P. 623
Models with smart entry system
20 CR-V PET ELP_MAP_HMIN_HCM_J-31TLA6310.book 620 ページ 2019年10月3日 木曜日 午後4時55分
Page 623 of 671
621
uuEngine Does Not Start uIf the Smart Entry Remote Battery is Weak
Handling the Unexpected
If the Smart Entry Remote Battery is Weak
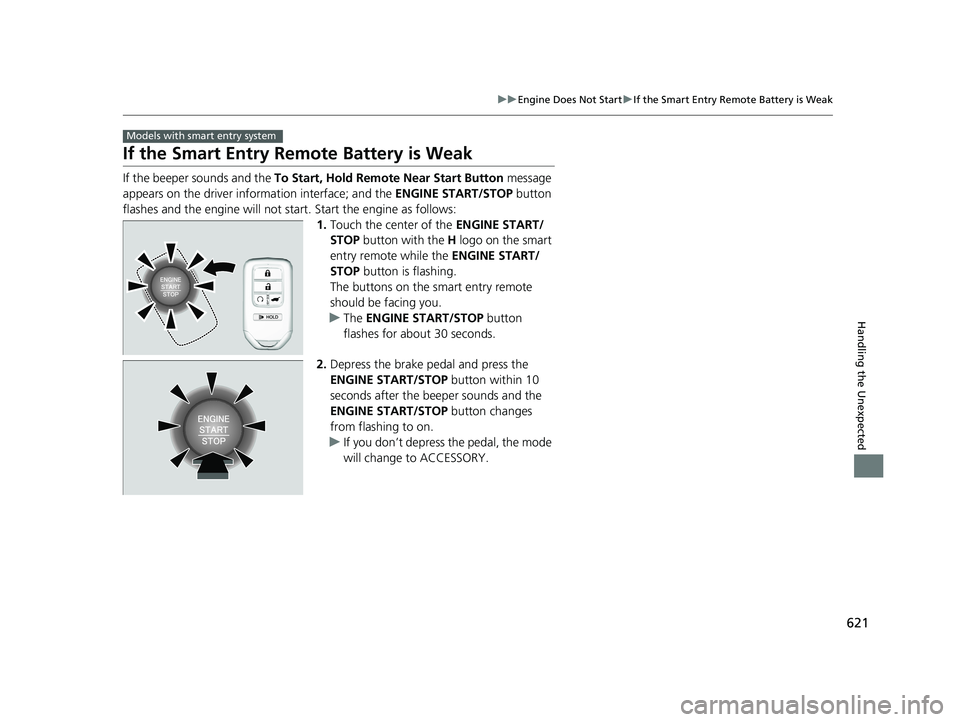
If the beeper sounds and the To Start, Hold Remote Near Start Button message
appears on the driver informa tion interface; and the ENGINE START/STOP button
flashes and the engine will not st art. Start the engine as follows:
1.Touch the center of the ENGINE START/
STOP button with the H logo on the smart
entry remote while the ENGINE START/
STOP button is flashing.
The buttons on the smart entry remote
should be facing you.
u The ENGINE START/STOP button
flashes for about 30 seconds.
2. Depress the brake pedal and press the
ENGINE START/STOP button within 10
seconds after the beeper sounds and the
ENGINE START/STOP button changes
from flashing to on.
u If you don’t depress the pedal, the mode
will change to ACCESSORY.
Models with smart entry system
20 CR-V PET ELP_MAP_HMIN_HCM_J-31TLA6310.book 621 ページ 2019年10月3日 木曜日 午後4時55分
Page 625 of 671
623Continued
Handling the Unexpected
Jump Starting
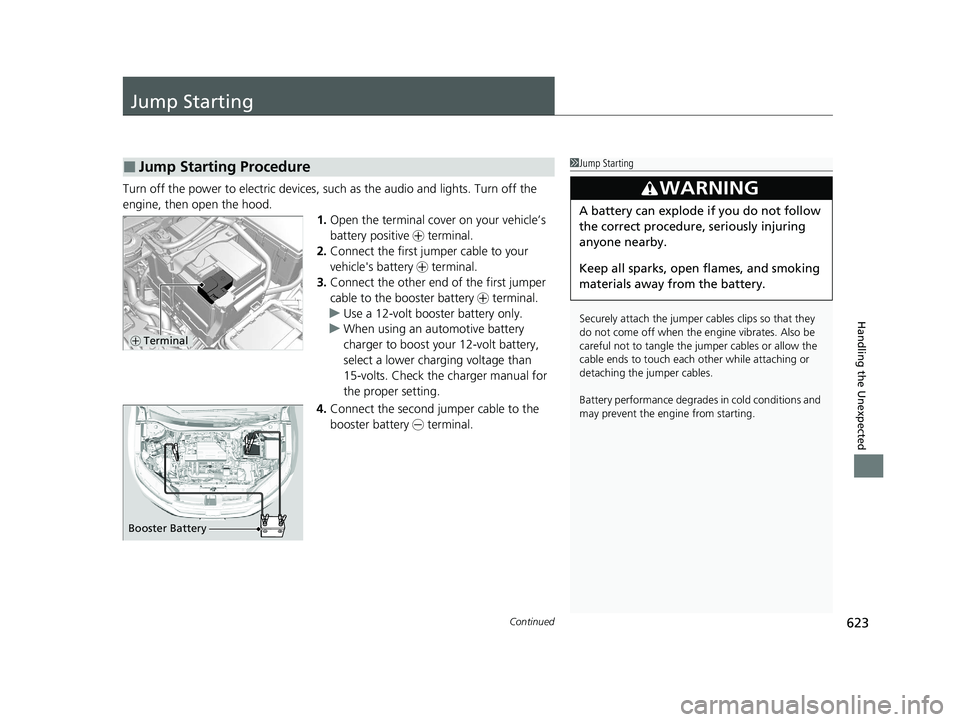
Turn off the power to electric devices, such as the audio and lights. Turn off the
engine, then open the hood. 1.Open the terminal cover on your vehicle’s
battery positive + terminal.
2. Connect the first jumper cable to your
vehicle's battery + terminal.
3. Connect the other end of the first jumper
cable to the booster battery + terminal.
u Use a 12-volt booster battery only.
u When using an automotive battery
charger to boost your 12-volt battery,
select a lower charging voltage than
15-volts. Check the charger manual for
the proper setting.
4. Connect the second jumper cable to the
booster battery - terminal.
■Jump Starting Procedure1Jump Starting
Securely attach the jumper cables clips so that they
do not come off when the e ngine vibrates. Also be
careful not to tangle the ju mper cables or allow the
cable ends to touch each other while attaching or
detaching the jumper cables.
Battery performance degrades in cold conditions and
may prevent the engi ne from starting.
3WARNING
A battery can explode if you do not follow
the correct procedure, seriously injuring
anyone nearby.
Keep all sparks, open flames, and smoking
materials away from the battery.
+ Terminal
Booster Battery
20 CR-V PET ELP_MAP_HMIN_HCM_J-31TLA6310.book 623 ページ 2019年10月3日 木曜日 午後4時55分
Page 627 of 671
625
uuJump Starting u
Handling the Unexpected
Once your vehicle's engine has started, re move the jumper cables in the following
order:
1. Disconnect the jumper cable from your vehicle's ground.
2. Disconnect the other end of the jumper cable from the booster battery -
terminal.
3. Disconnect the jumper cable from your vehicle's battery + terminal.
4. Disconnect the other end of the jumper cable from the booster battery +
terminal.
Have your vehicle inspected by a n earby service station or a dealer.
*1: Models with the smart entry system have an ENGINE START/STOP button instead of an
ignition switch.
■What to Do After the Engine Starts1 What to Do After the Engine Starts
The indicators for the Adaptive Cruise Control (ACC)
with Low Speed Follow, Road Departure Mitigation
(RDM), Vehicle Stability Assist
TM (VSA ®) system,
Vehicle Stability AssistTM (VSA ®) OFF, Collision
Mitigation Braking SystemTM (CMBSTM), low tire
pressure/TPMS, and Parking Brake and Brake System
(Amber) may come on along with a message in the
Driver Information Interface when you turn the
ignition switch to ON
( w*1 after reconnecting the
battery.
Drive a short distance at more than 12 mph (20 km/
h). The indicator should go of f. If it does not, have
your vehicle checked by a dealer.
20 CR-V PET ELP_MAP_HMIN_HCM_J-31TLA6310.book 625 ページ 2019年10月3日 木曜日 午後4時55分
Page 631 of 671
629
Handling the Unexpected
Indicator, Coming On/Blinking
If the Low Oil Pressure Indicator Comes On
■Reasons for the indicator to come on
Comes on when the engine oil pressure is low.
■What to do as soon as the indicator comes on
1. Immediately park the vehicle on level ground in a safe place.
2. If necessary, turn the hazard warning lights on.
■What to do after parking the vehicle
1. Stop the engine and let it sit for about three minutes.
2. Open the hood and check the oil level.
2 Oil Check P. 572
3.Start the engine and check th e low oil pressure indicator.
u The indicator goes off: Start driving again.
u The indicator does not go off within 10 seconds: Stop the engine
and contact a dealer for repairs immediately.
If the Charging System Indicator Comes On
■Reasons for the indicator to come on
Comes on when the battery is not being charged.
■What to do when th e indicator comes on
Turn off the climate control system, rear defogger, and other electrical
systems. Immediately cont act a dealer for repairs.
1If the Low Oil Pressure Indicator Comes On
NOTICE
Running the engine with low oil pressure can cause
serious mechanical damage almost immediately.
1If the Charging System Indicator Comes On
If you need to stop temporarily, do not turn off the
engine. Restarting the engi ne may rapidly discharge
the battery.
20 CR-V PET ELP_MAP_HMIN_HCM_J-31TLA6310.book 629 ページ 2019年10月3日 木曜日 午後4時55分
Page 637 of 671
635Continued
Handling the Unexpected
Fuses
Fuse Locations
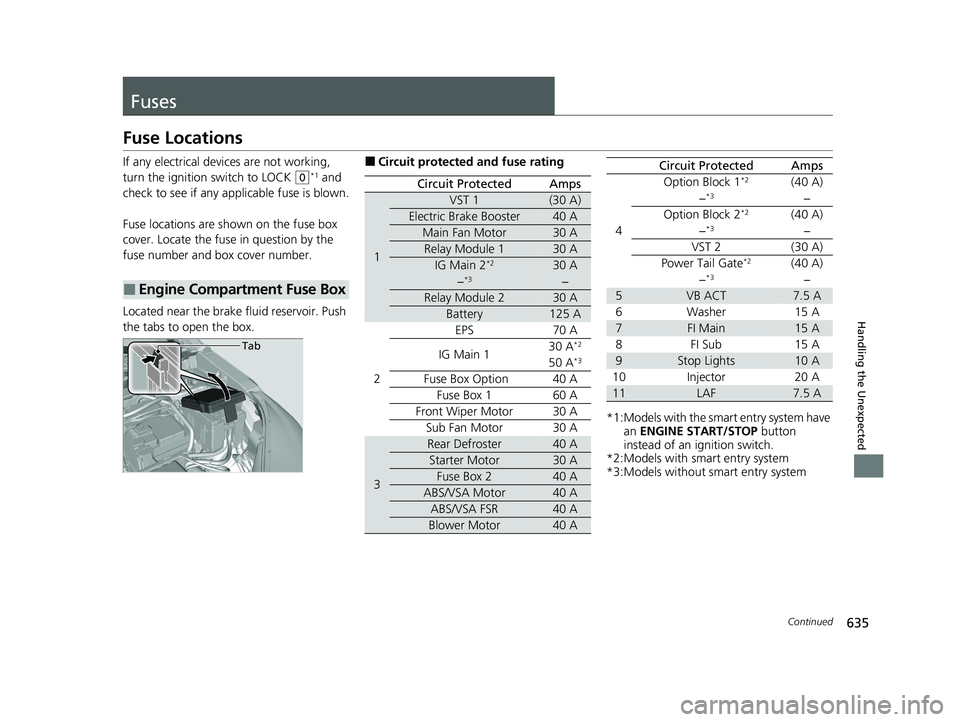
If any electrical devices are not working,
turn the ignition switch to LOCK
(0*1 and
check to see if any appl icable fuse is blown.
Fuse locations are shown on the fuse box
cover. Locate the fuse in question by the
fuse number and box cover number.
Located near the brake fluid reservoir. Push
the tabs to open the box.
■Engine Compartment Fuse Box
Tab
■Circuit protected and fuse rating
Circuit ProtectedAmps
1
VST 1(30 A)
Electric Brake Booster40 A
Main Fan Motor30 A
Relay Module 130 A
IG Main 2*230 A
−*3−
Relay Module 230 A
Battery125 A
2
EPS70 A
IG Main 130 A*2
50 A*3
Fuse Box Option40 A
Fuse Box 160 A
Front Wiper Motor30 A
Sub Fan Motor30 A
3
Rear Defroster40 A
Starter Motor30 A
Fuse Box 240 A
ABS/VSA Motor40 A
ABS/VSA FSR40 A
Blower Motor40 A
*1:Models with the smart entry system have an ENGINE START/STOP button
instead of an ignition switch.
*2:Models with smart entry system
*3:Models without smart entry system
4
Option Block 1*2(40 A)
−*3−
Option Block 2*2(40 A)
−*3−
VST 2(30 A)
Power Tail Gate*2(40 A)
−*3−
5VB ACT7.5 A
6Washer15 A
7FI Main15 A
8FI Sub15 A
9Stop Lights10 A
10Injector20 A
11LAF7.5 A
Circuit ProtectedAmps
20 CR-V PET ELP_MAP_HMIN_HCM_J-31TLA6310.book 635 ページ 2019年10月3日 木曜日 午後4時55分
Page 651 of 671
649Continued
Information
Emissions Testing
Testing of Readiness Codes
Your vehicle has readiness code as part of the onboard self diagnostic system.
Some States use these codes for testing to verify whether your vehicle's emissions
components are working properly.
The codes may not be read properly if testing is performed just after the battery has
gone dead or been disconnected.
To check if they are set, tu rn the ignition switch to ON
(w*1, without starting the
engine. The malfunction indicator lamp will co me on for several seconds. If it then
goes off, the readiness codes are set. If it blinks five times, the readiness codes are
not set.
If you are required to have your vehicle te sted before the readiness codes are ready,
prepare the vehicle for retest ing by doing the following:
1. Fill the gas tank to approximately 3/4 full.
2. Park the vehicle and leave the engine off for 6 hours or more.
3. Make sure the ambient temperature is between 40°F and 95°F (4°C and 35°C).
4. Start the engine without touching the ac celerator pedal, and let it idle for 20
seconds.
5. Keep the vehicle in
(P. Increase the engine speed to 2,000 rpm, and hold it there
for about 3 minutes.
6. Let the engine idle with your foot off the accelerator for 20 seconds.
*1: Models with the smart entry system have an ENGINE START/STOP button instead of an
ignition switch.
1 Testing of Readiness Codes
The readiness codes are erased when the battery is
disconnected, and set again onl y after several days of
driving under a variety of conditions.
If a testing facility determines that the readiness
codes are not set, you may be requested to return at
a later date to complete the test.
If the testing facility determines the readiness codes
are still not set, see a dealer.
20 CR-V PET ELP_MAP_HMIN_HCM_J-31TLA6310.book 649 ページ 2019年10月3日 木曜日 午後4時55分
Page 654 of 671
652
uuWarranty Coverages u
Information
Replacement Battery Limited Warranty – provides prorated coverage for a
replacement battery purchased from your dealer.
Replacement Muffler Life time Limited Warranty – provides coverage for as
long as the purchaser of the muffler owns the vehicle.
Restrictions and exclusions apply to a ll these warranties. Please read the Honda
warranty information booklet that came wi th your vehicle for precise information on
warranty coverages. Your vehi cle’s original tires are covered by their manufacturer.
Tire warranty information is in a separate booklet.
■Canadian Owners
Please refer to the warranty manual that came with your vehicle.
■EPA Contact Information
An owner may obtain further information concerning emission warranties or report
violations of the terms of the em ission warranties by contacting:
Director,
Light-Duty Vehicle Center,
U.S. Environmental Protection Agency,
Attention: Warranty Claim
2000 Traverwood Drive,
Ann Arbor, MI 48105;
[email protected]
20 CR-V PET ELP_MAP_HMIN_HCM_J-31TLA6310.book 652 ページ 2019年10月3日 木曜日 午後4時55分