ECU HONDA ELEMENT 2003 1.G Owner's Guide
[x] Cancel search | Manufacturer: HONDA, Model Year: 2003, Model line: ELEMENT, Model: HONDA ELEMENT 2003 1.GPages: 338, PDF Size: 4.08 MB
Page 205 of 338

Utility vehicles have a signif icantly
higher rollover rate than other types
of vehicles. To avoid loss of control
or rollover, be sure to f ollow all
recommendations and precautions
on page and in this section.
Seat belts are just as important of f -
road as on paved roads. Wherever
you drive, make sure you and your
passengers always wear seat belts. If
children or inf ants are along f or the
ride, see that they are properly
secured. In a rollover crash, an
unbelted person is more likely to die
than a person wearing a seat belt.On many unpaved roads, you won’t
f ind lane markers, traf f ic signals, or
signs to warn you of possible trouble
ahead. It’s up to you to continually
assess the situation and drive within
limits.The route presents limits (some
roads are too steep and bumpy f or
example). You have limits (in driving
skills and comf ort). And your vehicle
also has limits (traction, stability, and
power, f or instance).
Driving of f -highway can be
hazardous if you f ail to recognize
limits and take proper precautions.
For example, you can have an
accident or rollover during
maneuvers such as turning, driving
on hills, or over large obstacles.
Remember that your Element has
higher ground clearance and a
higher center of gravity than
passenger vehicles designed f or use
only on pavement. This means your
vehicle can more easily tip or roll
over if you make abrupt turns or
drive on slopes.
Be sure to store cargo properly, and
do not exceed your Element’s cargo
or trailer load limits (see pagesand ).
172
168 191
Important Saf ety Precautions
Off-Highway Guidelines
Driving201
Improperly operating this
vehicle on or off-pavement can
cause an accident or rollover in
which you and your passengers
could be seriously injured or
killed.
Follow all instructions and
guidelines in the owner’s
manual.
Keep your speed low and
don’t drive faster than
conditions permit.
Page 225 of 338
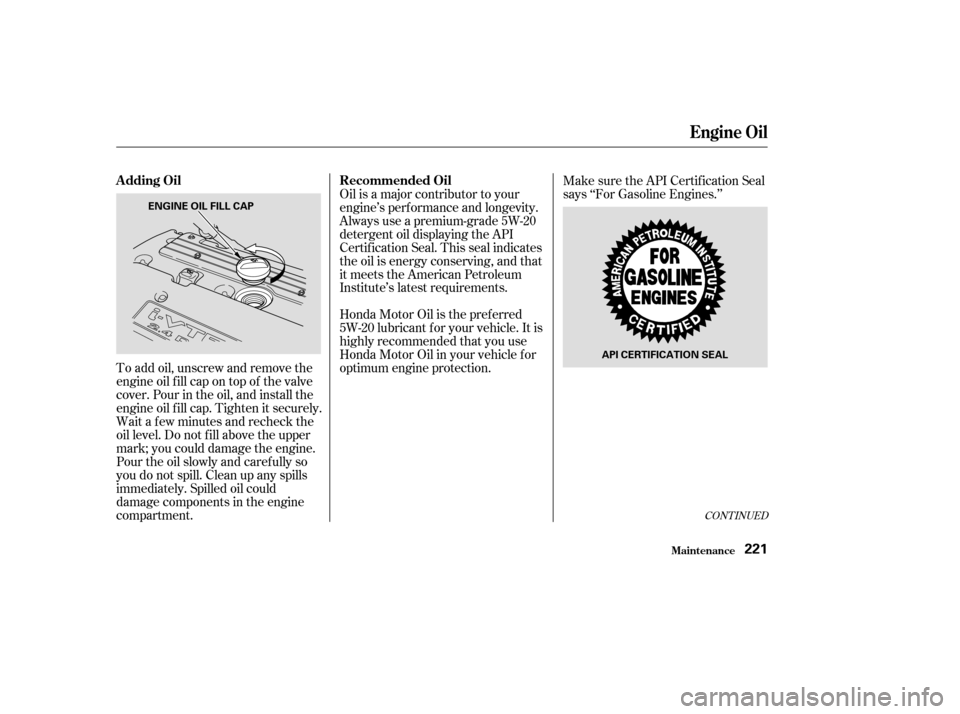
To add oil, unscrew and remove the
engine oil f ill cap on top of the valve
cover. Pour in the oil, and install the
engine oil f ill cap. Tighten it securely.
Wait a f ew minutes and recheck the
oil level. Do not f ill above the upper
mark; you could damage the engine.Make sure the API Certif ication Seal
says ‘‘For Gasoline Engines.’’
Oil is a major contributor to your
engine’s perf ormance and longevity.
Always use a premium-grade 5W-20
detergent oil displaying the API
Certif ication Seal. This seal indicates
the oil is energy conserving, and that
it meets the American Petroleum
Institute’s latest requirements.
Honda Motor Oil is the pref erred
5W-20 lubricant f or your vehicle. It is
highly recommended that you use
Honda Motor Oil in your vehicle f or
optimum engine protection.
Pour the oil slowly and caref ully so
you do not spill. Clean up any spills
immediately. Spilled oil could
damage components in the engine
compartment.
CONT INUED
Recommended Oil
A dding Oil
Engine Oil
Maint enance221
ENGINE OIL FILL CAP
API CERTIFICATION SEAL
Page 232 of 338
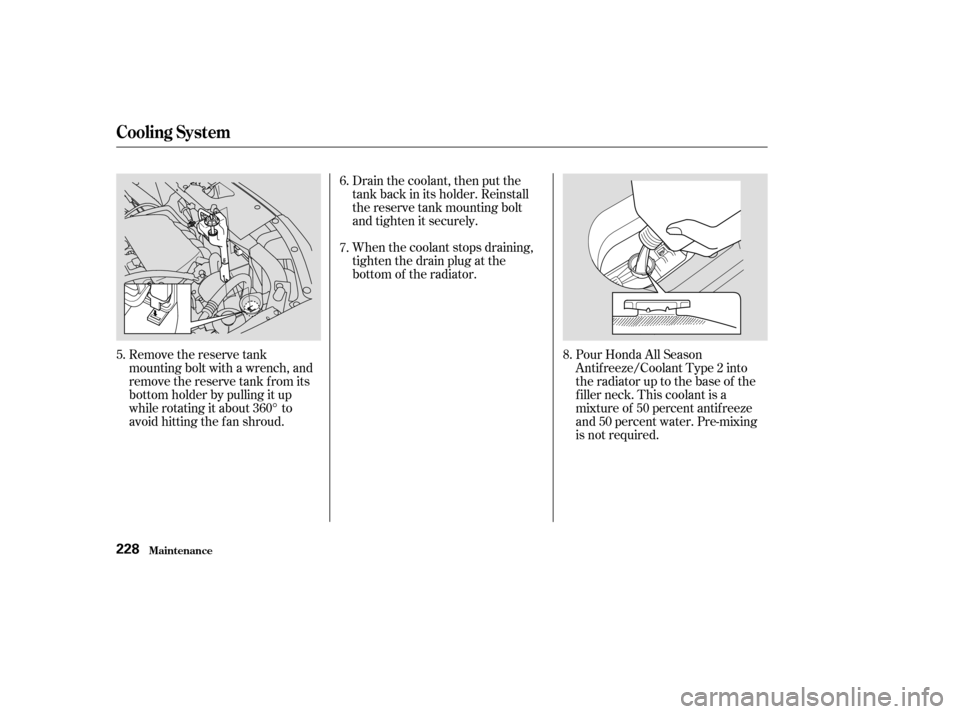
Remove the reserve tank
mounting bolt with a wrench, and
remove the reserve tank f rom its
bottom holder by pulling it up
while rotating it about 360° to
avoid hitting the fan shroud.Drain the coolant, then put the
tank back in its holder. Reinstall
the reserve tank mounting bolt
and tighten it securely.
When the coolant stops draining,
tightenthedrainplugatthe
bottom of the radiator.
Pour Honda All Season
Antif reeze/Coolant Type 2 into
the radiator up to the base of the
f iller neck. This coolant is a
mixture of 50 percent antif reeze
and 50 percent water. Pre-mixing
is not required.
5. 6.
7.
8.
Cooling Syst em
Maint enance228
Page 236 of 338
Insert the dipstick all the way back
into the transmission securely as
shown in the illustration.
The transmission should be drained
and ref illed with new f luid according
to the time and distance recommen-
dations in the maintenance schedule.
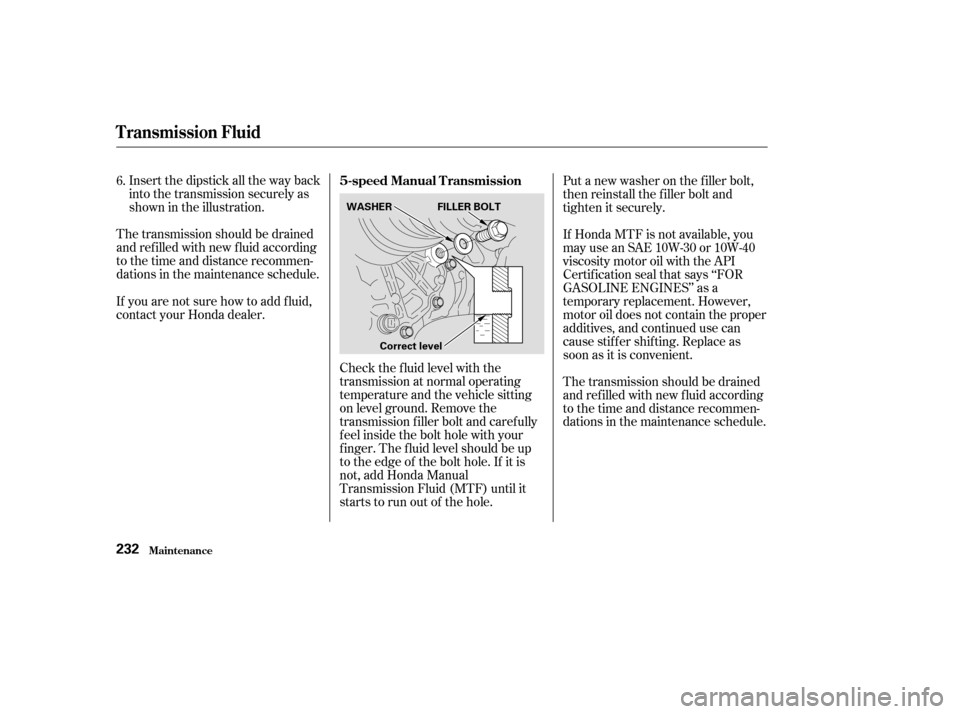
Check the f luid level with the
transmission at normal operating
temperature and the vehicle sitting
on level ground. Remove the
transmission f iller bolt and caref ully
f eel inside the bolt hole with your
f inger. The f luid level should be up
to the edge of the bolt hole. If it is
not, add Honda Manual
Transmission Fluid (MTF) until it
starts to run out of the hole.Put a new washer on the f iller bolt,
then reinstall the f iller bolt and
tighten it securely.
If you are not sure how to add f luid,
contact your Honda dealer. If Honda MTF is not available, you
may use an SAE 10W-30 or 10W-40
viscosity motor oil with the API
Certif ication seal that says ‘‘FOR
GASOLINE ENGINES’’ as a
temporary replacement. However,
motor oil does not contain the proper
additives, and continued use can
cause stif f er shif ting. Replace as
soon as it is convenient.
The transmission should be drained
and ref illed with new f luid according
to the time and distance recommen-
dations in the maintenance schedule.
6.
5-speed Manual Transmission
T ransmission Fluid
Maint enance232
WASHER FILLER BOLT
Correct level
Page 237 of 338
The rear dif f erential should be
drained and ref illed with new f luid
accordingtothetimeanddistance
recommendations in the mainte-
nance schedule.
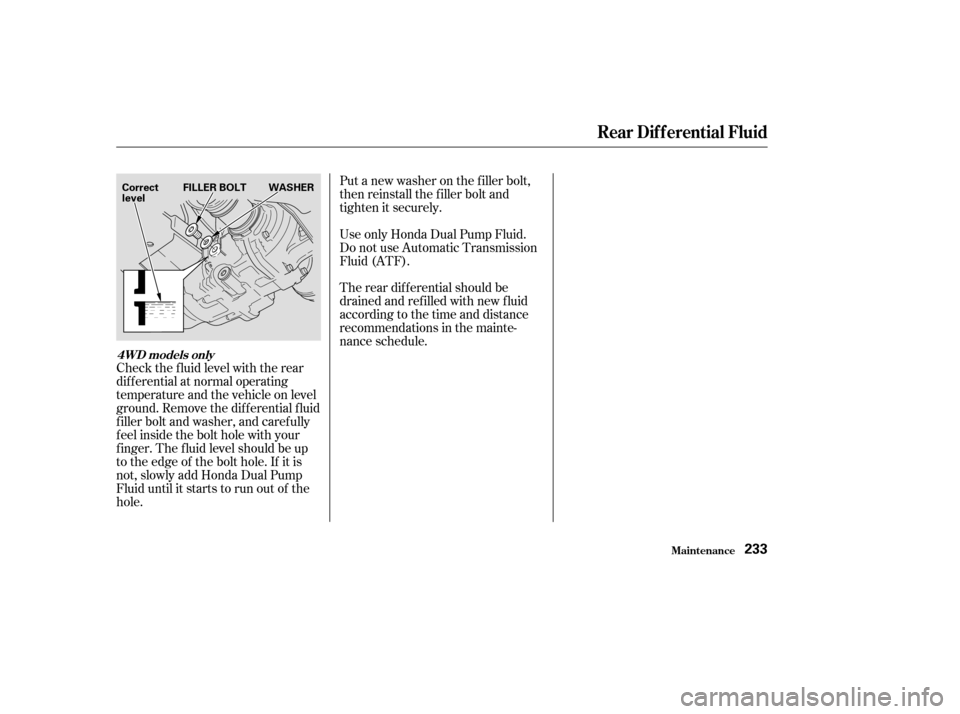
Check the f luid level with the rear
dif f erential at normal operating
temperature and the vehicle on level
ground. Remove the dif f erential f luid
f iller bolt and washer, and caref ully
f eel inside the bolt hole with your
f inger. The f luid level should be up
to the edge of the bolt hole. If it is
not, slowly add Honda Dual Pump
Fluid until it starts to run out of the
hole. Put a new washer on the f iller bolt,
then reinstall the f iller bolt and
tighten it securely.
Use only Honda Dual Pump Fluid.
Do not use Automatic Transmission
Fluid (ATF).
4WD models only
Rear Dif f erential Fluid
Maint enance233
Correct
level
FILLER BOLT WASHER
Page 263 of 338
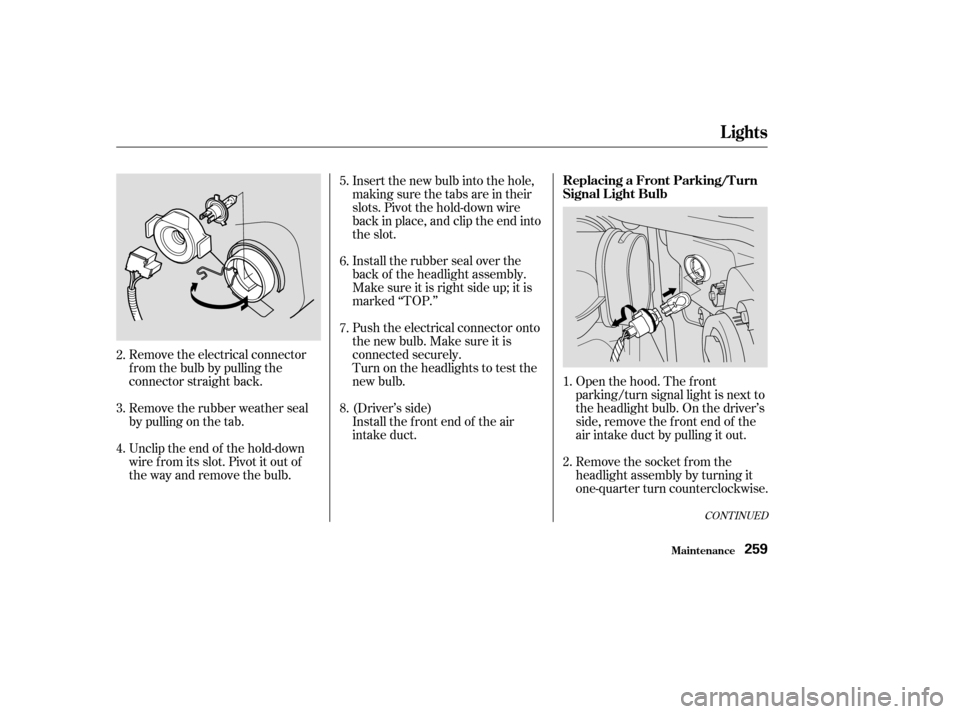
Remove the electrical connector
f rom the bulb by pulling the
connector straight back.
Remove the rubber weather seal
by pulling on the tab.
Unclip the end of the hold-down
wire f rom its slot. Pivot it out of
the way and remove the bulb.Insert the new bulb into the hole,
making sure the tabs are in their
slots. Pivot the hold-down wire
back in place, and clip the end into
the slot.
Install the rubber seal over the
back of the headlight assembly.
Make sure it is right side up; it is
marked ‘‘TOP.’’
Push the electrical connector onto
the new bulb. Make sure it is
connected securely.
Turn on the headlights to test the
new bulb.
(Driver’s side)
Install the f ront end of the air
intake duct.
Open the hood. The f ront
parking/turn signal light is next to
the headlight bulb. On the driver’s
side, remove the f ront end of the
air intake duct by pulling it out.
Remove the socket from the
headlight assembly by turning it
one-quarter turn counterclockwise.
1.
2.
3.
4. 5.
6.
7.
8.
2.
CONT INUED
Lights
Maint enance
Replacing a Front Parking/Turn
Signal Light Bulb
259
Page 276 of 338

Dirt build-up in the loops of the seat
belt anchors can cause the belts to
retract slowly. Wipe the insides of
the loops with a clean cloth
dampened in mild soap and warm
water or isopropyl alcohol.Clean the windows, inside and out,
with a commercially-available glass
cleaner. You can also use a mixture
of one part white vinegar to ten parts
water. This will remove the haze that
builds up on the inside of the
windows. Use a sof t cloth or paper
towels to clean all glass and clear
plastic surf aces.If you want to use an air f reshener/
deodorizer in the interior of your
vehicle, it is best to use a solid type.
Some liquid air f resheners contain
chemicals that may cause parts of
the interior trim and f abric to crack
or discolor.
If youusealiquidairfreshener,
make sure you f asten it securely so it
does not spill as you drive.
Windows
A ir Fresheners
Interior Care
Appearance Care272
The rear window def ogger wires are
bonded to the inside of the glass.
Wiping vigorously up-and-down can
dislodge and break the def ogger wires.
When cleaning the rear window, use
gentle pressure and wipe side-to-side.
Page 285 of 338
CONT INUED
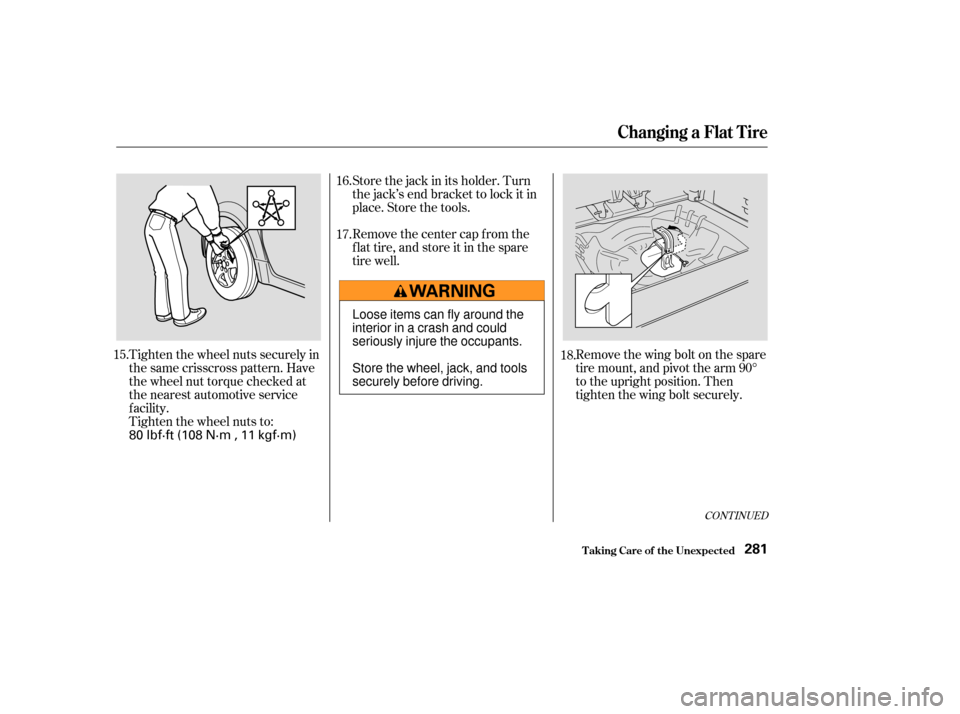
Tighten the wheel nuts securely in
the same crisscross pattern. Have
the wheel nut torque checked at
the nearest automotive service
f acility.
Tighten the wheel nuts to:Store the jack in its holder. Turn
the jack’s end bracket to lock it in
place. Store the tools.
Remove the center cap from the
f lat tire, and store it in the spare
tire well.
Removethewingboltonthespare
tire mount, and pivot the arm 90°
to the upright position. Then
tighten the wing bolt securely.
15. 16.
17.
18.
Changing a Flat T ire
T aking Care of t he Unexpect ed281
80 lbf·ft (108 N·m , 11 kgf·m)Loose items can fly around the
interior in a crash and could
seriously injure the occupants.
Store the wheel, jack, and tools
securely before driving.
Page 286 of 338
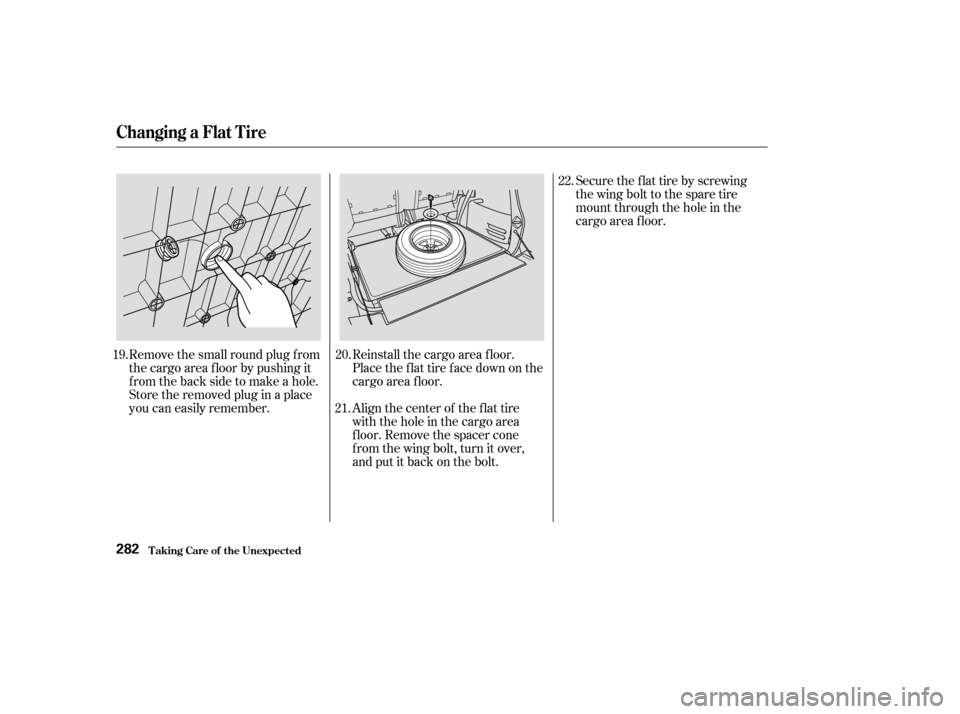
Remove the small round plug f rom
the cargo area f loor by pushing it
fromthebacksidetomakeahole.
Storetheremovedpluginaplace
you can easily remember.Reinstall the cargo area f loor.
Place the flat tire face down on the
cargo area f loor.
Align the center of the f lat tire
with the hole in the cargo area
f loor. Remove the spacer cone
from the wing bolt, turn it over,
and put it back on the bolt.Secure the f lat tire by screwing
thewingbolttothesparetire
mount through the hole in the
cargo area f loor.
20.
19.
21. 22.
T aking Care of t he Unexpect ed
Changing a Flat T ire
282