Eps HONDA FIT 2009 2.G Navigation Manual
[x] Cancel search | Manufacturer: HONDA, Model Year: 2009, Model line: FIT, Model: HONDA FIT 2009 2.GPages: 149, PDF Size: 4.18 MB
Page 26 of 149

26Navigation System
Entering the Street Number
After you have completed the street
name, the display changes to the Enter
street number screen. Use the voice
control system and say the address
number as a continuous string of
numbers. For example, the address 1527
should be spoken as “One, five, two,
seven.” You can also use the on-screen
keyboard to enter the street number.
Some address numbers may not be
available on the selected street. For
example, let’s say the individual address
ranges for a selected street name are 1 -
20 and 9,000 - 10,000, with an overall
range shown on the display of 1 to
10,000. If you try to enter a number
outside the individual address ranges
such as 500, the syst em will show this
number as unavailable (grayed out).
When using the on-screen keyboard, the system only a llows you to choose
available address numbers.
When using voice control, the system beeps if you try to select an
unavailable (grayed out) address
number. If you did not select a city in the
beginning, the street name you selected
might appear in more
than one city. The
system will give you a list of cities that
the street appears in. Select the desired
city from the list. The system then
displays the Calculate route to screen
(see Driving to Your Destination on
page44).
Tip:
If the particular address you want
cannot be found, select Map Input and
use the joystick to se lect the appropriate
location on the map (see By Map Input
on page35).
Select View Dest. Map and use the
joystick to select an icon, approximate
area, or street you wish to choose as
your destination. Otherwise, a central
location of the street will be selected. If
you select a point of interest (POI) or
road in an unverified area, you may or
may not have routing in these areas. See
Map Overview on page6.
By Intersection
After you select Intersection from the
Enter destination by screen, the
display changes to:
Tip:
When entering an address, it is usually
easier to enter the st reet first. A city or
cities that the street appears in will be
displayed. For your convenience, you
do not have to enter both city and street.
Entering a Destination
2009 Fit
Page 64 of 149

64Navigation System
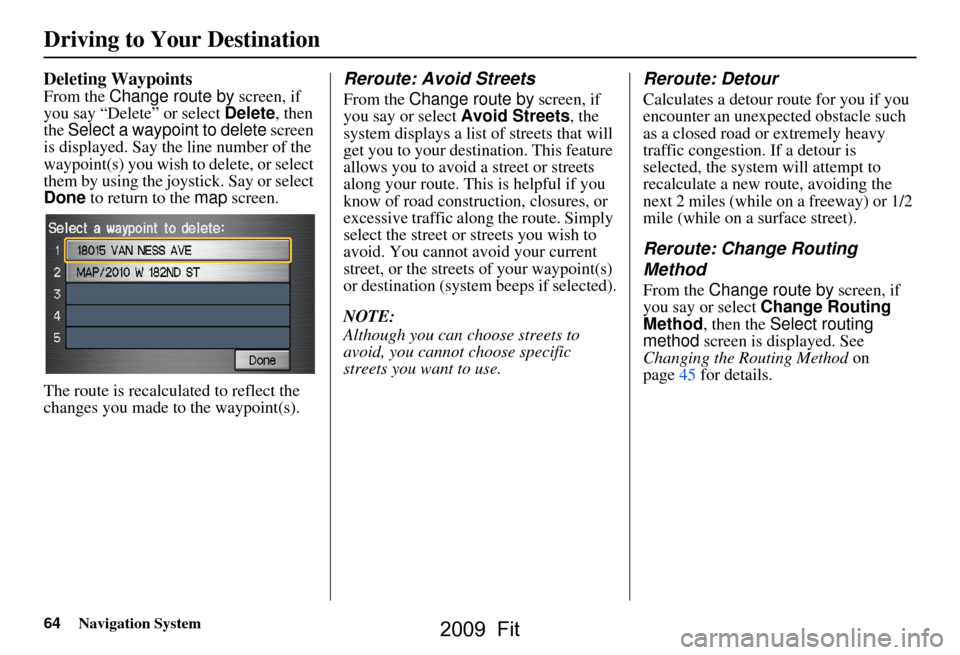
Deleting Waypoints
From the Change route by screen, if
you say “Delete” or select Delete, then
the Select a waypoint to delete screen
is displayed. Say the line number of the
waypoint(s) you wish to delete, or select
them by using the joystick. Say or select
Done to return to the map screen.
The route is recalculated to reflect the
changes you made to the waypoint(s).
Reroute: Avoid Streets
From the Change route by screen, if
you say or select Avoid Streets, the
system displays a list of streets that will
get you to your destination. This feature
allows you to avoid a street or streets
along your route. This is helpful if you
know of road construction, closures, or
excessive traffic along the route. Simply
select the street or streets you wish to
avoid. You cannot avoid your current
street, or the streets of your waypoint(s)
or destination (system beeps if selected).
NOTE:
Although you can choose streets to
avoid, you cannot choose specific
streets you want to use.
Reroute: Detour
Calculates a detour route for you if you
encounter an unexp ected obstacle such
as a closed road or extremely heavy
traffic congestion. If a detour is
selected, the system will attempt to
recalculate a new route, avoiding the
next 2 miles (while on a freeway) or 1/2
mile (while on a surface street).
Reroute: Change Routing
Method
From the Change route by screen, if
you say or select Change Routing
Method , then the Select routing
method screen is displayed. See
Changing the Routing Method on
page45 for details.
Driving to Your Destination
2009 Fit
Page 72 of 149

72Navigation System
System Setup
Setup Mode
The Setup function consists of two
different screens that allow you to
change and update information in the
system. To display the Setup screens,
use the voice control system and say
“Setup” or press the SETUP button. To
change to another Setup screen, say or
select More in the upper right corner of
the screen.
On any of the Setup screens, you can
use the voice control system to select
any item on the screen.
NOTE:
If some items appear to be grayed out and cannot be selected, it is because
you did not select OK on the initial
Disclaimer screen. See System Start-
up on page16.
For information on the available voice commands, see Voice
Command Index on page136.
Setup Screen (first)
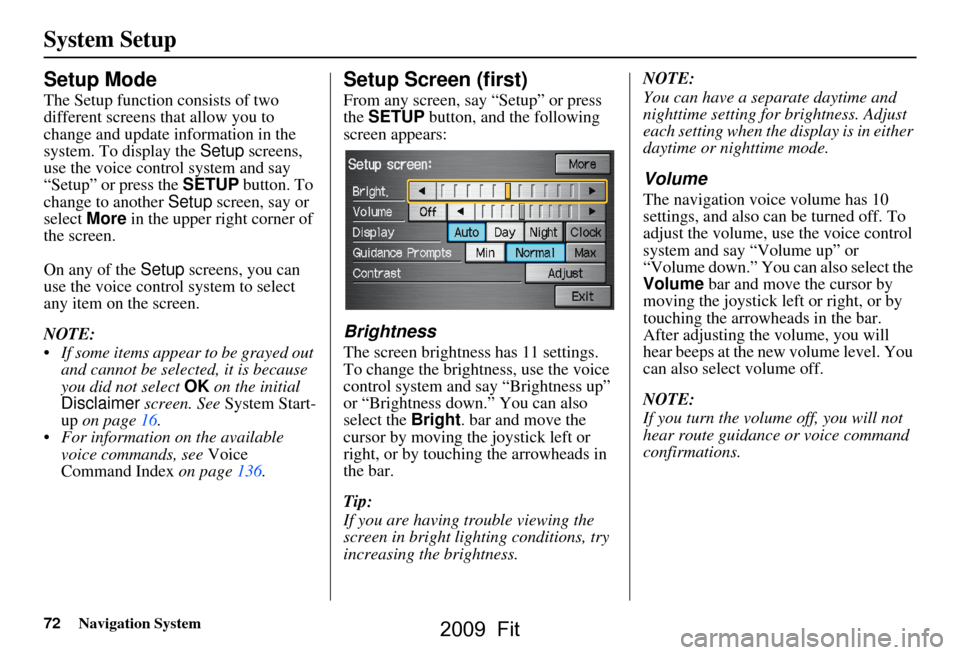
From any screen, say “Setup” or press
the SETUP button, and the following
screen appears:
Brightness
The screen brightness has 11 settings.
To change the brightness, use the voice
control system and say “Brightness up”
or “Brightness down.” You can also
select the Bright. bar and move the
cursor by moving the joystick left or
right, or by touching the arrowheads in
the bar.
Tip:
If you are having trouble viewing the
screen in bright li ghting conditions, try
increasing the brightness. NOTE:
You can have a separate daytime and
nighttime setting for brightness. Adjust
each setting when the display is in either
daytime or nighttime mode.
Volume
The navigation voice volume has 10
settings, and also can be turned off. To
adjust the volume, us
e the voice control
system and say “Volume up” or
“Volume down.” You can also select the
Volume bar and move the cursor by
moving the joystick left or right, or by
touching the arrowh eads in the bar.
After adjusting the volume, you will
hear beeps at the new volume level. You
can also select volume off.
NOTE:
If you turn the volume off, you will not
hear route guidance or voice command
confirmations.
2009 Fit
Page 90 of 149

90Navigation System
System Setup
Correct Vehicle Position
The system relies on satellites for
positioning information. Buildings,
tunnels, and other objects can block or
reflect these signals, requiring the
system to use “dead reckoning” to
determine your location and direction.
This can sometimes lead to small errors
in positioning, such as showing you on
an adjacent street.
NOTE:
Using this function to adjust vehicle
position is not recommended. When the
system acquires a GPS signal, it will
automatically place the vehicle in the
correct location.If you choose to do this, follow these
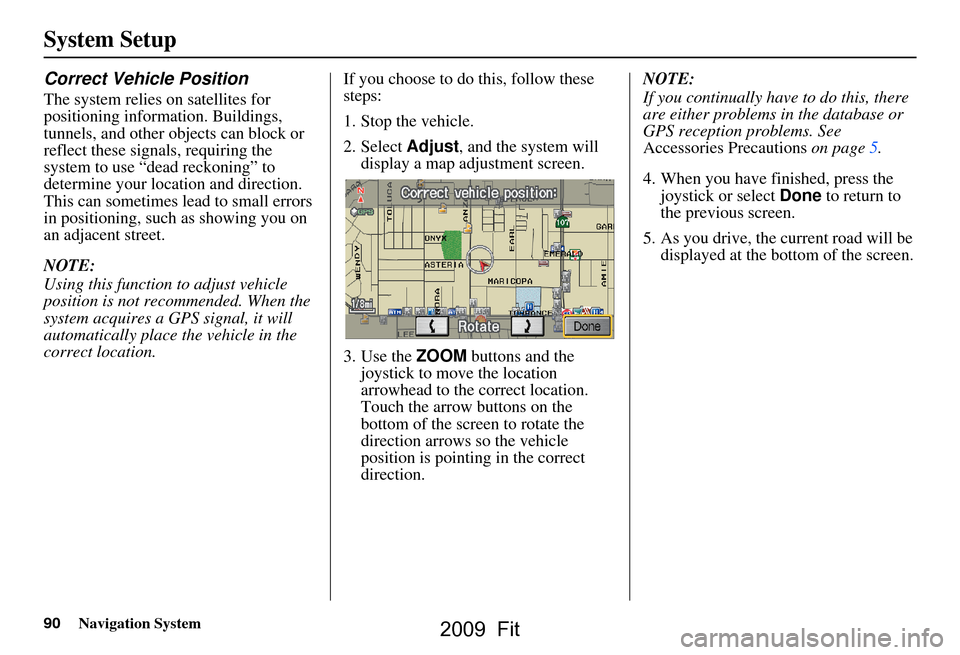
steps:
1. Stop the vehicle.
2. Select
Adjust, and the system will
display a map adjustment screen.
3. Use the ZOOM buttons and the
joystick to move the location
arrowhead to the correct location.
Touch the arrow buttons on the
bottom of the screen to rotate the
direction arrows so the vehicle
position is pointin g in the correct
direction. NOTE:
If you continually have to do this, there
are either problems in the database or
GPS reception problems. See
Accessories Precautions
on page5.
4. When you have finished, press the joystick or select Done to return to
the previous screen.
5. As you drive, the current road will be displayed at the bottom of the screen.
2009 Fit