lock HONDA FIT 2013 3.G Owners Manual
[x] Cancel search | Manufacturer: HONDA, Model Year: 2013, Model line: FIT, Model: HONDA FIT 2013 3.GPages: 286, PDF Size: 9.38 MB
Page 1 of 286
Contents
This owner’s manual should be considered a permanent part of the
vehicle and should remain with the vehicle when it is sold.
This owner’s manual covers all models of your vehicle. You may find
descriptions of equipment and features that are not on your
particular model.
Images throughout this owner’s manual (including the front cover)
represent features and equipment that are available on some, but
not all, models. Your particular model may not have some of these features.
This owner’s manual is for vehicles sold in the United States and Canada.
The information and specifications included in this publication were
in effect at the time of approval for printing. Honda Motor Co., Ltd.
reserves the right, however, to discontinue or change specifications
or design at any time without notice and without incurring any
obligation.2 Safe Driving P. 21
For Safe Driving P. 22 Seat Belts P. 26 Airbags P. 34
2Instrument Panel P. 63
Indicators P. 64 Gauges and Displays P. 72
2Controls P. 75
Setting the Clock P. 76 Locking and Unlocking the Doors P. 77
Opening and Closing the Windows P. 92
Adjusting the Seats P. 103
2Features P. 121
Audio System P. 122 Audio System Basic Operation P. 125
Bluetooth® HandsFreeLink ®*
P. 140
2 Driving P. 153
Before Driving P. 154 Towing a Trailer P. 159
Refueling P. 186 Fuel Economy P. 189
2Maintenance P. 191
Before Performing Maintenance P. 192 Maintenance Minder TM
P. 195
Checking and Maintaining Wiper Blades P. 218
Heating and Cooling *
System Maintenance P. 233
2 Handling the Unexpected P. 237
Tools P. 238 If a Tire Goes Flat P. 239
Overheating P. 254 Indicator, Coming On/Blinking P. 256
2Information P. 267
Specifications P. 268 Identification Numbers P. 270
Emissions Testing P. 273 Warranty Coverages P. 275
Main Menu2013 Fit Online Reference Owner's Manual
Page 5 of 286
Visual Index
4
Quick Reference Guide
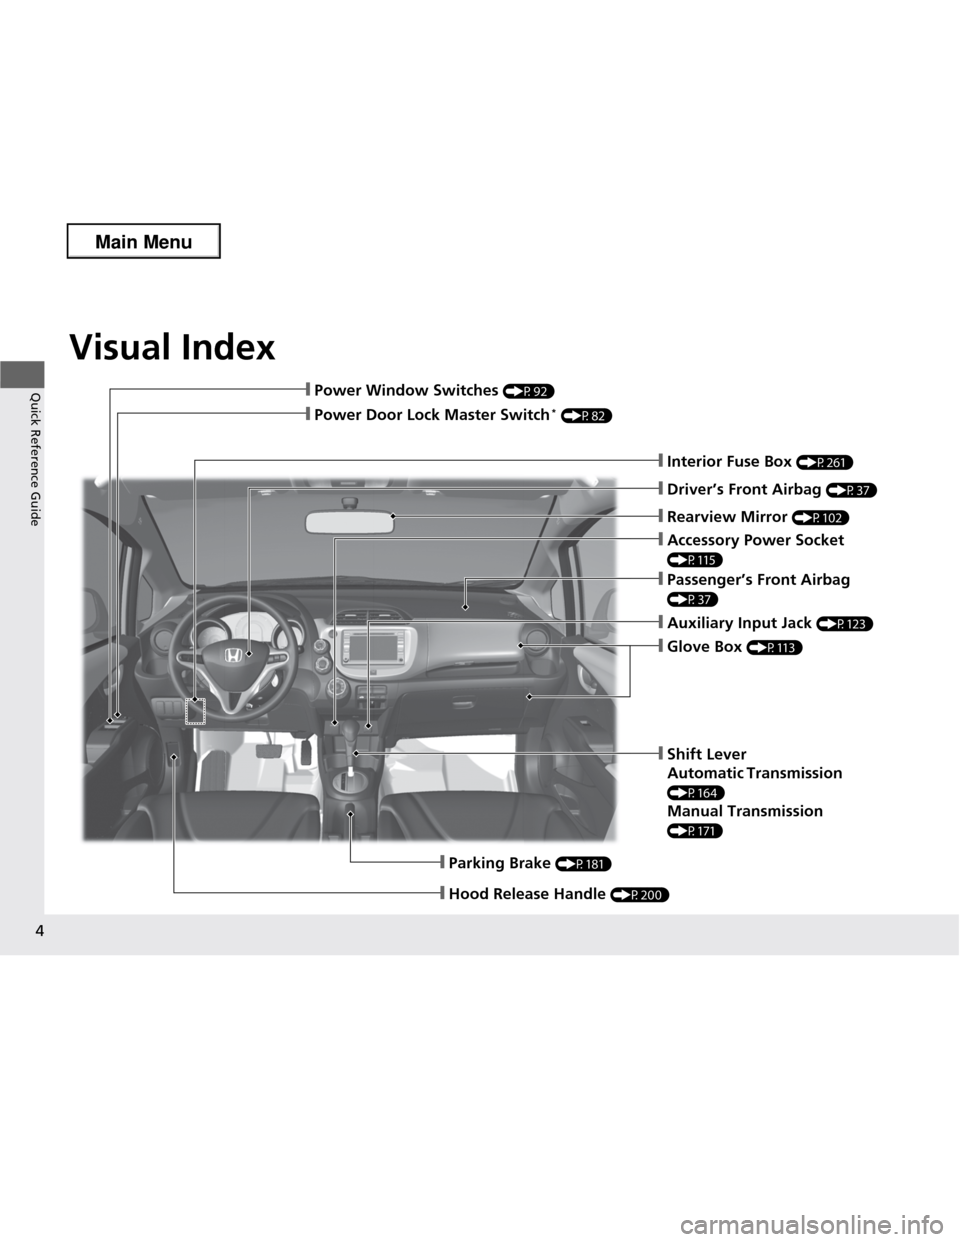
❙Parking Brake (P181)
❙Hood Release Handle (P200)
❙Power Window Switches (P92)
❙Passenger’s Front Airbag
(P37)
❙Glove Box (P113)
❙Rearview Mirror (P102)
❙Shift Lever
Automatic Transmission
(P164)
Manual Transmission
(P171)
❙Interior Fuse Box (P261)
❙Driver’s Front Airbag (P37)
❙Power Door Lock Master Switch *
(P82)
❙Accessory Power Socket
(P115)
❙Auxiliary Input Jack (P123)
Main Menu
Page 7 of 286
Visual Index
6
Quick Reference Guide
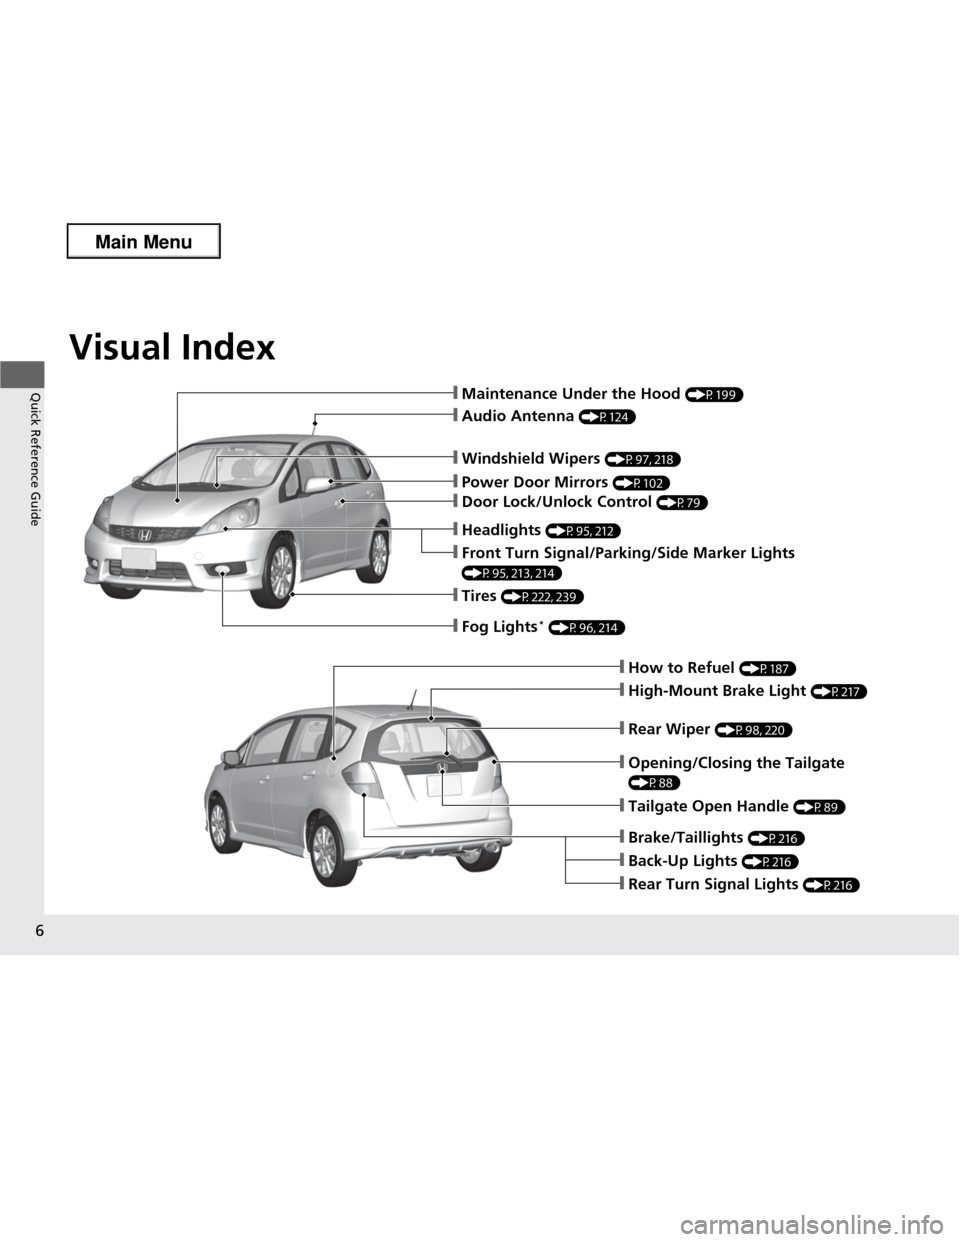
❙How to Refuel (P187)
❙High-Mount Brake Light (P217)
❙Tailgate Open Handle (P89)
❙Opening/Closing the Tailgate
(P88)
❙Back-Up Lights (P216)
❙Brake/Taillights (P216)
❙Rear Wiper (P98, 220)
❙Maintenance Under the Hood (P199)
❙Windshield Wipers (P97, 218)
❙Tires (P222, 239)
❙Fog Lights *
(P96, 214)
❙Door Lock/Unlock Control (P79)
❙Power Door Mirrors (P102)
❙Audio Antenna (P124)
❙Front Turn Signal/Parking/Side Marker Lights
(P95, 213, 214)
❙Headlights (P95, 212)
❙Rear Turn Signal Lights (P216)
Main Menu
Page 9 of 286
8
Quick Reference Guide
Instrument Panel (P63)
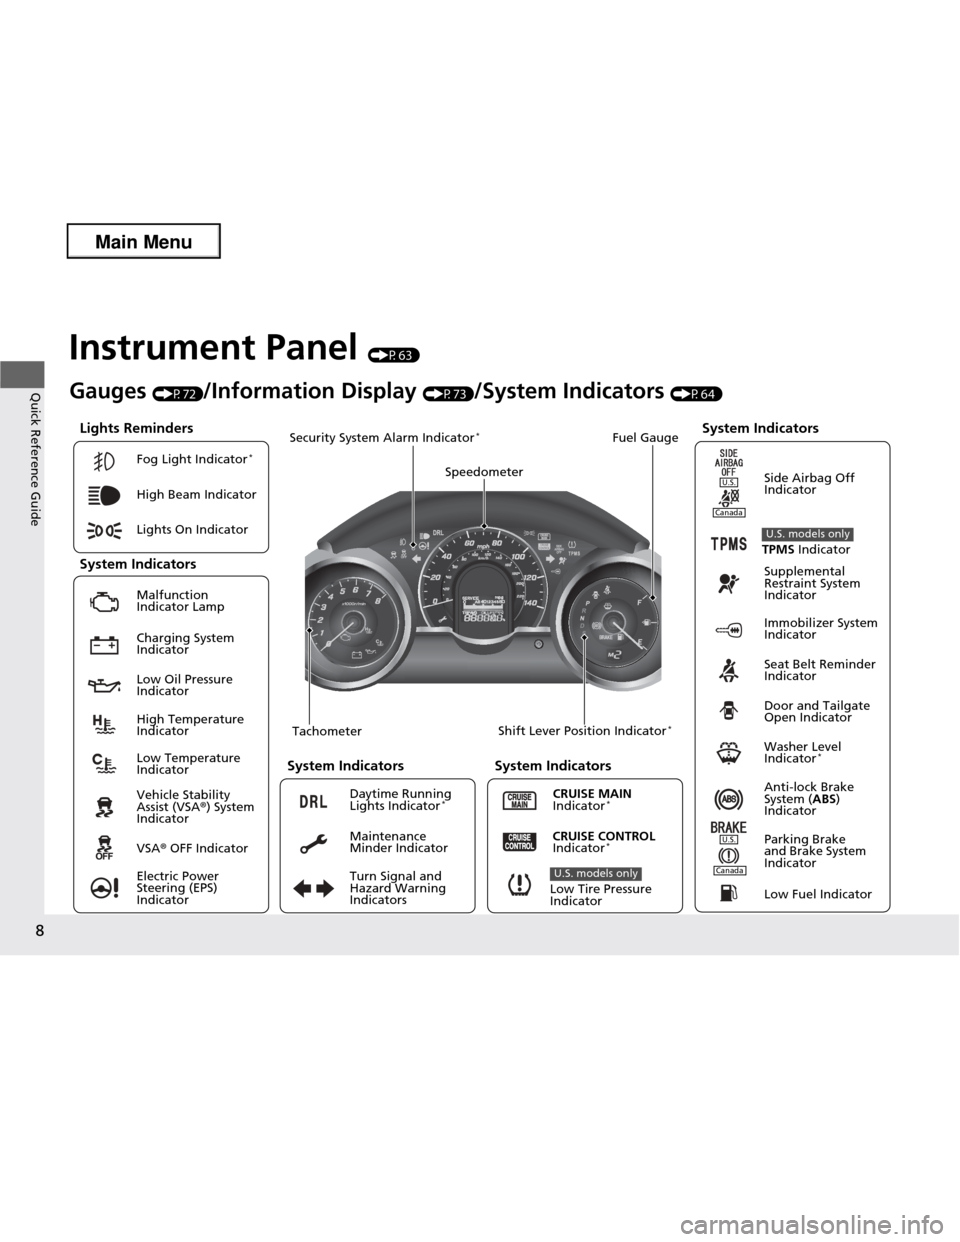
Lights Reminders
Malfunction
Indicator Lamp Low Oil Pressure Indicator Anti-lock Brake
System (ABS)
Indicator
Vehicle Stability Assist (VSA
®) System
Indicator VSA ® OFF Indicator
Electric Power Steering (EPS) Indicator
Lights On Indicator
High Beam Indicator
Immobilizer System
Indicator
Seat Belt Reminder
Indicator
System Indicators
CRUISE MAIN
Indicator * Supplemental
Restraint System
Indicator
Side Airbag Off
Indicator
Door and Tailgate
Open Indicator
Tachometer Speedometer
Fuel Gauge
Security System Alarm Indicator *
Shift Lever Position Indicator *
Low Fuel Indicator
Gauges
(P72)/Information Display (P73)/System Indicators (P64)
Turn Signal and Hazard Warning Indicators
High Temperature Indicator
Low Temperature Indicator
System Indicators System Indicators
Low Tire Pressure
Indicator
U.S. models only
Parking Brake
and Brake System
IndicatorCRUISE CONTROL
Indicator * System Indicators
Charging System Indicator
U.S.
U.S.
Canada
TPMS
Indicator
U.S. models only
Washer Level
Indicator *
Daytime Running Lights Indicator
*
Maintenance
Minder Indicator
Fog Light Indicator
*
Canada
Main Menu
Page 11 of 286
10
Quick Reference Guide
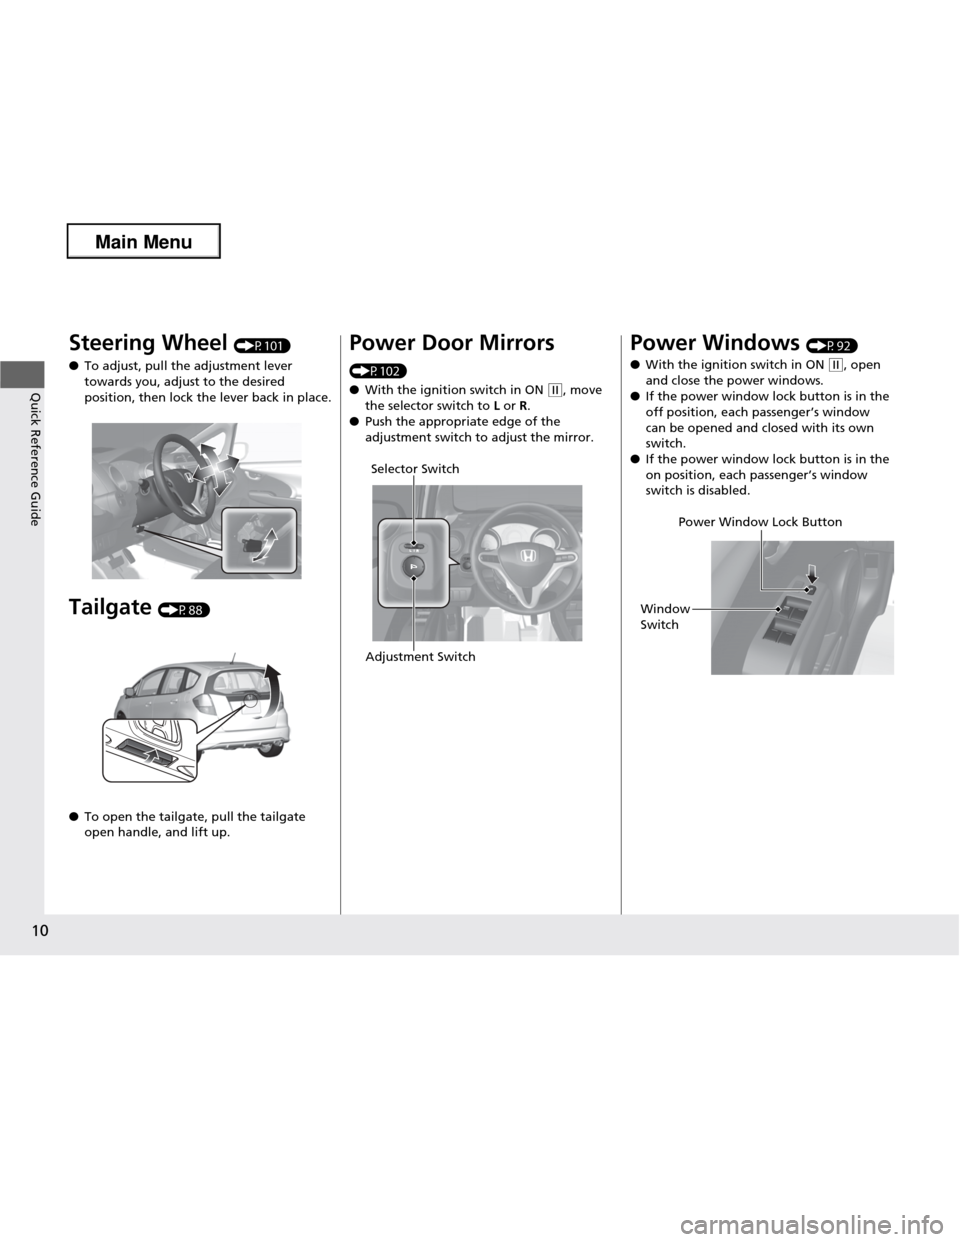
Steering Wheel (P101)
● To adjust, pull the adjustment lever
towards you, adjust to the desired
position, then lock the lever back in place.
Tailgate (P88)
● To open the tailgate, pull the tailgate open handle, and lift up.Power Door Mirrors
(P102) ● With the ignition switch in ON
(w, move
the selector switch to L or R.
● Push the appropriate edge of the
adjustment switch to adjust the mirror.
Selector Switch
Adjustment Switch
Power Windows (P92)
● With the ignition switch in ON
(w, open
and close the power windows.
● If the power window lock button is in the
off position, each passenger’s window
can be opened and closed with its own switch.
● If the power window lock button is in the on position, each passenger’s window
switch is disabled.
Power Window Lock Button
Window Switch
Main Menu
Page 12 of 286
11
Quick Reference Guide
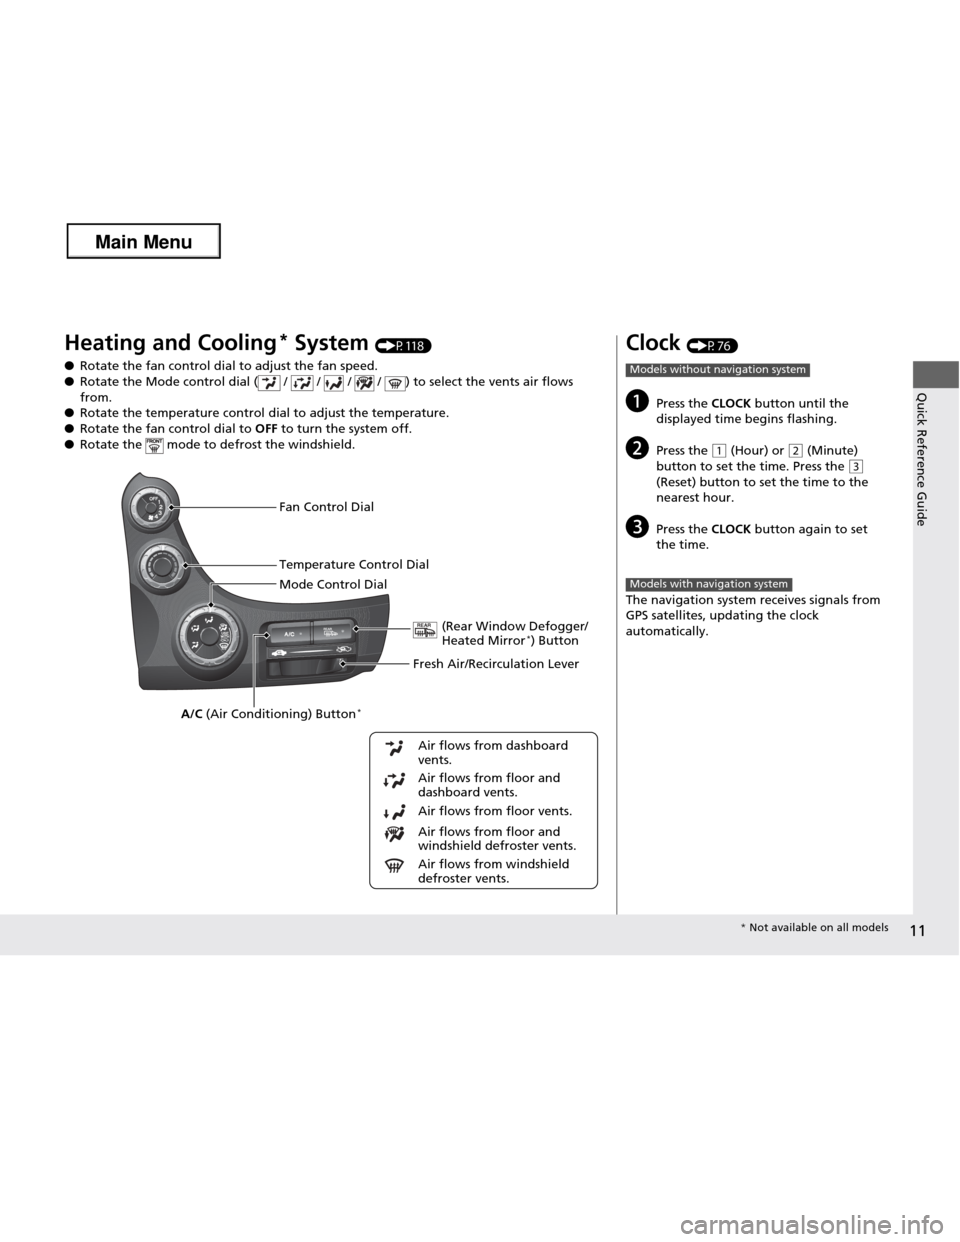
Heating and Cooling*
System (P118)
● Rotate the fan control dial to adjust the fan speed.
● Rotate the Mode control dial ( / / / / ) to select the vents air flows from.
● Rotate the temperature control dial to adjust the temperature.
● Rotate the fan control dial to OFF to turn the system off.
● Rotate the mode to defrost the windshield.
Fan Control Dial
(Rear Window Defogger/ Heated Mirror*
) Button
A/C (Air Conditioning) Button *
Air flows from floor and windshield defroster vents.
Air flows from floor vents.
Air flows from floor and
dashboard vents.
Air flows from dashboard
vents.
Temperature Control Dial
Air flows from windshield
defroster vents.
Mode Control Dial
Fresh Air/Recirculation Lever
Clock (P76)
a Press the CLOCK button until the
displayed time begins flashing.
b Press the
(1 (Hour) or (2 (Minute)
button to set the time. Press the
(3
(Reset) button to set the time to the nearest hour.
c Press the CLOCK button again to set
the time.
The navigation system receives signals from
GPS satellites, updating the clock automatically.
Models without navigation system
Models with navigation system
* Not available on all models
Main Menu
Page 14 of 286
13
Quick Reference Guide
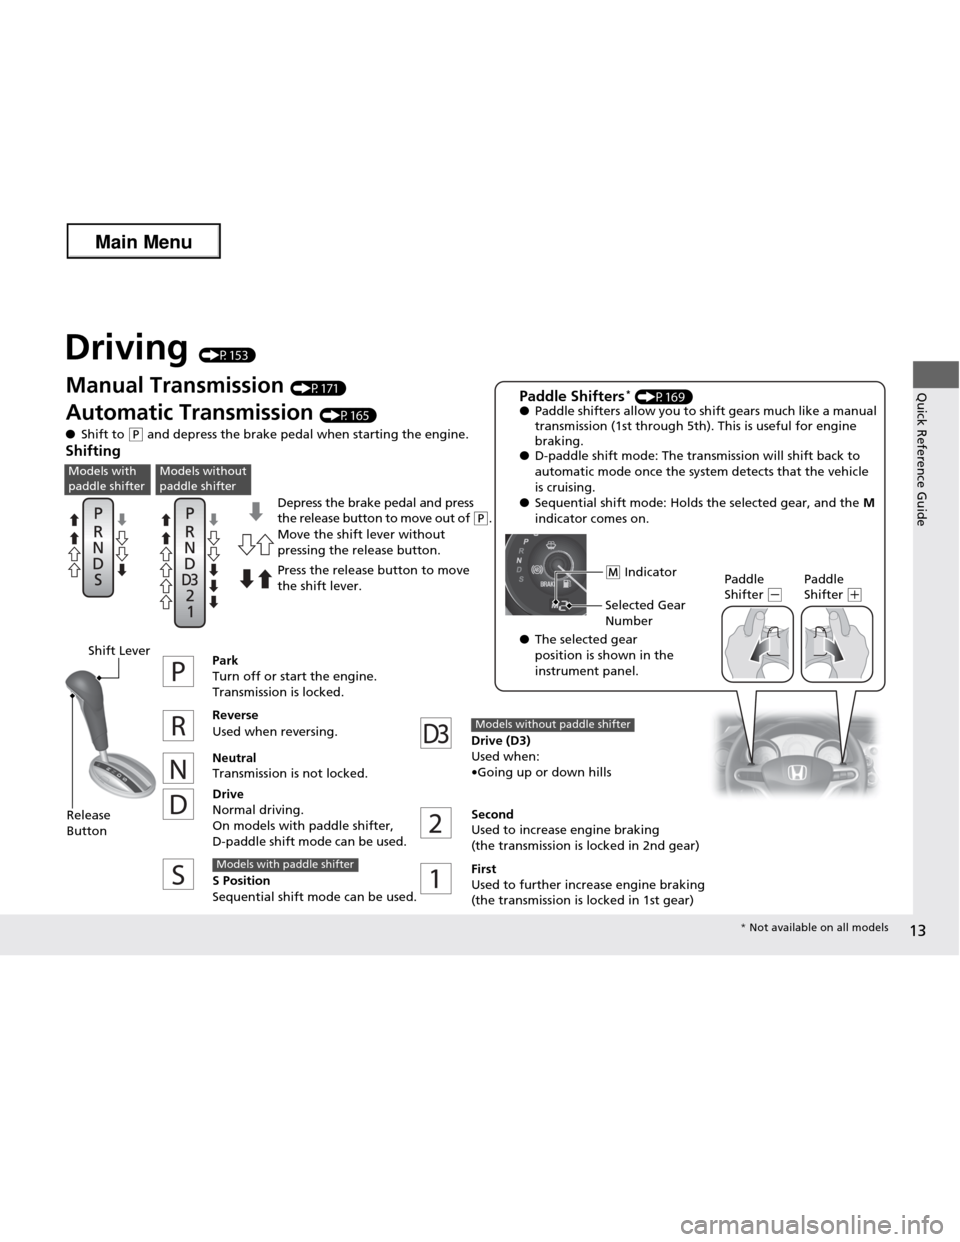
Driving (P153)
Depress the brake pedal and press
the release button to move out of
(P.
Manua
l Transmission
(P171)
Automatic Transmission (P165)
● Shift to
(P and depress the brake pedal when starting the engine.
Shifting
Park
Turn off or start the engine.
Transmission is locked. Reverse Used when reversing. Neutral
Transmission is not locked. Drive
Normal driving.On models with paddle shifter,
D-paddle shift mode can be used. Drive (D3)Used when:
•Going up or down hills
Models without paddle shifter
Second Used to increase engine braking
(the transmission is locked in 2nd gear) First
Used to further increase engine braking
(the transmission is locked in 1st gear)
S Position
Sequential shift mode can be used.
Models with paddle shifter
Move the shift lever without
pressing the release button.
Press the release button to move
the shift lever. Paddle Shifters
*
(P169)
● Paddle shifters allow you to shift gears much like a manual
transmission (1st through 5th). This is useful for engine
braking.
● D-paddle shift mode: The tran smission will shift back to
automatic mode once the system detects that the vehicle
is cruising.
● Sequential shift mode: Hold s the selected gear, and the M
indicator comes on.
Paddle Shifter
(-Paddle Shifter (+
(M
Indicator
Selected Gear
Number
● The selected gear
position is shown in the instrument panel.
Models with
paddle shifterModels without
paddle shifter
Shift Lever
Release Button
* Not available on all models
Main Menu
Page 16 of 286
15
Quick Reference Guide
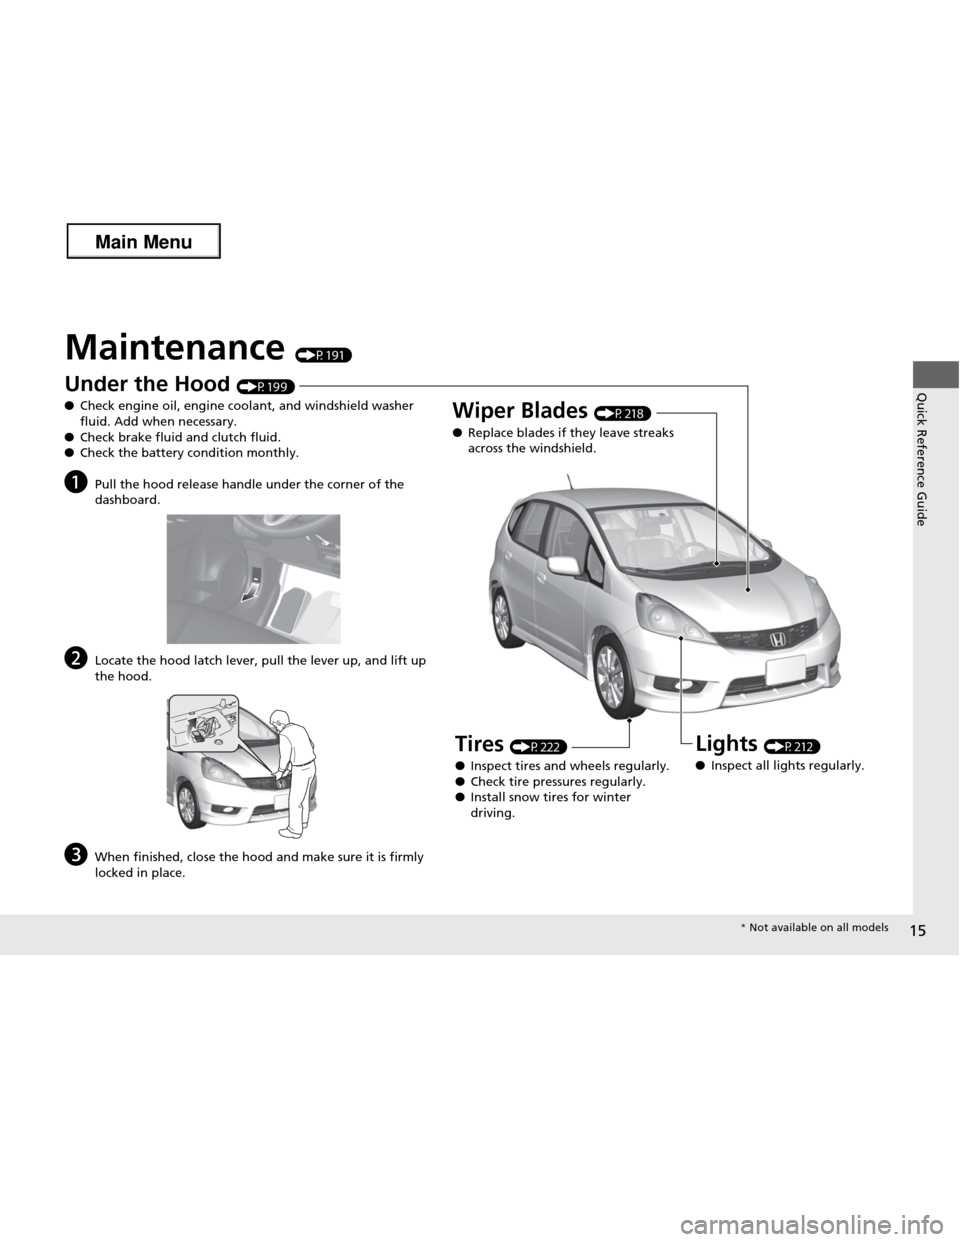
Maintenance (P191)
Under the Hood (P199)
● Check engine oil, engine coolant, and windshield washer fluid. Add when necessary.
● Check brake fluid and clutch fluid.
● Check the battery condition monthly.
a Pull the hood release handle under the corner of the
dashboard.
b Locate the hood latch lever, pull the lever up, and lift up
the hood.
c When finished, close the hood and make sure it is firmly
locked in place.
Lights (P212)
● Inspect all lights regularly.
Wiper Blades
(P218)
● Replace blades if they leave streaks
across the windshield.
Tires (P222)
● Inspect tires and wheels regularly.
● Check tire pressures regularly.
● Install snow tires for winter
driving.
* Not available on all models
Main Menu
Page 18 of 286
17
Quick Reference Guide
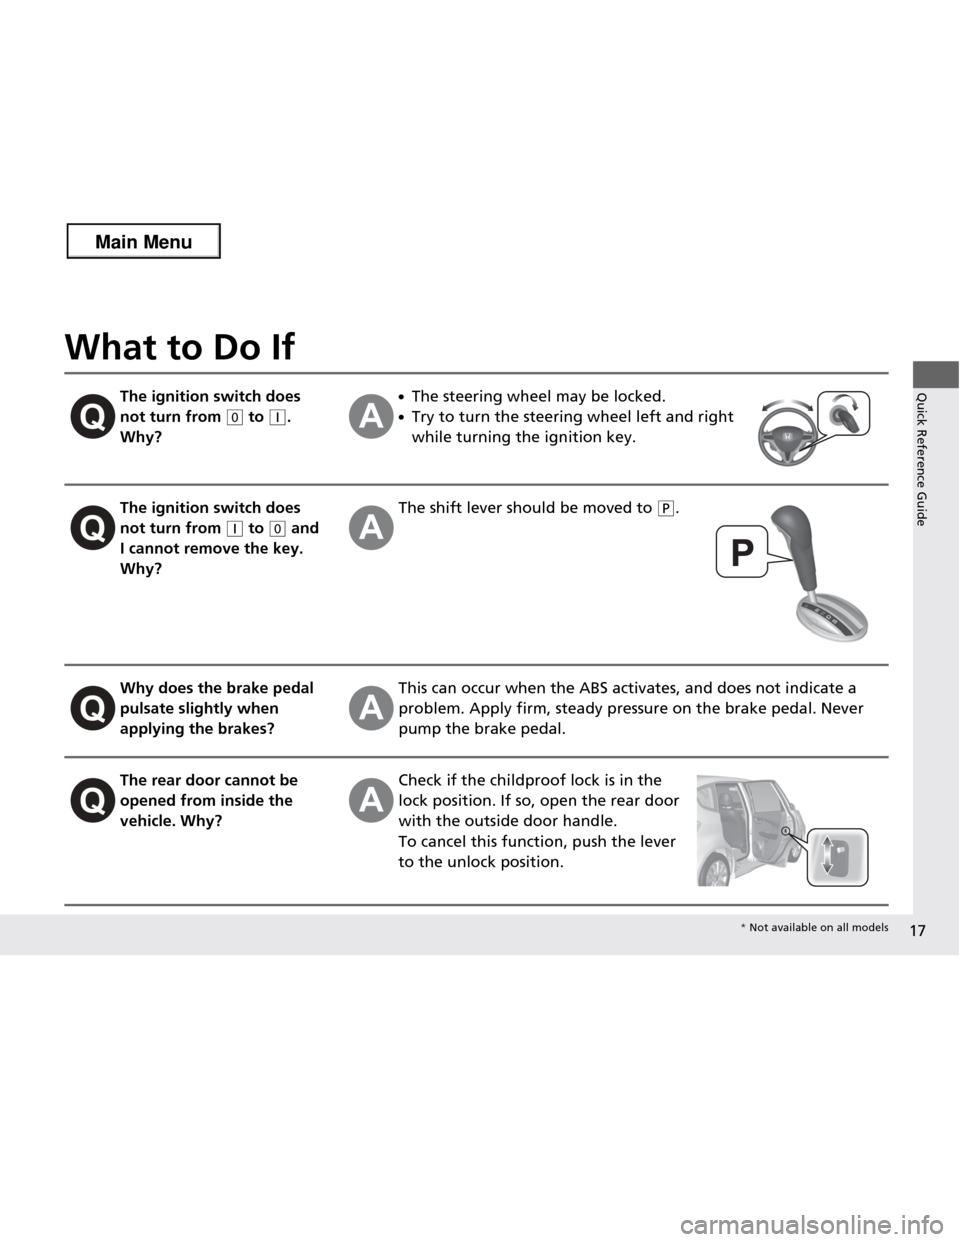
What to Do If
The ignition switch does
not turn from
(0 to (q.
Why?
● The steering wheel may be locked.
● Try to turn the steering wheel left and right
while turning the ignition key.
The ignition switch does
not turn from
(q to (0 and
I cannot remove the key.
Why?
The shift lever should be moved to (P .
Why does the brake pedal
pulsate slightly when
applying the brakes?This can occur when the ABS activates, and does not indicate a
problem. Apply firm, steady pressu re on the brake pedal. Never
pump the brake pedal.
The rear door cannot be
opened from inside the
vehicle. Why?Check if the childproof lock is in the
lock position. If so, open the rear door
with the outside door handle.
To cancel this function, push the lever
to the unlock position.
* Not available on all models
Main Menu
Page 19 of 286
18
Quick Reference GuideWhy do the doors lock
after I unlocked the doors
using a remote
transmitter?
If you do not open the doors within 30 seconds, the doors are
relocked automatically for security.
Why does the beeper
sound when I open the driver’s door?The beeper sounds when: ●The key is left in the ignition switch.
● The exterior lights are left on.
Why does the beeper
sound when I start driving?The beeper sounds when: ●Driver and/or front passeng er are not wearing their seat belts.
● The parking brake lever is not fully released.
Why do I hear a screeching
sound when I apply the
brake pedal?The brake pads may need to be replaced. Have your vehicle
inspected by a dealer.
Models with remote transmitter
Main Menu