maintenance HONDA HR-V 2017 2.G Quick Guide
[x] Cancel search | Manufacturer: HONDA, Model Year: 2017, Model line: HR-V, Model: HONDA HR-V 2017 2.GPages: 78, PDF Size: 5.33 MB
Page 4 of 78
| 1
V
ISUAL
I
NDEX
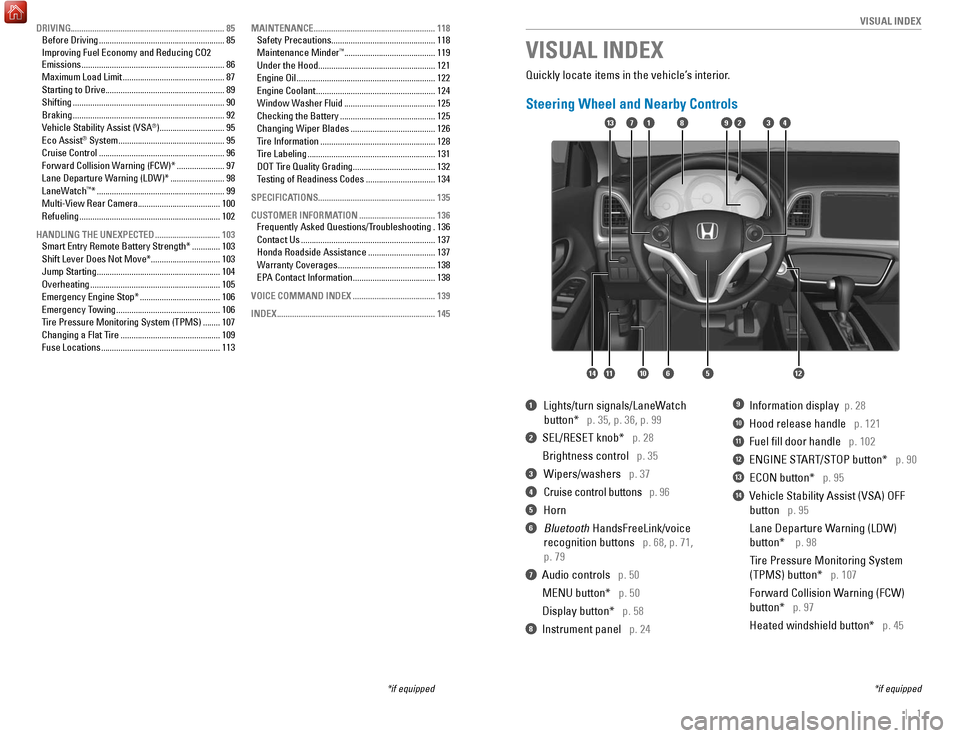
Quickly locate items in the vehicle’s interior.
Steering Wheel and Nearby Controls
1 Lights/turn signals/LaneW
atch
button* p. 35, p. 36, p. 99
2 SEL/RESET knob* p. 28
Brightness control
p. 35
3 Wipers/washers p. 37
4 Cruise control buttons p. 96
5 Horn
6 Bluetooth HandsFreeLink/voice
recognition buttons
p. 68, p. 71,
p. 79
7 Audio controls p. 50
MENU button*
p. 50
Display button*
p. 58
8 Instrument panel p. 24
9 Information display p. 28
10 Hood release handle p. 121
11 Fuel fill door handle p. 102
12 ENGINE START/STOP button* p. 90
13 ECON button* p. 95
14 Vehicle Stability Assist (VSA) OFF
button
p. 95
Lane Departure W
arning (LDW)
button*
p. 98
T
ire Pressure Monitoring System
(TPMS) button*
p. 107
Forward Collision W
arning (FCW)
button*
p. 97
Heated windshield button*
p. 45
VISUAL INDEX
*if equipped
*if equipped
82
1456121011
1713394
DRIVING....................................................................... 85
Before Driving .......................................................... 85
Improving Fuel Economy and Reducing CO2
Emissions
.................................................................. 86
Maximum Load Limit
............................................... 87
Starting to Drive
....................................................... 89
Shifting
...................................................................... 90
Braking
...................................................................... 92
Vehicle Stability Assist (VSA
®) .............................. 95
Eco Assist® System ................................................. 95
Cruise Control .......................................................... 96
Forward Collision Warning (FCW)*
......................97
Lane Departure Warning (LDW)*
.........................98
LaneWatch
™* ........................................................... 99
Multi-View Rear Camera ...................................... 100
Refueling
................................................................. 102
HANDLING THE UNEXPECTED
.............................. 103
Smart Entry Remote Battery Strength*
.............103
Shift Lever Does Not Move*
................................ 103
Jump Starting
......................................................... 104
Overheating
............................................................ 105
Emergency Engine Stop*
..................................... 106
Emergency Towing
................................................ 106
T
ire Pressure Monitoring System (TPMS) ........107
Changing a Flat Tire
.............................................. 109
Fuse Locations
....................................................... 113MAINTENANCE
........................................................
118
Safety Precautions
................................................
118
Maintenance Minder™ .......................................... 119
Under the Hood
...................................................... 121
Engine Oil
................................................................ 122
Engine Coolant
....................................................... 124
Window Washer Fluid
.......................................... 125
Checking the Battery
............................................ 125
Changing Wiper Blades
....................................... 126
Tire Information
..................................................... 128
Tire Labeling
........................................................... 131
DOT Tire Quality Grading
...................................... 132
T
esting of Readiness Codes ................................ 134
SPECIFICATIONS...................................................... 135 CUSTOMER INFORMATION
................................... 136
Frequently Asked Questions/Troubleshooting
.136
Contact Us
.............................................................. 137
Honda Roadside Assistance
............................... 137
Warranty Coverages
............................................. 138
EP
A Contact Information ...................................... 138
VOICE COMMAND INDEX
...................................... 139
INDEX
........................................................................\
. 145
Page 11 of 78
14 || 15
S AFETY
S
AFETY
Airbag Care
You do not need to, and should not, perform any maintenance on or replace\
any
airbag system components yourself. However, you should have your vehicle
inspected by a dealer in the following situations:
When the airbags have deployed
If an airbag has inflated, the control unit and other related parts mu\
st be replaced.
Similarly, once an automatic seat belt tensioner has been activated, it must be
replaced.
When the vehicle has been in a moderate-to-severe collision
Even if the airbags did not inflate, have your dealer inspect the foll\
owing: the
driver’s seat position sensor, weight sensors in the passenger’s seat, front seat
belt tensioners, and each seat belt that was worn during the crash.
Do not remove or modify a front seat without first consulting a dealer
This would likely disable the driver’s seat position sensor or the weight sensors
in the passenger’s seat. If it is necessary to remove or modify a front seat to
accommodate a person with disabilities, contact a Honda dealer. For U.S.
vehicles, call Honda Automobile Customer Service at (800) 999-1009. Fo\
r Canadian
vehicles, call Honda Canada Customer Relations at (888) 946-6329.Child Safety
Each year, many children are injured or killed in vehicle crashes because they are
either unrestrained or not properly restrained. In fact, vehicle collisi\
ons are the
number one cause of death of children ages 12 and under.
The National Highway Traffic Safety Administration and Transport Canada
recommend that all children ages 12 and under be properly restrained in \
a rear seat.
Some states or provinces/territories have laws restricting where childre\
n may ride.
To reduce the number of child deaths and injuries, every state, Canadian \
province
and territory requires that infants and children be properly restrained \
when they ride
in a vehicle.
Protecting Child Passengers•
An inflating front or side airbag can injure or kill a child sitting i\
n the front
seat.
•
A child in the front seat is more likely to interfere with the driver’\
s ability to
safely control the vehicle.
•
Statistics show that children of all sizes and ages are safer when they \
ar
e
properly restrained in a rear seat.
•
Any child who is too small to wear a seat belt correctly must be restrai\
n
ed in an
approved child seat that is properly secured to the vehicle using either\
the lap
belt portion of the lap/shoulder belt or the lower anchors of the LATCH system.
•
Never hold a child on your lap because it is impossible to protect them \
in t
he
event of a collision.
•
Never put a seat belt over yourself and a child. During a crash, the bel\
t w
ould
likely press deep into the child and cause serious or fatal injuries.
•
Never let two children use the same seat belt. Both children could be ve\
r
y
seriously injured in a crash.
•
Do not allow children to operate the doors, windows, or seat adjusters.
•
Do not leave children in the vehicle unattended, especially in hot weath\
er when
the inside of the vehicle can get hot enough to kill them. They could al\
so act
ivate
vehicle controls, causing it to move unexpectedly.
Children who are unrestrained or improperly restrained can be seriously \
injured or killed in a crash.
Any child too small for a seat belt should be properly restrained in a c\
hild
seat. A larger child should be properly restrained with a seat belt, usi\
ng a
booster seat if necessary.
WARNING
Page 17 of 78
26 || 27
I NSTRUMENT P
ANELI
NSTRUMENT P
ANEL
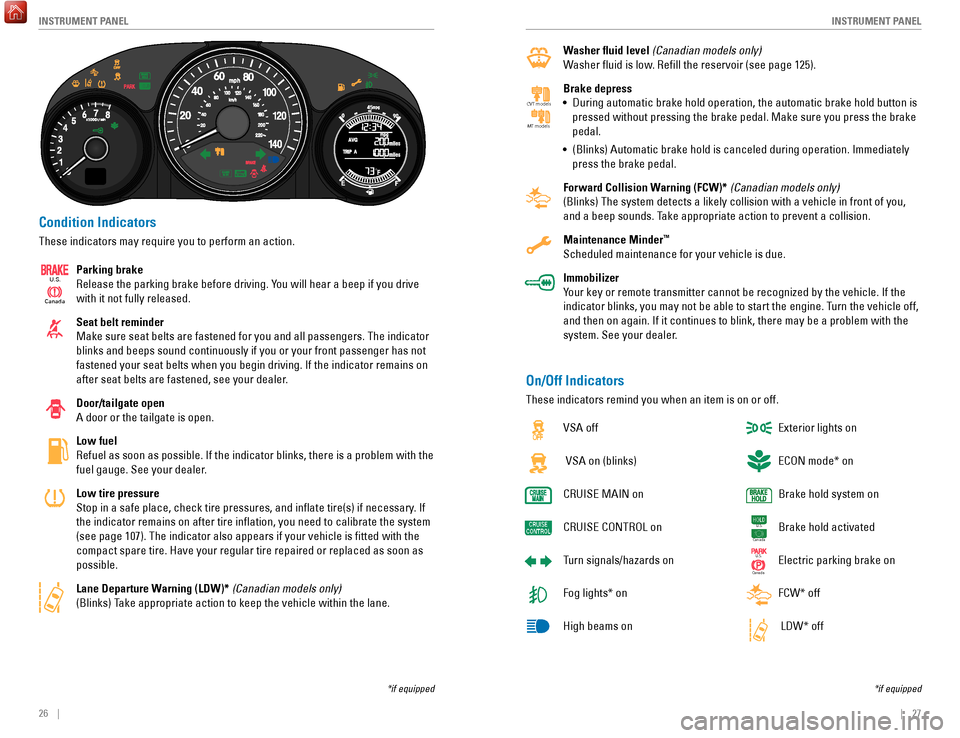
Condition Indicators
These indicators may require you to perform an action.
Parking brake
Release the parking brake before driving. You will hear a beep if you drive
with it not fully released.
Seat belt reminder
Make sure seat belts are fastened for you and all passengers. The indica\
tor
blinks and beeps sound continuously if you or your front passenger has not
fastened your seat belts when you begin driving. If the indicator remain\
s on
after seat belts are fastened, see your dealer.
Door/tailgate open
A door or the tailgate is open.
Low fuel
Refuel as soon as possible. If the indicator blinks, there is a problem \
with the
fuel gauge. See your dealer.
Low tire pressure
Stop in a safe place, check tire pressures, and inflate tire(s) if n\
ecessary. If
the indicator remains on after tire inflation, you need to calibrate t\
he system
(see page 107). The indicator also appears if your vehicle is fitted\
with the
compact spare tire. Have your regular tire repaired or replaced as soon \
as
possible.
Lane Departure Warning (LDW)* (Canadian models only)
(Blinks) Take appropriate action to keep the vehicle within the lane.
Canada
U.S.
*if equipped
Washer fluid level (Canadian models only)
Washer fluid is low. Refill the reservoir (see page 125).
Brake depress
•
During automatic brake hold operation, the automatic brake hold button i\
s
pressed without pressing the brake pedal. Make sure you press the brake \
pedal.
•
(Blinks) Automatic brake hold is canceled during operation. Immediatel\
y
press the brake pedal.
Forward Collision W
arning (FCW)* (Canadian models only)
(Blinks) The system detects a likely collision with a vehicle in front\
of you,
and a beep sounds. Take appropriate action to prevent a collision.
Maintenance Minder
™
Scheduled maintenance for your vehicle is due.
Immobilizer
Your key or remote transmitter cannot be recognized by the vehicle. If th\
e
indicator blinks, you may not be able to start the engine. Turn the vehicle off,
and then on again. If it continues to blink, there may be a problem with\
the
system. See your dealer.
CV T models
MT models
On/Off Indicators
These indicators remind you when an item is on or off.
VSA off
VSA on (blinks)
CRUISE
MAIN on
CRUISE
CONTROL on
Turn signals/hazards on
Fog lights* on
High beams on Exterior lights on
ECON mode* on
Brake hold system on
Brake hold activated
Electric parking brake on
FCW* off
LDW* off
U.S.
Canada
U.S.
Canada
*if equipped
Page 46 of 78
84 || 85
DRIVING
NAVIGATION
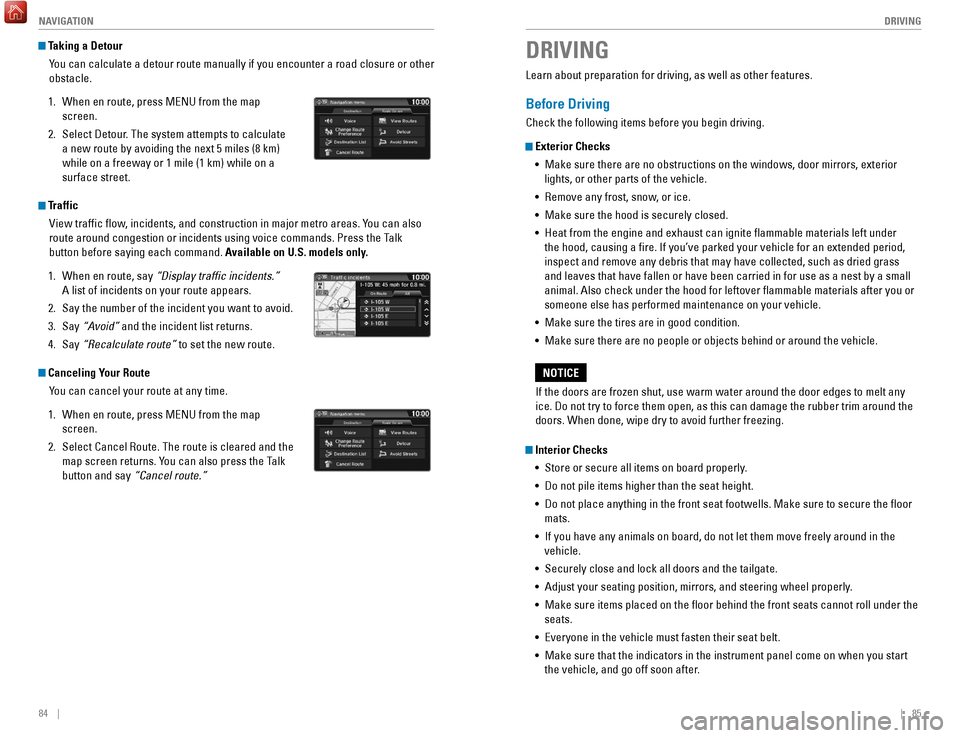
Taking a Detour
You can calculate a detour route manually if you encounter a road closure\
or other
obstacle.
1.
When en route, press MENU from the map
screen.
2.
Select Detour
. The system attempts to calculate
a new route by avoiding the next 5 miles (8 km)
while on a freeway or 1 mile (1 km) while on a
surface street.
Traffic
View traffic flow, incidents, and construction in major metro areas. You can also
route around congestion or incidents using voice commands. Press the Talk
button before saying each command. Available on U.S. models only.
1.
When en route, say
“Display traffic incidents.”
A list of incidents on your route appears.
2.
Say the number of the incident you want to avoid.
3.
Say
“Avoid” and the incident list returns.
4.
Say
“Recalculate route” to set the new route.
Canceling Your RouteYou can cancel your route at any time.
1.
When en route, press MENU from the map
screen.
2.
Select Cancel Route. The route is cleared and the
map screen returns. Y
ou can also press the Talk
button and say “Cancel route.” Learn about preparation for driving, as well as other features.
Before Driving
Check the following items before you begin driving.
Exterior Checks
•
Make sure there are no obstructions on the windows, door mirrors, exte
rior
lights, or other parts of the vehicle.
•
Remove any frost, snow
, or ice.
•
Make sure the hood is securely closed.
•
Heat from the engine and exhaust can ignite flammable materials left u\
nder
the hood, causing a fire. If you’ve parked your vehicle for an exte\
nded period,
inspect and remove any debris that may have collected, such as dried g
rass
and leaves that have fallen or have been carried in for use as a nest by\
a small
animal. Also check under the hood for leftover flammable materials aft\
er you or
someone else has performed maintenance on your vehicle.
•
Make sure the tires are in good condition.
•
Make sure there are no people or objects behind or around the vehicle.
DRIVING
If the doors are frozen shut, use warm water around the door edges to me\
lt any
ice. Do not try to force them open, as this can damage the rubber trim a\
round the
doors. When done, wipe dry to avoid further freezing.
NOTICE
Interior Checks•
Store or secure all items on board properly
.
•
Do not pile items higher than the seat height.
•
Do not place anything in the front seat footwells. Make sure to secure t\
he floor
mats.
•
If you have any animals on board, do not let them move freely around in \
the
vehicle.
•
Securely close and lock all doors and the tailgate.
•
Adjust your seating position, mirrors, and steering wheel properly
.
•
Make sure items placed on the floor behind the front seats cannot roll\
under the
seats.
•
Everyone in the vehicle must fasten their seat belt.
•
Make sure that the indicators in the instrument panel come on when you s\
tart
the vehicle, and go off soon after
.
Page 63 of 78
118 || 119
MAINTENANCE
MAINTENANCE
Learn about basic maintenance that you can perform on the vehicle yourse\
lf, as well
as information about how to best maintain the vehicle.
Safety Precautions
Some of the most important safety precautions are listed below; however, we cannot
warn you of every conceivable hazard that can arise in performing mainte\
nance.
Only you can decide whether or not you should perform a given task.
Maintenance Safety
•
T
o reduce the possibility of fire or explosion, keep cigarettes, sparks\
, and flames
away from the battery and all fuel-related parts.
•
Never leave rags, towels, or other flammable objects under the hood. H\
eat
from
the engine and exhaust can ignite them, causing a fire.
•
T
o clean parts, use a commercially available degreaser or parts cleaner, not
gasoline.
•
W
ear eye protection and protective clothing when working with the battery\
or
compressed air.
•
Do not run the engine in confined spaces where carbon monoxide gas can\
accumulate.
Vehicle Safety
•
The vehicle must be stationary
, and parked on level ground with the parking
brake set and the engine off.
•
Be aware that hot parts can burn you.
•
Be aware that moving parts can injure you.
MAINTENANCEMaintenance Minder™
Reminds you when indicated maintenance service is due.
When maintenance is due, the Maintenance Minder indicator comes on and a\
message appears on the display every time you turn the vehicle on. Press\
the select/
reset knob to change displays.
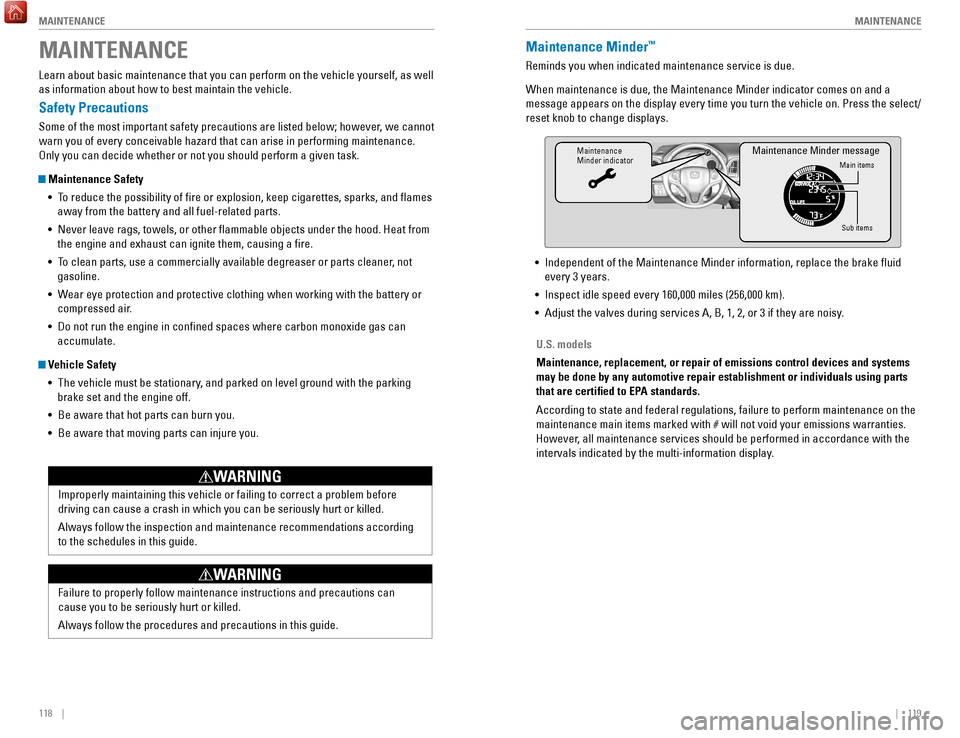
Maintenance
Minder indicator
Main items
Sub items
Maintenance Minder message
• Independent of the Maintenance Minder information, replace the brake fl\
uid
every 3 years.
•
Inspect idle speed every 160,000 miles (256,000 km).
•
Adjust the valves during services A, B, 1, 2, or 3 if they are noisy
.
U.S. models
Maintenance, replacement, or repair of emissions control devices and sys\
tems
may be done by any automotive repair establishment or individuals using \
parts
that are certified to EPA standards.
According to state and federal regulations, failure to perform maintenan\
ce on the
maintenance main items marked with # will not void your emissions warranties.
However, all maintenance services should be performed in accordance with the
intervals indicated by the multi-information display.
Improperly maintaining this vehicle or failing to correct a problem befo\
re
driving can cause a crash in which you can be seriously hurt or killed. \
Always follow the inspection and maintenance recommendations according
to the schedules in this guide.
WARNING
Failure to properly follow maintenance instructions and precautions can \
cause you to be seriously hurt or killed.
Always follow the procedures and precautions in this guide.
WARNING
Page 64 of 78
120 || 121
MAINTENANCE
MAINTENANCE
Maintenance Minder Service Codes
These codes indicate what services are due on your vehicle.
*1: If a message SERVICE does not appear more than 12 months after the display is reset, change the engine oil every year.
#: See information on maintenance and emissions warranty.
CODEMaintenance Main Items
A�Replace engine oi l*1
B�Replace engine oil*1 and oil �lter
�Inspect front and rear brakes
�Inspect tie rod ends, steering gearbox, and boots
�Inspect suspension component s
�Inspect driveshaft boots
�Inspect brake hoses and lines (Including ABS/VSA)
�Inspect all �uid levels and condition of �uids
�Inspect exhaust system#
�Inspect fuel lines and connections#
*2: If you drive in dusty conditions, replace the air cleaner element every \
15,000 miles (24,000 km).
*3: If you drive primarily in urban areas that have high concentrations of s\
oot in the air from industryand diesel-powered vehicles, replace the dust and pollen �lter every \
15,000 miles (24,000 km).
*4: Driving in mountainous areas at very low vehicle speeds results in higher transmission temperatures. This requires transmission �uid changes mo\
re frequently than
recommended by the Maintenance Minder. If you regularly drive your vehic\
le under these
conditions, have the transmission �uid changed every 25,000 miles (4\
0,000 km).
CODEMaintenance Sub Items
1
�Rotate tires
2�Replace air cleaner element*2
�Replace dust and pollen �lter*3
�Inspect drive belt
3
�Replace transmission �uid*4
4�Replace spark plugs
�Inspect valve clearance
5
�Replace engine coolan t
6�Replace rear differential �uid*
Continuously variable transmission models only
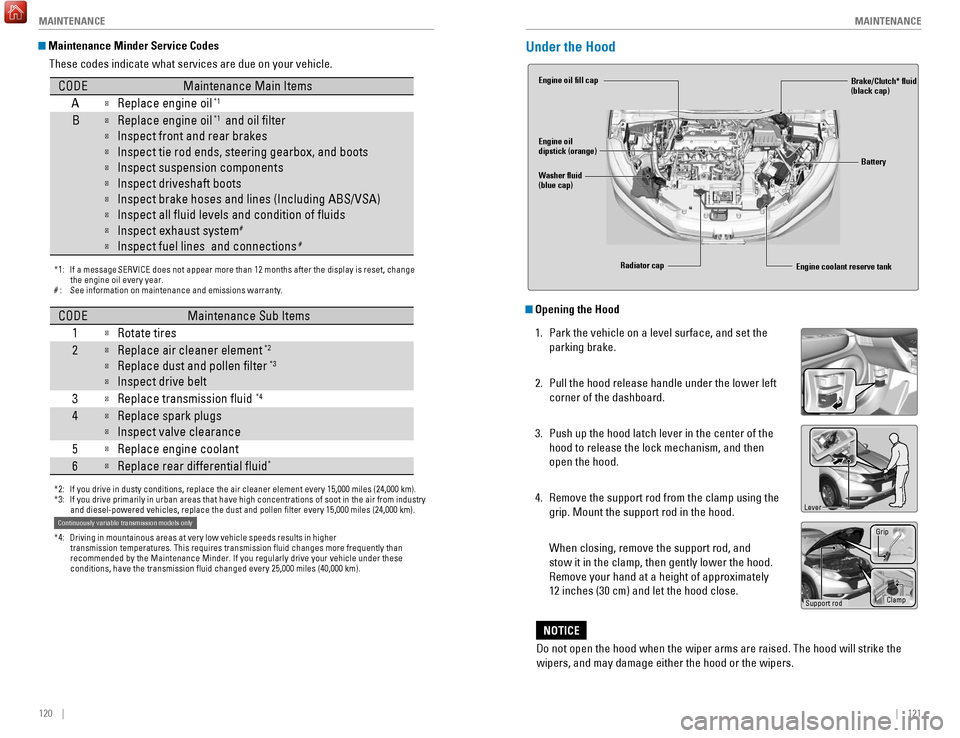
Under the Hood
Opening the Hood
1.
Park the vehicle on a level surface, and set the
parking brake.
2.
Pull the hood release handle under the lower left
corner of the dashboard.
3.
Push up the hood latch lever in the center of the
hood to release the lock mechanism, and then
open the hood.
4.
Remove the support rod from the clamp using the
grip. Mount the support rod in the hood.
When closing, remove the support rod, and
stow it in the clamp, then gently lower the hood.
Remove your hand at a height of approximately
12 inches (30 cm) and let the hood close.
Engine coolant reserve tank
Washer fluid
(blue cap) Engine oil fill cap
Engine oil
dipstick (orange)
Brake/Clutch* fluid
(black cap)
Battery
Radiator cap
Lever
Support rod Grip
Clamp
Do not open the hood when the wiper arms are raised. The hood will strik\
e the
wipers, and may damage either the hood or the wipers.
NOTICE
Page 65 of 78
122 || 123
MAINTENANCE
MAINTENANCE
Recommended Engine Oil
• Honda Genuine Motor Oil
•
Premium-grade 0W
-20 detergent oil with an API Certification Seal on the
container
This seal indicates the oil is energy conserving and
that it meets the American Petroleum Institute’s
latest requirements.
Use Honda Genuine Motor Oil or another
commercial engine oil of suitable viscosity for the
ambient temperature as shown.
You may also use synthetic motor oil if it is labeled with the API Certifi\
cation Seal
and is of the specified viscosity grade.
Engine Oil
Park the vehicle on level ground, and wait approximately three minutes after turning
the engine off before you check the oil.
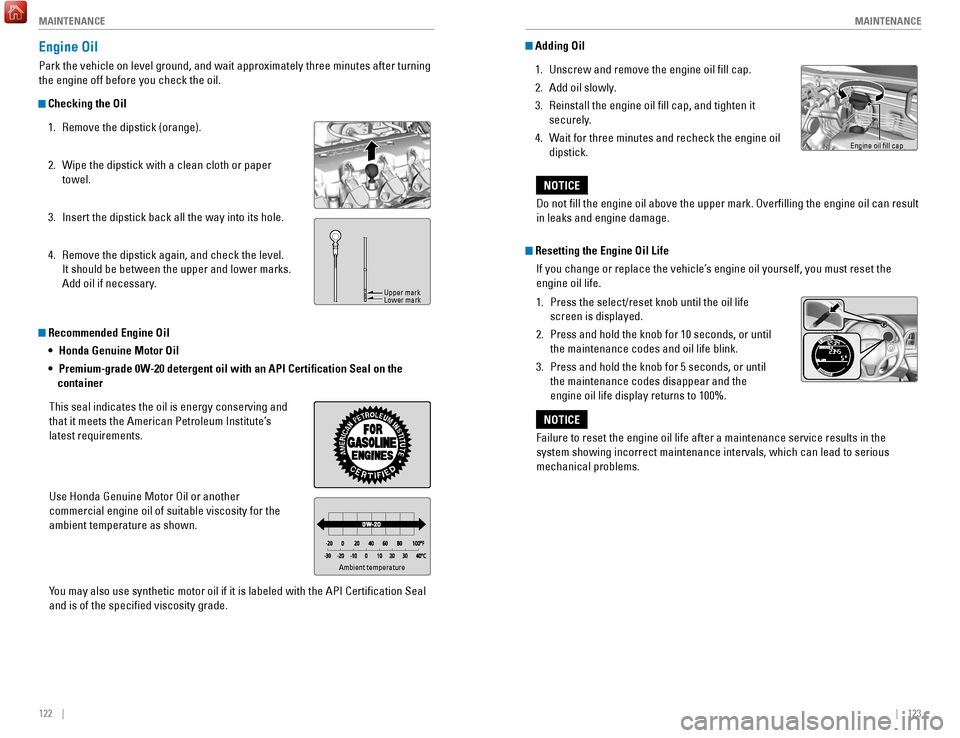
Checking the Oil 1.
Remove the dipstick (orange).
2.
Wipe the dipstick with a clean cloth or paper
towel.
3.
Insert the dipstick back all the way into its hole.
4.
Remove the dipstick again, and check the level.
It should be between the upper and lower marks.
Add oil if necessary
.
Ambient temperature
Upper mark
Lower mark
Adding Oil1.
Unscrew and remove the engine oil fill cap.
2.
Add oil slowly
.
3.
Reinstall the engine oil fill cap, and tighten it
securely
.
4.
W
ait for three minutes and recheck the engine oil
dipstick.
Failure to reset the engine oil life after a maintenance service results\
in the
system showing incorrect maintenance intervals, which can lead to seriou\
s
mechanical problems.
NOTICE
Engine oil fill cap
Do not fill the engine oil above the upper mark. Overfilling the eng\
ine oil can result
in leaks and engine damage.
NOTICE
Resetting the Engine Oil Life If you change or replace the vehicle’s engine oil yourself, you must reset the
engine oil life.
1.
Press the select/reset knob until the oil life
screen is displayed.
2.
Press and hold the knob for 10 seconds, or until
the maintenance codes and oil life blink.
3.
Press and hold the knob for 5 seconds, or until
the maintenance codes disappear and the
engine oil life display returns to 100%.
Page 66 of 78
124 || 125
MAINTENANCE
MAINTENANCE
Engine Coolant
Park the vehicle on level ground. Check the reserve tank and the coolant\
level in the
radiator. We recommend Honda Long Life Antifreeze/Coolant Type 2.
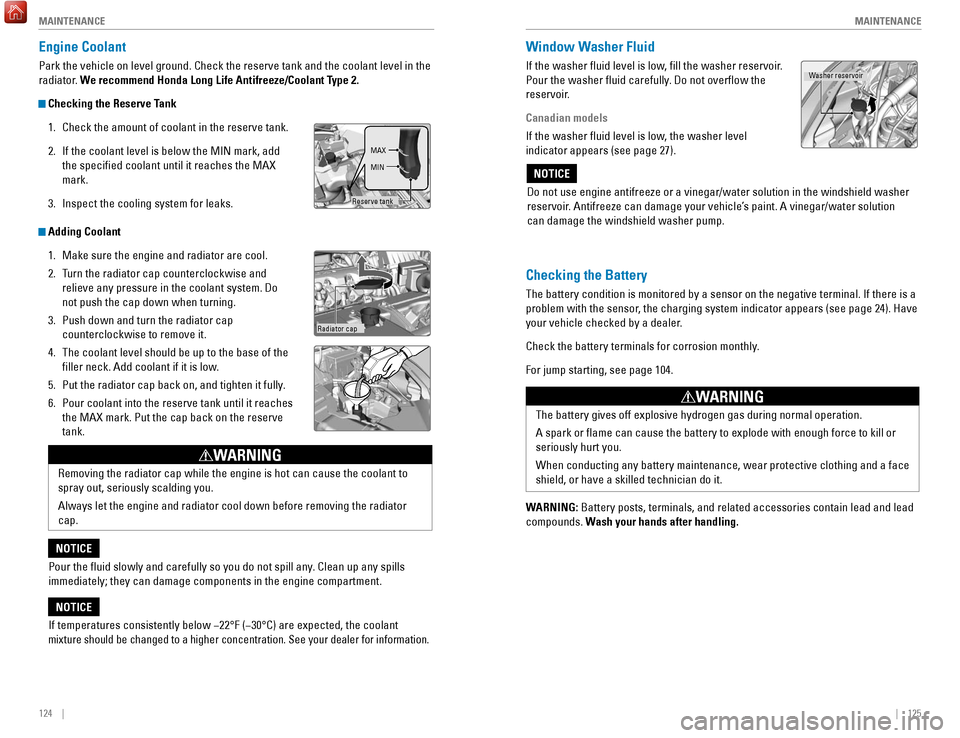
Checking the Reserve Tank
1.
Check the amount of coolant in the reserve tank.
2.
If the coolant level is below the MIN mark, add
the specified coolant until it reaches the MAX
mark.
3.
Inspect the cooling system for leaks.
Adding Coolant1.
Make sure the engine and radiator are cool.
2.
T
urn the radiator cap counterclockwise and
relieve any pressure in the coolant system. Do
not push the cap down when turning.
3.
Push down and turn the radiator cap
counterclockwise to remove it.
4.
The coolant level should be up to the base of the
filler neck. Add coolant if it is low
.
5.
Put the radiator cap back on, and tighten it fully
.
6.
Pour coolant into the reserve tank until it reaches
the MAX mark. Put the cap back on the reserve
tank.
If temperatures consistently below −22°F (−30°C) are expec\
ted, the coolant
mixture should be changed to a higher concentration. See your dealer for\
information.
NOTICE
Reserve tank MAX
MIN
Radiator cap
Removing the radiator cap while the engine is hot can cause the coolant \
to
spray out, seriously scalding you.
Always let the engine and radiator cool down before removing the radiato\
r
cap.
WARNING
Pour the fluid slowly and carefully so you do not spill any. Clean up any spills
immediately; they can damage components in the engine compartment.
NOTICE
Window Washer Fluid
If the washer fluid level is low, fill the washer reservoir.
Pour the washer fluid carefully. Do not overflow the
reservoir.
Canadian models
If the washer fluid level is low, the washer level
indicator appears (see page 27).
The battery gives off explosive hydrogen gas during normal operation.
A spark or flame can cause the battery to explode with enough force to\
kill or
seriously hurt you.
When conducting any battery maintenance, wear protective clothing and a \
face
shield, or have a skilled technician do it.
WARNING
Checking the Battery
The battery condition is monitored by a sensor on the negative terminal.\
If there is a
problem with the sensor, the charging system indicator appears (see page 24). Have
your vehicle checked by a dealer.
Check the battery terminals for corrosion monthly.
For jump starting, see page 104.
WARNING: Battery posts, terminals, and related accessories contain lead and lead\
compounds. Wash your hands after handling.
Do not use engine antifreeze or a vinegar/water solution in the windshie\
ld washer
reservoir. Antifreeze can damage your vehicle’s paint. A vinegar/water solution
can damage the windshield washer pump.
NOTICE
Washer reservoir
Page 67 of 78
126 || 127
MAINTENANCE
MAINTENANCE
Changing Wiper Blades
If the wiper blades leave streaks across the windshield, try cleaning th\
em first with a
paper towel or soft cloth and wiper fluid. If the wiper blade rubber h\
as deteriorated,
you should change the wiper blades.
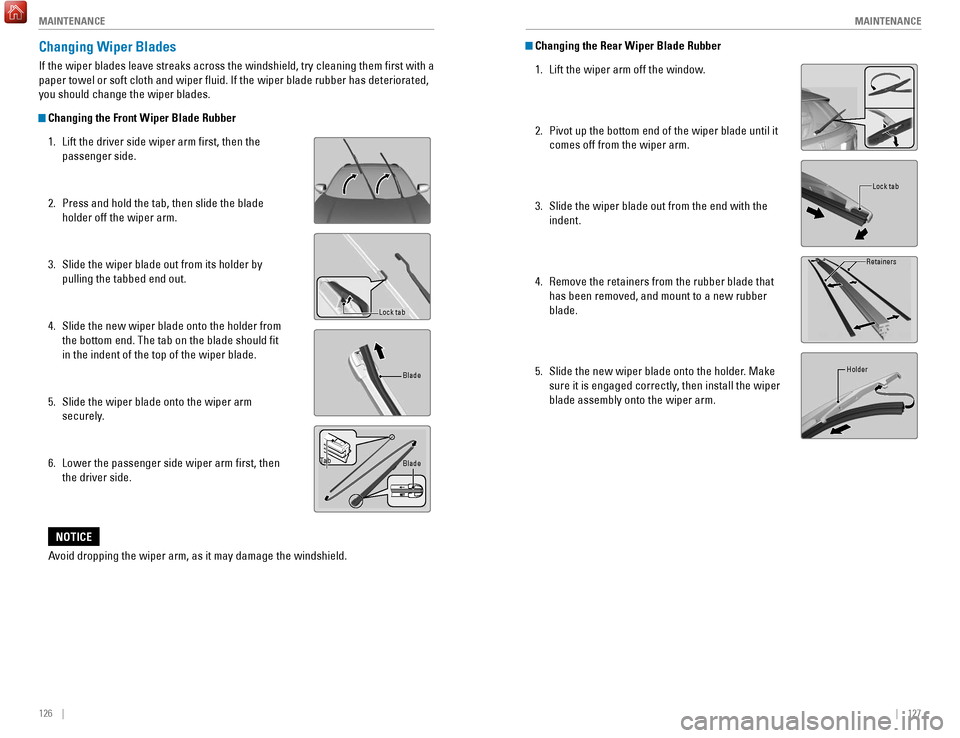
Changing the Front Wiper Blade Rubber
1.
Lift the driver side wiper arm first, then the
passenger side.
2.
Press and hold the tab, then slide the blade
holder off the wiper arm.
3.
Slide the wiper blade out from its holder by
pulling the tabbed end out.
4.
Slide the new wiper blade onto the holder from
the bottom end. The tab on the blade should fit
in the indent of the top of the wiper blade.
5.
Slide the wiper blade onto the wiper arm
securely
.
6.
Lower the passenger side wiper arm first, then
the driver side.
Lock tab Blade
Ta b Blade
Avoid dropping the wiper arm, as it may damage the windshield.
NOTICE
Changing the Rear Wiper Blade Rubber
1.
Lift the wiper arm off the window
.
2.
Pivot up the bottom end of the wiper blade until it
comes off from the wiper arm.
3.
Slide the wiper blade out from the end with the
indent.
4.
Remove the retainers from the rubber blade that
has been removed, and mount to a new rubber
blade.
5.
Slide the new wiper blade onto the holder
. Make
sure it is engaged correctly, then install the wiper
blade assembly onto the wiper arm.
Lock tab
Retainers
Holder
Page 68 of 78
128 || 129
MAINTENANCE
MAINTENANCE
Tire Information
To safely operate your vehicle, your tires must be of the proper type and\
size, in good
condition with adequate tread, and properly inflated.
Inflation Guidelines
•
Properly inflated tires provide the best combination of handling, trea\
d life, and
comfort. Refer to the driver’
s doorjamb label or the specifications (see page
135) for the specified pressure.
•
Underinflated tires wear unevenly
, adversely affect handling and fuel economy,
and are more likely to fail from overheating.
•
Overinflated tires make your vehicle ride harshly
, are more prone to road
hazards, and wear unevenly.
•
Every day before you drive, look at each of the tires. If one looks lowe\
r than t
he
others, check the pressure with a tire gauge.
•
Measure the air pressure when tires are cold. This means the vehicle ha
s been
parked for at least 3 hours, or driven less than 1 mile (1.6 km). If n\
ecessary, add
or release air until the specified pressure is reached, and then calib\
rate the
system (see page 107). If checked when hot, tire pressure can be as mu\
ch as
4–6 psi (30–40 kPa, 0.3–0.5 kgf/cm
2) higher than checked when cold.
•
At least once a month or before long trips, use a gauge to measure the p\
ressure
in all tires, including the spare. Even tires in good condition can lose\
1–2 ps
i
(10–20 kPa, 0.1–0.2 kgf/cm
2) per month.
Inspection Guidelines
Every time you inflate the tires, check for the following:
•
Any damage to tires, including bumps, bulges, cuts, splits, or cracks in\
t
he side
or tread. Remove any foreign objects and inspect for air leaks. Replace \
tires if
you see fabric or cord.
•
Uneven or excessive tread wear
. Have a dealer check the wheel alignment.
•
Cracks or other damage around the valve stems.
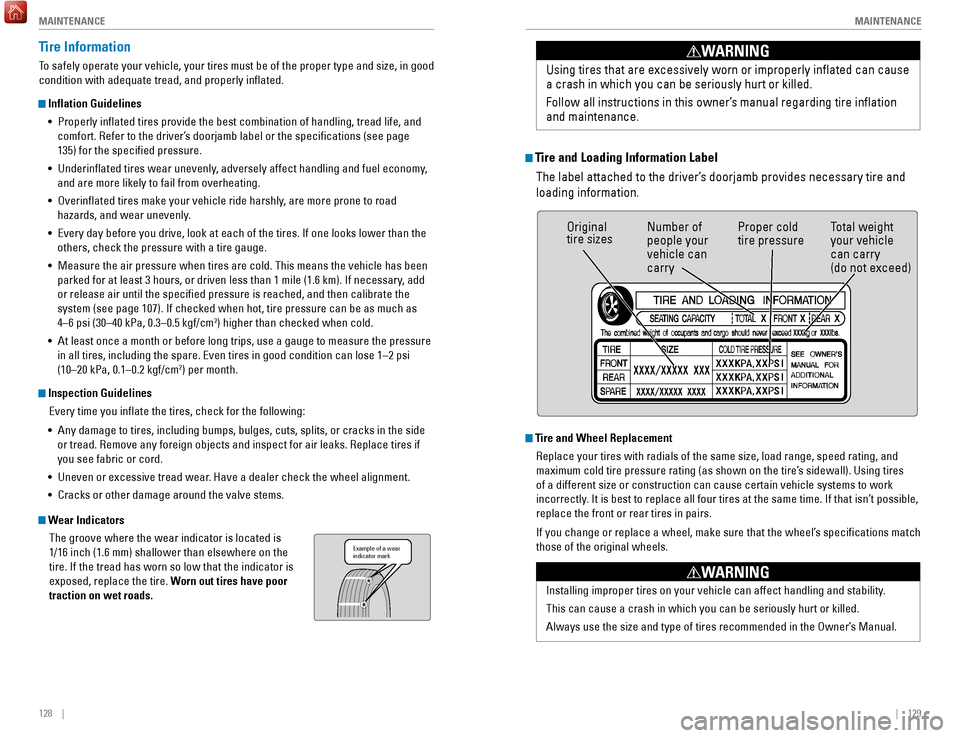
Wear IndicatorsThe groove where the wear indicator is located is
1/16 inch (1.6 mm) shallower than elsewhere on the
tire. If the tread has worn so low that the indicator is
exposed, replace the tire. Worn out tires have poor
traction on wet roads.
Example of a wear
indicator mark
Tire and Loading Information LabelThe label attached to the driver’s doorjamb provides necessary tire and
loading information. Using tires that are excessively worn or improperly inflated can cause\
a crash in which you can be seriously hurt or killed.
Follow all instructions in this owner’s manual regarding tire inflation
and maintenance
.
WARNING
Original
tire sizes
Number of
people your
vehicle can
carry Proper cold
tire pressure
Total weight
your vehicle
can carry
(do not exceed)
Tire and Wheel Replacement
Replace your tires with radials of the same size, load range, speed rati\
ng, and
maximum cold tire pressure rating (as shown on the tire’s sidewall). Using tires
of a different size or construction can cause certain vehicle systems to\
work
incorrectly. It is best to replace all four tires at the same time. If that isn’\
t possible,
replace the front or rear tires in pairs.
If you change or replace a wheel, make sure that the wheel’s specifications match
those of the original wheels.
Installing improper tires on your vehicle can affect handling and stabil\
ity.
This can cause a crash in which you can be seriously hurt or killed.
Always use the size and type of tires recommended in the Owner’s Manual.
WARNING