transmission fluid HONDA INTEGRA 1998 4.G User Guide
[x] Cancel search | Manufacturer: HONDA, Model Year: 1998, Model line: INTEGRA, Model: HONDA INTEGRA 1998 4.GPages: 1681, PDF Size: 54.22 MB
Page 587 of 1681
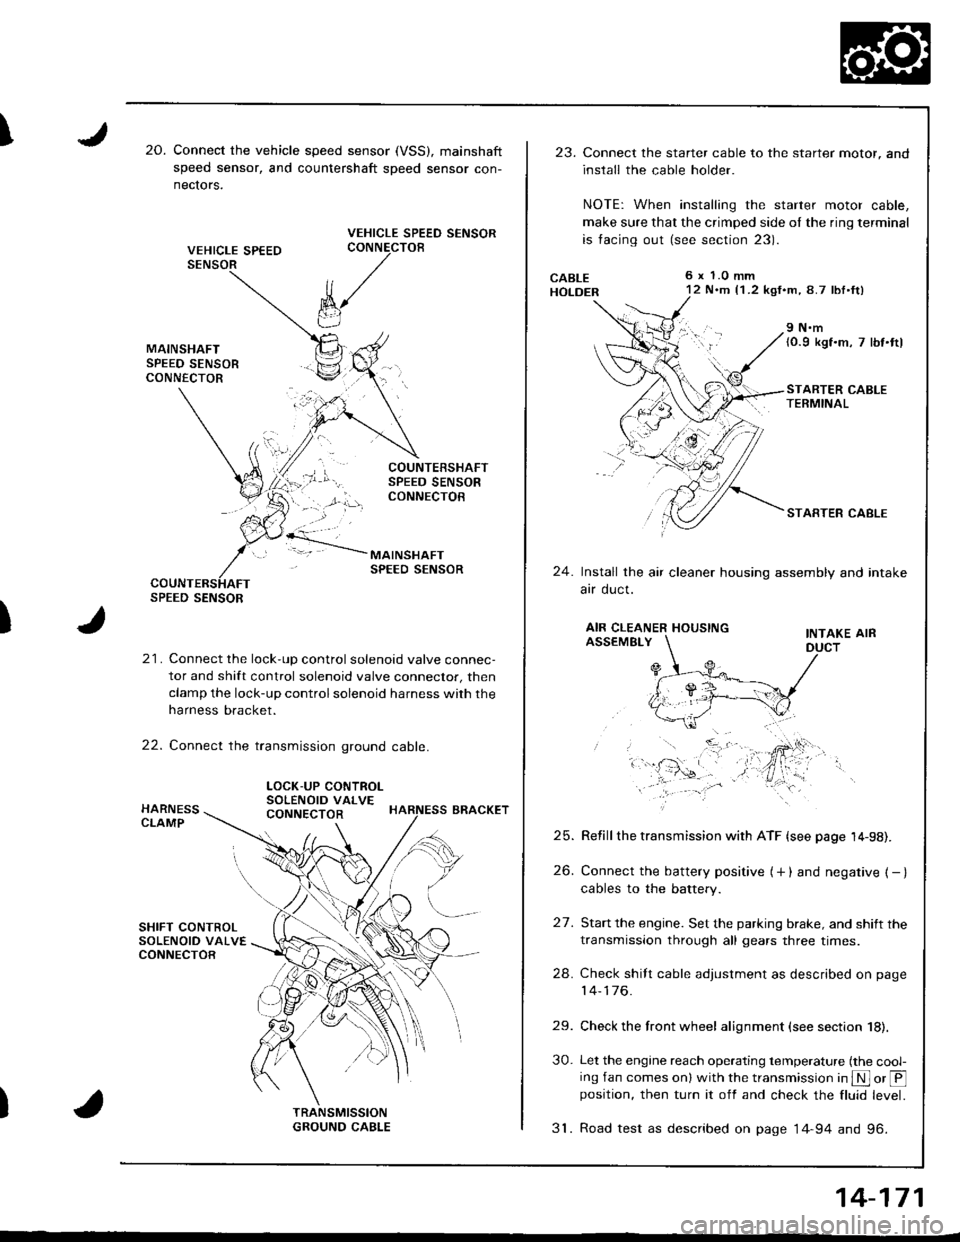
I20.Connect the vehicle speed sensor (VSS), mainshaft
speed sensor, and countershaft sDeed sensor con-
nectors.
VEHICLE SPEED SENSORCONNECTOB
)
k/
t"J
21. Connect the lock-up control solenoid valve connec-
tor and shift control solenoid valve conneclor, then
clamp the lock-up control solenoid harness with the
harness bracket.
22. Connect the transmission ground cable.
SPEED SENSOR
LOCK-UP CONTROLSOLENOID VALVECONNECTOR
23.Connect the starter cable to the starter motor, and
install the cable holder.
NOTE: When installing the starter motor cable,
make sure that the crimped side ol the ring terminal
is facing out (see section 23).
6 x 1.0 mm12 N.m {1 .2 kgf.m, 8.7 lbl.ft)
9 N.m(0.9 kgf.m, 7 lbt.ttl
STARTER CABLETERMINAL
STARTER CABLE
24.Install the air cleaner housing assembly and intake
arr oucl.
AIR CLEANER HOUSINGINTAKE AIRASSEMBLY
27.
Refill the transmission with ATF {see page 14-98).
Connect the battery positive (+ ) and negative { - }cables to the battery.
Start the engine. Set the parking brake, and shift the
transmission through all gears three times.
Check shilt cable adjustment as described on page
14-176.
Check the front wheel alignment (see section 18).
Let the engine reach operating temperature (the cool-ing fan comes onl with the transmission in S or @position, then turn it off and check the fluid level.
31. Road test as described on page 14-94 and 96.
25.
26.
24.
29.
30.
14-171
Page 588 of 1681
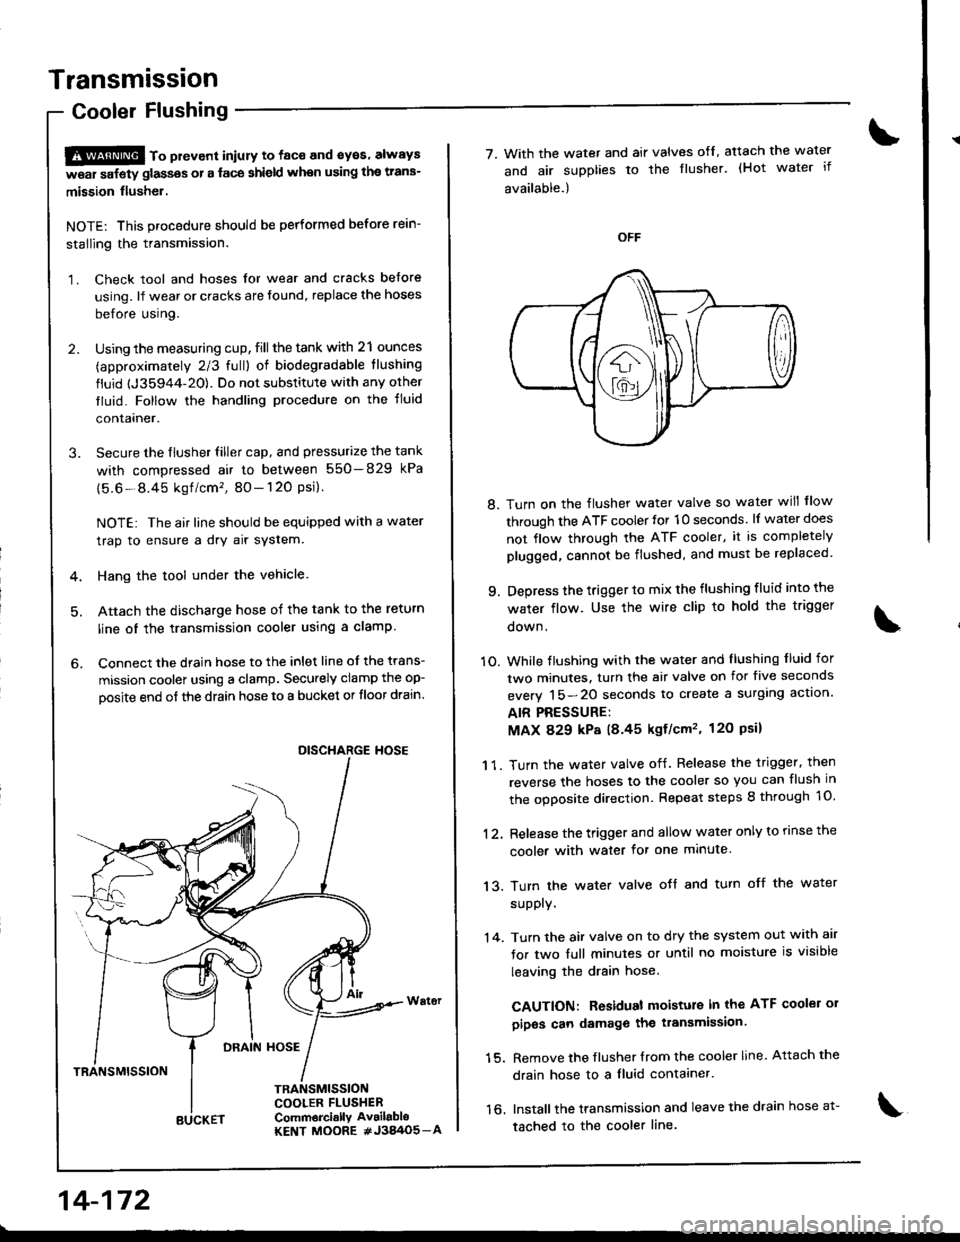
Transmission
Cooler Flushing
S@ to pttvont iniury to face and syes' always
w6ar safety glassos or a face shield when using the trans-
mission flusher.
NOTE: This procedure should be performed before rein-
stalling the transmission.
1. Check tool and hoses for wear and cracks before
using. lf wear or cracks are found, replace the hoses
before using.
2. Using the measuring cup, fill the tank with 21 ounces
(approximately 2/3 full) of biodegradable tlushing
fluid {J35944-20). Do not substitute with any orher
tluid. Follow the handling procedure on the tluid
contalner.
3. Secure the flusher filler cap, and pressurize the tank
with compressed air to between 550-829 kPa
{5.6-8.45 kgf /cm'�, 80- 120 Psi}.
NOTE: The air line should be equipped with a water
trap to ensure a dry air system.
4. Hang the tool under the vehicle
5. Attach the discharge hose of the tank to the return
line oI the transmission cooler using a clamp
6. Connect the drain hose to the inlet line of the trans-
mission coolel using a clamp. Securely clamp the op-
oosite end of the drain hose to a bucket or tloor drain.
DRAIN HOSE
TRANSMISSION
TRANSMISSIONCOOLER FLUSHERComm6rci.llY Av.ilabloKENT MOORE #J3A/O5_A
DISCHARGE HOSE
14-172
BUCKET
7. With the water and air valves ofl, atach the water
and air supplies to the flusher. (Hot water if
available.)
8. Turn on the flusher water valve so water will flow
through the ATF cooler for 10 seconds. lf water does
not flow through the ATF cooler, it is completely
plugged, cannot be flushed, and must be replaced
9. Depress the trigger to mix the flushing fluid into the
water flow. Use the wire clip to hold the trigger
oown.
1O. While tlushing with the water and llushing f luid for
two minutes. turn the air valve on for five seconds
everv 15-20 seconds to create a surglng actlon.
AIR PRESSURE:
MAX 829 kP8 18.45 kgf/cm'�, 120 Psil
1 1. Turn the water valve off. Release the trigger. then
reverse the hoses to the cooler so you can flush in
the ooDosite direction. Repeat steps 8 through 1O.
12, Release the trigger and allow water only to rinse the
cooler with water for one minute.
13. Turn the water valve oJf and turn off the water
supply.
'14. Turn the air valve on to dry the system out with air
for two full minutes or until no moisture is visible
leaving the drain hose.
CAUTION: Residual moisture in the ATF coolei 01
pipos can damage the transmission.
15. Remove the flusher {rom the cooler line. Attach the
drain hose to a fluid contaaner.
16. Installthe transmission and leave the drain hose a1-
tached to the cooler line.
Page 589 of 1681
![HONDA INTEGRA 1998 4.G User Guide 17. Make sure the transmission is in E] position.
Fill the transmission with ATF, and run the engineJor 30 seconds or until approximately one quart isdischarged.
18. Remove the drain hose, and reconn HONDA INTEGRA 1998 4.G User Guide 17. Make sure the transmission is in E] position.
Fill the transmission with ATF, and run the engineJor 30 seconds or until approximately one quart isdischarged.
18. Remove the drain hose, and reconn](/img/13/6069/w960_6069-588.png)
17. Make sure the transmission is in E] position.
Fill the transmission with ATF, and run the engineJor 30 seconds or until approximately one quart isdischarged.
'18. Remove the drain hose, and reconnect the coolerreturn hose to the transmission.
19. Refillthe tiansmission with ATF to the propef level.
FILLER CAP
TOOL MAINTENANCE
1. Empty and rinse after each use. Fill the can withwater and pressurize the can. Flush the dischargeline to ensure that the unit is clean.
2. lf discharge liquid does not foam, the orifice may beblocked.
3, To clean, disconnect the plumbing from the tank atthe large coupling nut,
4. Remove the in-line filter trom the discharge side andclean if necessary.
5. The fluid oritice is located behind the filter.
Clean it with the pick stored in the bottom of the tankhandle or blow it clean with air. Securely reassem-
ble all parts.
COUPLING NUT
FILTER
\
IO-RINGORIFICE
14-173
Page 634 of 1681
t
Driveshafts
Inspection
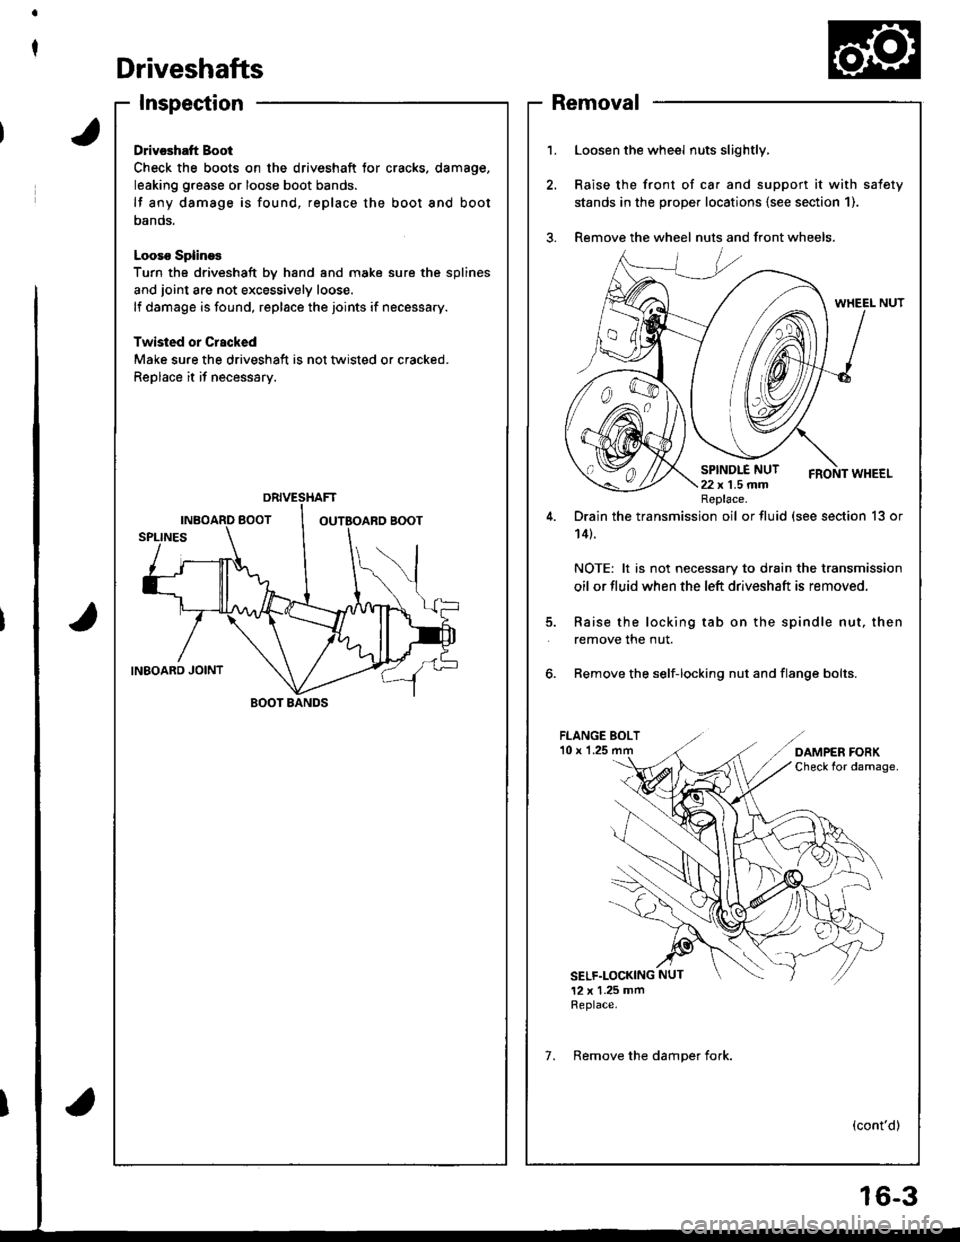
Drivcshatt Boot
Check the boots on the driveshaft tor cracks. damage,
leaking grease or loose boot bands.
lf any damage is found, replace the boot and boot
oanos.
Looso SplineE
Turn the driveshaft by hand and moke sure the splines
and joint are not excessively loose.
lf damage is found, replace the joints if necessary.
Twisled or Crscked
Make sure the driveshaft is not tlvisted or cracked.
Replace it if necessary.
BOOT BANDS
1.Loosen the wheel nuts slightly,
Raise the front of ca. and support it with safety
stands in the prope. locations {see section 1).
Remove the wheel nuts and front wheels.
5.
Drain the transmission oil or fluid (see section 13 or
14t.
NOTE: lt is not necessary to drain the transmission
oil or fluid when the left driveshaft is removed.
Raise the locking tab on the spindle nut, then
remove the nut.
6. Remove the self-locking nut and flange bolts.
FLANGE BOLT'10 x 1.25
SELF.LOCKING NUT
12 x 1.25 mmReplace.
(cont'd)
Replace.
7. Remove the damoer fork.
Removal
6-3
Page 646 of 1681
Intermediate Shaft
Removal
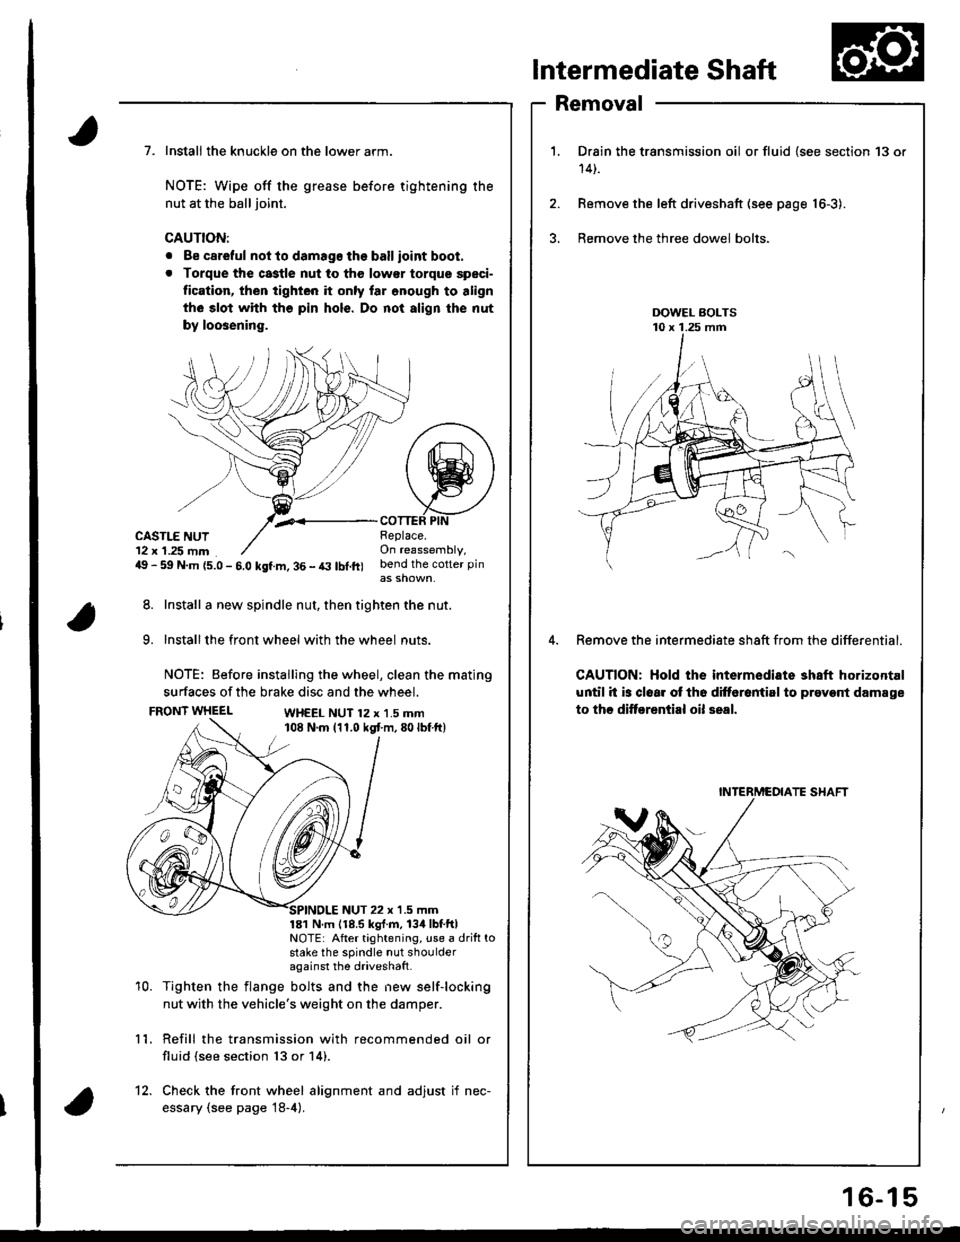
Drain the transmission oil or fluid {see section 13 or
14t.
Remove the left driveshaft (see page 16-3).
Bemove the three dowel bolts.
Remove the intermediate sh8ft from the differential.
CAUTION: Hold the intermediate shaft horizontal
until it is clear ot th6 difforantirl to prevont damage
to thc ditf€rential oil seal.
7. Install the knuckle on the lower arm.
NOTE: Wipe off the grease before tightening the
nut at the ball joint.
CAUTION:
. Be careful not to damago the ballioint boot.
. Torque the castle nut to tho low€r torque speci-
tication, then tighten it only lar onough to align
th6 slot whh tho pin hols. Do not align the nut
by loosening.
,.<__coTTEF PtNCASTLE NUT12 x 1.25 mm49 - 59 N.m {5.0 - 5.0 kgf.m, 36 - t3 lbl.ft)
Beplace.On reassembly,bend the cotter pin
8. Install a new spindle nut, then tighten the nut.
9. Installthe front wheel with the wheel nuts.
NOTE: Before installing the wheel, clean the mating
surfaces of the brake disc and the wheel.
FRONT WHEELWH€EL NUT 12 x 1.5 mm108 N.m (11.0 kgt m,80lbf ft)
10.
NUT 22 x '1.5 mm181 N m 118.5 kgl.m, 134lbtftlNOTE: After tightening, use a drift tostake the spindle nut shoulderagainst the driveshatt.
Tighten the flange bolts and the new self-locking
nut with the vehicle's weight on the damper.
Refill the transmission with recommended oil or
fluid (see section 13 or 14).
11.
12. Check the front wheel alignment and adjust if nec-
essary (see page 18-4).
INTERMCOIATE SHAFT
16-15
Page 1406 of 1681
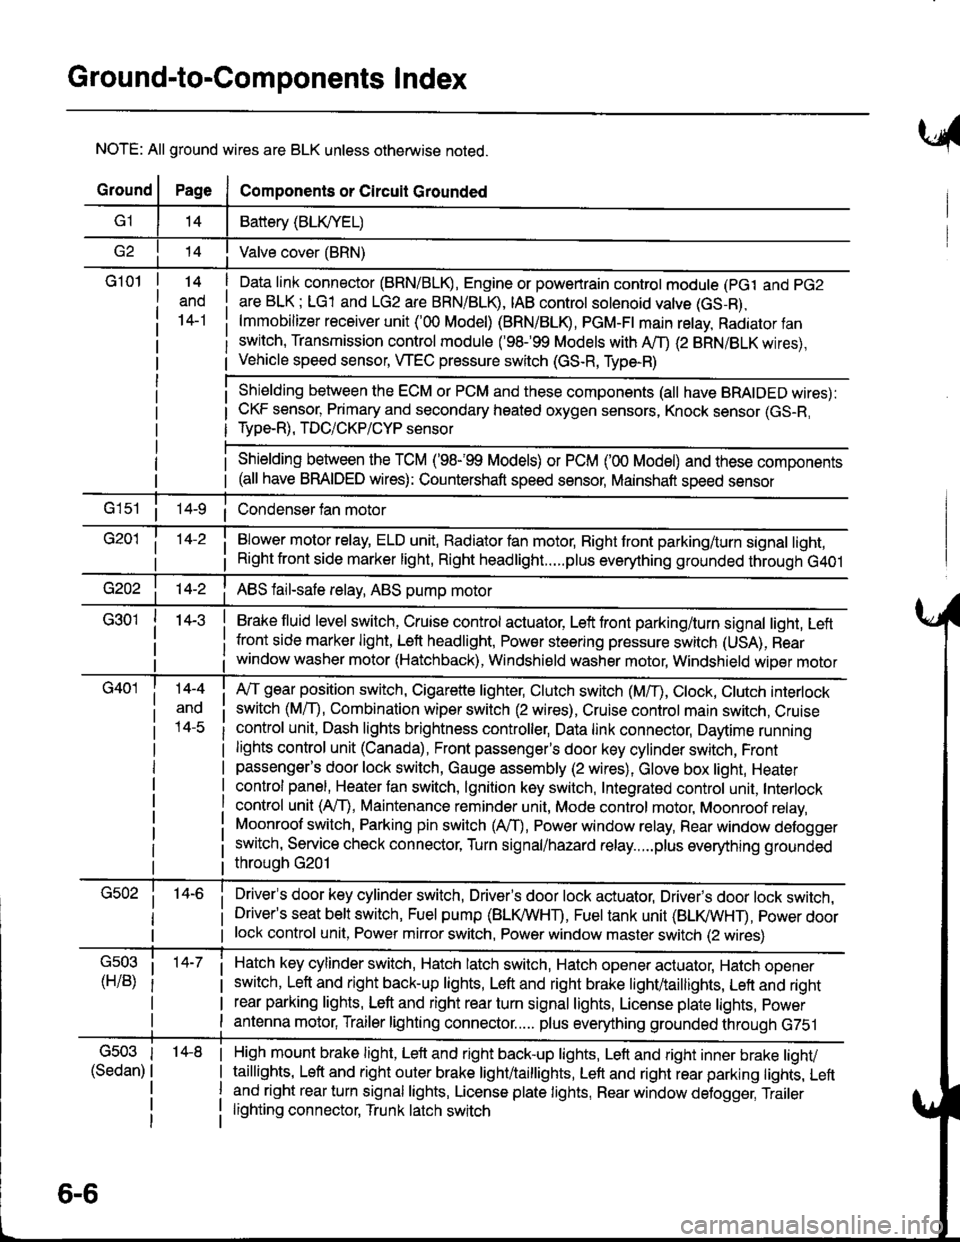
Ground-to-Components I ndex
NOTE: All ground wires are BLK unless otherwise noted.
GroundPageComponents or Circuit Grounded
Battery (BLIVYEL)
--t'I Valve cover (BRN)
G101t.+
and
14-1
Daia link connector (BRN/BLK), Engine or powertrain controt module (pct and pG2
are BLK; LG1 and LG2 are BRN/BLR, IAB controt solenoid valve (GS-B),
lmmobilizer receiver unit ('00 Model) (BRN/BLR, PGM-Ft main retay, Radiator fan
switch, Transmission control module ('98.�99 Models with MD (2 BRN/BLK wires),
Vehicle speed sensor, WEC pressure switch (GS-R, Type-R)
Shielding between the ECM or PCM and these components (all have BRAIDED wires):
CKF sensor, Primary and secondary heated oxygen sensors, Knock sensor (GS-R,
Type-R), TDC/CKP/CYP sensor
Shielding between the TCM ('98-'99 Models) or PCM ('00 Model) and these components(all have BRAIDED wires): Countershaft speed sensor, Mainshaft speed sensor
G1s1 ii Condenser fan motor
Brake fluid level switch, Cruise control actuator, Left front parking/turn signal light, Left
front side marker light, Left headlight, Power steering pressure switch (USA), Rear
window washer motor (Hatchback), Windshield washer motor, Windshield wiper motor
14-3
Blower motor relay, ELD unit, Badiator fan motor, Right front parking/turn signal light,
Right front side marker light, Right headlight.....plus everything grounded through G401
ABS fail-safe relay, ABS pump motor
G40114-4
ano
l4-c
A,/T gear position switch, Cigarette lighter, Clutch switch (M,/T), Ctock, Ctutch interlock
switch (MfD, Combination wiper switch (2 wires), Cruise control main switch, Cruise
control unit, Dash lights brightness controller, Data link connector, Daytime running
lights control unit (Canada), Front passenger's door key cylinder switch, Frontpassenger's door lock switch, Gauge assembly (2 wires), Glove box light, Heater
control panel, Heater tan switch, lgnition key switch, Integrated control unit, Interlock
control unit (AfI), Maintenance reminder unit, Mode control motor, Moonroof relay,
Moonroof switch, Parking pin switch (AfD, Power window relay, Rear window defogger
switch, Service check connector, Turn signal/hazard relay.....plus everything grounded
throuoh G201
Driver's door key cylinder switch, Driver's door lock actuator, Drivels door lock switch,Driver's seat belt switch, Fuel pump (BLI(/WHT), Fuel tank unit (BLI(/WHT), power doorlock control unit, Power mirror switch, Power window master switch (2 wires)
Hatch key cylinder switch, Hatch latch switch, Hatch opener actuator, Hatch ooener
switch, Left and right back-up lights, Left and right brake light/taillights, Lett and right
rear parking lights, Left and right rear turn signal lights, License plate lights, power
antenna motor, Trailer lighting connector..... plus everything grounded through G751
6-6
'14-8G503
(Sedan)
High mount brake light, Left and right back-up lights, Lett and right inner brake tighv
taillights, Left and right outer brake light/taittights, Left and right rear parking tights, Leftand right rear turn signal lights, License plate lights, Rear window detogger, Trailer
lighting connector, Trunk latch switch
Page 1651 of 1681
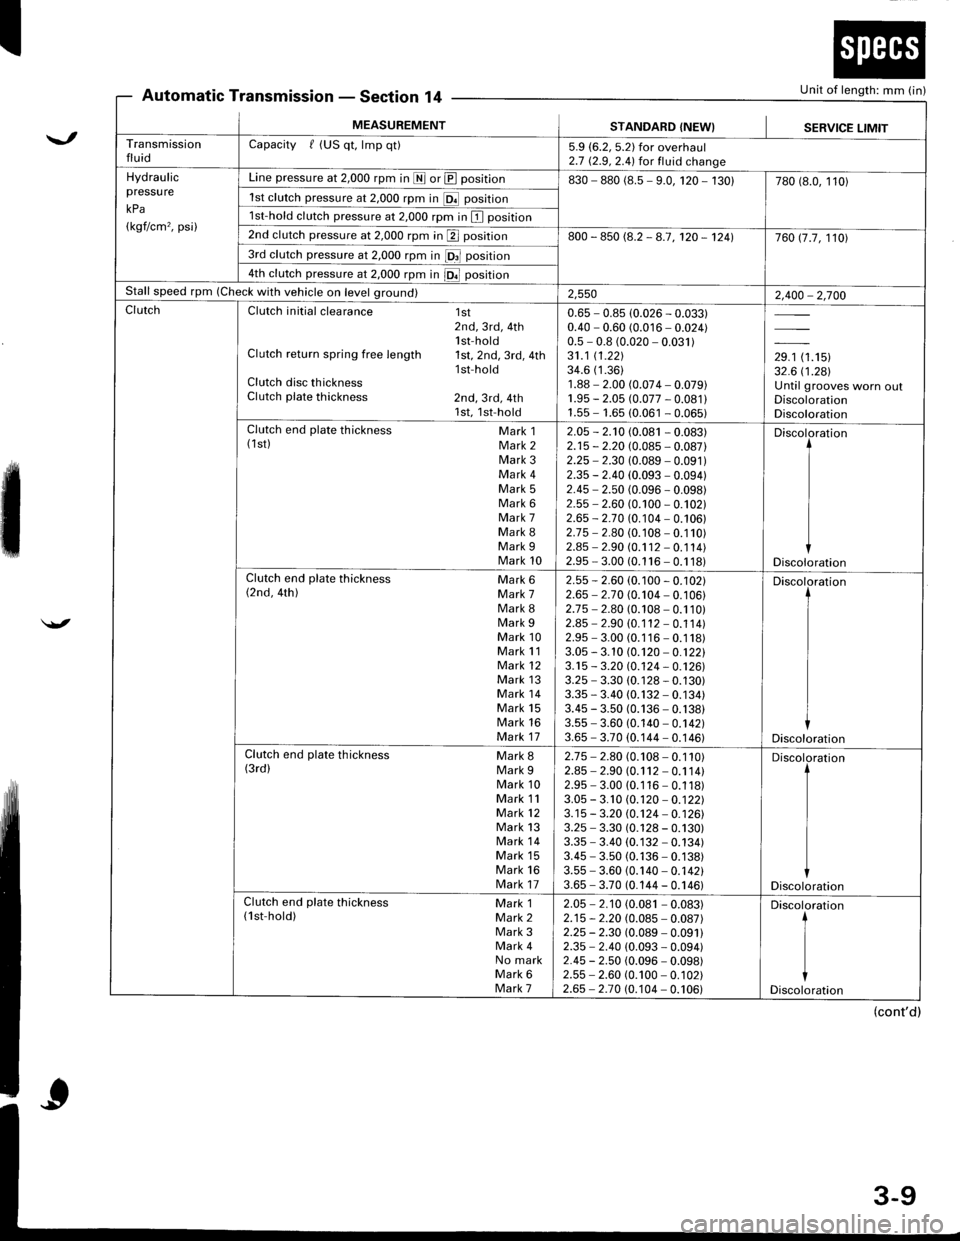
I
Automatic TransmissionSection 14
\.,
'
Unit of length: mm (in)- r;rEGl,l(tll I +
MEASUREMENTSTANDARD {NEW}SERVICE LIMITTransmissionfluidCapacity f (US qt, lmp qt)5.9 (6.2, 5.2) for overhaul2.7 (2.9,2.4) for fluid changeHydraulicpressu re
kPa
(kgf/cm'�, psi)
Line pressure at 2,000 rpm in I or @ position830 - 880 (8.5 - 9.0, 120 - 130)780 (8.0, 110)
1st clutch pressure at 2,000 rpm in [Of position
1st-hold clutch pressure at 2,000 rpm in I position
2nd clutch pressure at 2,000 rpm in p position800 - 850 (8.2 - 8.7, 120 - 1241760 17.7, 1101
3rd clutch pressure at 2,000 rpm in fOrl position
4th clutch pressure at 2,000 rpm in iOl position
Stall speed rpm (Check with vehicle on level ground)2,5502,400 - 2,700ClutchClutch initial clearance 1st2nd, 3rd, 4th1 st-hol dClutch return spring free length 1st,2nd,3rd,4thlsf holdClutch disc thicknessClutch plate thickness 2nd, 3rd, 4th1st,1st-hold
0.65 - 0.85 (0.026 - 0.033)0.40 - 0.60 (0.016 - 0.024)0.5 - 0.8 (0.020 - 0.031)31.1 (1.221
34.6 (1.36)
1.88 - 2.00 (0.074 - 0.079)1.95 - 2.05 (0.077 - 0.081 l1.55 - 1.65 (0.061 - 0.065)
,r, tr.'tur32.6 i'1.281Until grooves worn oulDiscolorationDiscolorationClutch end plate thickness Mark 1(1st) Mark 2Mark 3Mark 4Mark 5Mark 6Mark 7Mark 8Mark 9Mark 10
2.05 - 2.'t0 (0.081 - 0.083)2.15 - 2.20 (0.085 - 0.087)2.25 - 2.30 (0.089 - 0.091)2.35 - 2.40 (0.093 - 0.094)2.45 - 2.50 (0.096 - 0.098)2.55 - 2.60 (0.100 - 0.102)2.65 - 2-70 (0.104 - 0.106)2.75 - 2.80 (0.108 - 0.110)2.45 - 2.90 (0.1 12 - 0.1 14)2.95 - 3.00 (0.1 16 - 0.1 18)
Discoloration
Discoloration
Clutch end plate thickness Mark 6(2nd, 4th) Mark 7Mark 8Mark 9Mark 10Mark 11Mark 12Mark 13Mark 14Mark 15Mark 16Mark 17
2.55 -2.60 (0.100 - 0.102)2.65 - 2.7 0 (0.104 - 0. 1 06)2.75 - 2.80 (0.108 - 0.110)2.85 - 2.90 (0. 1 12 - 0.1 1 4)2.95 - 3.00 (0.1 16 - 0.1 18)3.05 - 3. 10 (0.120 - 0.12213.15 - 3.20 10.124 - 0.12613.25 - 3.30 (0. 1 28 - 0.130)3.35 * 3.40 (0.132 - 0.134)3.45 - 3.50 (0.136 - 0.138)3.55 - 3.60 (0.140 - 0.142)3.65 - 3.70 (0.144 - 0.146)
Discoloration
Discoloration
Clutch end plate thickness Mark g(3rd) Mark 9Mark 10Mark 11Mark 12Mark 13Mark 14Mark 15Mark 16Mark 17
2.75 - 2.80 (0.108 - 0.110)2.85 - 2.90 (0.1 12 - 0.1 14)2.95 - 3.00 (0.116 - 0.118)3.05 - 3.10 (0.120 - 0.12213.15 - 3.20 @j24 - 0.12613.25 - 3.30 (0.128 - 0.130)3.35 - 3.40 (0. 132 - 0.134)3.45 - 3.50 (0.136 - 0.138)3.55 - 3.60 (0.140 - 0.142)3.65 - 3.70 (0.144 - 0.146)
Discoloration
Discoloration
Clutch end plate thickness Mark 1(lst-hold) Mark 2Mark 3Mark 4No markMark 6Mark 7
2.05 - 2.10 (0.081 - 0.083)2.15 - 2.20 (0.085 - 0.087)2.25 - 2.30 (0.089 - 0.09112.35 - 2.40 (0.093 - 0.094)2.45 - 2.50 (0.096 - 0.098)2.55 - 2.60 (0.100 - 0. 1 02)2.65 - 2.70 (0.104 - 0.106)
Discoloration
t
I
iDiscoloration
(cont'd)
Page 1664 of 1681
Lubrication Points
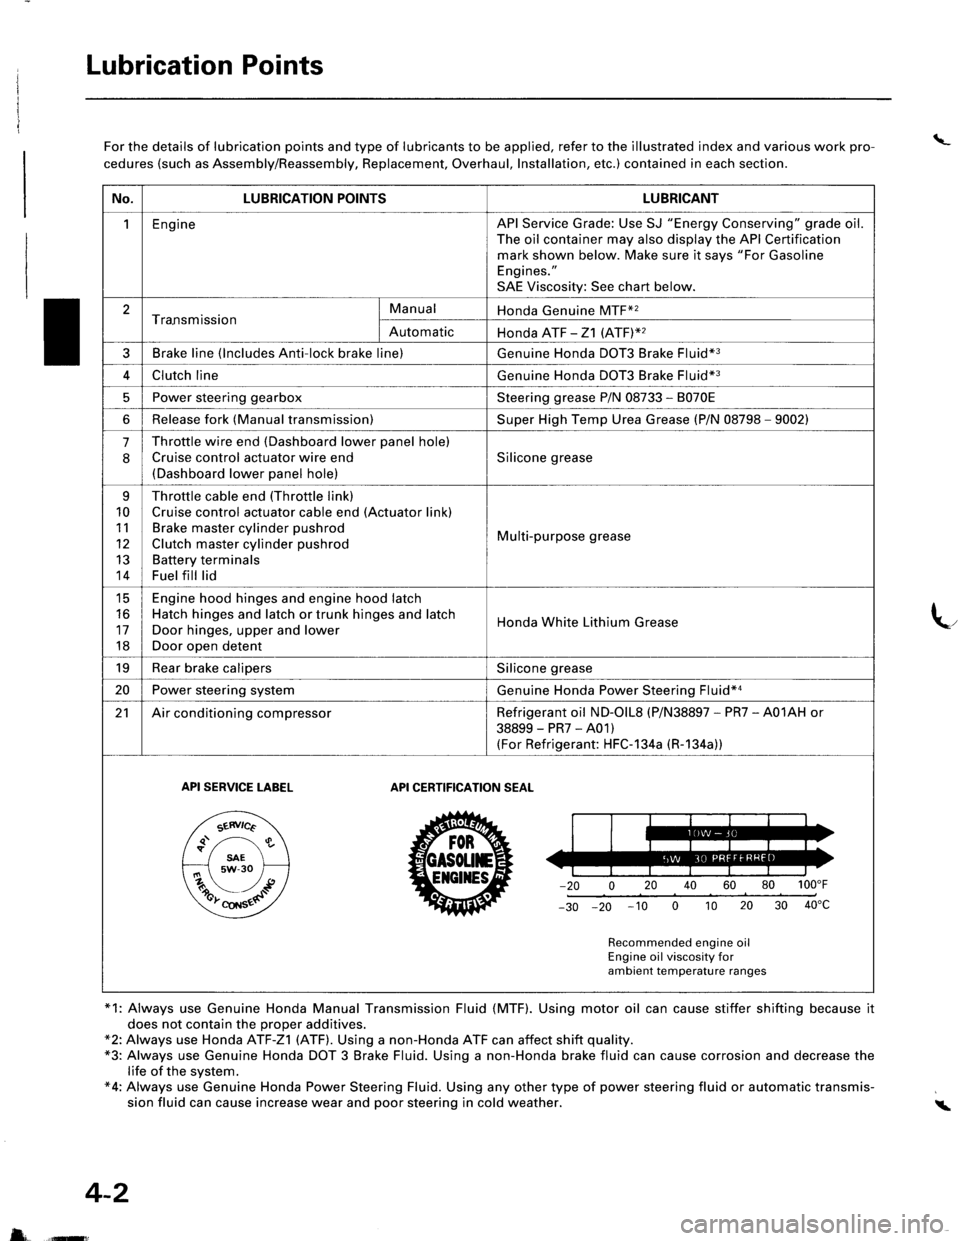
\_For the details of lubrication points and type of lubricants to be applied, refer to the illustrated index and various work pro-
cedures (such as Assembly/Reassembly, Replacement, Overhaul, Installation, etc.) contained in each section.
*1: Always use Genuine Honda Manual Transmission Fluid (MTF). Using motor oil can cause stiffer shifting because it
does not contain the proper additives.*2: Always use Honda ATF-Z1 (ATF). Using a non-Honda ATF can affect shift quality.*3: Always use Genuine Honda DOT 3 Brake Fluid. Using a non-Honda brake fluid can cause corrosion and decrease thelife of the system.*4: Always use Genuine Honda Power Steering Fluid. Using any other type of power steering fluid or automatic transmis-sion fluid can cause increase wear and poor steering in cold weather.i
4-2
5 ffi
No.LUBRICATION POINTSLUBRICANT
1EngineAPI Service Grade: Use SJ "Energy Conserving" grade oil.The oil container may also display the API Certificationmark shown below. Make sure it says "For GasolineEngines."
SAE Viscosity: See chart below.
2Tra.nsmissionManualHonda Genuine MTF*2
AutomaticHonda ATF -21 (ATFY2
3Brake line (lncludes Anti-lock brake line)Genuine Honda DOT3 Brake Fluid*3
4Clutch lineGenuine Honda DOT3 Brake Fluid*3
5Power steering gearboxSteering grease P/N 08733 - 8070E
6Release fork (Manual transmission)Super High Temp Urea Grease (P/N 08798 - 9002)
.J
Throttle wire end (Dashboard lower panel hole)
Cruise control actuator wire end(Dashboard lower panel hole)
Silicone grease
q
10
11
12
13
14
Throttle cable end (Throttle link)
Cruise control actuator cable end (Actuator link)Brake master cylinder pushrod
Clutch master cylinder pushrod
Battery terminalsFuel fill lid
Multi-purpose grease
tc
16
17
18
Engine hood hinges and engine hood latchHatch hinges and latch or trunk hinges and latch
Door hinges, upper and lower
Door open detent
Honda White Lithium Grease
19Rear brake calipersSilicone grease
20Power steering systemGenuine Honda Power Steering Fluid*a
21Air conditioning compressorRefrigerant oil ND-olL8 (P/N38897 - PR7 - A01AH or
38899-PR7-A01)(For Refrigerant: HFC-1 34a (R-1 34a))
API SERVICE TABELAPI CERTIFICATION SEAT
ZU30
Recommended engine oilEngine oil viscosity forambient temperature ranges