HONDA ODYSSEY 1999 Owners Manual
Manufacturer: HONDA, Model Year: 1999, Model line: ODYSSEY, Model: HONDA ODYSSEY 1999Pages: 343, PDF Size: 3.73 MB
Page 191 of 343

Accessories and Modifications
Modifications
Do not remove any original
equipment or modify your vehicle in any way that would alter its design or
operation. This could make your
vehicle unsafe and illegal to drive.
For example, do not make any
modifications that would change the
ride height of your vehicle, or install
wheels and tires with a different overall diameter.
Such modifications can adversely affect handling, and interfere with
the operation of the vehicle's anti-
lock brakes and other systems. In addition, any modifications that
decrease ground clearance increase
the chance of undercarriage parts striking a curb, speed bump, or other
raised object, which could cause
your airbags to deploy.
Do not modify your steering wheelor any other part of your
Supplemental Restraint System.
Modifications could make thesystem ineffective. Additional Safety Precaution
Do not attach or place objects on the
airbag covers. Any object attached to
or placed on the covers marked "SRS
AIRBAG," in the center of the steering wheel and on top of the
dashboard, could interfere with the
proper operation of the airbags. Or,
if the airbags inflate, the objects could be propelled inside the vehicle
and hurt someone.
Before DrivingProCarManuals.comMain Menu Table of Contents s t
Page 192 of 343
Carrying Cargo
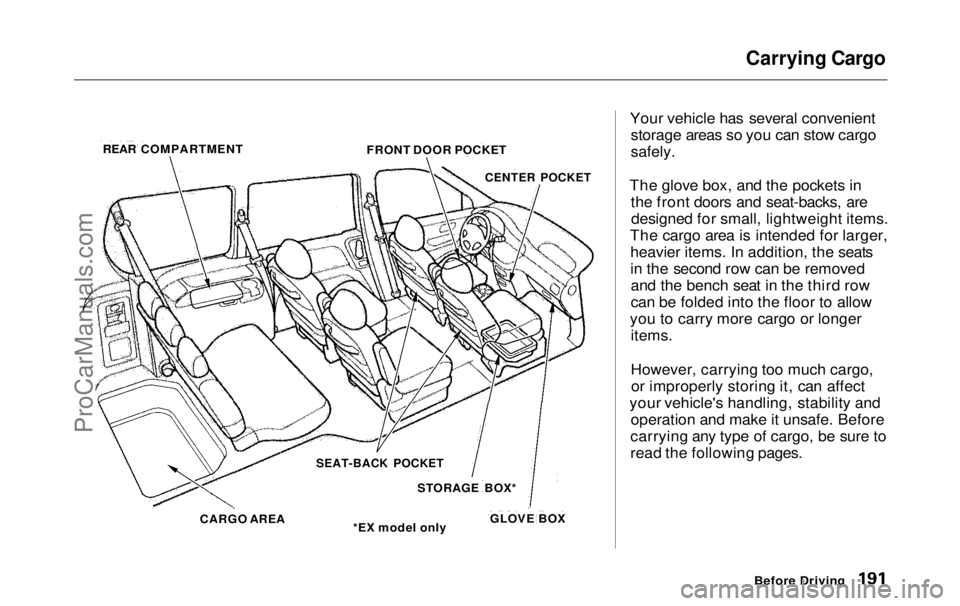
Your vehicle has several convenient storage areas so you can stow cargo
safely.
The glove box, and the pockets in the front doors and seat-backs, aredesigned for small, lightweight items.
The cargo area is intended for larger, heavier items. In addition, the seats
in the second row can be removedand the bench seat in the third row
can be folded into the floor to allow
you to carry more cargo or longer items.
However, carrying too much cargo,or improperly storing it, can affect
your vehicle's handling, stability and operation and make it unsafe. Before
carrying any type of cargo, be sure to
read the following pages.
Before Driving
REAR COMPARTMENT
FRONT DOOR POCKET
CENTER POCKET
SEAT-BACK POCKET
STORAGE BOX*
*EX model only
CARGO AREA
GLOVE BOXProCarManuals.comMain Menu Table of Contents s t
Page 193 of 343

Carrying Cargo
Load Limit
The maximum load for your vehicle
is
1,277 lbs
(580 kg).
This figure includes the total weight
of all occupants, cargo, accessories,
and the tongue weight if you are
towing a trailer.
To figure out how much cargo you can carry:
Add up the weight of all occupants.
If you are towing a trailer, add the
tongue weight to the number
above.
Subtract the total from 1,277 Ibs
(580kg).
The final number is the total weight
of cargo you can carry.
When you load luggage, the total
weight of the vehicle, all passengers,cargo, and trailer tongue load must
not exceed the Gross Vehicle
Weight Rating (GVWR). The load for the front and rear axles also must not exceed the Gross Axle Weight
Rating (GAWR). The GVWR and
GAWR are printed on the tire
information label attached to the driver's doorjamb (see page 316 ). Carrying Items in the Passenger
Compartment
Store or secure all items that could
be thrown around and hurt someone during a crash.
Be sure items placed on the floor
behind the front seats cannot roll
under the seats and interfere with
the driver's ability to operate the
pedals, or with the proper operation of the seats.
Keep the glove box closed while
driving. If the lid is open, a
passenger could injure their knees during a crash or sudden stop.
Before Driving Overloading or improper
loading can affect handling and
stability and cause a crash in
which you can be hurt or killed.
Follow all load limits and other
loading guidelines in this
manual.ProCarManuals.comMain Menu Table of Contents s t
Page 194 of 343
Carrying Cargo
Carrying Cargo in the Cargo Area
or on a Roof Rack
Distribute cargo evenly on the
floor of the cargo area, placing the
heaviest items on the bottom andas far forward as possible. Tiedown items that could be thrown
about the vehicle during a crash or
sudden stop.
If you carry large items that
prevent you from closing the
tailgate, exhaust gas can enter the
passenger area. To avoid the
possibility of carbon monoxide
poisoning, follow the instructions on page 53 . If you can carry any items on a
roof rack, be sure the total weight of the rack and the items does not
exceed the maximum allowable
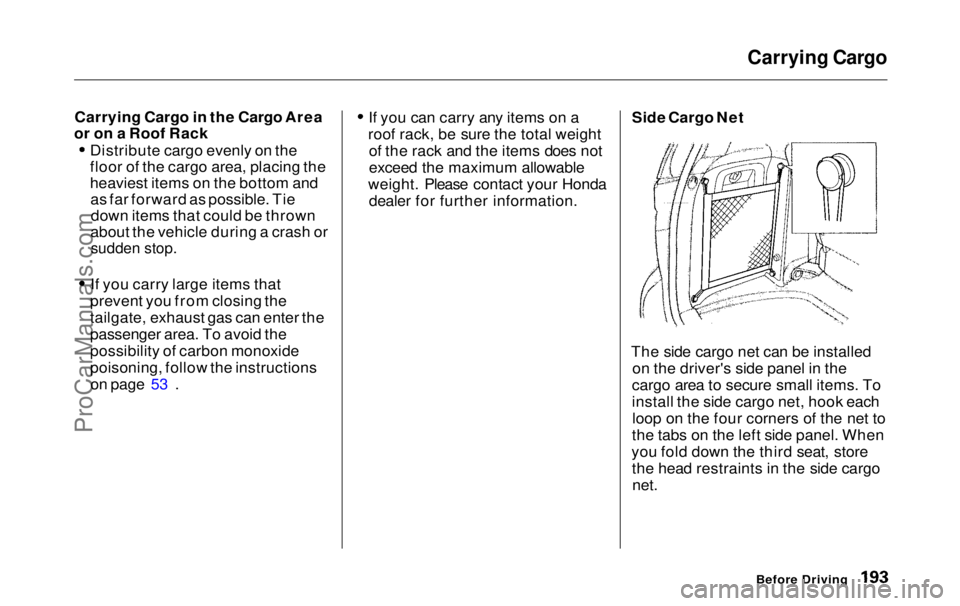
weight. Please contact your Honda dealer for further information. Side Cargo Net
The side cargo net can be installed on the driver's side panel in the
cargo area to secure small items. To
install the side cargo net, hook each loop on the four corners of the net to
the tabs on the left side panel. When
you fold down the third seat, store the head restraints in the side cargo
net.
Before DrivingProCarManuals.comMain Menu Table of Contents s t
Page 195 of 343
Carrying Cargo
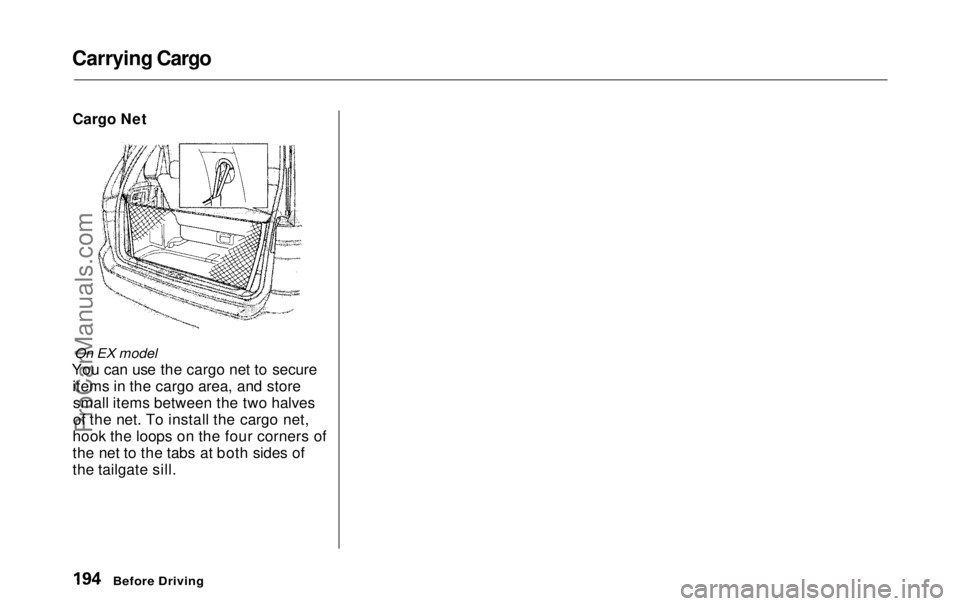
Cargo Net
On EX model
You can use the cargo net to secure items in the cargo area, and storesmall items between the two halves
of the net. To install the cargo net,
hook the loops on the four corners of
the net to the tabs at both sides of
the tailgate sill.
Before DrivingProCarManuals.comMain Menu Table of Contents s t
Page 196 of 343

Driving
This section gives you tips on starting the engine under various
conditions, and how to operate the automatic transmission. It also
includes important information on
parking your vehicle, the braking system, the Traction Control System,
and facts you need if you are
planning to tow a trailer. Preparing to Drive......................... 196
Starting the Engine........................ 197
Starting in Cold Weather at High Altitude ..................... 197
Automatic Transmission............... 198 Shift Lever Position Indicator.. 198
Shift Lever Positions................. 199
Maximum Allowable Speeds.... 201
Shift Lock Release..................... 202
Parking............................................ 203
The Braking System...................... 204 Brake Wear Indicators.............. 204
Brake System Design................ 205
Anti-lock Brakes........................ 205
Important SafetyReminders.......................... 206
ABS Indicator......................... 206
Traction Control System............... 207 TCS ON/OFF Switch................ 209
TCS Indicator............................. 209
Driving in Bad Weather................ 210
Towing a Trailer............................ 212
DrivingProCarManuals.comMain Menu s t
Page 197 of 343

Preparing to Drive
You should do the following checks and adjustments every day before
you drive your vehicle.
1. Make sure all windows, mirrors, and outside lights are clean and
unobstructed. Remove frost, snow, or ice.
2. Check that the hood and tailgate are fully closed.
3. Visually check the tires. If a tire looks low, use a gauge to check its
pressure.
4. Check that any items you may be carrying with you inside are storedproperly or fastened downsecurely. 5. Check the adjustment of the seat
(see page 100).
6. Check the adjustment of the inside and outside mirrors (see
page 115).
7. Check the adjustment of the steering wheel (see page 72 ).
8. Make sure the doors and tailgate are securely closed and locked.
9. Fasten your seat belt. Check that your passengers have fastenedtheir seat belts (see page 15). 10.Turn the ignition switch ON (II).
Check the indicator lights in the
instrument panel.
11.Start the engine (see page 197). 12. Check the gauges and indicator lights in the instrument panel (seepage 57).
DrivingProCarManuals.comMain Menu Table of Contents s t
Page 198 of 343

Starting the Engine
1. Apply the parking brake.
2. In cold weather, turn off all electrical accessories to reduce
the drain on the battery.
3. Make sure the shift lever is in Park. Press on the brake pedal.
4. Without touching the accelerator pedal, turn the ignition key to theSTART (III) position. If the enginedoes not start right away, do not
hold the key in START (III) for more than 15 seconds at a time.
Pause for at least 10 seconds
before trying again.
5. If the engine does not start within 15 seconds, or starts but stalls
right away, repeat step 4 with the accelerator pedal pressed half-way
down. If the engine starts, release
pressure on the accelerator pedal so the engine does not race. 6. If the engine still does not start,
press the accelerator pedal all the
way down and hold it there while starting in order to clear flooding.
As before, keep the ignition key in the START (III) position for nomore than 15 seconds. Return to
step 5 if the engine does not start.
If it starts, lift your foot off the
accelerator pedal so the engine
does not race.
Starting in Cold Weather at High
Altitude (Above 8,000 feet/
2,400 meters)
An engine is harder to start in cold weather. The thinner air found athigh altitude above 8,000 feet (2,400meters) adds to the problem.
Use the following procedure:
1. Turn off all electrical accessories to reduce the drain on the battery. 2. Push the accelerator pedal half-
way to the floor and hold it there
while starting the engine. Do nothold the ignition key in START (III) for more than 15 seconds.
When the engine starts, release the accelerator pedal gradually as
the engine speeds up and smoothsout.
3. If the engine fails to start in step 2, push the accelerator pedal to the
floor and hold it there while you try to start the engine for no more
than 15 seconds. If the enginedoes not start, return to step 2.
DrivingProCarManuals.comMain Menu Table of Contents s t
Page 199 of 343
Automatic Transmission
Your Honda's transmission has fourforward speeds, and is electronicallycontrolled for smoother shifting. It
also has a "lock-up" torque converter
for better fuel economy. You may
feel what seems like another shift
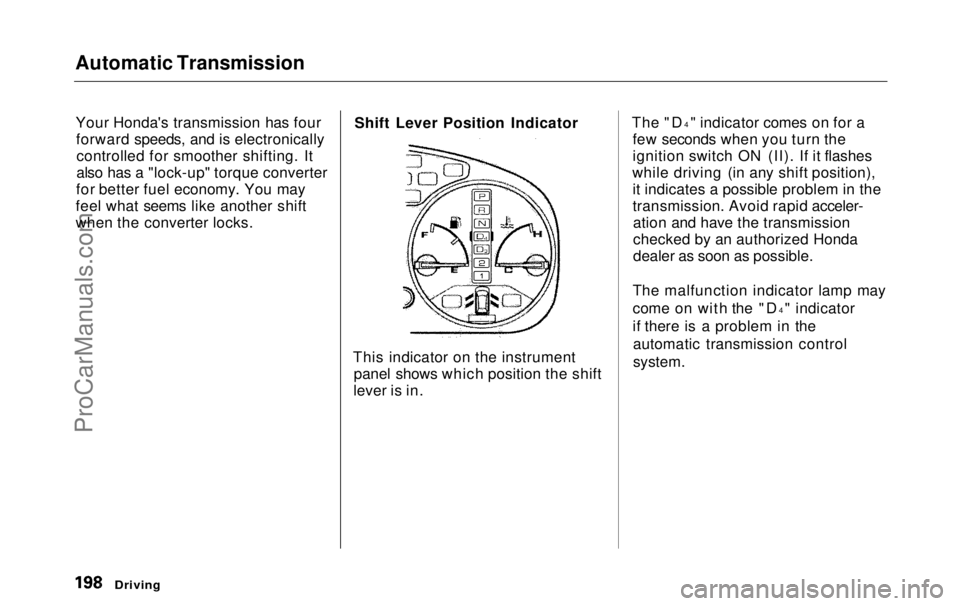
when the converter locks. Shift Lever Position Indicator
This indicator on the instrument panel shows which position the shift
lever is in. The "D
4
" indicator comes on for a
few seconds when you turn the
ignition switch ON (II). If it flashes
while driving (in any shift position), it indicates a possible problem in the
transmission. Avoid rapid acceler-ation and have the transmission
checked by an authorized Honda
dealer as soon as possible.
The malfunction indicator lamp may
come on with the "D 4
" indicator
if there is a problem in the automatic transmission control
system.
DrivingProCarManuals.comMain Menu Table of Contents s t
Page 200 of 343
Automatic Transmission
Shift Lever Positions
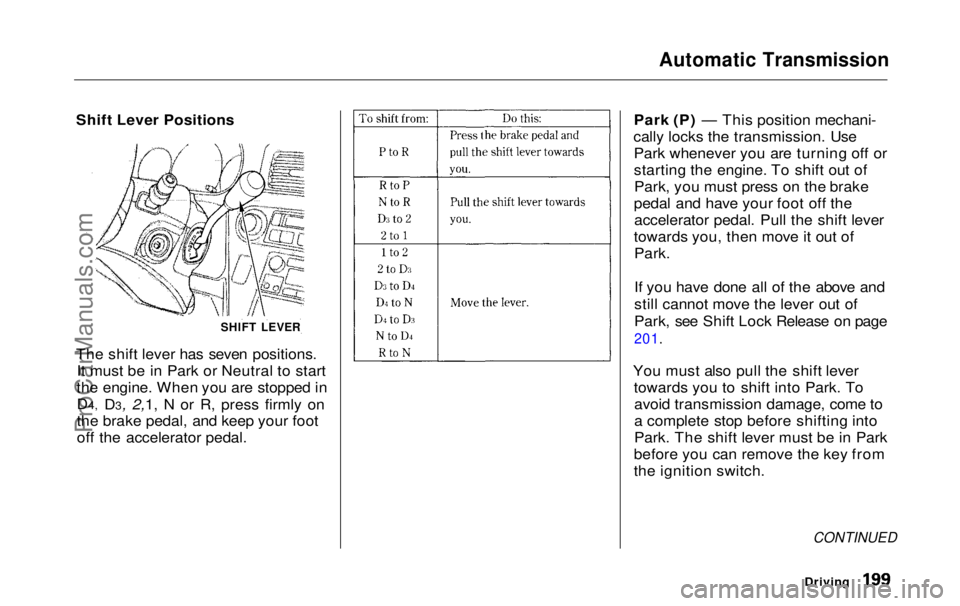
The shift lever has seven positions. It must be in Park or Neutral to start
the engine. When you are stopped in
D4, D3, 2,1, N or R, press firmly on
the brake pedal, and keep your foot
off
the accelerato
r pedal. Park (P) — This position mechani-
cally locks the transmission. Use Park whenever you are turning off or
starting the engine. To shift out ofPark, you must press on the brake
pedal and have your foot off the accelerator pedal. Pull the shift lever
towards you, then move it out of
Park.
If you have done all of the above and
still cannot move the lever out of
Park, see Shift Lock Release on page
201.
You must also pull the shift lever towards you to shift into Park. Toavoid transmission damage, come to
a complete stop before shifting into
Park. The shift lever must be in Park
before you can remove the key from
the ignition switch.
CONTINUED
Driving
SHIFT LEVERProCarManuals.comMain Menu Table of Contents s t