light HONDA ODYSSEY 2012 RB3-RB4 / 4.G Workshop Manual
[x] Cancel search | Manufacturer: HONDA, Model Year: 2012, Model line: ODYSSEY, Model: HONDA ODYSSEY 2012 RB3-RB4 / 4.GPages: 441, PDF Size: 14.07 MB
Page 246 of 441
Continued
245
uuRear Entertainment System
*uOperating the System
Features
Auto Play On:
1.Rotate to select Auto Play On, then press .
2.The check mark disappears, and the auto play feature turns off.
uWith this feature off, the DVD does not automatically start playing when the
disc is inserted. Press button to play.
Title/Chapter Search:
1.Rotate to select Title Search or Chapter Search, then press .
2.Rotate to select a title or chapter number, then press .■
TITLE/SCROLL button on the remote
Press the TITLE/SCROLL button while the DVD is playing to see the current status of
title, chapter, elapsed time, angle, subtitle, audio, and sound characteristics.
■
MENU button on the remote
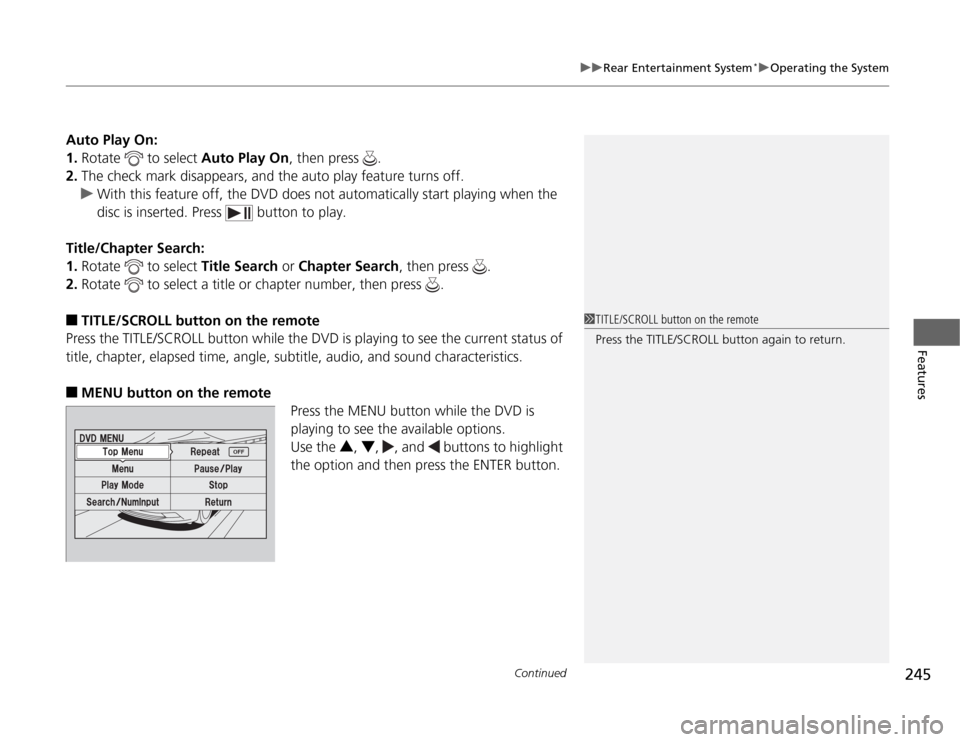
Press the MENU button while the DVD is
playing to see the available options.
Use the 3, 4, , and buttons to highlight
the option and then press the ENTER button.
1TITLE/SCROLL button on the remote
Press the TITLE/SCROLL button again to return.
Page 249 of 441

248
uuRear Entertainment System
*uOperating the System
Features
Search:
You can search for a DVD segment from the following methods.
1.Select NumInput to go to the number input screen.
2.Use the 3, 4, , and buttons to input numbers.
uIf you want to delete a number, select DEL.
3.The cursor automatically goes to ENT after you input three digits. Press the ENTER
button to command.
Repeat:
Highlight this option and press the ENTER button to change the repeat mode from
chapter repeat and title repeat, to repeat off.Title Search - Select the title you want to play.
Chapter Search - Select the chapter you want to play.
NumInput - Enter a three digit number, if issued to the DVD, to find the
segment you want to start to play.
Page 250 of 441
249
uuRear Entertainment System
*uOperating the System
Continued
Features
■
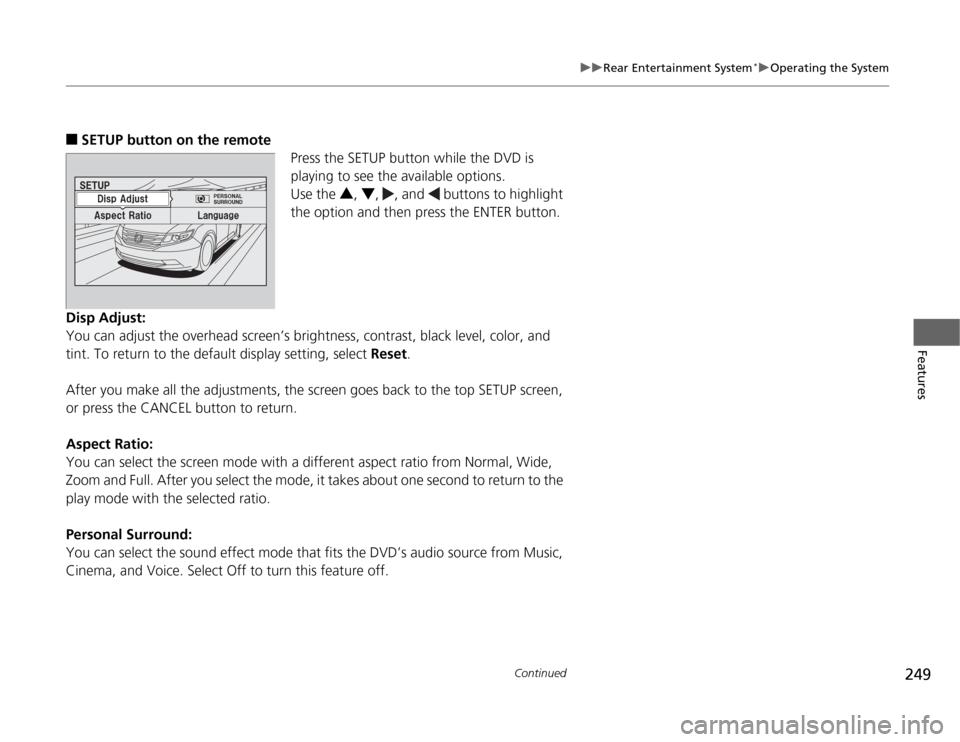
SETUP button on the remote
Press the SETUP button while the DVD is
playing to see the available options.
Use the 3, 4, , and buttons to highlight
the option and then press the ENTER button.
Disp Adjust:
You can adjust the overhead screen’s brightness, contrast, black level, color, and
tint. To return to the default display setting, select Reset.
After you make all the adjustments, the screen goes back to the top SETUP screen,
or press the CANCEL button to return.
Aspect Ratio:
You can select the screen mode with a different aspect ratio from Normal, Wide,
Zoom and Full. After you select the mode, it takes about one second to return to the
play mode with the selected ratio.
Personal Surround:
You can select the sound effect mode that fits the DVD’s audio source from Music,
Cinema, and Voice. Select Off to turn this feature off.
Page 252 of 441
251
uuRear Entertainment System
*uOperating the System
Continued
Features
■
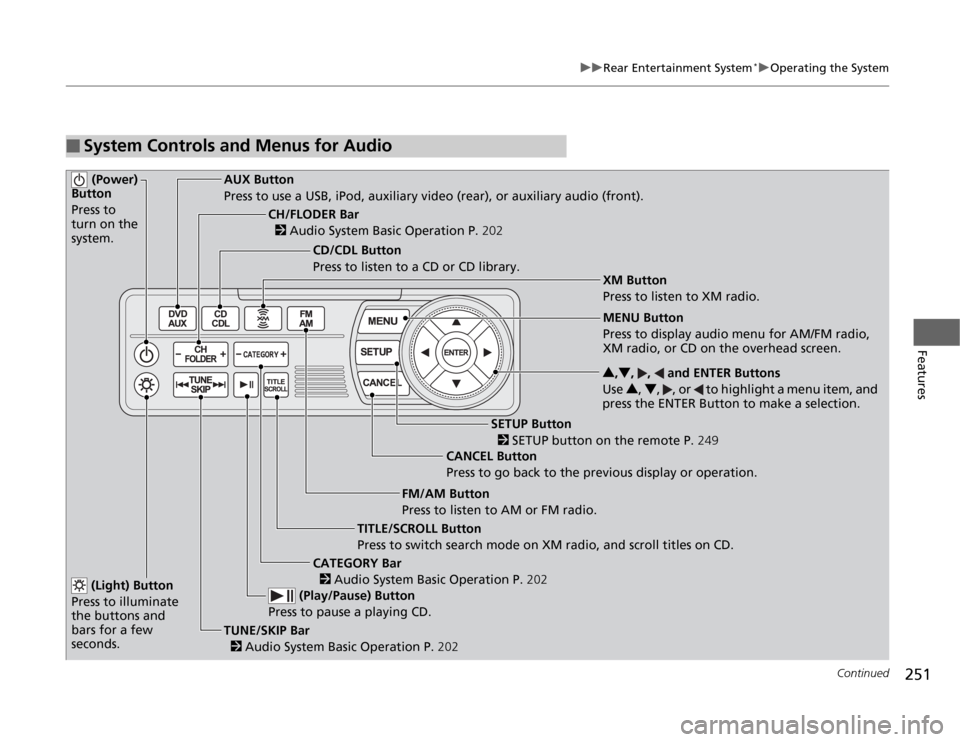
System Controls and Menus for Audio (Power)
Button
Press to
turn on the
system.
AUX Button
Press to use a USB, iPod, auxiliary video (rear), or auxiliary audio (front).
(Light) Button
Press to illuminate
the buttons and
bars for a few
seconds.TUNE/SKIP Bar
2 Audio System Basic Operation P.202 (Play/Pause) Button
Press to pause a playing CD.
TITLE/SCROLL Button
Press to switch search mode on XM radio, and scroll titles on CD.CANCEL Button
Press to go back to the previous display or operation.3,4, , and ENTER Buttons
Use 3, 4, , or to highlight a menu item, and
press the ENTER Button to make a selection.
CATEGORY Bar
2 Audio System Basic Operation P.202
CH/FLODER Bar
2 Audio System Basic Operation P.202
CD/CDL Button
Press to listen to a CD or CD library.
FM/AM Button
Press to listen to AM or FM radio.
SETUP Button
2 SETUP button on the remote P.249 XM Button
Press to listen to XM radio.
MENU Button
Press to display audio menu for AM/FM radio,
XM radio, or CD on the overhead screen.
Page 258 of 441
257
Continued
Features
HomeLink
® Universal Transceiver
*
The HomeLink
® Universal Transceiver can be programmed to operate up to three
remote controlled devices around your home, such as garage doors, lighting, or
home security systems.
Refer to the safety information that comes with your garage door opener to test that
the safety features are functioning properly. If you do not have the safety
information, contact the manufacturer.
Before programming HomeLink, make sure that people and objects are out of the
way of the garage or gate to prevent potential injury or damage.
When programming a garage door opener, park just outside the garage door’s
path.
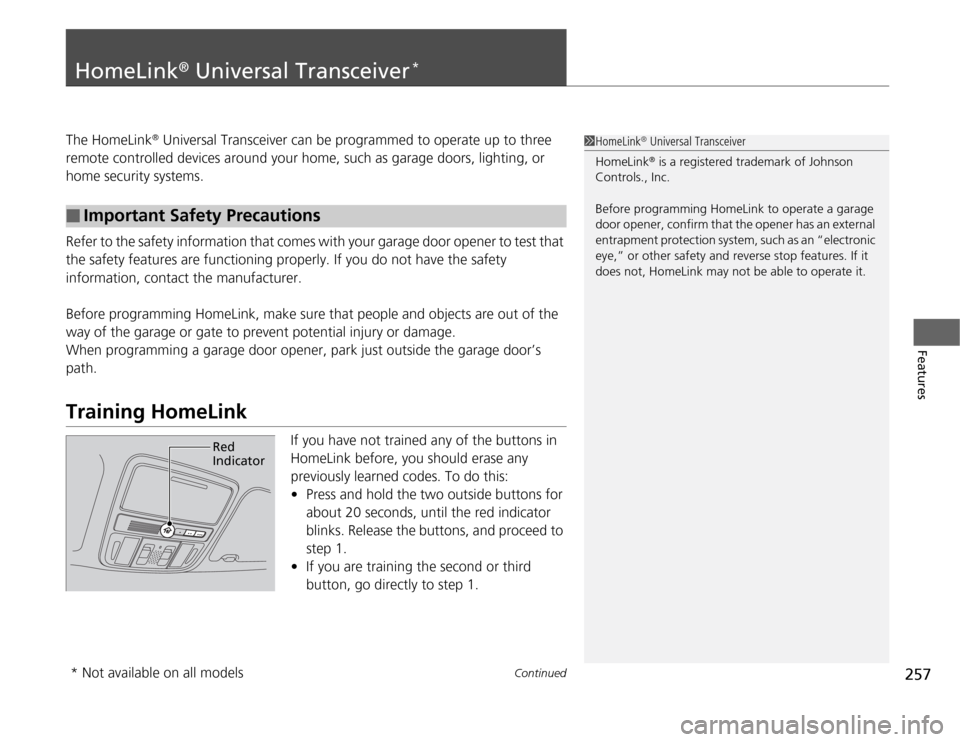
Training HomeLink
If you have not trained any of the buttons in
HomeLink before, you should erase any
previously learned codes. To do this:
•Press and hold the two outside buttons for
about 20 seconds, until the red indicator
blinks. Release the buttons, and proceed to
step 1.
•If you are training the second or third
button, go directly to step 1.
■
Important Safety Precautions
1HomeLink
® Universal Transceiver
HomeLink® is a registered trademark of Johnson
Controls., Inc.
Before programming HomeLink to operate a garage
door opener, confirm that the opener has an external
entrapment protection system, such as an “electronic
eye,” or other safety and reverse stop features. If it
does not, HomeLink may not be able to operate it.
Red
Indicator
* Not available on all models
Page 287 of 441
286Driving
Before DrivingDriving PreparationCheck the following items before you start driving.
•Make sure there are no obstructions on the windows, door mirrors, exterior
lights, or other parts of the vehicle.
uRemove any frost, snow, or ice.
uRemove any snow on the roof, as this can slip down and obstruct your field of
vision while driving. If frozen solid, remove ice once it has softened.
uWhen removing ice from around the wheels, be sure not to damage the wheel
or wheel components.
•Make sure the hood is securely closed.
uIf the hood opens while driving, your front view will be blocked.
•Make sure the tires are in good condition.
uCheck air pressure, and check for damage and excessive wear.
2Checking and Maintaining Tires P. 370
•Make sure there are no people or objects behind or around the vehicle.
uThere are blind spots from the inside.■
Exterior Checks
1Exterior Checks
NOTICEWhen doors are frozen shut, use warm water around
the door edges to melt any ice. Do not try to force
them open, as this can damage the rubber trim
around the doors. When done, wipe dry to avoid
further freezing.
Do not pour warm water into the key cylinder.
You will be unable to insert key if the water freezes in
the hole.
Page 288 of 441
Continued
287
uuBefore DrivinguDriving Preparation
Driving
•Store or secure all items on board properly.
uCarrying too much cargo, or improperly storing it, can affect your vehicle's
handling, stability, stopping distance, and tires, and make it unsafe.
2Maximum Load Limit P. 289
•Do not pile items higher than the seat height.
uThey can block your view and may be thrown forward in the event of sudden
braking.
•Do not place anything in the front seat footwells. Make sure to secure the floor
mat.
uAn object or unsecured floor mat can interfere with your brake and accelerator
pedal operation while driving.
•If you have any animals on board, do not let them move around in the vehicle.
uThey may interfere with driving and a crash could occur.
•Securely close and lock all doors and the tailgate.
2Locking/Unlocking the Doors from the Inside P. 114
•Adjust your seating position properly.
uAdjust the head restraint, too.
2Adjusting the Seats P. 154
2Adjusting the Head Restraints P. 157
•Adjust the mirrors and steering wheel properly for your driving.
uAdjust them while sitting in the proper driving position.
2Adjusting the Mirrors P. 152
2Adjusting the Steering Wheel P. 151
■
Interior Checks
1Interior Checks
The headlight aim is set by the factory, and does not
need to be adjusted. However, if you regularly carry
heavy items in the cargo area or tow a trailer, have
the aiming readjusted at a dealer or by a qualified
technician.
Page 293 of 441
uuTowing a TraileruTowing Preparation
292Driving
■
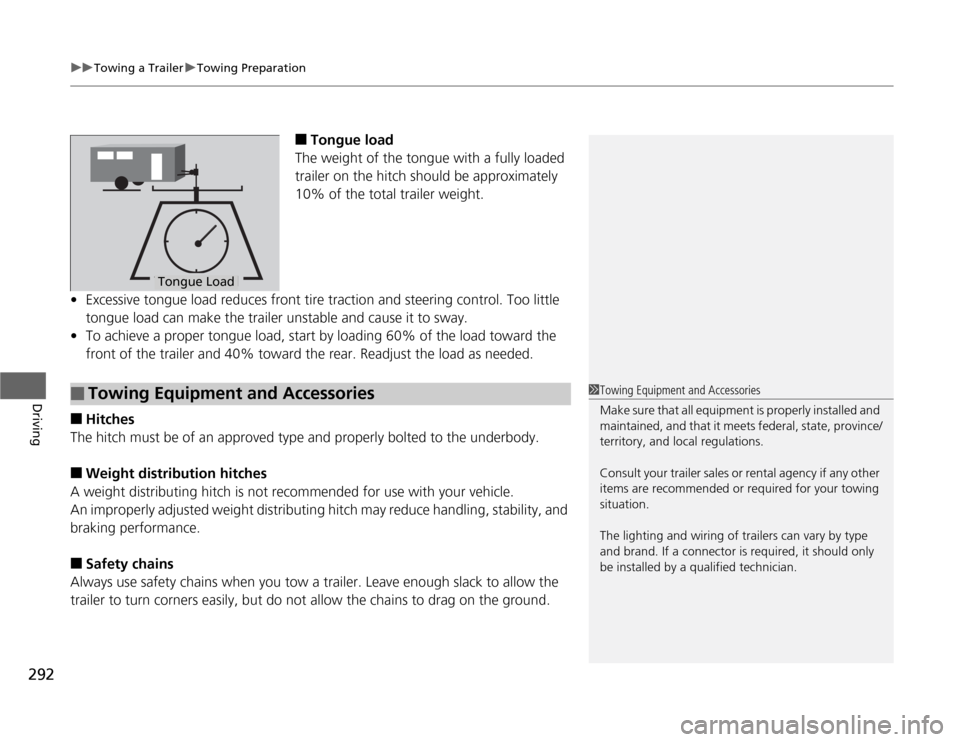
Tongue load
The weight of the tongue with a fully loaded
trailer on the hitch should be approximately
10% of the total trailer weight.
•Excessive tongue load reduces front tire traction and steering control. Too little
tongue load can make the trailer unstable and cause it to sway.
•To achieve a proper tongue load, start by loading 60% of the load toward the
front of the trailer and 40% toward the rear. Readjust the load as needed.
■
Hitches
The hitch must be of an approved type and properly bolted to the underbody.
■
Weight distribution hitches
A weight distributing hitch is not recommended for use with your vehicle.
An improperly adjusted weight distributing hitch may reduce handling, stability, and
braking performance.
■
Safety chains
Always use safety chains when you tow a trailer. Leave enough slack to allow the
trailer to turn corners easily, but do not allow the chains to drag on the ground.
Tongue LoadTongue Load
■
Towing Equipment and Accessories
1Towing Equipment and Accessories
Make sure that all equipment is properly installed and
maintained, and that it meets federal, state, province/
territory, and local regulations.
Consult your trailer sales or rental agency if any other
items are recommended or required for your towing
situation.
The lighting and wiring of trailers can vary by type
and brand. If a connector is required, it should only
be installed by a qualified technician.
Page 294 of 441
293
uuTowing a TraileruTowing Preparation
Continued
Driving
■
Trailer brakes
Recommended for any trailer with a total weight of 1,000 lbs (450 kg) or more:
There are two common types of trailer brakes: surge and electric. Surge brakes are
common for boat trailers, since the brakes will get wet. If you choose electric brakes,
be sure they are electronically actuated. Do not attempt to attach trailer brakes to
your vehicle's hydraulic system, as it will lower braking effectiveness and create a
potential hazard.
■
Trailer light
Trailer lights and equipment must comply with federal, state, province/territory, and
local regulations. Check with your local trailer sales or rental agency for the
requirements in the area where you plan to tow.
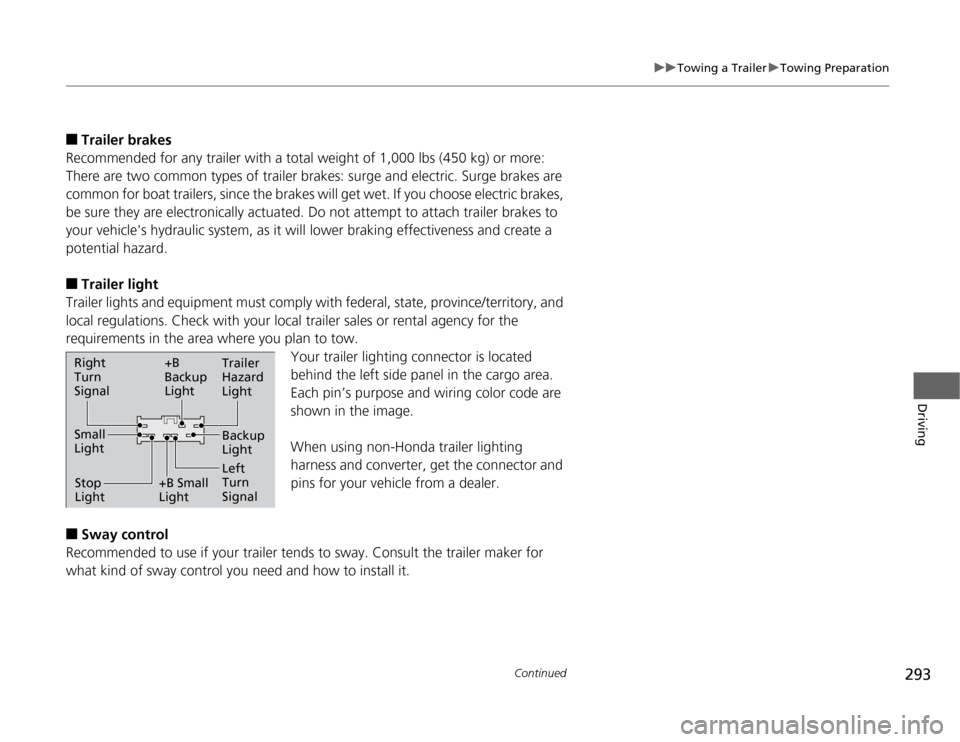
Your trailer lighting connector is located
behind the left side panel in the cargo area.
Each pin’s purpose and wiring color code are
shown in the image.
When using non-Honda trailer lighting
harness and converter, get the connector and
pins for your vehicle from a dealer.
■
Sway control
Recommended to use if your trailer tends to sway. Consult the trailer maker for
what kind of sway control you need and how to install it.Right
Turn
Signal
Small
Light
Stop
Light+B
Backup
Light
+B Small
LightTrailer
Hazard
Light
Left
Turn
SignalBackup
Light
Page 296 of 441
295
uuTowing a TraileruDriving Safely with a Trailer
Continued
Driving
Driving Safely with a Trailer•Have the trailer properly serviced and keep it in good condition.
•Make sure that all the weights and load in the vehicle and trailer are within limits.
2Towing Load Limits P. 291
•Securely attach the hitch, safety chains, and other necessary parts to the trailer.
•Securely store all the items in and on the trailer so that they do not shift while
driving.
•Check if the lights and brakes on the trailer are working properly.
•Check the pressure of the trailer tires, including the spare.
•Drive slower than normal.
•Obey posted speed limits for vehicles with trailer.
•Use the
(D
when towing a trailer on level roads.
•Turn more slowly and with a wider turning arc than normal.
•Allow more time and distance for braking.
•Do not brake or turn suddenly.
■
Things You Need To Know Before Towing a Trailer
■
Towing Speeds and Gears
■
Turning and Braking
1Driving Safely with a Trailer
Parking
In addition to the normal precautions, place wheel
chocks at each of the trailer’s tires.
When towing a trailer, we recommend that you carry
a full-size spare wheel and tire for your vehicle and
trailer. If you use the compact spare tire that came
with your vehicle, it could adversely affect vehicle
handling.
2Specifications P. 421
2Changing a Flat Tire P. 391
Remember to unhitch the trailer before changing a
flat tire. Ask the trailer sales or rental agency where
and how to store the trailer’s spare tire.