check engine light Hyundai Getz 2004 Owner's Guide
[x] Cancel search | Manufacturer: HYUNDAI, Model Year: 2004, Model line: Getz, Model: Hyundai Getz 2004Pages: 445, PDF Size: 12.16 MB
Page 300 of 445
1- 42 FEATURES OF YOUR HYUNDAI
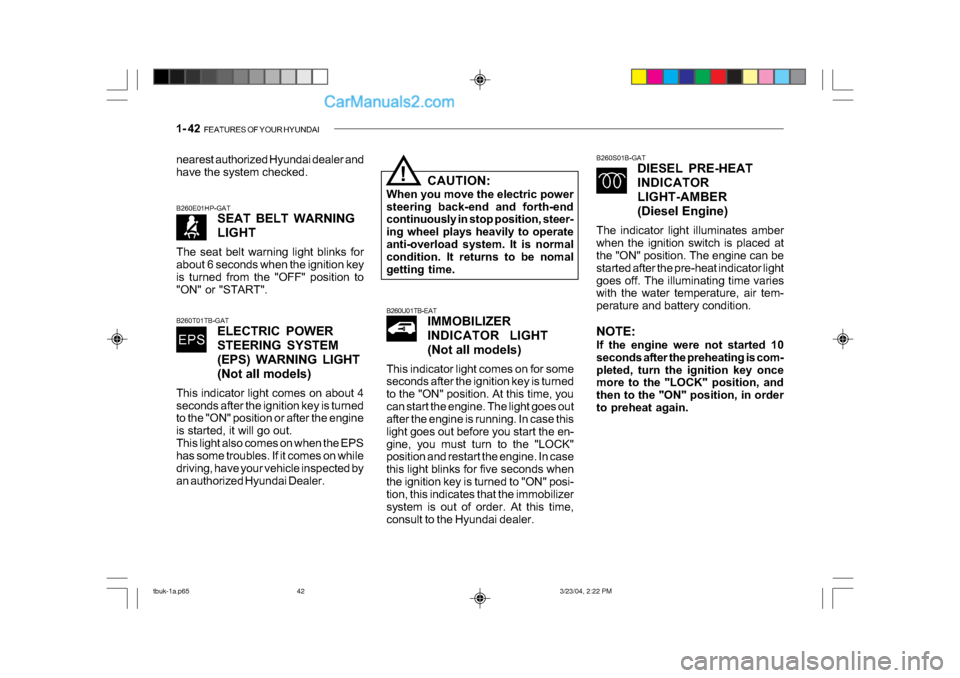
B260S01B-GAT
DIESEL PRE-HEAT
INDICATOR
LIGHT-AMBER
(Diesel Engine)
The indicator light illuminates amber
when the ignition switch is placed at
the "ON" position. The engine can be
started after the pre-heat indicator light
goes off. The illuminating time varies
with the water temperature, air tem-
perature and battery condition.
NOTE:
If the engine were not started 10
seconds after the preheating is com-
pleted, turn the ignition key once
more to the "LOCK" position, and
then to the "ON" position, in order
to preheat again.
B260T01TB-GAT
ELECTRIC POWER
STEERING SYSTEM
(EPS) WARNING LIGHT
(Not all models)
This indicator light comes on about 4
seconds after the ignition key is turned
to the "ON" position or after the engine
is started, it will go out.
This light also comes on when the EPS
has some troubles. If it comes on while
driving, have your vehicle inspected by
an authorized Hyundai Dealer. B260E01HP-GAT
SEAT BELT WARNING
LIGHT
The seat belt warning light blinks for
about 6 seconds when the ignition key
is turned from the "OFF" position to
"ON" or "START".
CAUTION:
When you move the electric power
steering back-end and forth-end
continuously in stop position, steer-
ing wheel plays heavily to operate
anti-overload system. It is normal
condition. It returns to be nomal
getting time.!
B260U01TB-EAT IMMOBILIZER
INDICATOR LIGHT
(Not all models)
This indicator light comes on for some
seconds after the ignition key is turned
to the "ON" position. At this time, you
can start the engine. The light goes out
after the engine is running. In case this
light goes out before you start the en-
gine, you must turn to the "LOCK"
position and restart the engine. In case
this light blinks for five seconds when
the ignition key is turned to "ON" posi-
tion, this indicates that the immobilizer
system is out of order. At this time,
consult to the Hyundai dealer.
nearest authorized Hyundai dealer and
have the system checked.
tbuk-1a.p65
3/23/04, 2:22 PM
42
Page 346 of 445
DRIVING YOUR HYUNDAI 2- 3
!
C020A01O-EAT BEFORE STARTING THE EN- GINE Before you start the engine, you should always:
1. Look around the vehicle to be sure
there are no flat tyres, puddles of oil or water or other indications of pos- sible trouble.
2. After entering the car, check to be
sure the parking brake is engaged.
3. Check that all windows, and lights are clean.
4. Check that the interior and exterior
mirrors are clean and in position.
5. Check your seat, seatback and
headrestraint to be sure they are intheir proper positions.
6. Close all the doors.
7. Fasten your seat belt and be sure
that all other occupants have fas- tened theirs.
8. Turn off all lights and accessories that are not needed.
9. When you turn the ignition switch to "ON" check that all appropriate warn-ing lights are operating and that youhave sufficient fuel. 10.Check the operation of warning
lights and all bulbs when key is inthe "ON" position.
WARNING: (DIESEL ENGINE)
To ensure that sufficient vacuum exists within the brake system dur-ing cold weather start-up condi-tions, it is necessary to run theengine at idle for several seconds after starting the engine. SC040A1-F COMBINATION IGNITION SWITCH AND STEERING LOCK To Start the Engine
o If your Hyundai is equipped with a
manual transaxle, place the shift lever in neutral and depress theclutch pedal fully.
o If your Hyundai has an automatic
transaxle, place the shift lever in "P" (park).
o To start the engine, insert the igni-
tion key and turn it to the "START" position. Release it as soon as theengine starts. Do not hold the key inthe "START" position for more that 15 seconds.
NOTE: For safety, the engine will not start if the shift lever is not in "P" or "N"Position (automatic transaxle).
tbuk-2.p65 3/23/04, 4:55 PM
3
Page 356 of 445
DRIVING YOUR HYUNDAI 2- 13
SC140B1-E ANTI-LOCK BRAKE SYSTEM (Not all models) The Anti-Lock Brake System (ABS) is designed to prevent wheel lock-upduring sudden braking or on hazard-ous road surfaces. The ABS controlmodule monitors the wheel speed and controls the pressure applied to each brake. Thus, in emergency situationsor on slick roads, ABS will increasevehicle control during braking. NOTE: During ABS operation, a slight pul- sation may be felt in the brake pedal when the brakes are applied. Also, a noise may be heard in the enginecompartment whilst braking. Theseconditions are normal and indicatethat the anti-lock brake system isfunctioning properly.
located in the instrument cluster will beilluminated. When the overdrive switchis turned "ON", the transaxle functionsas a fully automatic four speed unitwith the maximum fuel economy po- tential of the vehicle being realized. SC140A1-E EFFECTIVE BRAKING Braking system performance and fric- tion material life are greatly affected by the driving style adopted. The follow-ing suggestions are made to assist inachieving the best results from thebraking system.
o Anticipate the road and conditions
ahead in order that heavy braking may be avoided.
o When descending long gradients,
use the engine to assist in retardingthe vehicle to minimize the possibil- ity of brake fade occurring.
o When trailer towing, ensure that the
trailer brakes function correctly and use engine braking to assist thevehicle braking system. o Use only genuine Hyundai replace-
ment brake pads and shoes to en-sure consistent friction characteris-tics and wear rates.
o After driving through deep water (e.g. fording), the brakes may be-come wet and performance reduced.Always check brake efficiency afteremerging from the water and dry thebrakes by lightly depressing thebrake pedal several times whilst driving slowly.
o Apply the parking brake only when the vehicle is at rest.
o Since the power assistance pro- vided by the brake servo is derived from the engine, coasting with the engine turned off or towing of the vehicle with the engine turned offwill result in greatly increased pedalpressures being required to stop thevehicle.
o Do not hold the vehicle on the up- grade with the accelerator pedal.This can cause the transmission tooverheat. Always use the brakepedal or parking brake.
tbuk-2.p65 3/23/04, 4:55 PM
13
Page 358 of 445
DRIVING YOUR HYUNDAI 2- 15
o Keep your car in good condition. For
better fuel economy and reduced maintenance costs, maintain yourcar in accordance with the mainte-nance schedule in Section 5. If you drive your car in severe conditions, more frequent maintenance is re-quired (see Section 5 for details).
o Keep your car clean. For maximum service, your car should be keptclean and free of corrosive materi- als. It is especially important that mud, dirt, ice, etc. not be allowed toaccumulate on the underside of thecar. This extra weight can result inincreased fuel consumption and alsocontribute to corrosion.
o Travel lightly. Don't carry unneces-
sary weight in your car. Weight is anenemy of good fuel economy.
o Don't let the engine idle longer than necessary. If you are waiting (andnot in traffic), turn off your engine and restart only when you're ready to go.
o Remember, your car does not re-
quire extended warm-up. As soonas the engine is running smoothly,you can drive away. In very cold weather, however, give your engine a slightly longer warm-up period. o Don't "lug" or "over-rev" the engine.
Lugging is driving too slowly in toohigh a gear resulting in the enginebucking. If this happens to you, shiftto a lower gear. Over-revving is racing the engine beyond its safe limit. This can beavoided by shifting at the recom-mended speeds.
o Use your air conditioning sparingly.
The air conditioning system is oper- ated by the engine power so your fuel economy is reduced when youuse it.
SC160A1-F SMOOTH CORNERING Avoid braking or gear changing in cor- ners, especially when roads are wet.Ideally, corners should always be takenunder gentle acceleration. If you followthese suggestions, tyre wear will beheld to a minimum. SC170A1-E WINTER MOTORING The onset of winter conditions subject motor vehicles to greater operatingdemands. Therefore, the followingsuggestions will assist in maintainingpeak performance and reliability dur- ing these periods: ZC170B1-E Electrical System Winter conditions impose severe de- mands upon vehicle electrical systems, particularly the charging circuit. The battery condition and performancealong with the alternator performanceand drive belt condition should bechecked prior to the onset of winter.
tbuk-2.p65
3/23/04, 4:55 PM
15
Page 362 of 445
DRIVING YOUR HYUNDAI 2- 19
Coupling point
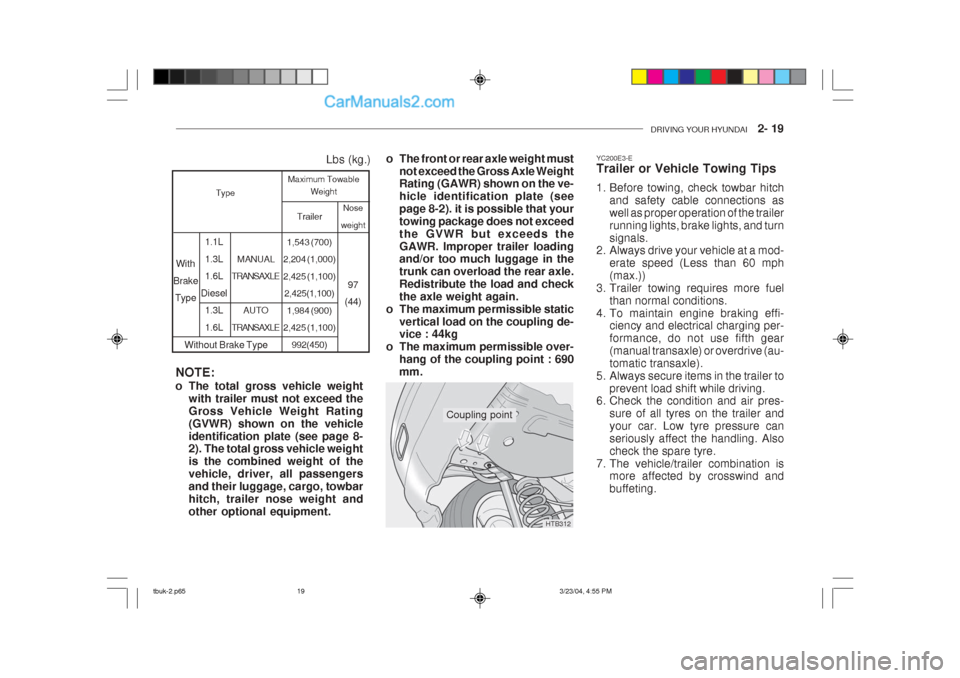
Nose
weight
97
(44)
Without Brake Type Trailer
1,543 (700)
2,204 (1,000) 2,425 (1,100) 2,425(1,100)
1,984 (900)
2,425 (1,100)
992(450)
MANUAL
TRANSAXLE
AUTO
TRANSAXLE
1.1L 1.3L 1.6L
Diesel 1.3L 1.6L
With
Brake Type Lbs (kg.)
Maximum Towable
Weight
Type
NOTE:
o The total gross vehicle weight with trailer must not exceed the Gross Vehicle Weight Rating(GVWR) shown on the vehicleidentification plate (see page 8- 2). The total gross vehicle weight is the combined weight of thevehicle, driver, all passengersand their luggage, cargo, towbarhitch, trailer nose weight andother optional equipment. o The front or rear axle weight must
not exceed the Gross Axle Weight Rating (GAWR) shown on the ve- hicle identification plate (seepage 8-2). it is possible that yourtowing package does not exceedthe GVWR but exceeds theGAWR. Improper trailer loading and/or too much luggage in the trunk can overload the rear axle.Redistribute the load and checkthe axle weight again.
o The maximum permissible static vertical load on the coupling de- vice : 44kg
o The maximum permissible over-
hang of the coupling point : 690 mm. YC200E3-E Trailer or Vehicle Towing Tips
1. Before towing, check towbar hitch
and safety cable connections as well as proper operation of the trailerrunning lights, brake lights, and turnsignals.
2. Always drive your vehicle at a mod-
erate speed (Less than 60 mph(max.))
3. Trailer towing requires more fuel than normal conditions.
4. To maintain engine braking effi- ciency and electrical charging per-formance, do not use fifth gear(manual transaxle) or overdrive (au-tomatic transaxle).
5. Always secure items in the trailer to
prevent load shift while driving.
6. Check the condition and air pres-
sure of all tyres on the trailer andyour car. Low tyre pressure canseriously affect the handling. Alsocheck the spare tyre.
7. The vehicle/trailer combination is more affected by crosswind andbuffeting.
HTB312
tbuk-2.p65 3/23/04, 4:55 PM
19
Page 363 of 445
2- 20 DRIVING YOUR HYUNDAI
When being passed by a large ve- hicle, keep a constant speed andsteer straight ahead. If there is toomuch wind buffeting slow down toget out of the other vehicle's air turbulence.
8. When parking your car and trailer, especially on a hill, be sure to follow all the normal precautions. Turn yourfront wheel into the curb, set theparking brake firmly, and put the transaxle in 1st or Reverse (manual) or Park (automatic). In addition,place wheel chocks at each of thetrailer's tyres.
9. If the trailer has electric brakes,
start your vehicle and trailer mov- ing, and then apply the trailer brake controller by hand to be sure thebrakes are working. This lets youcheck your electrical connection atthe same time.
10. During your trip, check occasion- ally to be sure that the load issecure, and that the lights andany trailer brakes are still working.
11. Avoid jerky starts, sudden accel- eration or sudden stops.
12. Avoid sharp turns and rapid lane changes. 13. Avoid holding the brake pedal
down too long or too frequently.This could cause the brakes tooverheat, resulting in reduced brak-ing efficiency.
14. When going down a hill, shift into
a lower gear and use the enginebraking effect.When ascending a long grade,
downshift the transaxle to a lowergear and reduce speed to reduce chances of engine overloading and/ or overheating.
15. If you have to stop while going
uphill, do not hold the vehicle inplace by pressing on the accelera-tor. This can cause the automatic transaxle to overheat. Use the park- ing brake or footbrake.
NOTE: When towing check transaxle fluid more frequently. CAUTION:
If overheating should occur whentowing, (temperature gauge reads near red zone), taking the following action may reduce or eliminate theproblem.
1. Turn off the air conditioner.
2. Reduce highway speed.
3. Select a lower gear when going uphill.
4. While in stop and go traffic, place the gear selection in park or neu- tral and idle the engine at a higherspeed.
!
tbuk-2.p65 3/23/04, 4:55 PM
20
Page 365 of 445
3- 2 WHAT TO DO IN AN EMERGENCY
HTB165
SD020B1-E
IF THE ENGINE CANNOT BE
CRANKED
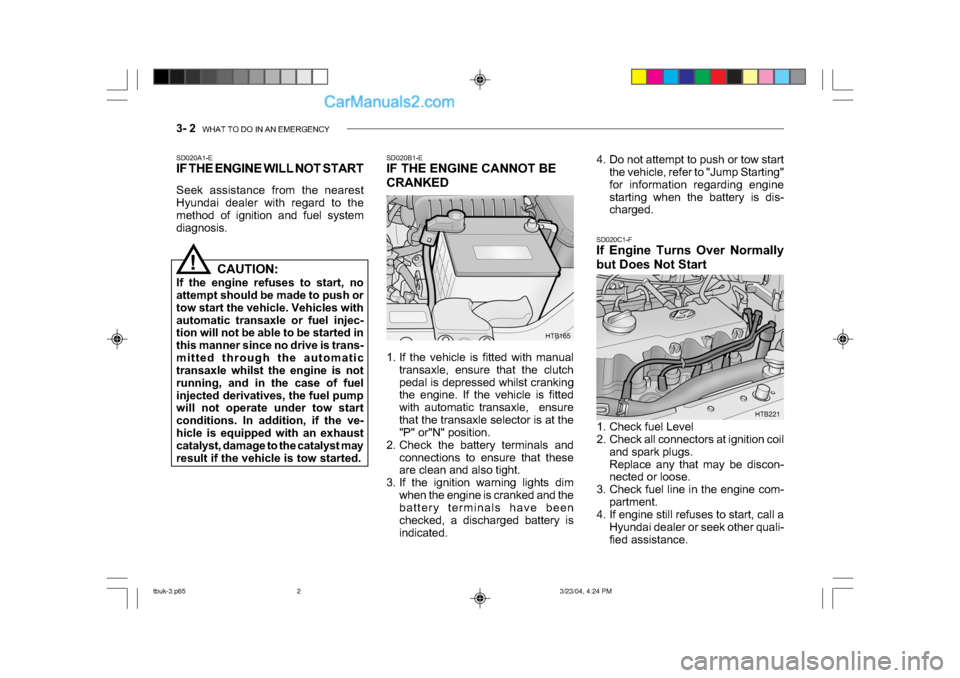
1. If the vehicle is fitted with manual
transaxle, ensure that the clutch
pedal is depressed whilst cranking
the engine. If the vehicle is fitted
with automatic transaxle, ensure
that the transaxle selector is at the
"P" or"N" position.
2. Check the battery terminals and
connections to ensure that these
are clean and also tight.
3. If the ignition warning lights dim
when the engine is cranked and the
battery terminals have been
checked, a discharged battery is
indicated. SD020C1-F
If Engine Turns Over Normally
but Does Not Start
SD020A1-E
IF THE ENGINE WILL NOT START
Seek assistance from the nearest
Hyundai dealer with regard to the
method of ignition and fuel system
diagnosis.
!
HTB221
CAUTION:
If the engine refuses to start, no
attempt should be made to push or
tow start the vehicle. Vehicles with
automatic transaxle or fuel injec-
tion will not be able to be started in
this manner since no drive is trans-
mitted through the automatic
transaxle whilst the engine is not
running, and in the case of fuel
injected derivatives, the fuel pump
will not operate under tow start
conditions. In addition, if the ve-
hicle is equipped with an exhaust
catalyst, damage to the catalyst may
result if the vehicle is tow started. 4. Do not attempt to push or tow start
the vehicle, refer to "Jump Starting"
for information regarding engine
starting when the battery is dis-
charged.
1. Check fuel Level
2. Check all connectors at ignition coil and spark plugs.
Replace any that may be discon-
nected or loose.
3. Check fuel line in the engine com- partment.
4. If engine still refuses to start, call a
Hyundai dealer or seek other quali-
fied assistance.
tbuk-3.p65 3/23/04, 4:24 PM
2
Page 392 of 445
6. Do-It-Yourself MaintenanceEngine compart ment ............................................... ......................... 6-2
Daily operating checks ............................................. ........................ 6-6
Engine oil ......................................... ................................................. 6-6
Engine and filter Replacement ................................................... ...... 6-9
Engine coolant Checking and R eplacing ....................................... 6-10
Spark plug Replacem ent ................................................ ................6-13
Changing the air cleaner filter ................................................... ......6-14
Manual Transaxle Lubri cant ............................................... ............6-15
Automatic Transaxle flui d .................................................. .............6-16
Brake System Checki ng ................................................. ...............6-18
Air conditioning System ............................................. .....................6-19
Drive belts .............................................. ........................................6-23
Individual Circu it Fuses ........................................... .......................6-24
Power steering fluid level ........................................ .......................6-26
Replacing Light Bulbs .............................................. ......................6-28
Fuse panel description ................................................... ................6-34
6
tbuk-6.p65 3/23/04, 4:26 PM
1
Page 397 of 445
6- 6 DO-IT-YOURSELF MAINTENANCE
SG020B1-E
DAILY OPERATING CHECKS
The following items should be checked
on a daily basis or whenever the vehicle
is refuelled, whichever occurs sooner.
o Engine oil level.
o Engine coolant level.
o Power steering fluid level.
o Brake fluid level.
o Windscreen washer fluid level.
o Battery condition.
o Tyre condition and pressures.
o Operation and cleanliness of all light-
ing equipment.
o Windscreen wiper and washer opera- tion.
o Horn operation.
o Warning light operation.
o Adjustment and cleanliness of mir- rors.
o Seat and seat belt adjustment and operation.
o Fluid leakage.
The vehicle must not be driven if the
daily operating checks indicate that
any item of equipment related to the
safety or roadworthiness of the vehicle
is not functioning correctly. G030B02A-EAT
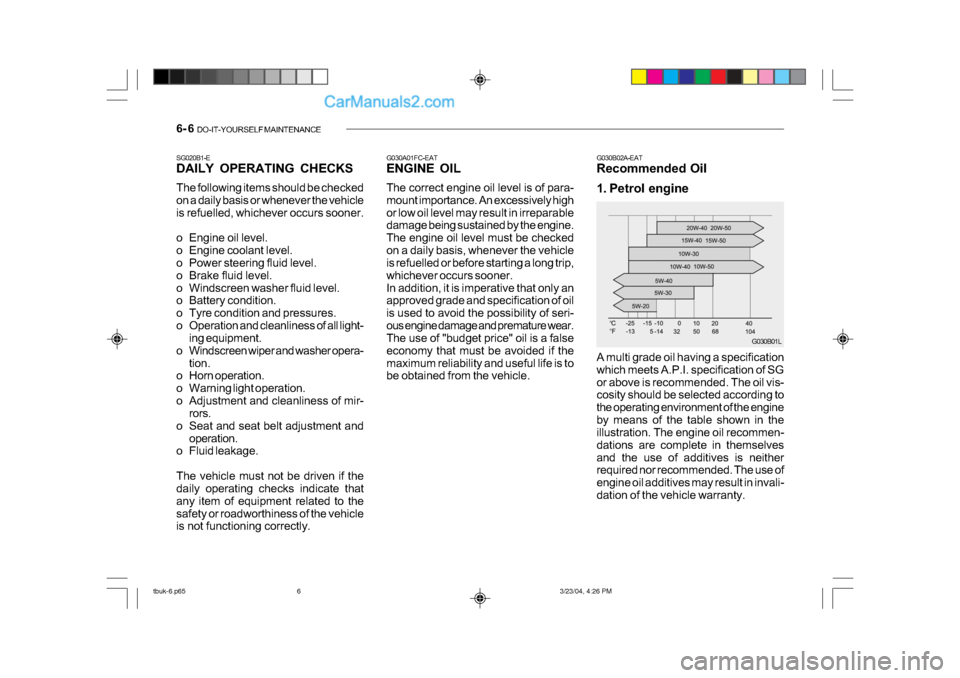
Recommended Oil
1. Petrol engine
A multi grade oil having a specification
which meets A.P.I. specification of SG
or above is recommended. The oil vis-
cosity should be selected according to
the operating environment of the engine
by means of the table shown in the
illustration. The engine oil recommen-
dations are complete in themselves
and the use of additives is neither
required nor recommended. The use of
engine oil additives may result in invali-
dation of the vehicle warranty.
G030A01FC-EAT
ENGINE OIL
The correct engine oil level is of para-
mount importance. An excessively high
or low oil level may result in irreparable
damage being sustained by the engine.
The engine oil level must be checked
on a daily basis, whenever the vehicle
is refuelled or before starting a long trip,
whichever occurs sooner.
In addition, it is imperative that only an
approved grade and specification of oil
is used to avoid the possibility of seri-
ous engine damage and premature wear.
The use of "budget price" oil is a false
economy that must be avoided if the
maximum reliability and useful life is to
be obtained from the vehicle.
G030B01L
tbuk-6.p65
3/23/04, 4:26 PM
6
Page 404 of 445

DO-IT-YOURSELF MAINTENANCE 6- 13
SG060A1-E
SPARKING PLUG REPLACE-
MENT
G060A01L
0.039 ~ 0.043 in.
(1.0 ~ 1.1 mm )
This operation should only be performed
when the engine is cold.
1. Remove the centre cover from the engine rocker cover.
2. Remove plug lead from the sparking plug to be replaced, pulling the lead
by the rubber cap. (Pulling the lead
may damage the carbon conductor).
3. Clean around the base of the plug to be removed, and install the plug
socket ensuring that the ceramic
insulator does not become damaged.
Turn the socket counterclockwise to
remove the plug. CAUTION:
Sparking plugs must only be cleaned
using purpose designed equipment.
Wire brushing may damage the cen-
tre electrodein-sulator causing mis-
firing to occur. Only the correct grade
of sparking plug should be used.
Use of an incorrect grade may result
in serious engine damage.
Prior to installing a sparking plug, the
gap between the centre and outer elec-
trodes must be checked and adjusted
as necessary.
Adjustment is facilitated by bending the
outer electrode towards or away from
the centre electrode. Under no circum-
stances should attempts be made to
adjust the position of the centre elec-
trode.
4. Insert the sparking plug into the cyl- inder head and screw by the wrench
and until the plug contacts the seat-
ing area. Tighten the plug with the
socket by a further 1/2 to 3/4 of a turn
only. 5. Replace the plug lead ensuring that
the cap is pushed firmly into place.
Confirm that the cap is correctly
seated by lightly pulling upon it.
NOTE:
When replacing the spark plug, al-
ways use the genuine parts recom-
mended.
Recommended Spark Plugs
CHAMPION
NGK RC10YC
BKR5ES
Unleaded
engine Leaded
engine
RC10YC4
BKR5ES-11
!
tbuk-6.p65 3/23/04, 4:26 PM
13