clock Hyundai Getz 2010 User Guide
[x] Cancel search | Manufacturer: HYUNDAI, Model Year: 2010, Model line: Getz, Model: Hyundai Getz 2010Pages: 256, PDF Size: 7.84 MB
Page 123 of 256

FEATURES OF YOUR HYUNDAI 1- 111
HOW TO PRESET STATIONS Six AM and twelve FM stations may be programmed into the memory of theradio. Then, by simply pressing the band select button and/or one of the six station select buttons, you may recallany of these stations instantly. To pro- gram the stations, follow these steps:
o Press band selector to set the band
for AM, FM and FM2.
o Select the desired station to be stored by seek, scan or manual tuning.
o Determine the preset station select
button you wish to use to access that station.
o Press the station select button for
more than two seconds. Beep soundwill be heard while depressig the button. You should then release the button, and proceed to program thenext desired station. A total of 18 stations can be programmed by se- lecting one AM and two FM stationper button.
o When completed, any preset station
may be recalled by selecting AM,FM or FM2 band and the appropriate station button. CLASSIC
� JAZZ � ROCK � DEFEAT7. EQUALIZER (EQ) Press the EQ button to select the CLAS- SIC, JAZZ, ROCK and DEFEAT MODEfor the desired tone quality. Each press of the button changes the display as follows; sound will be attenuated) When the control knob is turned counter clock- wise, left speaker sound will be empha-sized (Right speaker sound will be at- tenuated). TREBLE Control Turn to the left or right for the desired treble tone. FAD (Fader Control) Turn the control knob clockwise to em- phasize rear speaker sound (frontspeaker sound will be attenuated). When the control knob is turned counterclock- wise, front speaker sound will be em-phasized (rear speaker sound will be attenuated).
8. Adjustment Mode select But-
ton (A.MODE).
Pressing the A.MODE button changesthe BASS, BALANCE, TREBLE and FADER mode.The mode selected is shown on the display. After selecting the each mode, rotatethe volume control knob clockwise or counterclockwise. BASS Control To increase the bass, rotate the knob clockwise, while to decrease the bass, rotate the knob counterclockwise. BALANCE Control Rotate the knob clockwise to empha- size right speaker sound. (Left speaker
! CAUTION:
o Do not place beverages close to the audio system. The playback mechanism may be damaged if you spill them.
o Do not impact on the audio sys- tem, or the playback mechanismcould be damaged.
Page 133 of 256

FEATURES OF YOUR HYUNDAI 1- 121
H446B01MC-GAT 1. POWER ON-OFF Control Knob
o The radio unit may be operated when
the ignition key is in the "ACC" or "ON" position. Press the button to switch the power on. The LCD shows the radio frequency in the radio mode,CD/MP3 track in the CD/MP3 mode. To switch the power off, press the button again.
o Push the FM, AM or CD/MP3 to turn on that function without pushingpower ON-OFF control knob.
VOLUME Control Rotate the knob clockwise to increase the volume and turn the knob counter-clockwise to reduce the volume. 2. BAND Select Button Pressing the FM, AM button changes the AM, FM1 and FM2 bands. The mode selected is shown on the display. 3. Best Station Memory (BSM)
Button
When the BSM button is pressed, the six channels from the highest field in- tensity are selected next and stored inmemory. The stations selected are stored in the sequence frequency from the first preset key. 4. EQ Button Press the EQ button to select the CLAS- SIC, POPS, ROCK, JAZZ and OFF MODE for the desired tone quality.Each press of the button changes the display as follows;
5. AUTO SEEK Select Button (Automatic Channel Selection)
Press the AUTO SEEK select button. When the side is pressed, the unit will automatically tune to the next higherfrequency and when the side is pressed, it will automatically tune to the next lower frequency. 6. TUNE (Manual) Select Knob Rotate the knob clockwise to increase the frequency and turn the knob coun-terclockwise to reduce the frequency. AUDIO Select Button Pressing the AUDIO button changes the BASS, TREBLE, FADER and BAL- ANCE mode. The mode selected is shown on thedisplay. After selecting the each mode, rotate the Volume control knob clockwise orcounterclockwise. o BASS Control To increase the BASS, rotate the knob clockwise, while to decrease the bass, rotate the knob counterclockwise. o TREBLE Control Turn to the left or right for the desired treble tone.
CLASSIC
� POPS � ROCK � JAZZ � OFF
Page 134 of 256

1- 122 FEATURES OF YOUR HYUNDAI
o FADER Control Turn the control knob clockwise to emphasize rear speaker sound (frontspeaker sound will be attenuated). When the control knob is turned counterclock- wise, front speaker sound will be em-phasized (rear speaker sound will be attenuated). o BALANCE Control Rotate the knob clockwise to empha- size right speaker sound (Left speakersound will be attenuated). When the control knob is turned counterclock- wise, left speaker sound will be empha-sized (Right speaker sound will be at- tenuated).
!
CAUTION:
o Do not place beverages close to the audio system. The playback mechanism may be damaged ifyou spill them.
o Do not strike or allow anything to
impact the audio system, damageto the system mechanisms could occur.
7. PRESET STATION Select But-
tons
Six stations for AM, FM1 and FM2respectively can be preset in the elec- tronic memory circuit. HOW TO PRESET STATIONS Six AM and twelve FM stations may be programmed into the memory of the radio. Then, by simply pressing the band select button and/or one of the sixstation select buttons, you may recall any of these stations instantly. To pro- gram the stations, follow these steps:
o Press AM, FM selector to set the band for AM, FM1 and FM2.
o Select the desired station to be stored by seek or manual tuning.
o Determine the preset station select button you wish to use to access that station.
o Press the station select button for
more than two seconds. Beep soundwill be heard while depressing the button. You should then release thebutton, and proceed to program the next desired station. A total of 18 stations can be pro-grammed by selecting one AM and two FM station per button.
o When completed, any preset station may be recalled by selecting AM,FM1 or FM2 band and the appropri-ate station button.
Page 138 of 256

1- 126 FEATURES OF YOUR HYUNDAI
!
CAUTION:
o Do not insert warped or poor qual- ity discs into the CD player as damage to the unit may occur.
o Do not insert anything like coins
into the player slot as damage tothe unit may occur.
o Do not place beverages close to
the audio system. The playbackmechanism may be damaged if you spill them.
10. CD SCAN Button
o To playback the first 10 seconds of
each track, press the CD SCAN button more than 1 second.
o To playback the first 10 seconds of
each track in the selected folder,press the CD SCAN button within 1 second (MP3 CD only).
o Press the CD SCAN button again within 10 sec. when you have reachedthe desired track.
11. FILE SEARCH Knob (TUNE Select Knob)
o You can skip the track by turning the FILE SEARCH knob clockwise or counterclockwise.After selecting the desired track, press the FILE SEARCH knob to playback the track.If you do not press the FILE SEARCH knob within five seconds, the search will stop. 12. DIRECTORY SEARCH
Button
o You can move through the folder by pushing the DIR button to up ( ) anddown ( ).After moving the desired folder, press the FILE SEARCH knob to playback the selected folder.If you do not press the FILE SEARCH knob within five seconds, the search will stop.
NOTE :
o To assure proper operation of the unit, keep the vehicle interior tem- perature within a normal range by using the vehicle's air condition- ing or heating system.
o When replacing the fuse, replace it with a fuse having the correctcapacity.
o All stored bookmarks are all erased when the car battery is discon-nected or power to the vehicle islost. If this occurs, the bookmarks will have to be reset.
o This equipment is designed to be
used only in a 12 volt DC batterysystem with negative ground.
o This unit is made of precisionparts. Do not attempt to disas- semble or adjust any parts.
o When driving your vehicle, be sure to keep the volume of the unit setlow enough to allow you to hearsounds coming from the outside.
o Do not expose this equipment (in-
cluding the speakers and tape) towater or excessive moisture.
Page 142 of 256
1- 130 FEATURES OF YOUR HYUNDAI
HTB2043
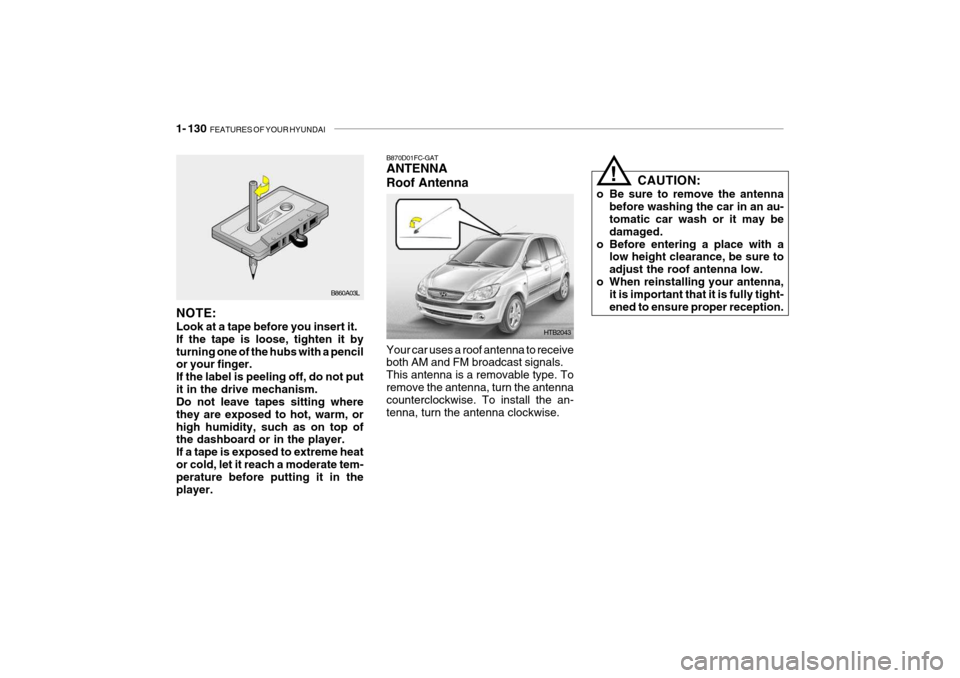
B870D01FC-GAT ANTENNA Roof Antenna Your car uses a roof antenna to receive both AM and FM broadcast signals. This antenna is a removable type. Toremove the antenna, turn the antenna counterclockwise. To install the an- tenna, turn the antenna clockwise.
B860A03L
NOTE: Look at a tape before you insert it. If the tape is loose, tighten it byturning one of the hubs with a pencil or your finger. If the label is peeling off, do not putit in the drive mechanism. Do not leave tapes sitting where they are exposed to hot, warm, orhigh humidity, such as on top of the dashboard or in the player. If a tape is exposed to extreme heator cold, let it reach a moderate tem- perature before putting it in the player. CAUTION:
o Be sure to remove the antenna before washing the car in an au- tomatic car wash or it may be damaged.
o Before entering a place with a low height clearance, be sure toadjust the roof antenna low.
o When reinstalling your antenna, it is important that it is fully tight-ened to ensure proper reception.
!
Page 146 of 256
2- 4 DRIVING YOUR HYUNDAI
C070C01E
C070C01A-AAT
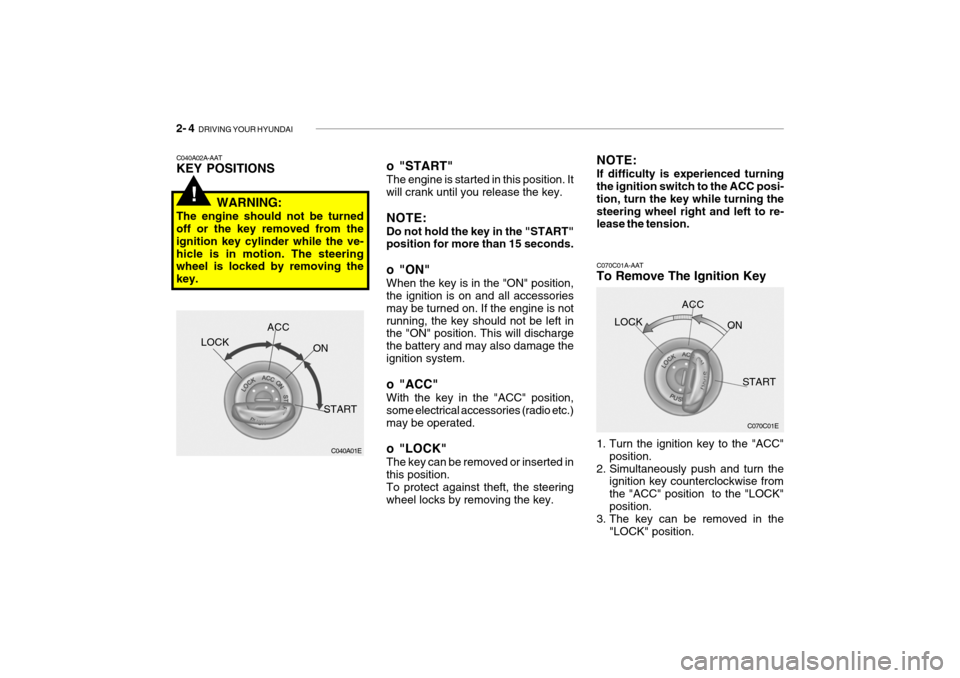
To Remove The Ignition Key
1. Turn the ignition key to the "ACC"
position.
2. Simultaneously push and turn the ignition key counterclockwise from the "ACC" position to the "LOCK"position.
3. The key can be removed in the
"LOCK" position.LOCK
ACC
ON
START
o "START" The engine is started in this position. It will crank until you release the key. NOTE: Do not hold the key in the "START" position for more than 15 seconds.
o "ON" When the key is in the "ON" position, the ignition is on and all accessories may be turned on. If the engine is notrunning, the key should not be left in the "ON" position. This will discharge the battery and may also damage theignition system.
o "ACC" With the key in the "ACC" position, some electrical accessories (radio etc.)may be operated.
o "LOCK" The key can be removed or inserted in this position. To protect against theft, the steering wheel locks by removing the key. NOTE: If difficulty is experienced turning the ignition switch to the ACC posi- tion, turn the key while turning thesteering wheel right and left to re- lease the tension.
C040A02A-AAT KEY POSITIONS
WARNING:
The engine should not be turned off or the key removed from the ignition key cylinder while the ve-hicle is in motion. The steering wheel is locked by removing the key.
C040A01E
LOCK
ACC
ON
START
!
Page 173 of 256
3- 8 WHAT TO DO IN AN EMERGENCY
HTB149
HTB4003
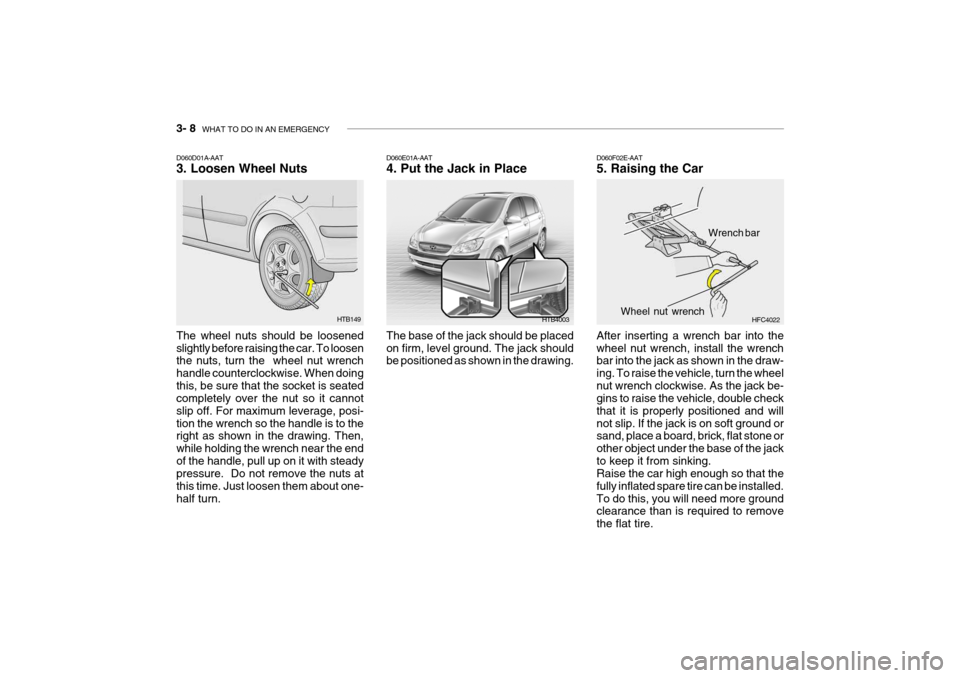
D060D01A-AAT 3. Loosen Wheel Nuts The wheel nuts should be loosened slightly before raising the car. To loosen the nuts, turn the wheel nut wrench handle counterclockwise. When doingthis, be sure that the socket is seated completely over the nut so it cannot slip off. For maximum leverage, posi-tion the wrench so the handle is to the right as shown in the drawing. Then, while holding the wrench near the endof the handle, pull up on it with steady pressure. Do not remove the nuts at this time. Just loosen them about one-half turn. D060E01A-AAT 4. Put the Jack in Place The base of the jack should be placed on firm, level ground. The jack should be positioned as shown in the drawing.
D060F02E-AAT 5. Raising the Car After inserting a wrench bar into the wheel nut wrench, install the wrench bar into the jack as shown in the draw- ing. To raise the vehicle, turn the wheelnut wrench clockwise. As the jack be- gins to raise the vehicle, double check that it is properly positioned and willnot slip. If the jack is on soft ground or sand, place a board, brick, flat stone or other object under the base of the jackto keep it from sinking. Raise the car high enough so that the fully inflated spare tire can be installed.To do this, you will need more ground clearance than is required to remove the flat tire.
HFC4022
Wrench bar
Wheel nut wrench
Page 175 of 256
3- 10 WHAT TO DO IN AN EMERGENCY
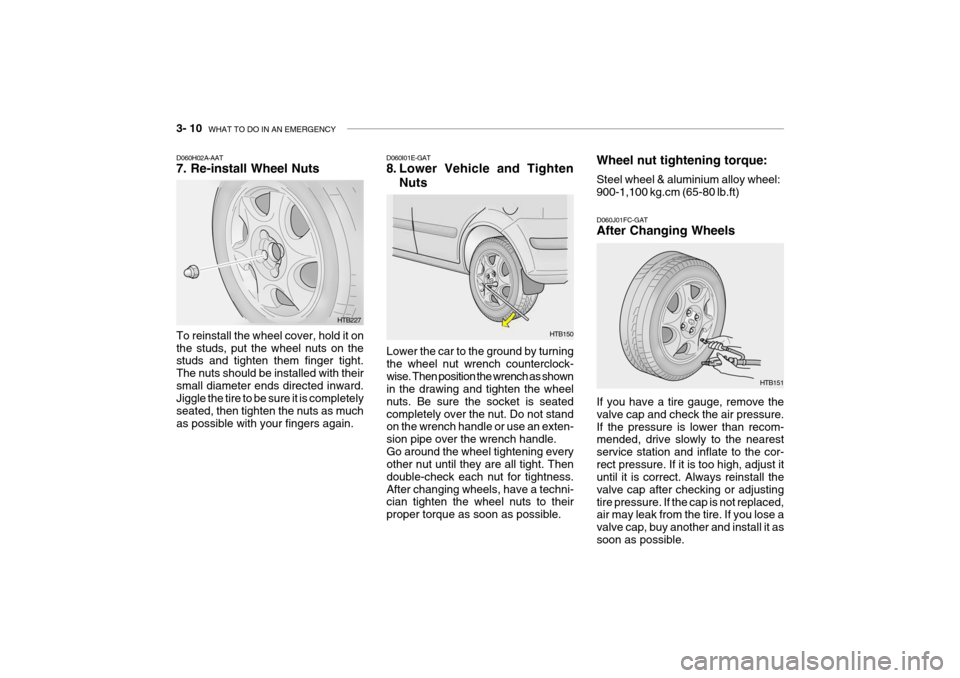
D060H02A-AAT 7. Re-install Wheel Nuts To reinstall the wheel cover, hold it on the studs, put the wheel nuts on the studs and tighten them finger tight. The nuts should be installed with theirsmall diameter ends directed inward. Jiggle the tire to be sure it is completely seated, then tighten the nuts as muchas possible with your fingers again. Lower the car to the ground by turningthe wheel nut wrench counterclock-wise. Then position the wrench as shown in the drawing and tighten the wheel nuts. Be sure the socket is seatedcompletely over the nut. Do not stand on the wrench handle or use an exten- sion pipe over the wrench handle.Go around the wheel tightening every other nut until they are all tight. Then double-check each nut for tightness.After changing wheels, have a techni- cian tighten the wheel nuts to their proper torque as soon as possible.
D060I01E-GAT
8. Lower Vehicle and Tighten
Nuts
D060J01FC-GATAfter Changing Wheels If you have a tire gauge, remove the valve cap and check the air pressure.If the pressure is lower than recom- mended, drive slowly to the nearest service station and inflate to the cor-rect pressure. If it is too high, adjust it until it is correct. Always reinstall the valve cap after checking or adjustingtire pressure. If the cap is not replaced, air may leak from the tire. If you lose a valve cap, buy another and install it assoon as possible.
HTB227 Wheel nut tightening torque: Steel wheel & aluminium alloy wheel: 900-1,100 kg.cm (65-80 lb.ft)
HTB150
HTB151
Page 178 of 256
WHAT TO DO IN AN EMERGENCY 3- 13
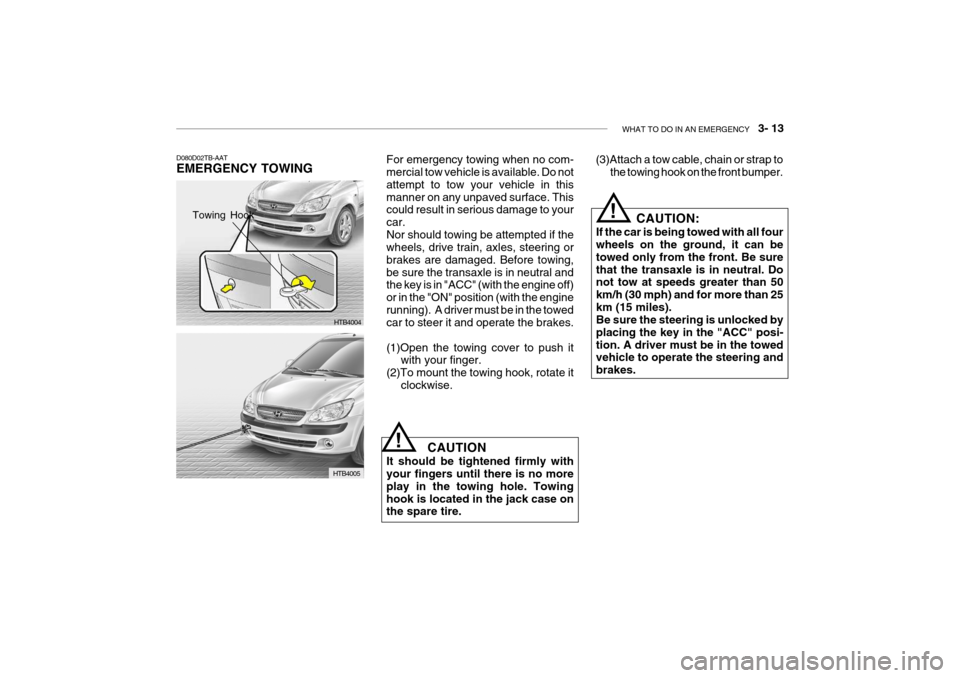
D080D02TB-AAT EMERGENCY TOWING
HTB4004
HTB4005
Towing Hook
CAUTION:
If the car is being towed with all four wheels on the ground, it can be towed only from the front. Be surethat the transaxle is in neutral. Do not tow at speeds greater than 50 km/h (30 mph) and for more than 25km (15 miles). Be sure the steering is unlocked by placing the key in the "ACC" posi-tion. A driver must be in the towed vehicle to operate the steering and brakes.!
(3)Attach a tow cable, chain or strap to
the towing hook on the front bumper.
For emergency towing when no com- mercial tow vehicle is available. Do not attempt to tow your vehicle in thismanner on any unpaved surface. This could result in serious damage to your car.Nor should towing be attempted if the wheels, drive train, axles, steering or brakes are damaged. Before towing,be sure the transaxle is in neutral and the key is in "ACC" (with the engine off) or in the "ON" position (with the enginerunning). A driver must be in the towed car to steer it and operate the brakes. (1)Open the towing cover to push it
with your finger.
(2)To mount the towing hook, rotate it clockwise.
CAUTION
It should be tightened firmly with your fingers until there is no more play in the towing hole. Towinghook is located in the jack case on the spare tire.
!
Page 205 of 256
6- 8 DO-IT-YOURSELF MAINTENANCE
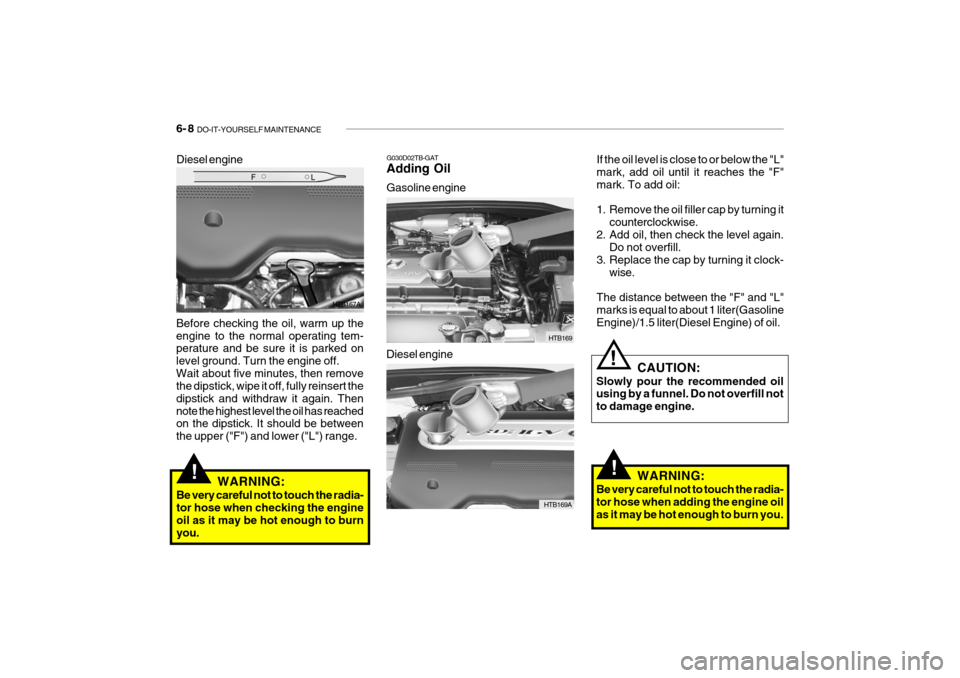
If the oil level is close to or below the "L" mark, add oil until it reaches the "F" mark. To add oil:
1. Remove the oil filler cap by turning it
counterclockwise.
2. Add oil, then check the level again. Do not overfill.
3. Replace the cap by turning it clock- wise.
The distance between the "F" and "L" marks is equal to about 1 liter(Gasoline Engine)/1.5 liter(Diesel Engine) of oil.G030D02TB-GAT Adding Oil Gasoline engine
Before checking the oil, warm up the engine to the normal operating tem- perature and be sure it is parked on level ground. Turn the engine off.Wait about five minutes, then remove the dipstick, wipe it off, fully reinsert the dipstick and withdraw it again. Thennote the highest level the oil has reached on the dipstick. It should be between the upper ("F") and lower ("L") range. HTB169
HTB169A
Diesel engine
!WARNING:
Be very careful not to touch the radia- tor hose when checking the engine oil as it may be hot enough to burn you.!
CAUTION:
Slowly pour the recommended oil using by a funnel. Do not overfill not to damage engine.
WARNING:
Be very careful not to touch the radia-tor hose when adding the engine oilas it may be hot enough to burn you.!
HTB167A
Diesel engine