battery replacement Hyundai Nexo 2019 Owner's Manual
[x] Cancel search | Manufacturer: HYUNDAI, Model Year: 2019, Model line: Nexo, Model: Hyundai Nexo 2019Pages: 560, PDF Size: 24.2 MB
Page 96 of 560
3-9
Convenient features of your vehicle
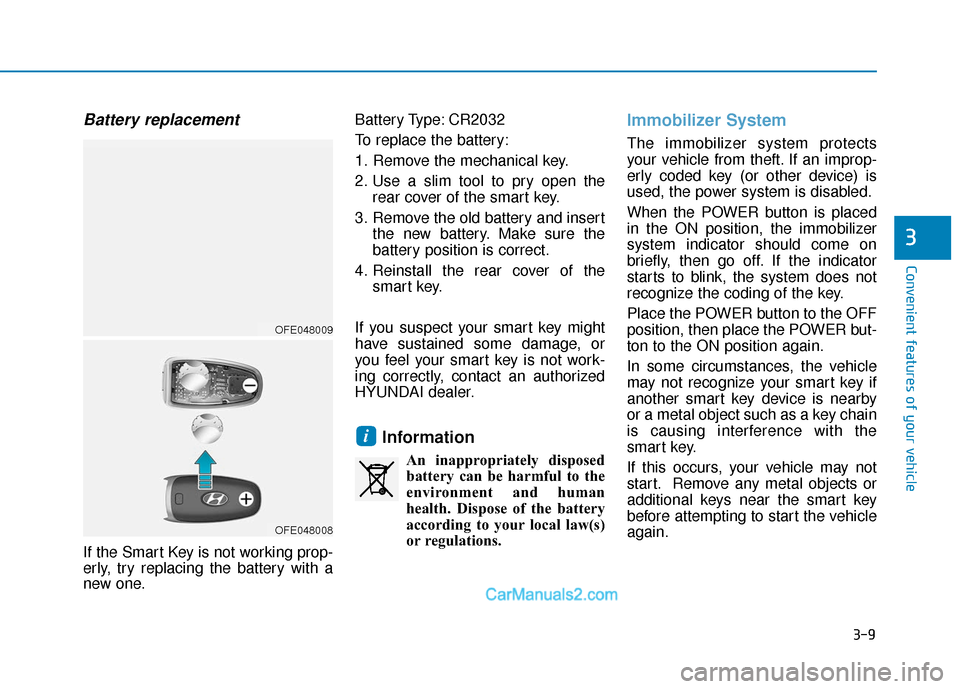
Battery replacement
If the Smart Key is not working prop-
erly, try replacing the battery with a
new one.Battery Type: CR2032
To replace the battery:
1. Remove the mechanical key.
2. Use a slim tool to pry open the
rear cover of the smart key.
3. Remove the old battery and insert the new battery. Make sure the
battery position is correct.
4. Reinstall the rear cover of the smart key.
If you suspect your smart key might
have sustained some damage, or
you feel your smart key is not work-
ing correctly, contact an authorized
HYUNDAI dealer.
Information
An inappropriately disposed battery can be harmful to the
environment and human
health. Dispose of the battery
according to your local law(s)
or regulations.
Immobilizer System
The immobilizer system protects
your vehicle from theft. If an improp-
erly coded key (or other device) is
used, the power system is disabled.
When the POWER button is placed
in the ON position, the immobilizer
system indicator should come on
briefly, then go off. If the indicator
starts to blink, the system does not
recognize the coding of the key.
Place the POWER button to the OFF
position, then place the POWER but-
ton to the ON position again.
In some circumstances, the vehicle
may not recognize your smart key if
another smart key device is nearby
or a metal object such as a key chain
is causing interference with the
smart key.
If this occurs, your vehicle may not
start. Remove any metal objects or
additional keys near the smart key
before attempting to start the vehicle
again.
i
3
OFE048009
OFE048008
Page 202 of 560
3-115
Convenient features of your vehicle
3
Big vehicles such as buses ortrucks parked
Sensor covered with foreign mat- ter, such as snow or water
An obstacle such as a trash can, bicycle, shopping cart, etc. is near
Heavy wind
Wheel changed to an unauthorized size
A problem with the wheel alignment
Vehicle leaned severely to one side
Front or rear distance sensors are malfunction or not working properly.
(Refer to the Parking Distance
Warning system in chapter 3.)
requires battery replacementLimitations of the System
When the vehicle has beenparked/stopped for a long time in a
cold environment, the Remote
Moving Forward/Backward may be
delayed depending on the vehicle
condition when the vehicle is
turned on remotely.
The RSPA system may suddenly apply brake to avoid collision
against stationary or moving
object.
The system may be cancelled unexpectedly when a person or
animal passes by near the vehicle.
The performance of the system may be degraded and frequently
stop when driving in strong electric
field area.
Right after the parking place search complete and beep sound
is generated, the search complete
may be cancelled according to the
surrounding environment Even while the system is in activa-
tion, the vehicle may collide with
the object existing within the blind-
spot area of the sensor.
When there is any obstacle within the blind-spot area, drive out of the
parking space manually.
The system may not recognize the object that appears suddenly.
The system does not work if there is no car parked in front of the
parking space you are planning to
park.
Page 401 of 560
6-4
If you have a flat tire while
driving
If a tire goes flat while you are driv-
ing:
1. Take your foot off the acceleratorpedal and let the vehicle slow
down while driving straight ahead.
Do not apply the brakes immedi-
ately or attempt to pull off the road
as this may cause a loss of con-
trol. When the vehicle has slowed
to such a speed that it is safe to do
so, brake carefully and pull off the
road. Drive off the road as far as
possible and park on firm, level
ground. If you are on a divided
highway, do not park in the medi-
an area between the two traffic
lanes.
2. When the vehicle is stopped, turn on your emergency hazard flash-
ers, set the parking brake and shift
gear to the P(Park) position.
3. Have all passengers get out of the vehicle. Be sure they all get out on
the side of the vehicle that is away
from traffic.
If the vehicle stalls while driv-
ing
1. Reduce your speed gradually,keeping a straight line. Move cau-
tiously off the road to a safe place.
2. Turn on your emergency flashers.
3. Try to start the vehicle again. If your vehicle will not start, contact
an authorized HYUNDAI dealer. Be sure the shift lever is in P
(Park). The vehicle starts only
when the shift lever is in P (Park).
This vehicle does not have a regu- lar 12V battery that needs periodic
replacement. It is lithium ion poly-
mer type integrated into the high
voltage battery. The vehicle has a
12V battery protection system that
cuts 12V battery from vehicle draw
to prevent full discharge. If vehicle
will not start, first try pressing the
12V Battery Reset switch (left side
of the steering wheel near the fuel
door open switch) to reconnect the
12V battery, but you must start
vehicle within 15 seconds of press-
ing the 12V Battery Reset switch.
After starting vehicle, operate the
vehicle safely outdoors in ready
mode stopped and/or drive it for 30
minutes total to charge the 12V
battery fully.
Check the fuel level and add fuel if necessary.
Do not push or pull the vehicle to start it.
If the vehicle still does not start, call
an authorized HYUNDAI dealer for
assistance.
What to do in an emergency
I I F
F
T
T H
H E
E
V
V E
EH
H I
IC
C L
LE
E
W
W I
IL
L L
L
N
N O
O T
T
S
S T
T A
A R
RT
T
Page 402 of 560
6-5
What to do in an emergency
6
Before Jump Starting
This vehicle does not have a regular
12V battery that needs periodic
replacement. It is lithium ion polymer
type integrated into the high voltage
battery. The vehicle has a 12V bat-
tery protection system that cuts 12V
battery from vehicle draw to prevent
full discharge.
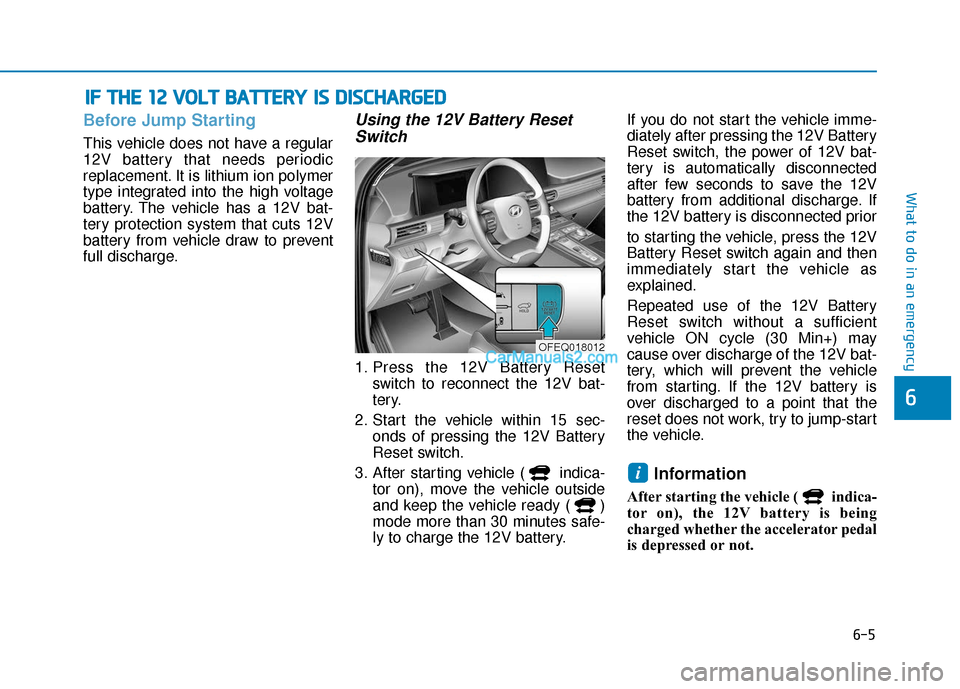
Using the 12V Battery ResetSwitch
1. Press the 12V Battery Reset
switch to reconnect the 12V bat-
tery.
2. Start the vehicle within 15 sec- onds of pressing the 12V Battery
Reset switch.
3. After starting vehicle ( indica- tor on), move the vehicle outside
and keep the vehicle ready ( )
mode more than 30 minutes safe-
ly to charge the 12V battery. If you do not start the vehicle imme-
diately after pressing the 12V Battery
Reset switch, the power of 12V bat-
tery is automatically disconnected
after few seconds to save the 12V
battery from additional discharge. If
the 12V battery is disconnected prior
to starting the vehicle, press the 12V
Battery Reset switch again and then
immediately start the vehicle as
explained.
Repeated use of the 12V Battery
Reset switch without a sufficient
vehicle ON cycle (30 Min+) may
cause over discharge of the 12V bat-
tery, which will prevent the vehicle
from starting. If the 12V battery is
over discharged to a point that the
reset does not work, try to jump-start
the vehicle.
Information
After starting the vehicle ( indica-
tor on), the 12V battery is being
charged whether the accelerator pedal
is depressed or not.
i
I
I
F
F
T
T H
H E
E
1
1 2
2
V
V O
O L
LT
T
B
B A
A T
TT
TE
ER
R Y
Y
I
IS
S
D
D I
IS
S C
C H
H A
AR
RG
G E
ED
D
OFEQ018012
Page 415 of 560
6-18
What to do in an emergency
Introduction
With the Tire Mobility Kit you stay
mobile even after experiencing a tire
puncture.
The compressor and sealing com-
pound system effectively and com-
fortably seals most punctures in a
passenger car tire caused by nails
or similar objects and reinflates the
tire.
After you ensure that the tire is prop-
erly sealed you can drive cautiously
on the tire (distance up to 120 miles
(200 km)) at a max. speed of (50
mph (80 km/h)) in order to reach a
service station or tire dealer for the
tire replacement.
It is possible that some tires, espe-
cially with larger punctures or dam-
age to the sidewall, cannot be sealed
completely.
Air pressure loss in the tire may
adversely affect tire performance.
For this reason, you should avoid
abrupt steering or other driving
maneuvers, especially if the vehicle
is heavily loaded or if a trailer is in
use.The Tire Mobility Kit is not designed
or intended as a permanent tire
repair method and is to be used for
one tire only.
This instruction shows you step by
step how to temporarily seal the
puncture simply and reliably.
Read the section "Notes on the safe
use of the Tire Mobility Kit".
Notes on the safe use of the
Tire Mobility Kit
Park your car at the side of the
road so that you can work with the
Tire Mobility Kit away from moving
traffic.
To be sure your vehicle will not move, even when you're on fairly
level ground, always set your park-
ing brake.
Only use the Tire Mobility Kit for sealing/inflation passenger car
tires. Only punctured areas located
within the tread region of the tire
can be sealed using the tire mobil-
ity kit.
Do not use on motorcycles, bicy- cles or any other type of tires. When the tire and wheel are dam-
aged, do not use Tire Mobility Kit
for your safety.
Use of the Tire Mobility Kit may not be effective for tire damage larger
than approximately 0.16 in. (4
mm).
Please contact the nearest
HYUNDAI dealership if the tire
cannot be made roadworthy with
the Tire Mobility Kit.
Do not use the Tire Mobility Kit if a tire is severely damaged by driving
run flat or with insufficient air pres-
sure.
Do not remove any foreign objects such as nails or screws that have
penetrated the tire.
Provided the car is outdoors, leave the vehicle ON ( indicator ON).
Otherwise operating the compres-
sor may eventually drain the car
battery.
Never leave the Tire Mobility Kit unattended while it is being used.
Do not leave the compressor run- ning for more than 10 minutes at a
time or it may overheat.
Page 425 of 560
7
Maintenance
7
Maintenance
Fuel cell power module compartment.................7-3
Maintenance services ...........................................7-4
Owner's Responsibility .....................................................7-4
Owner Maintenance Precautions..................................7-4
Owner maintenance ...............................................7-5
Owner maintenance schedule ........................................7-6
Scheduled maintenance services.........................7-7
Normal Maintenance Schedule ......................................7-8
Maintenance Under Severe Usage Conditions ........7-10
Explanation of scheduled maintenance items .7-12
Device cooling coolant ........................................7-13
Checking the Coolant Level ..........................................7-13
Changing Coolant ............................................................7-15
Stack cooling coolant ..........................................7-16
Checking the Coolant Level ..........................................7-16
Changing Coolant ............................................................7-18
Brake fluid ............................................................7-19
Checking the Brake Fluid Level ...................................7-19
Washer fluid .........................................................7-20
Checking the Washer Fluid Level................................7-20
Air cleaner ............................................................7-20
Filter Replacement ..........................................................7-20
Climate control air filter .....................................7-22
Filter Inspection ...............................................................7-22
Wiper blades .........................................................7-24
Blade Inspection ..............................................................7-24
Blade Replacement .........................................................7-24
12V battery ...........................................................7-27
Battery recharging .........................................................7-28
Reset Features.................................................................7-28
Tires and wheels ..................................................7-29
Tire Care ........................................................................\
....7-29
Recommended Cold Tire Inflation Pressures ...........7-30
Check Tire Inflation Pressure ......................................7-31
Tire Rotation...................................................................\
..7-32
Wheel Alignment and Tire Balance ............................7-33
Tire Replacement ............................................................7-33
Wheel Replacement ........................................................7-34
Tire Traction .....................................................................7-3\
4
Tire Maintenance ............................................................7-34
Tire Sidewall Labeling ....................................................7-34
Tire Terminology and Definitions................................7-38
All Season Tires ...............................................................7-42
Summer Tires ...................................................................7-42
Snow Tires ........................................................................\
7-42
Radial-Ply Tires ...............................................................7-42
Low Aspect Ratio Tires..................................................7-43
7
Page 451 of 560
7-27
7
Maintenance
1
12
2V
V
B
B A
A T
TT
TE
ER
R Y
Y
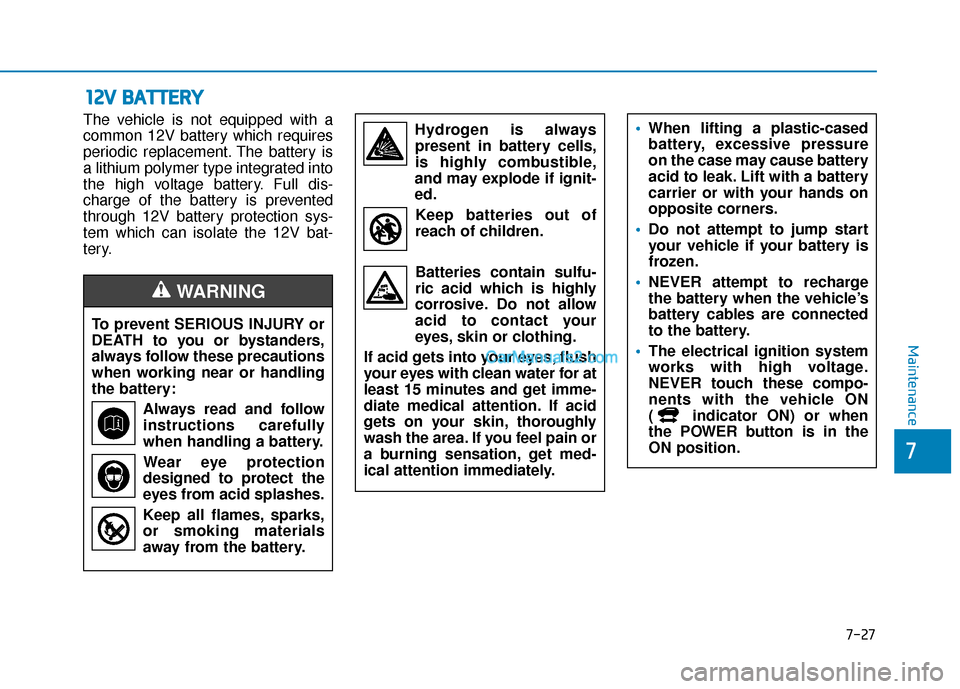
The vehicle is not equipped with a
common 12V battery which requires
periodic replacement. The battery is
a lithium polymer type integrated into
the high voltage battery. Full dis-
charge of the battery is prevented
through 12V battery protection sys-
tem which can isolate the 12V bat-
tery.
To prevent SERIOUS INJURY or
DEATH to you or bystanders,
always follow these precautions
when working near or handling
the battery: Always read and follow
instructions carefully
when handling a battery.Wear eye protection
designed to protect the
eyes from acid splashes.
Keep all flames, sparks,
or smoking materials
away from the battery.
WARNING
Hydrogen is always present in battery cells,
is highly combustible,
and may explode if ignit-
ed.
Keep batteries out of
reach of children.
Batteries contain sulfu-
ric acid which is highly
corrosive. Do not allow
acid to contact your
eyes, skin or clothing.
If acid gets into your eyes, flush
your eyes with clean water for at
least 15 minutes and get imme-
diate medical attention. If acid
gets on your skin, thoroughly
wash the area. If you feel pain or
a burning sensation, get med-
ical attention immediately. When lifting a plastic-cased
battery, excessive pressure
on the case may cause battery
acid to leak. Lift with a battery
carrier or with your hands on
opposite corners.
Do not attempt to jump start
your vehicle if your battery is
frozen.
NEVER attempt to recharge
the battery when the vehicle’s
battery cables are connected
to the battery.
The electrical ignition system
works with high voltage.
NEVER touch these compo-
nents with the vehicle ON
( indicator ON) or when
the POWER button is in the
ON position.
Page 469 of 560
7-45
7
Maintenance
F
FU
U S
SE
E S
S
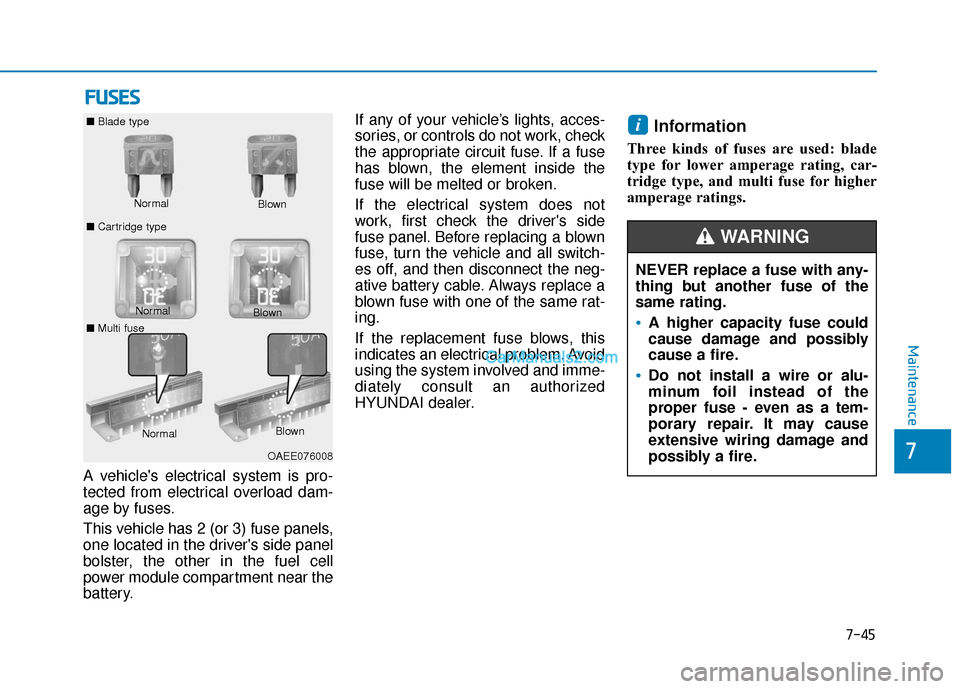
A vehicle's electrical system is pro-
tected from electrical overload dam-
age by fuses.
This vehicle has 2 (or 3) fuse panels,
one located in the driver's side panel
bolster, the other in the fuel cell
power module compartment near the
battery. If any of your vehicle’s lights, acces-
sories, or controls do not work, check
the appropriate circuit fuse. If a fuse
has blown, the element inside the
fuse will be melted or broken.
If the electrical system does not
work, first check the driver's side
fuse panel. Before replacing a blown
fuse, turn the vehicle and all switch-
es off, and then disconnect the neg-
ative battery cable. Always replace a
blown fuse with one of the same rat-
ing.
If the replacement fuse blows, this
indicates an electrical problem. Avoid
using the system involved and imme-
diately consult an authorized
HYUNDAI dealer.
Information
Three kinds of fuses are used: blade
type for lower amperage rating, car-
tridge type, and multi fuse for higher
amperage ratings.
i
NEVER replace a fuse with any-
thing but another fuse of the
same rating.
A higher capacity fuse could
cause damage and possibly
cause a fire.
Do not install a wire or alu-
minum foil instead of the
proper fuse - even as a tem-
porary repair. It may cause
extensive wiring damage and
possibly a fire.
WARNING
Normal
■
Blade type
■ Cartridge type Blown
Normal Blown
OAEE076008
Normal
Blown
■ Multi fuse
Page 529 of 560
H25
When the high voltage battery
is weak
When the high voltage battery is
weak due to driving on a hill for a
long time or accelerating and decel-
erating the vehicle repeatedly, the
acceleration performance may be
lower than usual. In this case, be
cautious not to overtake other vehi-
cles.
If the 12 volt battery is dis-
charged
This vehicle does not have a regular
12V battery that needs periodic
replacement. It is lithium ion polymer
type integrated into the high voltage
battery. The vehicle has a 12V bat-
tery protection system that cuts 12V
battery from vehicle draw to prevent
full discharge.
If the 12V battery is discharged, you
should try charging it by pressing the
"12V BATT RESET" button.
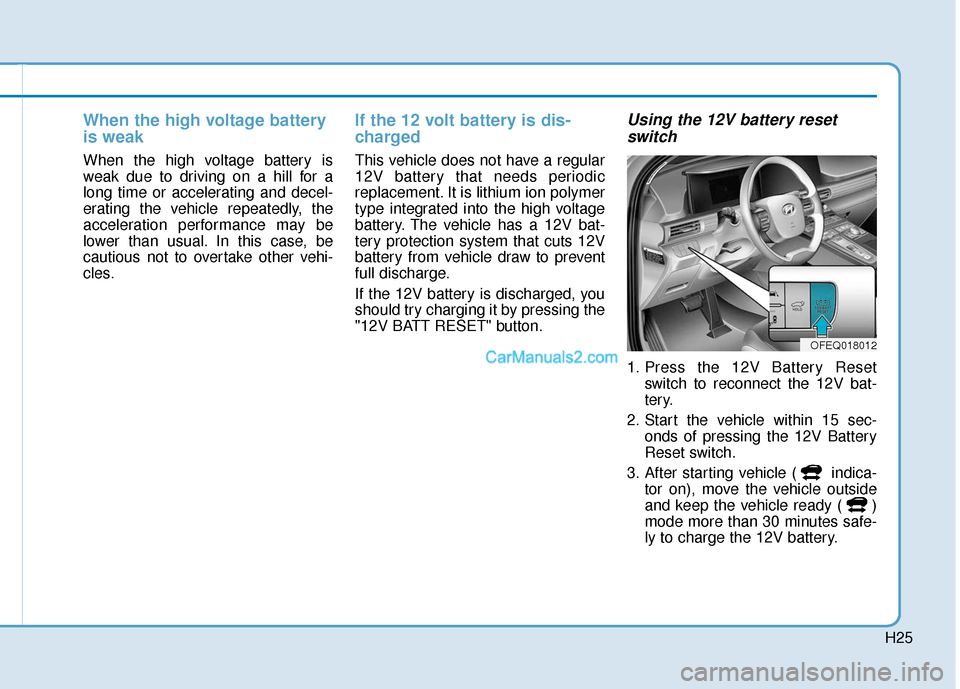
Using the 12V battery resetswitch
1. Press the 12V Battery Reset
switch to reconnect the 12V bat-
tery.
2. Start the vehicle within 15 sec- onds of pressing the 12V Battery
Reset switch.
3. After starting vehicle ( indica- tor on), move the vehicle outside
and keep the vehicle ready ( )
mode more than 30 minutes safe-
ly to charge the 12V battery.
OFEQ018012
Page 551 of 560
I-2
12V battery......................................................................7-\
27Battery recharging ......................................................7-28
Reset Features ............................................................7-28
AC Inverter ...................................................................3-166\
Accessing Your Vehicle ....................................................3-3 Smart Key.....................................................................3-3\
Immobilizer System .....................................................3-9
Active Hood Lift System ................................................2-70 System activation .......................................................2-70
System limitation........................................................2-71
System malfunction ....................................................2-72
Air Bag - Advanced Supplemental Restraint System.....2-47 Where Are the Air Bags? ...........................................2-49
How Does the Air Bag System Operate? ...................2-52
What to Expect After an Air Bag Inflates ..................2-57
Occupant Classification System (OCS) .....................2-58
Why Didn't My Air Bag Go Off in a Collision?........2-60
SRS Care ....................................................................2-60\
Additional Safety Precautions ....................................2-60
Air Bag Warning Labels.............................................2-60
Why Didn't My Air Bag Go Off in a Collision?........2-63
SRS Care ....................................................................2-68\
Additional Safety Precautions ....................................2-69
Air Bag Warning Labels.............................................2-69 Air Bag Warning Labels .................................................2-69
Air cleaner.......................................................................7\
-20
Filter Replacement .....................................................7-20
Air Conditioning System ..................................................8-5
Anti-lock Brake System (ABS) ......................................5-29
Appearance care..............................................................7-62 Exterior Care ..............................................................7-62
Interior Care ...............................................................7-67
Auto Hold .......................................................................5\
-25
Automatic Climate Control System..............................3-146 Automatic Temperature Control Mode ....................3-147
Manual Temperature Control Mode .........................3-147
System Operation .....................................................3-154
System Maintenance ................................................3-155
Before Driving ..................................................................5-4 Before Entering the Vehicle .........................................5-4
Before Starting .............................................................5-4
Blind-Spot Collision Warning/ Blind-Spot Collision-avoidance Assist ........................5-53
System Description ....................................................5-53
System Setting and Activation ...................................5-54
Warning and System Control .....................................5-57
Detecting Sensor (Front View Camera and Rear Corner Radar) .................................................5-59
Limitations of the System ..........................................5-62
Index
A
B