oil pressure Hyundai Sonata
[x] Cancel search | Manufacturer: HYUNDAI, Model Year: , Model line: , Model:Pages: 285, PDF Size: 9.38 MB
Page 12 of 285
YOUR VEHICLE AT A GLANCE
F12
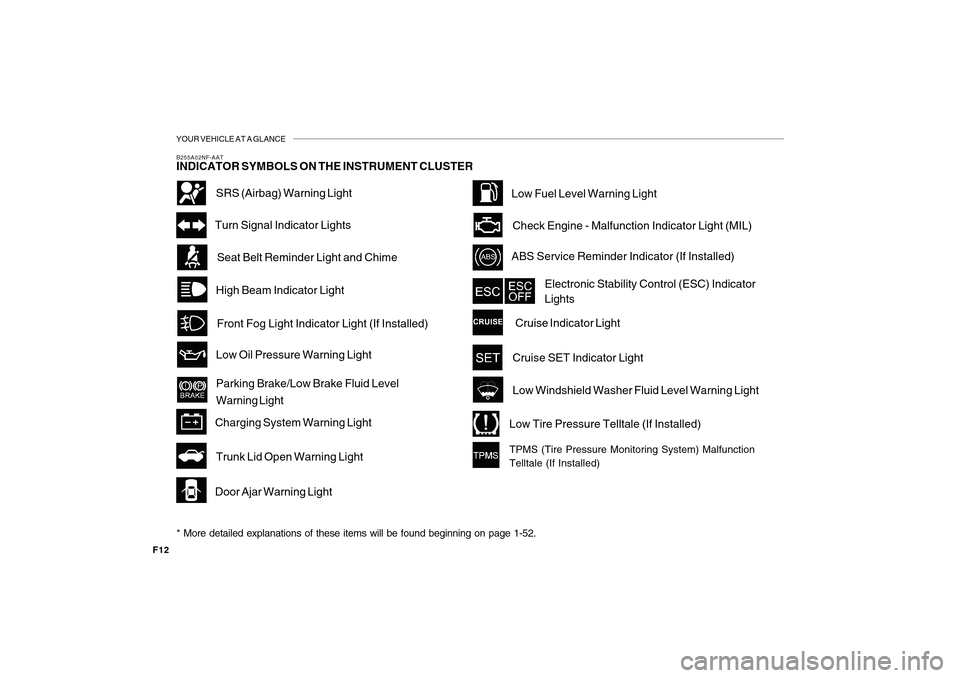
B255A02NF-AATINDICATOR SYMBOLS ON THE INSTRUMENT CLUSTER
High Beam Indicator Light
Door Ajar Warning LightSeat Belt Reminder Light and ChimeTurn Signal Indicator Lights
ABS Service Reminder Indicator (If Installed)
Low Oil Pressure Warning Light
Parking Brake/Low Brake Fluid Level
Warning Light
Charging System Warning Light
SRS (Airbag) Warning Light
Cruise Indicator Light Check Engine - Malfunction Indicator Light (MIL)
Electronic Stability Control (ESC) Indicator
Lights
Low Windshield Washer Fluid Level Warning LightFront Fog Light Indicator Light (If Installed)
Cruise SET Indicator LightLow Fuel Level Warning Light
Trunk Lid Open Warning Light
* More detailed explanations of these items will be found beginning on page 1-52.
Low Tire Pressure Telltale (If Installed)TPMS (Tire Pressure Monitoring System) Malfunction
Telltale (If Installed)
Page 64 of 285
1
FEATURES OF YOUR HYUNDAI
51
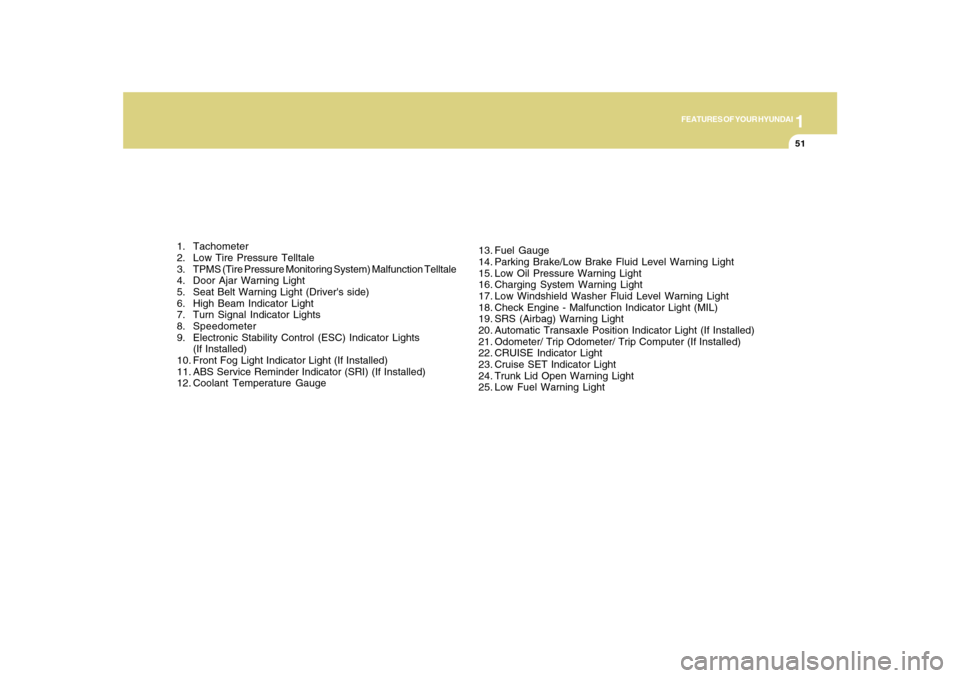
1. Tachometer
2. Low Tire Pressure Telltale
3. TPMS (Tire Pressure Monitoring System) Malfunction Telltale
4. Door Ajar Warning Light
5. Seat Belt Warning Light (Driver's side)
6. High Beam Indicator Light
7. Turn Signal Indicator Lights
8. Speedometer
9. Electronic Stability Control (ESC) Indicator Lights
(If Installed)
10. Front Fog Light Indicator Light (If Installed)
11. ABS Service Reminder Indicator (SRI) (If Installed)
12. Coolant Temperature Gauge13. Fuel Gauge
14. Parking Brake/Low Brake Fluid Level Warning Light
15. Low Oil Pressure Warning Light
16. Charging System Warning Light
17. Low Windshield Washer Fluid Level Warning Light
18. Check Engine - Malfunction Indicator Light (MIL)
19. SRS (Airbag) Warning Light
20. Automatic Transaxle Position Indicator Light (If Installed)
21. Odometer/ Trip Odometer/ Trip Computer (If Installed)
22. CRUISE Indicator Light
23. Cruise SET Indicator Light
24. Trunk Lid Open Warning Light
25. Low Fuel Warning Light
Page 66 of 285
1
FEATURES OF YOUR HYUNDAI
53
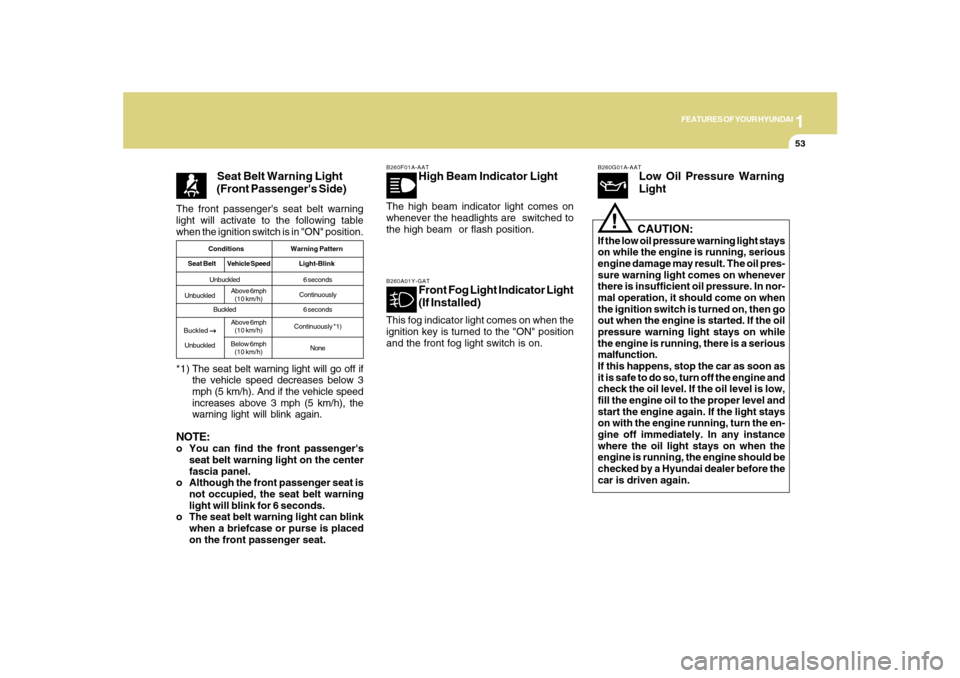
The front passenger's seat belt warning
light will activate to the following table
when the ignition switch is in "ON" position.
Seat Belt Warning Light
(Front Passenger's Side)
*1) The seat belt warning light will go off if
the vehicle speed decreases below 3
mph (5 km/h). And if the vehicle speed
increases above 3 mph (5 km/h), the
warning light will blink again.NOTE:o You can find the front passenger's
seat belt warning light on the center
fascia panel.
o Although the front passenger seat is
not occupied, the seat belt warning
light will blink for 6 seconds.
o The seat belt warning light can blink
when a briefcase or purse is placed
on the front passenger seat.
Conditions Warning Pattern
Seat BeltVehicle SpeedLight-BlinkUnbuckled
Buckled6 seconds
Continuously
6 seconds
Continuously *1)
None
UnbuckledAbove 6mph
(10 km/h)
Buckled
→ →→ →
→
UnbuckledAbove 6mph
(10 km/h)
Below 6mph
(10 km/h)
B260F01A-AAT
High Beam Indicator Light
The high beam indicator light comes on
whenever the headlights are switched to
the high beam or flash position.B260A01Y-GAT
Front Fog Light Indicator Light
(If Installed)
This fog indicator light comes on when the
ignition key is turned to the "ON" position
and the front fog light switch is on.
B260G01A-AAT
Low Oil Pressure Warning
Light
CAUTION:
If the low oil pressure warning light stays
on while the engine is running, serious
engine damage may result. The oil pres-
sure warning light comes on whenever
there is insufficient oil pressure. In nor-
mal operation, it should come on when
the ignition switch is turned on, then go
out when the engine is started. If the oil
pressure warning light stays on while
the engine is running, there is a serious
malfunction.
If this happens, stop the car as soon as
it is safe to do so, turn off the engine and
check the oil level. If the oil level is low,
fill the engine oil to the proper level and
start the engine again. If the light stays
on with the engine running, turn the en-
gine off immediately. In any instance
where the oil light stays on when the
engine is running, the engine should be
checked by a Hyundai dealer before the
car is driven again.
!
Page 172 of 285
2
DRIVING YOUR HYUNDAI
19
!
C160K01A-AATCarry Emergency EquipmentDepending on the severity of the weather
where you drive your car, you should carry
appropriate emergency equipment. Some
of the items you may want to carry include
tire chains, tow straps or chains, flashlight,
emergency flares, sand, a shovel, jumper
cables, a window scraper, gloves, ground
cloth, coveralls, a blanket, etc.
HIGHER SPEED MOTORINGC170A02A-AATPre-Trip Inspections1. Tires:
Adjust the tire inflation pressures to speci-
fication. Low tire inflation pressures will
result in overheating and possible failure
of the tires.
Avoid using worn or damaged tires which
may result in reduced traction or tire failure.NOTE:Never exceed the maximum tire inflation
pressure shown on the tires.2. Fuel, engine coolant and engine oil:
High speed travel consumes more fuel
than urban motoring. Do not forget to check
both engine coolant and engine oil.
3. Drive belt:
A loose or damaged drive belt may result
in overheating of the engine.
WARNING:
o Underinflated or overinflated tires
can cause poor handling, loss of
vehicle control, and sudden tire failure
leading to accidents, injuries, and
even death. Always check tires are
properly inflated before driving. Refer
to pages 2-23 and 8-3 for proper tire
pressures and further information.
o Driving on tires with no or insufficient
tread is dangerous. Worn-out tires
can result in loss of vehicle control,
collisions, injury, and even death.
Worn-out tires should be replaced as
soon as possible and should never be
used for driving. Always check tire
tread before driving your car. Refer
to 8-10 for further information and
tread limits.
Page 218 of 285
6
DO-IT-YOURSELF MAINTENANCE
4
G020C01A-AATVehicle InteriorThe following should be checked each
time when the vehicle is driven:
o Lights operation
o Windshield wiper operation
o Horn operation
o Defroster, heating system operation
(and air conditioning, if installed)
o Steering operation and condition
o Mirror condition and operation
o Turn signal operation
o Accelerator pedal operation
o Brake operation, including parking
brake
o Manual transaxle operation, including
clutch operation
o Automatic transaxle operation,
including "Park" mechanism operation
o Seat control condition and operation
o Seat belt condition and operation
o Sun visor operation
If you notice anything that does not operate
correctly or appears to be functioning
correctly, inspect it carefully and seek
assistance from your Hyundai dealer if
service is needed.
G020B01A-AATVehicle ExteriorThe following should be checked monthly:
o Overall appearance and condition
o Wheel condition and wheel nut torque
o Exhaust system condition
o Light condition and operation
o Windshield glass condition
o Wiper blade condition
o Paint condition and body corrosion
o Fluid leaks
o Door and hood lock condition
o Tire pressure and condition
(including spare tire)GENERAL CHECKSG020A01NF-AATEngine CompartmentThe following should be checked regu-
larly:
o Engine oil level and condition
o Transaxle fluid level and condition
o Brake fluid level
o Engine coolant level
o Windshield washer fluid level
o Accessory drive belt condition
o Engine coolant hose condition
o Fluid leaks (on or below components)
o Power steering fluid level
o Battery condition
o Air filter condition
o Engine vibration
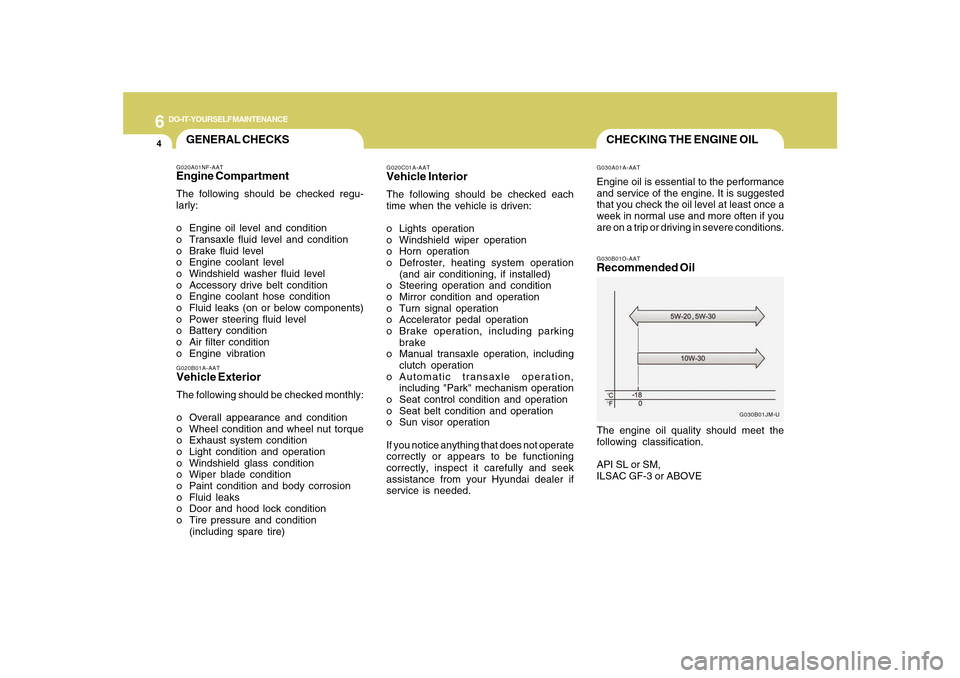
CHECKING THE ENGINE OILG030B01O-AATRecommended OilThe engine oil quality should meet the
following classification.
API SL or SM,
ILSAC GF-3 or ABOVE
G030B01JM-U G030A01A-AAT
Engine oil is essential to the performance
and service of the engine. It is suggested
that you check the oil level at least once a
week in normal use and more often if you
are on a trip or driving in severe conditions.
Page 222 of 285
6
DO-IT-YOURSELF MAINTENANCE
8
CHECKING AND CHANGING THE
ENGINE COOLANT!
G050A01A-AAT
WARNING:
Do not remove the radiator cap when the
engine is hot. When the engine is hot, the
engine coolant is under pressure and
may erupt through the opening if the cap
is removed. You could be seriously
burned if you do not observe this
precaution. Do not remove the radiator
cap until the radiator is cool to the touch.
!
5. Remove the oil filter by turning it counter-
clockwise with a oil filter wrench of the
proper size. A certain amount of oil will
come out when you remove the filter. So be
sure to have your drain pan in place
underneath it.
6. Install a new oil filter in accordance with the
instructions on the carton or on the filter
itself. Do not over-tighten.
Tightening torque:
8.7 ~ 11.6 lb.ft (1.2 ~ 1.6 kgf.m)
Be sure that the mounting surface on the
engine is clean and that the old gasket is
removed completely. Lubricate the new
gasket on the filter with clean engine oil
before installation.
7. Remove the engine oil level dipstick.
8. Refill the crankcase with the recommended
engine oil. Refer to the specification in
chapter 9 for engine oil capacity.
CAUTION:
Slowly pour the recommended oil into a
funnel. Do not overfill to avoid damage to
the engine.
NOTE:Always dispose of used engine oil in an
environmentally acceptable manner. It
is suggested that it be placed in a sealed
container and taken to a service station
for reclamation. Do not pour the oil on the
ground or put it into the household trash.
PROPOSITION 65 WARNING:
Engine oil contains chemicals known to
the State of California to cause cancer,
birth defects and reproductive harm.
Used engine oil may cause irritation or
cancer of the skin if left in contact with
the skin for prolonged periods of time.
Always protect your skin by washing
your hands thoroughly with soap and
warm water as soon as possible after
handling used oil.
!
9. Start the engine and check to be sure no
oil is leaking from the drain plug or oil
filter.
10. Shut off the engine and recheck the oil
level.
Page 241 of 285
6
DO-IT-YOURSELF MAINTENANCE
27
FOR MORE INFORMATION
ABOUT YOUR HYUNDAIG250A01A-AATIf you desire additional information about
maintaining and servicing your Hyundai,
you may purchase a factory Shop Manual
at your Hyundai dealer's parts department.
This is the same manual used by
dealership technicians and while it is highly
technical it can be useful in obtaining a
better understanding of your car and how
it works.
HEADLIGHT AIMING ADJUST-
MENTG290A03O-AATBefore performing aiming adjustment,
make sure of the following.
1. Keep all tires inflated to the correct
pressure.
2. Place the vehicle on level ground and
press the front bumper & rear bumper
down several times.
Place vehicle at a distance of 118 in.
(3m) from the test wall.
3. See that the vehicle is unloaded (except
for full levels of coolant, engine oil and
fuel, and spare tire, jack, and tools).
Have the driver or equivalent weight
placed in driver's seat.
4. Clean the headlight lenses and turn on
the headlights (Low beam).
5. Open the hood.
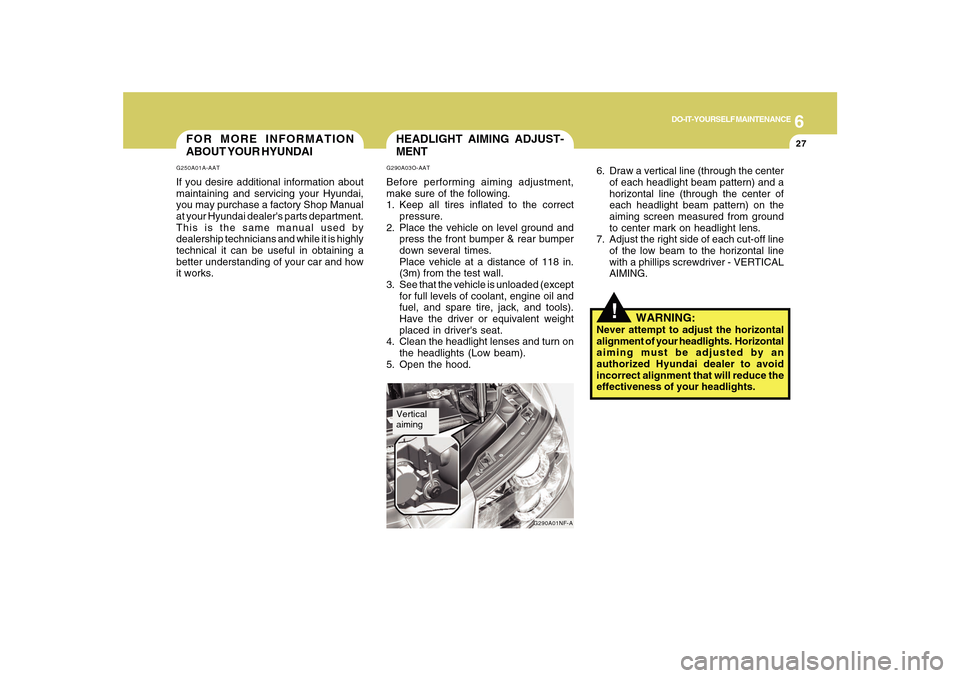
G290A01NF-A
Vertical
aiming
!
6. Draw a vertical line (through the center
of each headlight beam pattern) and a
horizontal line (through the center of
each headlight beam pattern) on the
aiming screen measured from ground
to center mark on headlight lens.
7. Adjust the right side of each cut-off line
of the low beam to the horizontal line
with a phillips screwdriver - VERTICAL
AIMING.
WARNING:
Never attempt to adjust the horizontal
alignment of your headlights. Horizontal
aiming must be adjusted by an
authorized Hyundai dealer to avoid
incorrect alignment that will reduce the
effectiveness of your headlights.
Page 265 of 285
8
CONSUMER INFORMATION, REPORTING SAFETY DEFECTS & BINDING ARBITRATION OF WARRANTY CLAIMS
7
6. Maximum load rating
This number indicates the maximum
load in kilograms and pounds that
can be carried by the tire. When
replacing the tires on the vehicle,
always use a tire that has the same
load rating as the factory installed
tire.
7. Uniform Tire Quality Grading
(UTQG):
Tire manufacturers are required to
grade tires based on three perfor-
mance factors: treadwear, traction
and temperature resistance. For more
information, see Uniform Tire Qual-
ity Grading on page 8-14.
I030D01JM-AATTIRE TERMINOLOGY AND DEFINI-
TIONS
Air Pressure: The amount of air inside
the tire pressing outward on the tire. Air
pressure is expressed in pounds per
square inch (psi) or kilopascal (kPa).
Accessory Weight: This means the
combined weight of optional accesso-
ries. Some examples of optional ac-
cessories are, automatic transmission,
power seats, and air conditioning.
Aspect Ratio: The relationship of a
tire's height to its width.
Belt: A rubber coated layer of cords that
is located between the plies and the
tread. Cords may be made from steel or
other reinforcing materials.
Bead: The tire bead contains steel
wires wrapped by steel cords that hold
the tire onto the rim.
Bias Ply Tire: A pneumatic tire in which
the plies are laid at alternate angles
less than 90 degrees to the centerline of
the tread.Cold Tire Pressure: The amount of air
pressure in a tire, measured in pounds
per square inch (psi) or kilopascals
(kPa) before a tire has built up heat from
driving.
Curb Weight: This means the weight of
a motor vehicle with standard and op-
tional equipment including the maxi-
mum capacity of fuel, oil and coolant,
but without passengers and cargo.
DOT Markings: A code molded into the
sidewall of a tire signifying that the tire
is in compliance with the U.S. Depart-
ment of Transportation motor vehicle
safety standards. The DOT code in-
cludes the Tire Identification Number
(TIN), an alphanumeric designator which
can also identify the tire manufacturer,
production plant, brand and date of
production.
GVWR: Gross Vehicle Weight Rating
GAWR FRT: Gross Axle Weight Rating
for the front Axle.
GAWR RR: Gross Axle Weight Rating
for the rear axle.
Page 277 of 285
9
VEHICLE SPECIFICATIONS2
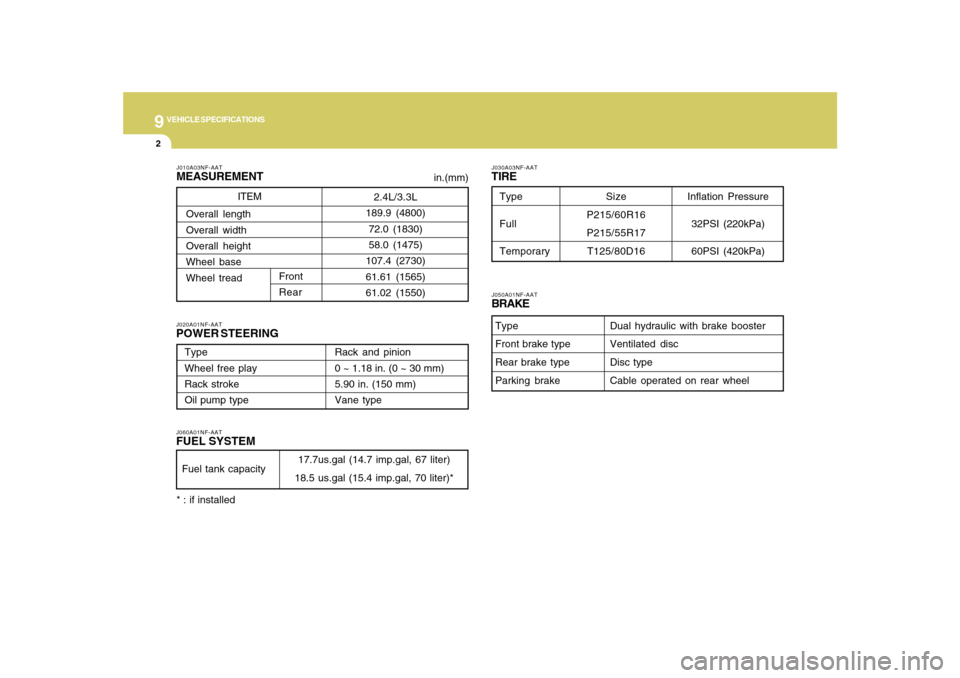
J010A03NF-AATMEASUREMENTJ060A01NF-AATFUEL SYSTEMJ020A01NF-AATPOWER STEERING
J030A03NF-AATTIRE
in.(mm)
Fuel tank capacity
17.7us.gal (14.7 imp.gal, 67 liter)
18.5 us.gal (15.4 imp.gal, 70 liter)* ITEM
J050A01NF-AATBRAKE
Dual hydraulic with brake booster
Ventilated disc
Disc type
Cable operated on rear wheel Type
Front brake type
Rear brake type
Parking brake
Type
Wheel free play
Rack stroke
Oil pump typeRack and pinion
0 ~ 1.18 in. (0 ~ 30 mm)
5.90 in. (150 mm)
Vane type
2.4L/3.3L
189.9 (4800)
72.0 (1830)
58.0 (1475)
107.4 (2730)
61.61 (1565)
61.02 (1550) Overall length
Overall width
Overall height
Wheel base
Wheel tread
Front
Rear
Inflation Pressure
32PSI (220kPa)
60PSI (420kPa)
Type
Full
TemporarySize
P215/60R16
P215/55R17
T125/80D16
* : if installed
Page 285 of 285
10
INDEX
6
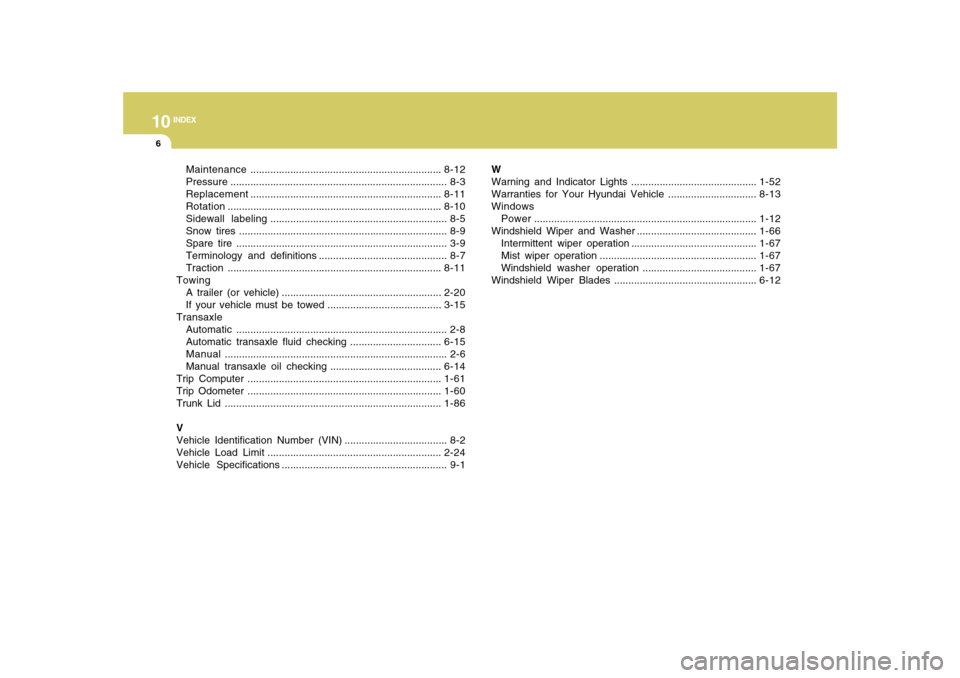
Maintenance...................................................................8-12
Pressure............................................................................ 8-3
Replacement...................................................................8-11
Rotation...........................................................................8-10
Sidewall labeling.............................................................. 8-5
Snow tires ......................................................................... 8-9
Spare tire .......................................................................... 3-9
Terminology and definitions ............................................. 8-7
Traction...........................................................................8-11
Towing
A trailer (or vehicle) ........................................................2-20
If your vehicle must be towed ........................................3-15
Transaxle
Automatic.......................................................................... 2-8
Automatic transaxle fluid checking ................................6-15
Manual.............................................................................. 2-6
Manual transaxle oil checking .......................................6-14
Trip Computer ....................................................................1-61
Trip Odometer ....................................................................1-60
Trunk Lid ............................................................................1-86
V
Vehicle Identification Number (VIN) .................................... 8-2
Vehicle Load Limit .............................................................2-24
Vehicle Specifications .......................................................... 9-1W
Warning and Indicator Lights ............................................1-52
Warranties for Your Hyundai Vehicle ...............................8-13
Windows
Power..............................................................................1-12
Windshield Wiper and Washer ..........................................1-66
Intermittent wiper operation ............................................1-67
Mist wiper operation .......................................................1-67
Windshield washer operation ........................................1-67
Windshield Wiper Blades ..................................................6-12