engine INFINITI G-CONVERTIBLE 2012 Owners Manual
[x] Cancel search | Manufacturer: INFINITI, Model Year: 2012, Model line: G-CONVERTIBLE, Model: INFINITI G-CONVERTIBLE 2012Pages: 474, PDF Size: 3.63 MB
Page 407 of 474
8-10Maintenance and do-it-yourself
GUID-D6CB878A-AAC3-4398-B058-77A171E0C394
SDI2045
CHECKING ENGINE OIL LEVELGUID-806540FD-DD98-45E7-8655-4199E7FCE41B1. Park the vehicle on a level surface andapply the parking brake.
2. Run the engine until it reaches operat- ing temperature.
3. Turn off the engine. Wait more than 15
minutes for the oil to drain back into
the oil pan.
4. Remove the dipstick and wipe it clean. Reinsert it all the way.
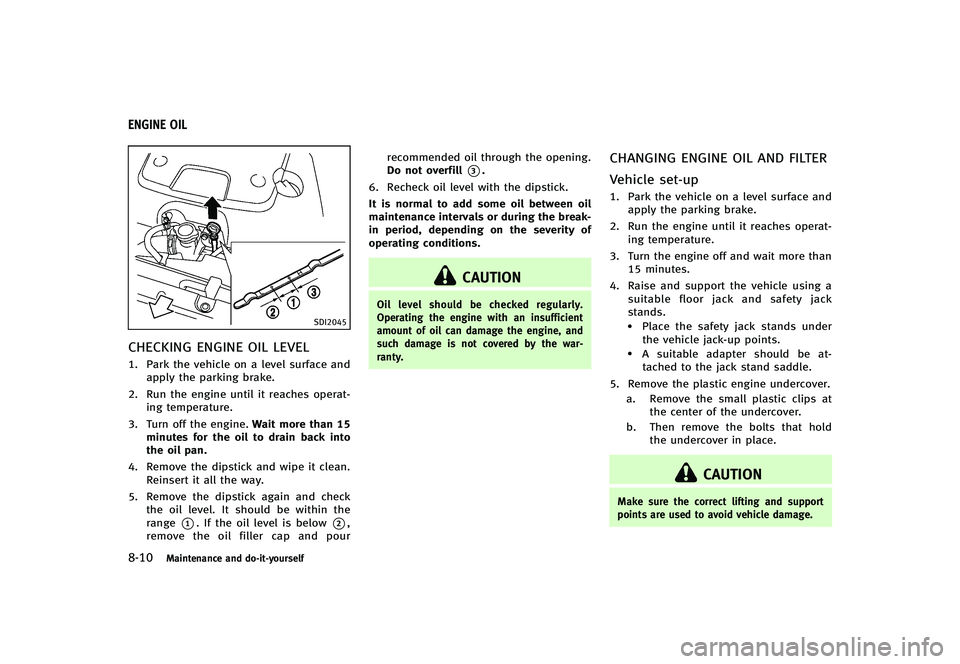
5. Remove the dipstick again and check the oil level. It should be within the
range
*1. If the oil level is below*2,
remove the oil filler cap and pour recommended oil through the opening.
Do not overfill
*3.
6. Recheck oil level with the dipstick.
It is normal to add some oil between oil
maintenance intervals or during the break-
in period, depending on the severity of
operating conditions.
CAUTION
Oil level should be checked regularly.
Operating the engine with an insufficient
amount of oil can damage the engine, and
such damage is not covered by the war-
ranty.
CHANGING ENGINE OIL AND FILTERGUID-F404E429-876E-48DC-8B0E-5858D249A08E
Vehicle set-upGUID-5EE5B5DE-2ACC-4CF1-80B3-8DE973DC3EAA1. Park the vehicle on a level surface and apply the parking brake.
2. Run the engine until it reaches operat- ing temperature.
3. Turn the engine off and wait more than 15 minutes.
4. Raise and support the vehicle using a suitable floor jack and safety jack
stands.
.Place the safety jack stands underthe vehicle jack-up points.
.A suitable adapter should be at-tached to the jack stand saddle.
5. Remove the plastic engine undercover. a. Remove the small plastic clips at the center of the undercover.
b. Then remove the bolts that hold the undercover in place.
CAUTION
Make sure the correct lifting and support
points are used to avoid vehicle damage.
ENGINE OIL
Page 408 of 474
SDI2335
Engine oil and filterGUID-1CDEEF93-AD62-40A3-B762-F692019EE0591. Place a large drain pan under the drainplug.
2. Remove the oil filler cap.
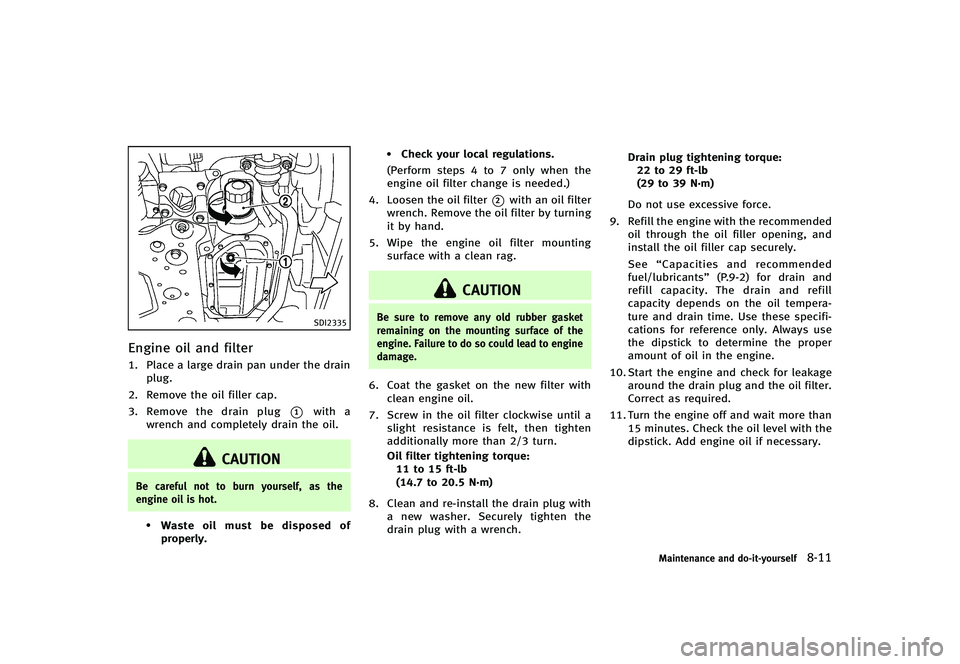
3. Remove the drain plug
*1with a
wrench and completely drain the oil.
CAUTION
Be careful not to burn yourself, as the
engine oil is hot.
.Waste oil must be disposed of
properly.
.Check your local regulations.
(Perform steps 4 to 7 only when the
engine oil filter change is needed.)
4. Loosen the oil filter
*2with an oil filter
wrench. Remove the oil filter by turning
it by hand.
5. Wipe the engine oil filter mounting
surface with a clean rag.
CAUTION
Be sure to remove any old rubber gasket
remaining on the mounting surface of the
engine. Failure to do so could lead to engine
damage.
6. Coat the gasket on the new filter with
clean engine oil.
7. Screw in the oil filter clockwise until a slight resistance is felt, then tighten
additionally more than 2/3 turn.
Oil filter tightening torque:11 to 15 ft-lb
(14.7 to 20.5 N·m)
8. Clean and re-install the drain plug with a new washer. Securely tighten the
drain plug with a wrench. Drain plug tightening torque:
22 to 29 ft-lb
(29 to 39 N·m)
Do not use excessive force.
9. Refill the engine with the recommended oil through the oil filler opening, and
install the oil filler cap securely.
See “Capacities and recommended
fuel/lubricants” (P.9-2) for drain and
refill capacity. The drain and refill
capacity depends on the oil tempera-
ture and drain time. Use these specifi-
cations for reference only. Always use
the dipstick to determine the proper
amount of oil in the engine.
10. Start the engine and check for leakage around the drain plug and the oil filter.
Correct as required.
11. Turn the engine off and wait more than 15 minutes. Check the oil level with the
dipstick. Add engine oil if necessary.
Maintenance and do-it-yourself8-11
Page 409 of 474
8-12Maintenance and do-it-yourself
After the operationGUID-B97EAD5B-9BEE-4BB5-93D4-6870CAA2D63C1.Install the engine undercover into
position as the following steps.
a. Pull the center of the small plastic clips out.
b. Hold the engine undercover into position.
c. Insert the clips through the under- cover into the holes in the frame,
then push the center of the clips in
to lock the clips in place.
d. Install the bolts that hold the
undercover in place. Be careful
not to strip the bolts or over-
tighten them.
2. Lower the vehicle carefully to the
ground.
3. Dispose of waste oil and filter properly.
WARNING
. Prolonged and repeated contact with
used engine oil may cause skin cancer.
. Try to avoid direct skin contact with used
oil. If skin contact is made, wash
thoroughly with soap or hand cleaner
as soon as possible. .
Keep used engine oil out of the reach of
children.
GUID-98EC505F-77DF-41A4-AE70-9205FB568012When checking or replacement is required,
we recommend an INFINITI retailer for
servicing.
CAUTION
.Use only Genuine NISSAN Matic S ATF.
Do not mix with other fluids.
. Using automatic transmission fluid other
than Genuine NISSAN Matic S ATF will
cause deterioration in driveability and
automatic transmission durability, and
may damage the automatic transmis-
sion, which is not covered by the INFINITI
new vehicle limited warranty.
AUTOMATIC TRANSMISSION FLUID
Page 410 of 474

GUID-E6349F5A-30CB-464F-9C20-522FC0ACF05D
SDI1765A
Check the fluid level in the reservoir.
The fluid level should be checked with the
engine off using the HOT range (
*1: HOT
MAX.,
*2: HOT MIN.) at fluid temperatures
of 122 to 1768F (50 to 808C) or using the
COLD range (
*3: COLD MAX.,*4: COLD
MIN.) at fluid temperatures of 32 to 868F (0
to 308C).
If the fluid is below the MIN line, add
Genuine NISSAN PSF or equivalent. Re-
move the cap and fill through the opening.
CAUTION
. Do not overfill.
. Use Genuine NISSAN PSF or equivalent.
GUID-1D2EA3BC-D20D-4834-8E55-D17790F6C116For further brake and clutch fluid informa-
tion, see “Capacities and recommended
fuel/lubricants” (P.9-2) of this manual.
WARNING
.Use only new fluid from a sealed
container. Old, inferior or contaminated
fluid may damage the brake system. The
use of improper fluids can damage the
brake system and affect the vehicle’s
stopping ability.
. Be sure to clean the filler cap before
removing.
. Brake fluid is poisonous and should be
stored carefully in marked containers out
of the reach of children.
CAUTION
Do not spill the fluid on painted surfaces.
This will damage the paint. If fluid is spilled,
wash the surface with water.
Maintenance and do-it-yourself8-13
POWER STEERING FLUID BRAKE AND CLUTCH FLUID
Page 412 of 474
Recommended fluid is Genuine NISSAN
Windshield Washer Concentrate Cleaner &
Antifreeze or equivalent.
CAUTION
.Do not substitute engine anti-freeze
coolant for window washer solution. This
may result in damage to the paint.
. Do not fill the window washer reservoir
tank with washer fluid concentrates at
full strength. Some methyl alcohol
based washer fluid concentrates may
permanently stain the grille if spilled
while filling the window washer reser-
voir tank.
. Pre-mix washer fluid concentrates with
water to the manufacturer’s recom-
mended levels before pouring the fluid
into the window washer reservoir tank.
Do not use the window washer reservoir
tank to mix the washer fluid concentrate
and water.
GUID-8579C36F-FFF9-4B84-AE07-383645D32C18.Keep the battery surface clean and dry.
Clean the battery with a solution of
baking soda and water.
. Make certain the terminal connections
are clean and securely tightened.
. If the vehicle is not to be used for 30
days or longer, disconnect the negative
(−) battery terminal cable to prevent
discharging it.
CAUTION
When the battery cable is removed from the
battery terminal, do not close either of front
doors. The automatic window adjusting
function will not work, and the side roof
panel may be damaged.
To disconnect the negative (−) battery
terminal, perform the procedure in the
following order. Otherwise, the window
and the side roof panel may contact and
be damaged.
1. Close the windows.
2. Open the hood.
3. Close and lock all the doors.
4. Disconnect the negative (−) battery
terminal. 5. Securely close the hood.
To connect the negative (−) battery term-
inal, perform the procedure in the follow-
ing order. Otherwise, the window and the
side roof panel may contact and be
damaged.
1. Unlock and open the driver side door.
Do not close the door.
2. Open the hood.
3. Connect the negative (−) battery term- inal. Then close the hood.
4. Fully open the driver side door window.
5. Close the driver side door and the window.
WARNING
. Do not expose the battery to flames or
electrical sparks. Hydrogen gas gener-
ated by the battery is explosive. Do not
allow battery fluid to contact your skin,
eyes, fabrics, or painted surfaces. After
touching a battery or battery cap, do not
touch or rub your eyes. Thoroughly wash
your hands. If the acid contacts your
eyes, skin or clothing, immediately flush
with water for at least 15 minutes and
Maintenance and do-it-yourself8-15
BATTERY
Page 414 of 474
JUMP STARTINGGUID-06B974E0-9B09-4316-BF6D-083DE94FA734If jump starting is necessary, see“Jump
starting” (P.6-13). If the engine does not
start by jump starting, the battery may
have to be replaced. Contact an INFINITI
retailer.
GUID-ACEB8038-7B64-4F43-B2D3-031914EC39FA
CAUTION
. Do not ground accessories directly to the
battery terminal. Doing so will bypass
the variable voltage control system and
the vehicle battery may not charge
completely.
. Use electrical accessories with the en-
gine running to avoid discharging the
vehicle battery.
The variable voltage control system mea-
sures the amount of electrical discharge
from the battery and controls voltage
generated by the generator.
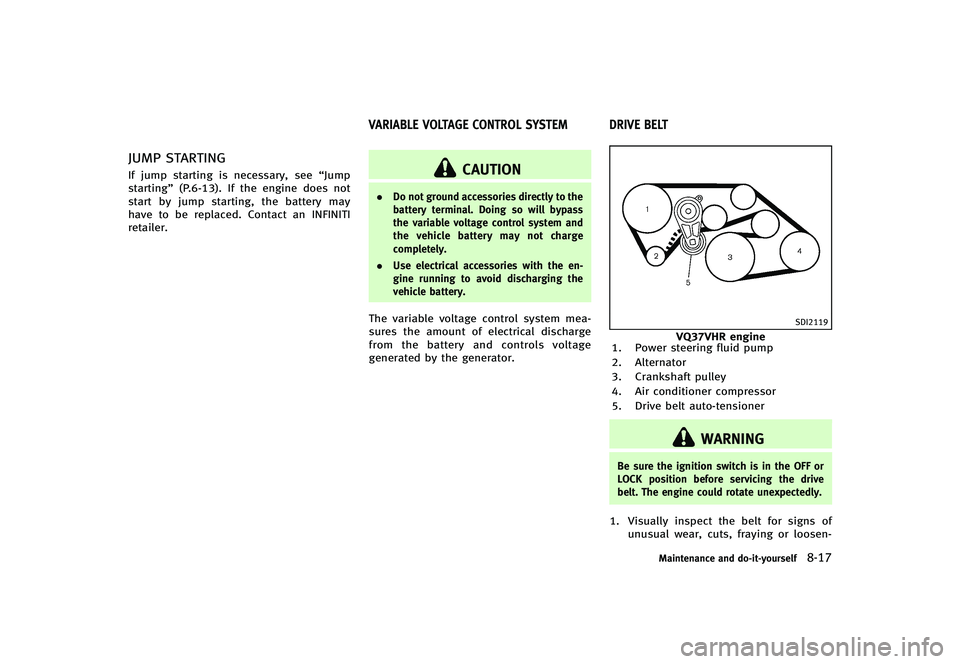
GUID-68009DBC-5CAC-4B35-8572-06F937E52494
SDI2119
VQ37VHR engine
1. Power steering fluid pump
2. Alternator
3. Crankshaft pulley
4. Air conditioner compressor
5. Drive belt auto-tensioner
WARNING
Be sure the ignition switch is in the OFF or
LOCK position before servicing the drive
belt. The engine could rotate unexpectedly.
1. Visually inspect the belt for signs of
unusual wear, cuts, fraying or loosen-
Maintenance and do-it-yourself8-17
VARIABLE VOLTAGE CONTROL SYSTEM DRIVE BELT
Page 415 of 474

8-18Maintenance and do-it-yourself
ess. If the belt is in poor condition or
loose, have it replaced or adjusted by
an INFINITI retailer.
2. Have the belt condition checked reg- ularly.
GUID-900D5AE6-7439-4CED-A2BC-3548697953CD
WARNING
Be sure the engine and the ignition switch
are off and that the parking brake is
engaged securely.
CAUTION
Be sure to use the correct socket to remove
the spark plugs. An incorrect socket can
damage the spark plugs.
SDI2020
REPLACING SPARK PLUGSGUID-1EB23356-F5F5-4C2A-851B-89F31CA66D80If replacement is required, see an INFINITI
retailer for servicing.
Iridium-tipped spark plugsGUID-DDA1D9CF-9C6B-4DD6-B89F-D4A52E0AB799It is not necessary to replace the iridium-
tipped spark plugs as frequently as the
conventional type spark plugs since they
will last much longer. Follow the main-
tenance schedule in “INFINITI Service and
Maintenance Guide”, but do not reuse
them by cleaning or regapping.
SPARK PLUGS
Page 416 of 474

Always replace spark plugs with recom-
mended or equivalent ones.
GUID-CC965B91-AF8B-4F99-99C4-ECB0137BE4DE
SDI2363
Remove the retainers*1as illustrated and
pull out the filter element
*2.
The filter element should not be cleaned
and reused. Replace it according to the
maintenance intervals. See “INFINITI Ser-
vice and Maintenance Guide” for mainte-
nance intervals. When replacing the filter, wipe the inside of the air cleaner housing
and the cover with a damp cloth.
WARNING
.
Operating the engine with the air
cleaner removed can cause you or others
to be burned. The air cleaner not only
cleans the air, it stops flame if the
engine backfires. If it is not there, and
the engine backfires, you could be
burned. Do not drive with the air cleaner
removed, and be careful when working
on the engine with the air cleaner
removed.
. Never pour fuel into the throttle body or
attempt to start the engine with the air
cleaner removed. Doing so could result
in serious injury.
Maintenance and do-it-yourself8-19
AIR CLEANER
Page 419 of 474

8-22Maintenance and do-it-yourself
GUID-E5DF23F8-C853-4A16-B731-875E7AB9DDC2
SDI1479A
ENGINE COMPARTMENTGUID-64171551-5633-47A8-B88A-55FE9630BBEA
CAUTION
Never use a fuse of a higher or lower
amperage rating than that specified on the
fuse box cover. This could damage the
electrical system or cause a fire.
If any electrical equipment does not
operate, check for an open fuse.
1. Be sure the ignition switch is pushed tothe OFF or LOCK position and the
headlight switch is turned to OFF. 2. Open the engine hood and remove the
cover on the battery and the fuse/
fusible link holder.
3. Remove the fuse/fusible link holder
cover.
4. Remove the fuse with the fuse puller located in the passenger compartment
fuse box.
SDI1754
5. If the fuse is open*A, replace it with a
new fuse
*B. Spare fuses are stored in
the passenger compartment fuse box.
6. If a new fuse also opens, have the electrical system checked and repaired
by an INFINITI retailer.
Fusible linksGUID-85CCA4A5-CFBD-4923-A9D8-AF759D45C85CIf any electrical equipment does not
operate and the fuses are in good condi-
tion, check the fusible links. If any of these
fusible links are melted, replace only with
genuine INFINITI parts.
FUSES
Page 438 of 474

9 Technical and consumer information
Capacities and recommended fuel/lubricants...
....... 9-2
Fuel recommendation ...
...................................... 9-4
Engine oil and oil filter recommendation ...
......... 9-6
Air conditioning system refrigerant and
lubricant recommendations ...
............................. 9-7
Specifications ...
...................................................... 9-8
Engine ...
............................................................. 9-8
Wheels and tires ...
............................................. 9-9
Dimensions ...
................................................... 9-10
When traveling or registering your vehicle in
another country ...
................................................. 9-11
Vehicle identification ...
......................................... 9-11
Vehicle Identification Number (VIN) plate ...
....... 9-11
Vehicle identification number
(chassis number) ...
........................................... 9-11
Engine serial number ...
.................................... 9-12
F.M.V.S.S./C.M.V.S.S. certification label ...
.......... 9-12
Emission control information label ...
................ 9-12
Tire and loading information label ...
................. 9-13
Air conditioner specification label ...
.................. 9-13 Installing front license plate
...
.............................. 9-13
Except for Aerodynamic Package models ...
...... 9-14
For Aerodynamic Package models ...
................ 9-16
Vehicle loading information ...
............................... 9-17
Terms ...
.......................................................... 9-17
Vehicle load capacity ...
................................... 9-18
Loading tips ...
................................................. 9-19
Measurement of weights ...
.............................. 9-20
Towing a trailer ...
................................................. 9-20
Flat towing ...
................................................... 9-20
Uniform tire quality grading ...
.............................. 9-21
Treadwear ...
.................................................... 9-21
Traction AA, A, B and C ...
................................ 9-21
Temperature A, B and C ...
............................... 9-21
Emission control system warranty ...
..................... 9-22
Reporting safety defects ...
.................................... 9-22
Readiness for Inspection/Maintenance
(I/M) test ...
.......................................................... 9-23
Event Data Recorders (EDR) ...
............................... 9-24
Owner’s manual/service manual
order information ...
.............................................. 9-24