phone INFINITI M 2013 Owner's Manual
[x] Cancel search | Manufacturer: INFINITI, Model Year: 2013, Model line: M, Model: INFINITI M 2013Pages: 522, PDF Size: 3.72 MB
Page 5 of 522

INFINITI CUSTOMER CARE PROGRAM
INFINITI CARES ...
Both INFINITI and your INFINITI retailer are dedicated to serving all your automotive needs. Your satisfaction with your vehicle and your
INFINITI retailer are our primary concerns. Your INFINITI retailer is always available to assist you with all your automobile sales and service
needs.
However, if there is something that your
INFINITI retailer cannot assist you with or
you would like to provide INFINITI directly
with comments or questions, please con-
tact our (INFINITI’s) Consumer Affairs De-
partment using our toll-free number:For U.S. customers1-800-662-6200
For Canadian customers 1-800-361-4792
The Consumer Affairs Department will ask
for the following information:
. Your name, address, and telephone
number
. Vehicle identification number (on dash
panel)
. Date of purchase
. Current odometer reading
. Your INFINITI retailer’s name
. Your comments or questions OR
You can write to INFINITI with the informa-
tion on the left at:
For U.S. customersINFINITI Division
Nissan North America, Inc.
Consumer Affairs Department
P.O. Box 685003
Franklin, TN 37068-5003
or via e-mail at:
[email protected]
For Canadian customers INFINITI Division
Nissan Canada Inc.
5290 Orbitor Drive
Mississauga, Ontario L4W 4Z5
or via e-mail at:
information.centre@nissancanada.
com If you prefer, visit us at:
www.infinitiUSA.com (for U.S. customer) or
www.infiniti.ca (for Canadian customers)
We appreciate your interest in INFINITI and
thank you for buying a quality INFINITI
vehicle.
Page 6 of 522
Illustrated table of contents0
Safety—Seats, seat belts and supplemental restraint
system1
Instruments and controls
Pre-driving checks and adjustments
Monitor, climate, audio, phone and voice recognition
systems
Starting and driving
In case of emergency
Appearance and care
Maintenance and do-it-yourself
Technical and consumer information
Index
2
3
4
5
6
7
8
9
10
Table of
Contents
Page 13 of 522
0-6Illustrated table of contents
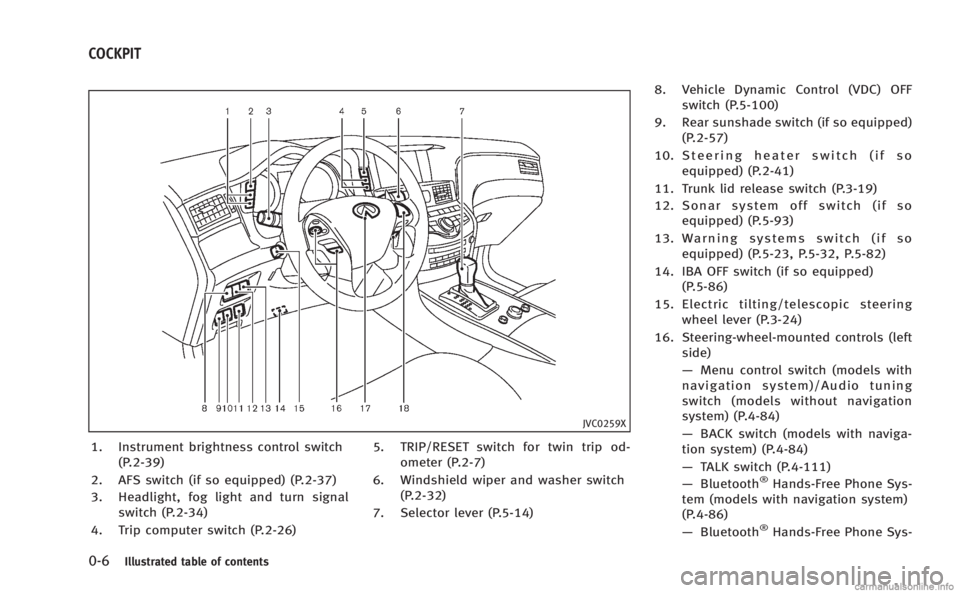
JVC0259X
1. Instrument brightness control switch(P.2-39)
2. AFS switch (if so equipped) (P.2-37)
3. Headlight, fog light and turn signal switch (P.2-34)
4. Trip computer switch (P.2-26) 5. TRIP/RESET switch for twin trip od-
ometer (P.2-7)
6. Windshield wiper and washer switch (P.2-32)
7. Selector lever (P.5-14) 8. Vehicle Dynamic Control (VDC) OFF
switch (P.5-100)
9. Rear sunshade switch (if so equipped) (P.2-57)
10. Steering heater switch (if so equipped) (P.2-41)
11. Trunk lid release switch (P.3-19)
12. Sonar system off switch (if so equipped) (P.5-93)
13. Warning systems switch (if so equipped) (P.5-23, P.5-32, P.5-82)
14. IBA OFF switch (if so equipped) (P.5-86)
15. Electric tilting/telescopic steering wheel lever (P.3-24)
16. Steering-wheel-mounted controls (left side)
—Menu control switch (models with
navigation system)/Audio tuning
switch (models without navigation
system) (P.4-84)
— BACK switch (models with naviga-
tion system) (P.4-84)
— TALK switch (P.4-111)
— Bluetooth
®Hands-Free Phone Sys-
tem (models with navigation system)
(P.4-86)
— Bluetooth
®Hands-Free Phone Sys-
COCKPIT
Page 76 of 522
JVC0259X
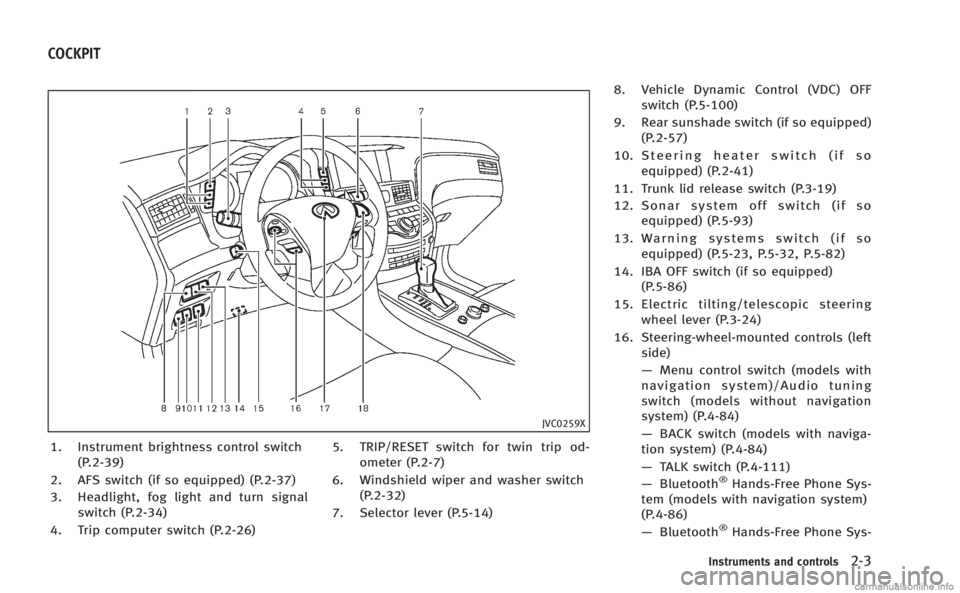
1. Instrument brightness control switch(P.2-39)
2. AFS switch (if so equipped) (P.2-37)
3. Headlight, fog light and turn signal switch (P.2-34)
4. Trip computer switch (P.2-26) 5. TRIP/RESET switch for twin trip od-
ometer (P.2-7)
6. Windshield wiper and washer switch (P.2-32)
7. Selector lever (P.5-14) 8. Vehicle Dynamic Control (VDC) OFF
switch (P.5-100)
9. Rear sunshade switch (if so equipped) (P.2-57)
10. Steering heater switch (if so equipped) (P.2-41)
11. Trunk lid release switch (P.3-19)
12. Sonar system off switch (if so equipped) (P.5-93)
13. Warning systems switch (if so equipped) (P.5-23, P.5-32, P.5-82)
14. IBA OFF switch (if so equipped) (P.5-86)
15. Electric tilting/telescopic steering wheel lever (P.3-24)
16. Steering-wheel-mounted controls (left side)
—Menu control switch (models with
navigation system)/Audio tuning
switch (models without navigation
system) (P.4-84)
— BACK switch (models with naviga-
tion system) (P.4-84)
— TALK switch (P.4-111)
— Bluetooth
®Hands-Free Phone Sys-
tem (models with navigation system)
(P.4-86)
— Bluetooth
®Hands-Free Phone Sys-
Instruments and controls2-3
COCKPIT
Page 80 of 522

SIC4318
Speedometer
SPEEDOMETER AND ODOMETER
Speedometer
The speedometer indicates vehicle speed
in miles per hour (MPH) and kilometers per
hour (km/h).
SIC4319
Odometer/twin trip odometer
Odometer/twin trip odometer
The odometer*1and twin trip odometer
*2are displayed on the dot matrix crystal
display when the ignition switch is in the
ON position.
The odometer records the total distance
the vehicle has been driven.
The twin trip odometer records the dis-
tance of individual trips.
Changing the display:
Pushing the TRIP RESET switch
*3on the
right of the combination meter panel
changes the display as follows: TRIP A
?TRIP B ?TRIP A
Resetting the trip odometer:
Pushing the TRIP RESET switch
*3for more
than 1 second resets the trip odometer to
zero.
Average fuel economy and distance to
empty information is also available. (See
“Dot matrix liquid crystal display” later in
this section and “How to use STATUS
button” in the“4. Monitor, climate, audio,
phone and voice recognition systems”
section.)
Instruments and controls2-7
Page 98 of 522
INDICATORS FOR MAINTENANCE
1. Engine oil replacement indicator
This indicator appears when the customer
set time comes for changing the engine oil.
You can set or reset the distance for
changing the engine oil. (See“Trip compu-
ter” later in this section.)
2. Oil filter replacement indicator
This indicator appears when the customer
set time comes for replacing the oil filter.
You can set or reset the distance for
replacing the oil filter. (See “Trip compu-
ter” later in this section.)
3. Tire replacement indicator
This indicator appears when the customer
set distance comes for replacing tires. You
can set or reset the distance for replacing
tires. (See “Trip computer” later in this
section.)
WARNING
The tire replacement indicator is not a
substitute for regular tire checks, including
tire pressure checks. See “Changing wheels
and tires” in the“Maintenance and do-it- yourself”
section. Many factors including
tire inflation, alignment, driving habits and
road conditions affect tire wear and when
tires should be replaced. Setting the tire
replacement indicator for a certain driving
distance does not mean your tires will last
that long. Use the tire replacement indicator
as a guide only and always perform regular
tire checks. Failure to perform regular tire
checks, including tire pressure checks could
result in tire failure. Serious vehicle damage
could occur and may lead to a collision,
which could result in serious personal injury
or death.
4. “OTHER” indicator
This indicator appears when the customer
set time comes for replacing items other
than the engine oil, oil filter and tires. You
can set or reset the distance for replacing
the items. (See “Trip computer” later in
this section.)
More maintenance reminders are also
available on the center display. (See
“ How to use INFO button” in the“4.
Monitor, climate, audio, phone and voice
recognition systems” section.)
Instruments and controls2-25
Page 109 of 522

2-36Instruments and controls
The autolight system can turn on the
headlights automatically when it is dark
and turn off the headlights when it is light.
For US models: The headlights will also be
turned on automatically at twilight or in
rainy weather (when the windshield wiper
is operated continuously).
If the ignition switch is pushed to the OFF
position and one of the doors is opened
and this condition is continued, the head-
lights remain on for 5 minutes.
Automatic headlights off delay:
You can keep the headlights on for up to
180 seconds after you push the ignition
switch to OFF and open any door then close
all the doors.
You can adjust the period of the automatic
headlights off delay from 0 seconds (OFF)
to 180 seconds. The factory default setting
is 45 seconds.
For automatic headlights off delay setting,
see“Light Off Delay” in the“4. Monitor,
climate, audio, phone and voice recogni-
tion systems” section.
SAA0642A
Be sure not to put anything on top of the
photo sensor
*Alocated on the top of the
instrument panel. The photo sensor con-
trols the autolight; if it is covered, the
photo sensor reacts as if it is dark and the
headlights will illuminate.
SIC3269
Headlight beam select
*1To select the low beam, put the lever
in the neutral position as shown.
*2To select the high beam, push the
lever forward while the switch is in the
position. Pull it back to select the
low beam.
*3Pulling the lever toward you will flash
the headlight high beam even when
the headlight switch is in the OFF
position.
Page 119 of 522

2-46Instruments and controls
“Vehicle Dynamic Control (VDC) system”in
the “5. Starting and driving” section.)
SIC4338
If the power supply is disconnected, the
clock will not indicate the correct time.
Readjust the time.
ADJUSTING THE TIME
1. To set the clock forward, push the
button
*1.
2. To set the clock backward, push the button
*2.
3. To move forward or backward faster, push and hold the button more than 5
seconds.
For details about display clock adjustment
(if so equipped), see “How to use SETTING
button” in the“4. Monitor, climate, audio, phone and voice recognition systems”
section.
CLOCK
Page 133 of 522
2-60Instruments and controls
SIC4357
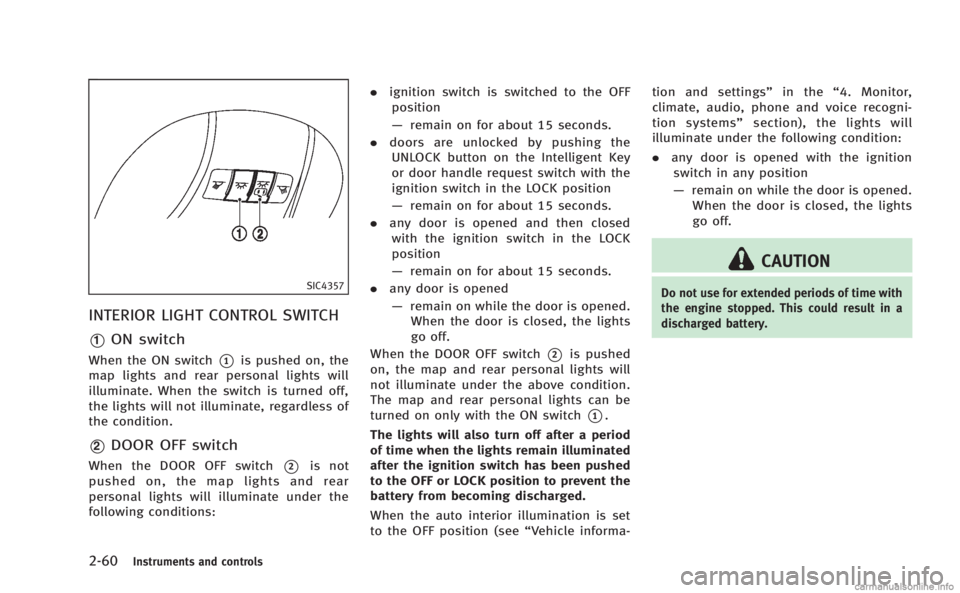
INTERIOR LIGHT CONTROL SWITCH
*1ON switch
When the ON switch*1is pushed on, the
map lights and rear personal lights will
illuminate. When the switch is turned off,
the lights will not illuminate, regardless of
the condition.
*2DOOR OFF switch
When the DOOR OFF switch*2is not
pushed on, the map lights and rear
personal lights will illuminate under the
following conditions: .
ignition switch is switched to the OFF
position
— remain on for about 15 seconds.
. doors are unlocked by pushing the
UNLOCK button on the Intelligent Key
or door handle request switch with the
ignition switch in the LOCK position
— remain on for about 15 seconds.
. any door is opened and then closed
with the ignition switch in the LOCK
position
— remain on for about 15 seconds.
. any door is opened
— remain on while the door is opened.
When the door is closed, the lights
go off.
When the DOOR OFF switch
*2is pushed
on, the map and rear personal lights will
not illuminate under the above condition.
The map and rear personal lights can be
turned on only with the ON switch
*1.
The lights will also turn off after a period
of time when the lights remain illuminated
after the ignition switch has been pushed
to the OFF or LOCK position to prevent the
battery from becoming discharged.
When the auto interior illumination is set
to the OFF position (see “Vehicle informa-tion and settings”
in the“4. Monitor,
climate, audio, phone and voice recogni-
tion systems” section), the lights will
illuminate under the following condition:
. any door is opened with the ignition
switch in any position
— remain on while the door is opened.
When the door is closed, the lights
go off.
CAUTION
Do not use for extended periods of time with
the engine stopped. This could result in a
discharged battery.
Page 144 of 522

.You can switch the lock system to the
mode that allows you to open all the
doors when the key is turned once.
(See “How to use SETTING button” in
the “4. Monitor, climate, audio, phone
and voice recognition systems” sec-
tion.)
OPENING AND CLOSING WINDOWS
WITH THE MECHANICAL KEY
The driver’s door key operation also allows
you to open and close the window that is
equipped with the automatic open/close
function. (See “Power windows” in the“2.
Instruments and controls” section).
To open the window, turn the driver’s door
key cylinder to the rear of the vehicle for
longer than 1 second. The door is unlocked
and the window keeps opening while
turning the key.
This function can also be performed by
pushing and holding the door UNLOCK
button of the Intelligent Key. (See “Remote
keyless entry system” later in this section.)
To close the window, turn the driver’s door
key cylinder to the front of the vehicle for
longer than 1 second. The door is locked
and the window keeps closing while turn-
ing the key.
SPA2726
LOCKING WITH INSIDE LOCK KNOB
To lock the door individually, move the
inside lock knob to the lock position
*1
then close the door.
To unlock, move the inside lock knob to the
unlock position
*2.
When locking the door without an Intelli-
gent Key, be sure not to leave the
Intelligent Key inside the vehicle.
SPA2727
LOCKING WITH POWER DOOR LOCK
SWITCH
Operating the power door lock switch will
lock or unlock all the doors. The switches
are located on the driver’ s and front
passenger’s door armrests.
To lock the doors, push the power door
lock switch to the lock position
*1with the
driver’s or front passenger’s door open,
then close the door.
When locking the door this way, be certain
not to leave the Intelligent Key inside the
vehicle.
To unlock the doors including the fuel-filler
Pre-driving checks and adjustments3-5