air condition INFINITI Q50 HYBRID 2016 Quick Reference Guide
[x] Cancel search | Manufacturer: INFINITI, Model Year: 2016, Model line: Q50 HYBRID, Model: INFINITI Q50 HYBRID 2016Pages: 36, PDF Size: 2.04 MB
Page 2 of 36
*See your Owner’s Manual for information.
Behind
steering wheel Behind
steering wheel
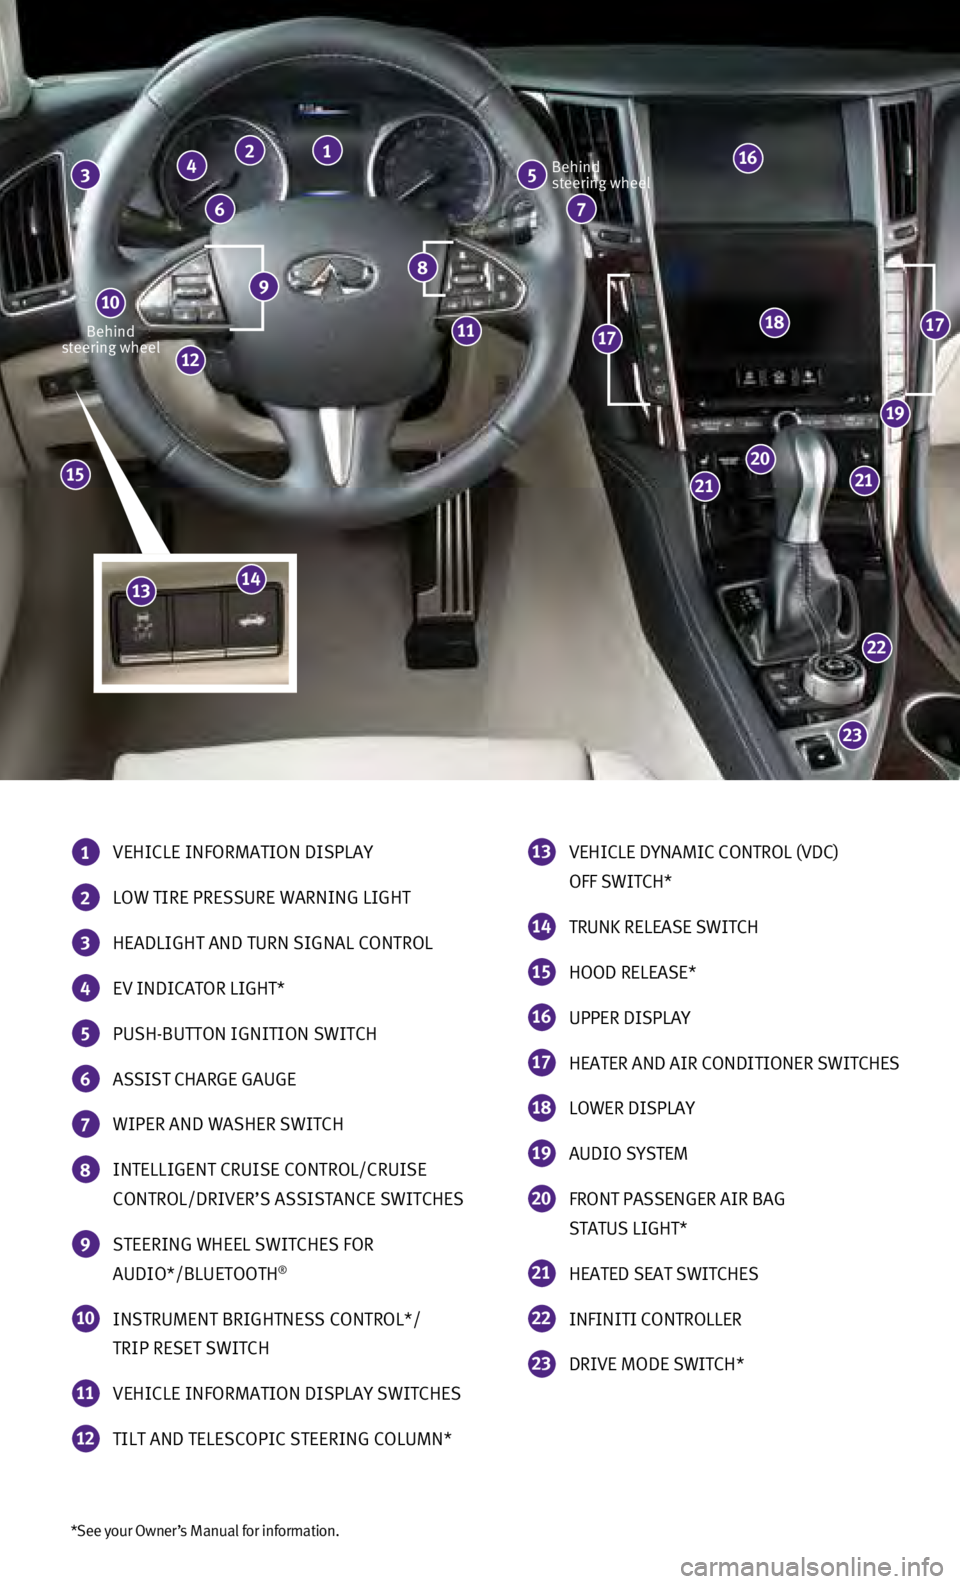
1 VEHICLE INFORMATION DISPLAY
2 LOW TIRE PRESSURE WARNING LIGHT
3 HEADLIGHT AND TURN SIGNAL CONTROL
4 EV INDICATOR LIGHT*
5 PUSH-BUTTON IGNITION SWITCH
6 ASSIST CHARGE GAUGE
7 WIPER AND WASHER SWITCH
8 INTELLIGENT CRUISE CONTROL/CRUISE
CONTROL/DRIVER’S ASSISTANCE SWITCHES
9 STEERING WHEEL SWITCHES FOR
AUDIO*/BLUETOOTH®
10 INSTRUMENT BRIGHTNESS CONTROL*/
TRIP RESET SWITCH
11 VEHICLE INFORMATION DISPLAY SWITCHES
12 TILT AND TELESCOPIC STEERING COLUMN*
13 VEHICLE DYNAMIC CONTROL (VDC)
OFF SWITCH*
14 TRUNK RELEASE SWITCH
15 HOOD RELEASE*
16 UPPER DISPLAY
17 HEATER AND AIR CONDITIONER SWITCHES
18 LOWER DISPLAY
19 AUDIO SYSTEM
20 FRONT PASSENGER AIR BAG
STATUS LIGHT*
21 HEATED SEAT SWITCHES
22 INFINITI CONTROLLER
23 DRIVE MODE SWITCH*
23
22
2121
20
19
1717
16
12
9 8
5 3 2 1
7 6
4
10
1118
15
1413
Page 3 of 36
table of contents
new system features
Approaching Vehicle Sound for Pedestrians (VSP) System .............2 Main Interface Switches Overview .................................2
User Registration
...............................................
2
Upper Display..................................................3
essential information
Tire Pressure Monitoring System (TPMS) with Tire Inflation Indicator.....4 Hybrid Awareness ..............................................5
Direct Response Hybrid™ System Warning Light ......................5
Loose Fuel Cap.................................................5
Fuel-filler Door
.................................................
6 Lower Display Maintenance
......................................
6 Driving Aids
...................................................
6 Active Lane Control (if so equipped)................................6
Heated Steering Wheel
..........................................
7 Clock Set/Adjustment
...........................................
7
first drive features
Infiniti InTouch™ Services (if so equipped) . . . . . . . . . . . . . . . . . . . . . . . . . . 8 Infiniti Intelligent Key System ....................................10 Around View® Monitor (AVM) with Moving Object Detection (MOD) .....11 Trunk Lid Release..............................................13 Seat Adjustments..............................................14 Heated Seats
.................................................
14
Automatic Drive Positioner
......................................
15
Assist Charge Gauge
...........................................
15
Starting/Stopping the Hybrid System..............................15 Outside Mirror Control Switch....................................16
Headlight Control Switch........................................16
Wiper and Washer Switch
.......................................
18
Heater and Air Conditioner (automatic)
............................
19
FM/AM/HD Radio
®/SiriusXM® Satellite Radio.......................21 USB (Universal Serial Bus) Connection Port/iPod® Interface...........22 Conventional (Fixed Speed) Cruise Control (if so equipped) ...........22 Intelligent Cruise Control (ICC) (if so equipped).....................23
system guide
Vehicle Information Display .....................................24
Bluetooth® Hands-free Phone System .............................24
System Operating Tips .......................................24 Infiniti InTouch™ Navigation.....................................28
HomeLink® Universal Transceiver.................................30
To view detailed
instructional videos, go to
www.infinitiownersinfo.mobi/2016/q50
or snap this barcode with an appropriate barcode reader.
Additional information about your vehicle is also available in your Owne\
r’s
Manual, InTouch Owner’s Manual and at www.InfinitiUSA.com.
Please see your Owner’s Manual for important safety information
and system operation limitations.
•
A cellular telephone should not be used for any purpose while
driving so full attention may be given to vehicle operation.
• Always wear your seat belt.
• Supplemental air bags do not replace proper seat belt usage.
•
Children 12 and under should always ride in the rear seat
properly secured in child restraints or seat belts according to their
age and weight.
• Do not drink and drive.
For more information, refer to your InTouch Owner’s Manual, the
“Safety –– Seats, seat belts and supplemental restraint system
(section 1)” and the “Starting and driving (section 5)” of your
Owner’s Manual.
Page 9 of 36
7
Heated Steering Wheel
The heated steering wheel system is designed to operate only when the su\
rface
temperature of the steering wheel is below approximately 68°F (20°\
C). The steering wheel
heater will also turn off automatically after approximately 30 minutes.
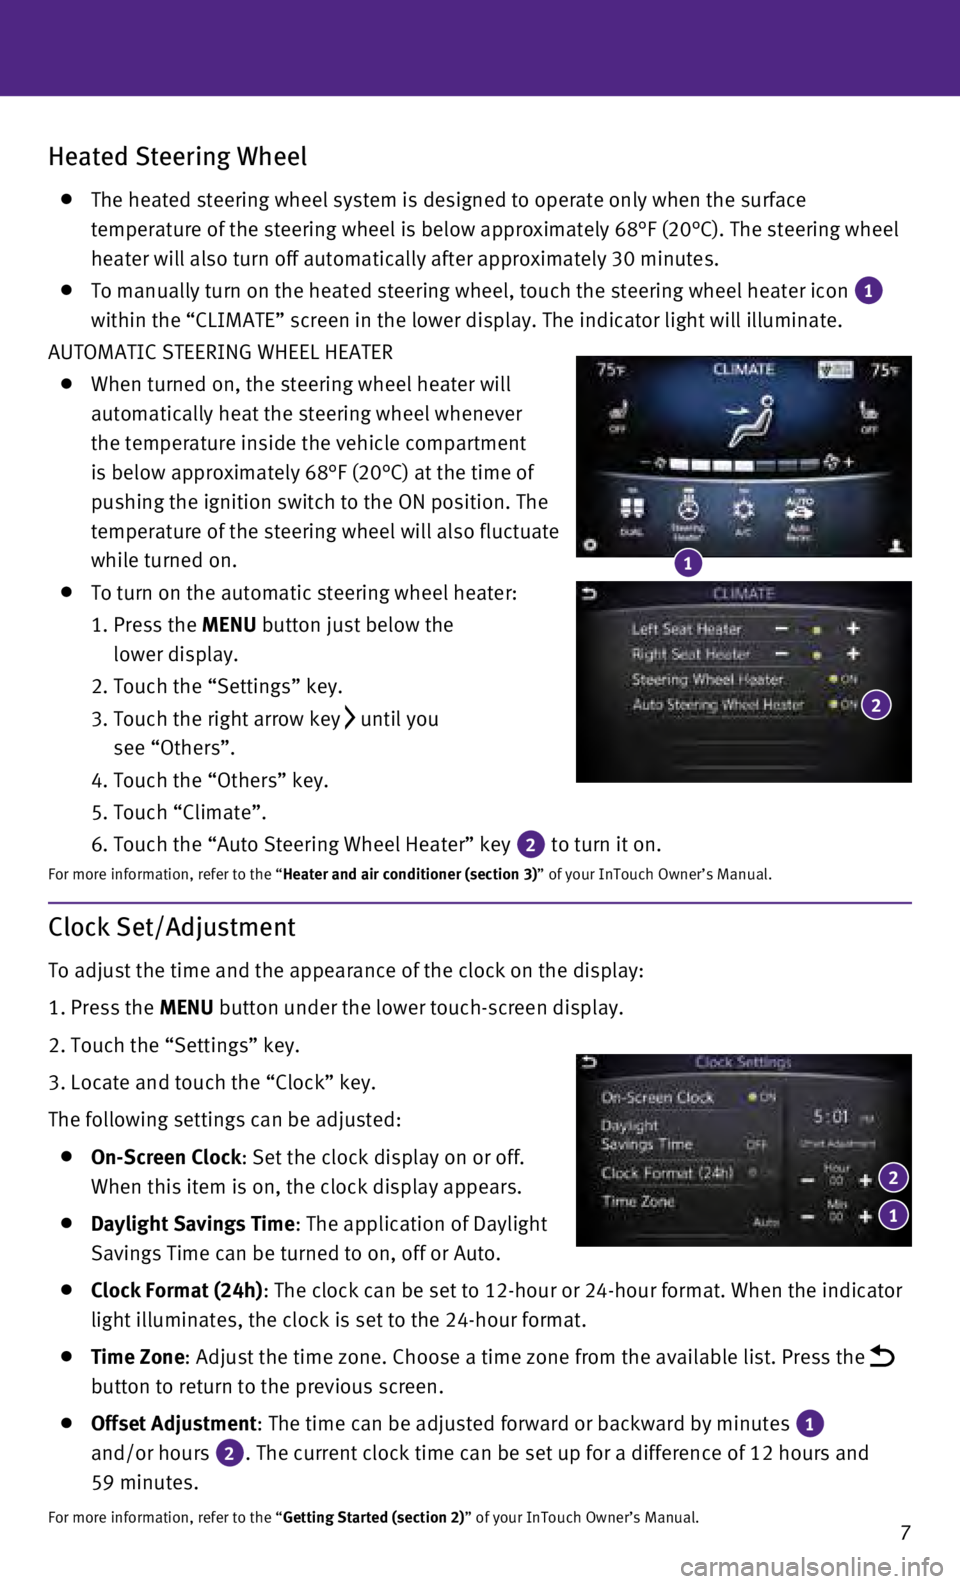
To manually turn on the heated steering wheel, touch the steering wheel \
heater icon 1
within the “CLIMATE” screen in the lower display. The indicator li\
ght will illuminate.
AUTOMATIC STEERING WHEEL HEATER
When turned on, the steering wheel heater will
automatically heat the steering wheel whenever
the temperature inside the vehicle compartment
is below approximately 68°F (20°C) at the time of
pushing the ignition switch to the ON position. The
temperature of the steering wheel will also fluctuate
while turned on.
To turn on the automatic steering wheel heater:
1.
Press the
MENU button just below the
lower display.
2. Touch the “Settings” key.
3.
Touch the right arrow key until you
see “Others”.
4. Touch the “Others” key.
5. Touch “Climate”.
6. Touch the “Auto Steering Wheel Heater” key 2 to turn it on.
For more information, refer to the “Heater and air conditioner (section 3)” of your InTouch Owner’s Manual.
1
2
Clock Set/Adjustment
To adjust the time and the appearance of the clock on the display:
1.
Press the
MENU button under the lower touch-screen display.
2.
Touch the “Settings” key.
3.
Locate and touch the “Clock” key.
The following settings can be adjusted:
On-Screen Clock : Set the clock display on or off.
When this item is on, the clock display appears.
Daylight Savings Time: The application of Daylight
Savings Time can be turned to on, off or Auto.
Clock Format (24h) : The clock can be set to 12-hour or 24-hour format. When the indicator \
light illuminates, the clock is set to the 24-hour format.
Time Zone : Adjust the time zone. Choose a time zone from the available list. Pres\
s the
button to return to the previous screen.
Offset Adjustment : The time can be adjusted forward or backward by minutes 1
and/or hours
2. The current clock time can be set up for a difference of 12 hours and \
59 minutes.
For more information, refer to the “Getting Started (section 2)” of your InTouch Owner’s Manual.
1
2
Page 16 of 36
14
Heated Seats
There are two ways to operate the heated seats:
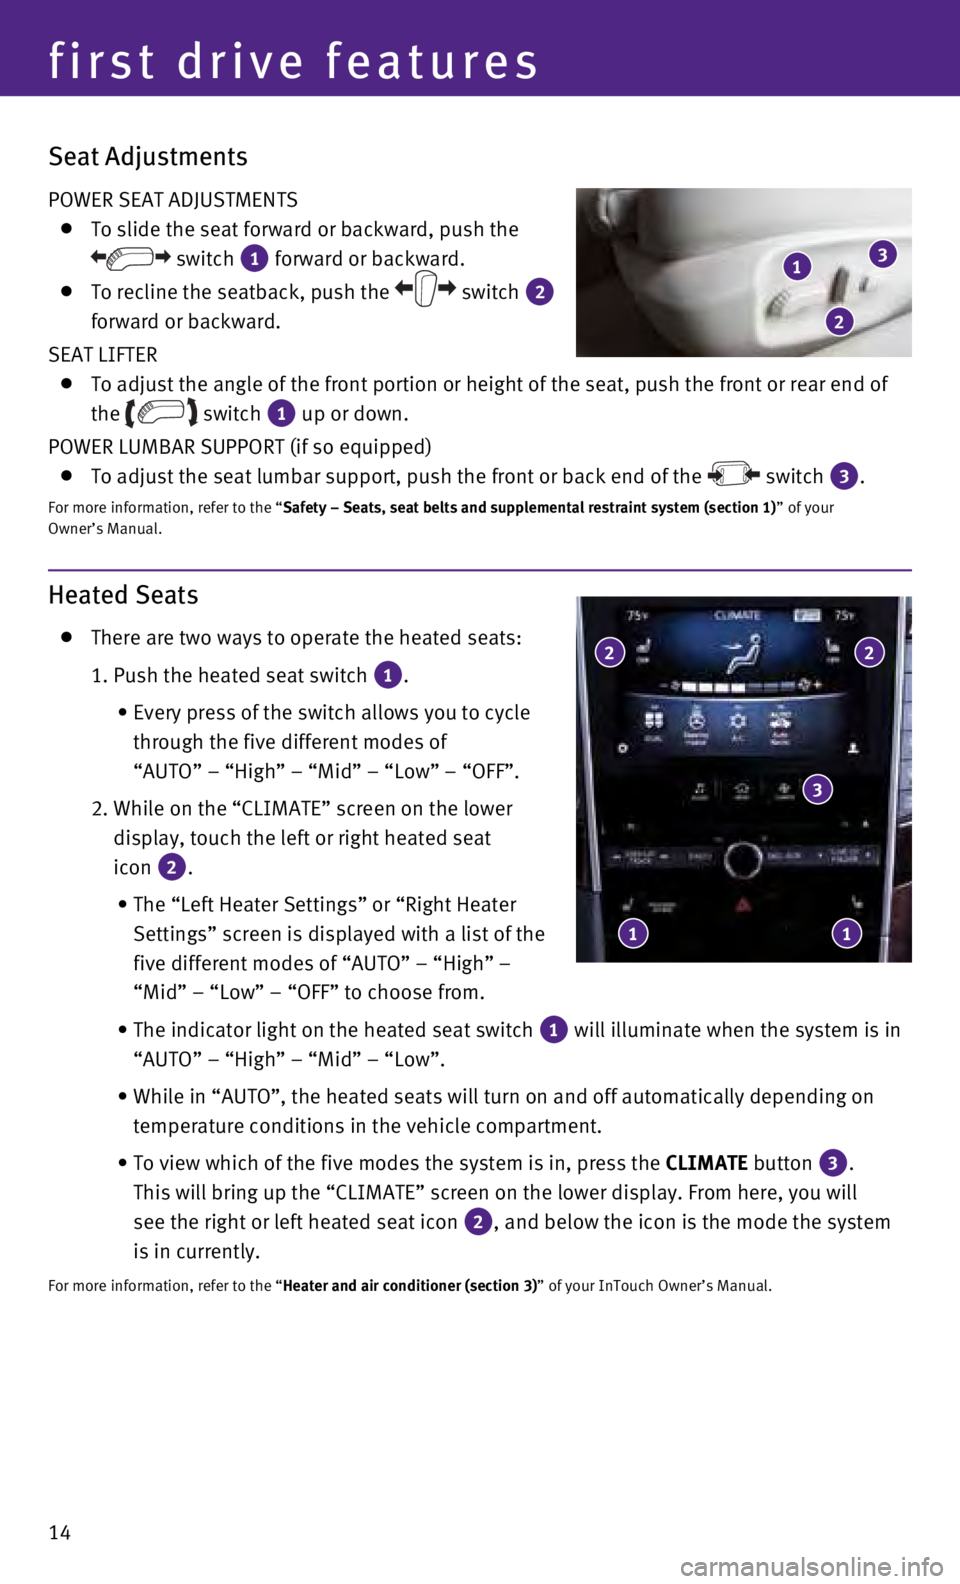
1. Push the heated seat switch 1.
•
Every press of the switch allows you to cycle
through the five different modes of
“AUTO” – “High” – “Mid” – “Low” – “\
OFF”.
2.
While on the “CLIMATE” screen on the lower
display, touch the left or right heated seat
icon
2.
•
The “Left Heater Settings” or “Right Heater
Settings” screen is displayed with a list of the
five different modes of “AUTO” – “High” –
“Mid” – “Low” – “OFF” to choose from.
•
The indicator light on the heated seat switch 1 will illuminate when the system is in
“AUTO” – “High” – “Mid” – “Low”.
•
While in “AUTO”, the heated seats will turn on and off automatical\
ly depending on
temperature conditions in the vehicle compartment.
•
To view which of the five modes the system is in, press the CLIMATE
button
3.
This will bring up the “CLIMATE” screen on the lower display. From\
here, you will
see the right or left heated seat icon
2, and below the icon is the mode the system
is in currently.
For more information, refer to the “Heater and air conditioner (section 3)” of your InTouch Owner’s Manual.
2 2
3
1 1
first drive features
Seat Adjustments
POWER SEAT ADJUSTMENTS
To slide the seat forward or backward, push the
switch 1 forward or backward.
To recline the seatback, push the switch 2
forward or backward.
SEAT LIFTER
To adjust the angle of the front portion or height of the seat, push the\
front or rear end of
the
switch 1 up or down.
POWER LUMBAR SUPPORT (if so equipped)
To adjust the seat lumbar support, push the front or back end of the switch 3.
For more information, refer to the “Safety – Seats, seat belts and supplemental restraint system (sectio\
n 1) ” of your
Owner’s Manual.
1
2
3
Page 21 of 36
19
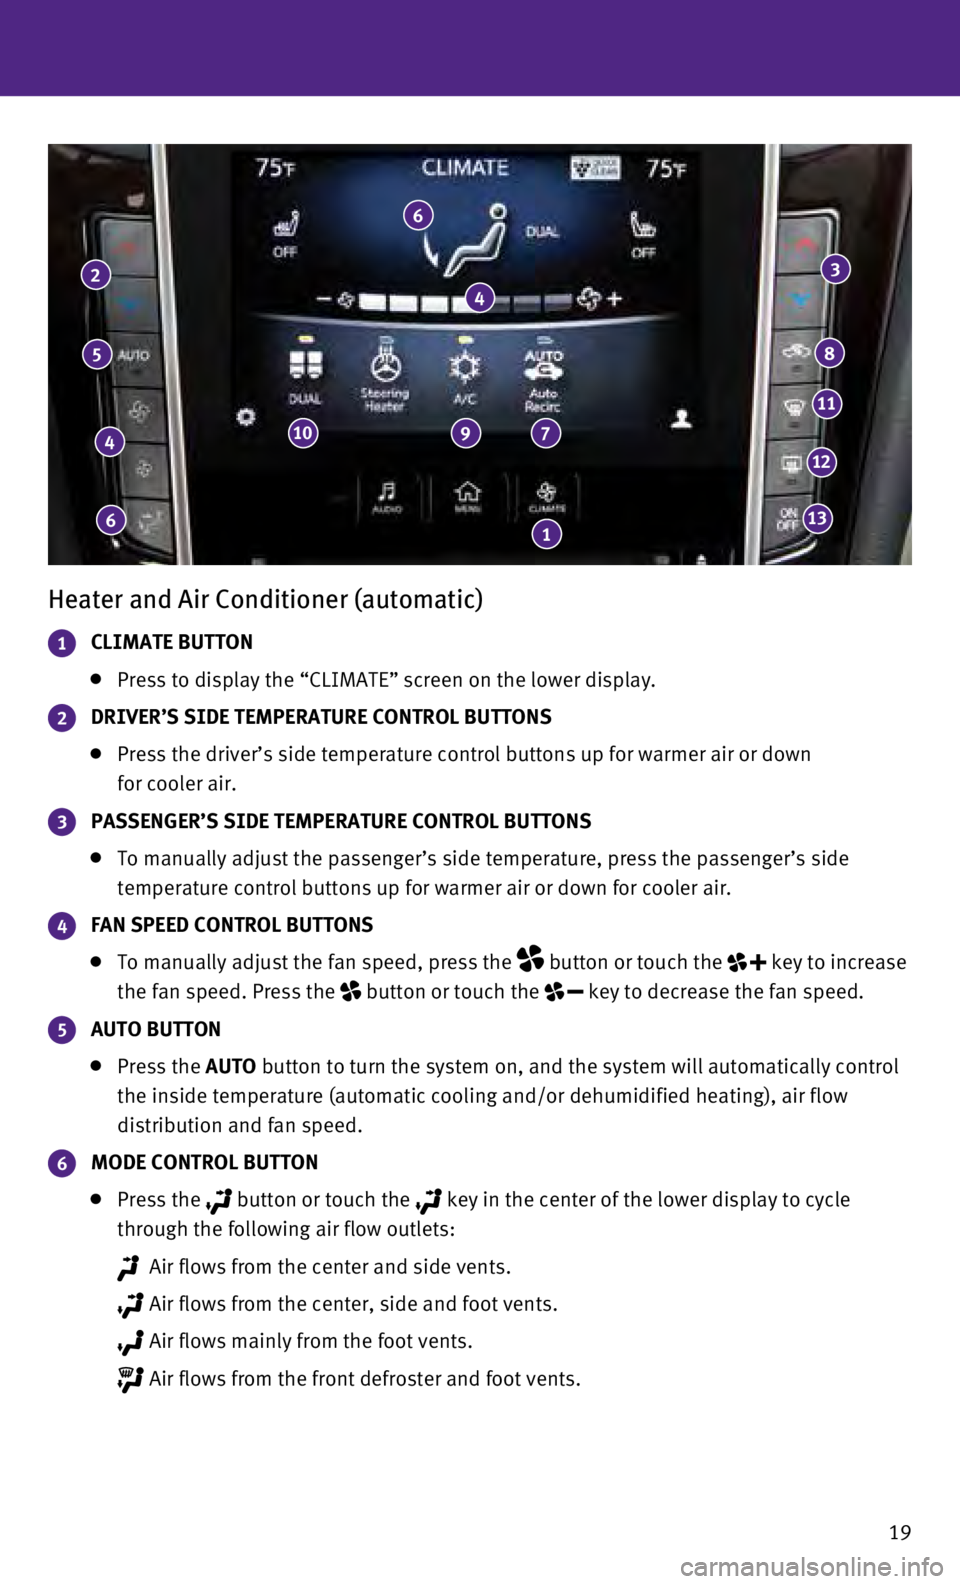
Heater and Air Conditioner (automatic)
1 CLIMATE BUTTON
Press to display the “CLIMATE” screen on the lower display.
2 DRIVER’S SIDE TEMPERATURE CONTROL BUTTONS
Press the driver’s side temperature control buttons up for warmer air\
or down
for cooler air.
3 PASSENGER’S SIDE TEMPERATURE CONTROL BUTTONS
To manually adjust the passenger’s side temperature, press the passen\
ger’s side
temperature control buttons up for warmer air or down for cooler air.
4 FAN SPEED CONTROL BUTTONS
To manually adjust the fan speed, press the button or touch the key to increase
the fan speed. Press the
button or touch the key to decrease the fan speed.
5 AUTO BUTTON
Press the AUTO button to turn the system on, and the system will automatically control\
the inside temperature (automatic cooling and/or dehumidified heating)\
, air flow
distribution and fan speed.
6 MODE CONTROL BUTTON
Press the button or touch the key in the center of the lower display to cycle
through the following air flow outlets:
Air flows from the center and side vents.
Air flows from the center, side and foot vents.
Air flows mainly from the foot vents.
Air flows from the front defroster and foot vents.
6
4
5
2
6
4
7 910
1
3
8
11
12
13
Page 22 of 36

20
7 AUTO AIR RECIRCULATION KEY (if so equipped)
Touch to allow inside air recirculation and outside air circulation to s\
witch automatically
depending on the quality of the outside air.
8 INTAKE AIR CONTROL BUTTON
Pressing the intake air control button will cancel auto air recirculation 7 (if so
equipped) until it is re-activated from the touch-screen (see above).\
Press the intake
air control button
to manually control whether the interior air is recirculated
or outside air is drawn into the vehicle. When the indicator light is on\
, interior air is
recirculated, outside odors are avoided and the interior vehicle tempera\
ture is most
effectively maintained.
The air recirculation mode cannot be activated when the climate control \
sy stem is in the
front defroster mode
or the front defroster and foot vent mode .
9 A/C KEY
Touch the “A/C” key to turn the air conditioner system on or off. \
This system helps cool
and dehumidify the air inside the cabin and defog the windows.
10 DUAL KEY
Touch to turn the passenger’s side temperature controls on or off. Wh\
en the system
is on, the indicator light will illuminate. This function will allow the\
passenger’s side
temperature to be adjusted independently from the driver’s side by pr\
essing the
passenger’s side temperature control buttons
3.
11 DEFROSTING/DEFOGGING FRONT AND SIDE WINDOWS
Press the front defroster button to turn the system on. The A/C automatically
turns on when the front defroster mode is selected. This feature removes\
humidity from
the air.
To defrost the front and side windows, set the driver’s side temperat\
ure controls 2
and fan speed controls
4 to their maximum settings.
12 DEFROSTING REAR WINDOW AND OUTSIDE MIRRORS
Push the rear window and outside mirror defroster switch to turn the system on
or off.
This function automatically turns off after approximately 15 minutes.
13 ON/OFF BUTTON
Press the ON/OFF button to turn the climate control system on or off.
For more information, refer to the “Instruments and controls (section 2)” of your Owner’s Manual and the “Heater and air
conditioner (section 3)” of your InTouch Owner’s Manual.
first drive features