light INFINITI QX60 2018 Infiniti Connection
[x] Cancel search | Manufacturer: INFINITI, Model Year: 2018, Model line: QX60, Model: INFINITI QX60 2018Pages: 284, PDF Size: 1.34 MB
Page 10 of 284
1. Introduction
TRADEMARKS
HD Radio Technology manufactured under
license from iBiquity Digital Corporation.
U.S. and Foreign Patents. For patents see
http://patents.dts.com/. HD Radio and the
HD, HD Radio, and “ARC” logos are regis-
tered trademarks or trademarks of iBiquity
Digital Corporation in the United States
and/or other countries.
SiriusXM services require a subscription
after trial period and are sold separately or
as a package. Our satellite service is avail-
able only to those at least 18 and older in the
48 contiguous USA and DC. For more
information visit www.siriusxm.com.
Required SiriusXM Satellite Radio and Sir-
iusXM Traffic monthly subscriptions are sold
separately. SiriusXM Traffic are only avail-
able in select markets. For more information,
see www.siriusxm.com/siriusxmtraffic
Required SiriusXM Satellite Radio and Sir-
iusXM Travel Link monthly subscriptions are
sold separately. SiriusXM Travel Link is only
available in select markets. For more infor-
mation,
see www.siriusxm.com/travellink
“Made for iPod®” and “Made for iPhone®”
mean that an electronic accessory has been
designed to connect specifically to iPod® or
iPhone®, respectively, and has been certified
by the developer to meet Apple performance
standards. Apple is not responsible for the
operation of this device or its compliance
with safety and regulatory standards. Please
note that the use of this accessory with
iPod® or iPhone® may affect wireless
performance.Apple, the Apple logo, iPhone®, iPod®, iPod
classic®, iPod nano®, and iPod touch® are
trademarks of Apple Inc., registered in the
U.S. and other countries. Lightning
TMis a
trademark of Apple Inc. App StoreSMis a
service mark of Apple Inc.
Music and video recognition technology and
related data are provided by Gracenote®.
Gracenote is the industry standard in music
recognition technology and related content
delivery. For more information visit www.
gracenote.com.
CD, DVD, Blu-ray Disc, and music and video-
related data from Gracenote, Inc., copyright
© 2000 to present Gracenote. Gracenote
Software, copyright © 2000 to present
Gracenote. One or more patents owned by
Gracenote apply to this product and service.
1-4
Page 18 of 284
2. Getting started
CENTER MULTI-FUNCTION CONTROL PANEL (Type A) (if so equipped)
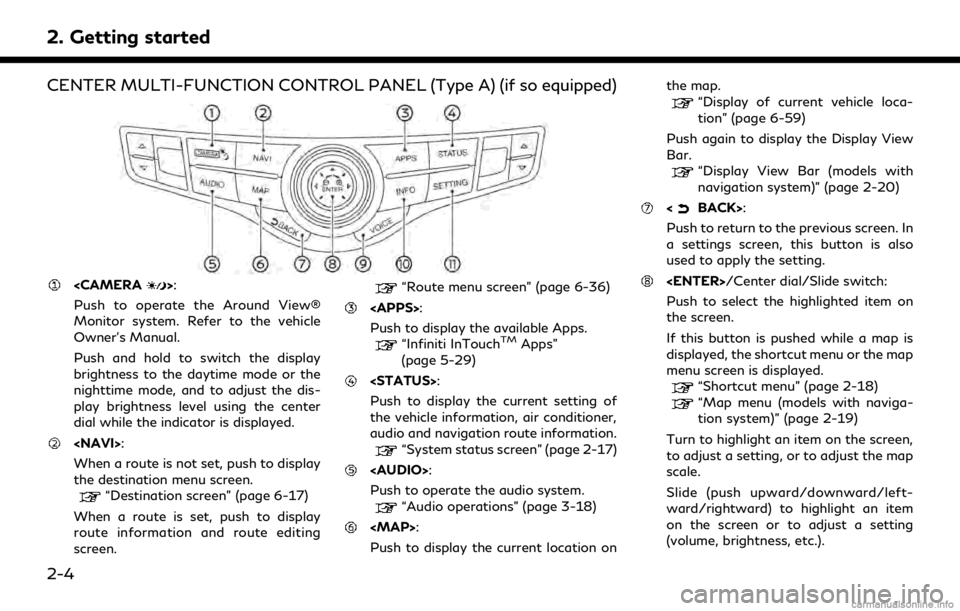
Push to operate the Around View®
Monitor system. Refer to the vehicle
Owner’s Manual.
Push and hold to switch the display
brightness to the daytime mode or the
nighttime mode, and to adjust the dis-
play brightness level using the center
dial while the indicator is displayed.
When a route is not set, push to display
the destination menu screen.
“Destination screen” (page 6-17)
When a route is set, push to display
route information and route editing
screen.
“Route menu screen” (page 6-36)
Push to display the available Apps.
“Infiniti InTouchTMApps”
(page 5-29)
Push to display the current setting of
the vehicle information, air conditioner,
audio and navigation route information.
“System status screen” (page 2-17)
Page 19 of 284
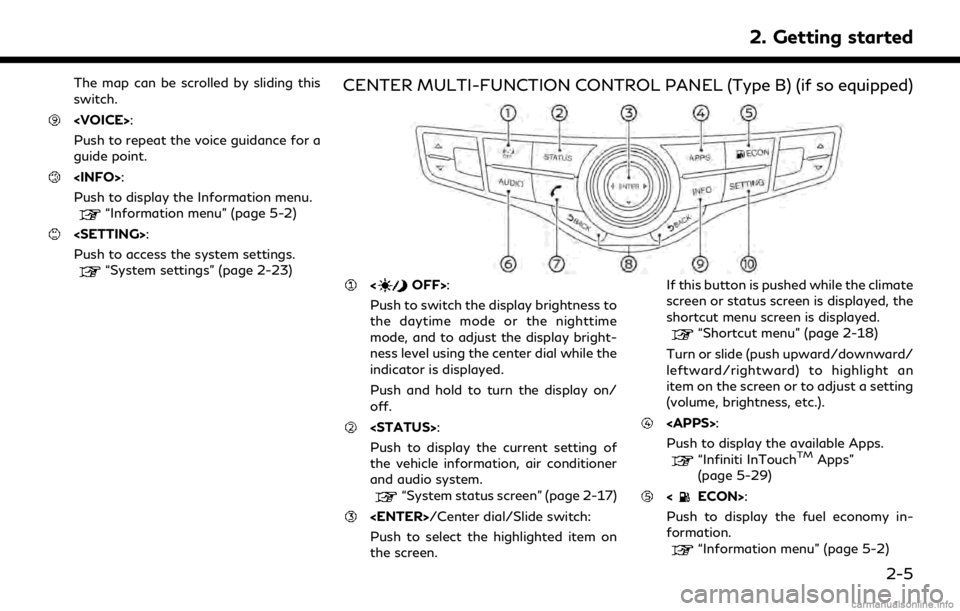
The map can be scrolled by sliding this
switch.
Push to repeat the voice guidance for a
guide point.
Push to display the Information menu.
“Information menu” (page 5-2)
Push to access the system settings.
“System settings” (page 2-23)
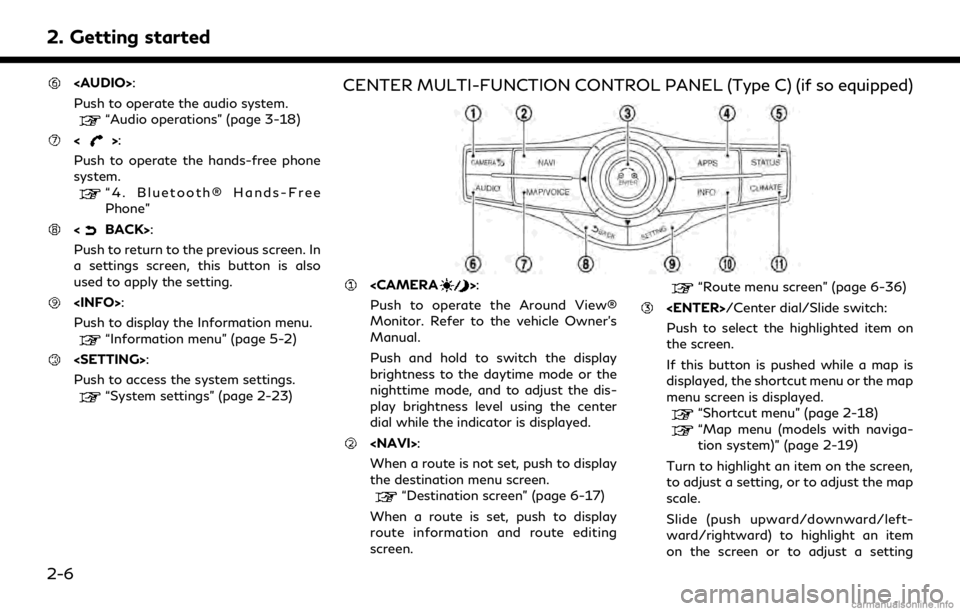
CENTER MULTI-FUNCTION CONTROL PANEL (Type B) (if so equipped)
Push to switch the display brightness to
the daytime mode or the nighttime
mode, and to adjust the display bright-
ness level using the center dial while the
indicator is displayed.
Push and hold to turn the display on/
off.
Push to display the current setting of
the vehicle information, air conditioner
and audio system.
“System status screen” (page 2-17)
Push to select the highlighted item on
the screen. If this button is pushed while the climate
screen or status screen is displayed, the
shortcut menu screen is displayed.
“Shortcut menu” (page 2-18)
Turn or slide (push upward/downward/
leftward/rightward) to highlight an
item on the screen or to adjust a setting
(volume, brightness, etc.).
Push to display the available Apps.
“Infiniti InTouchTMApps”
(page 5-29)
Push to display the fuel economy in-
formation.
“Information menu” (page 5-2)
2. Getting started
2-5
Page 20 of 284
2. Getting started
Page 22 of 284

2. Getting started
guidance for a guide point.
Page 23 of 284
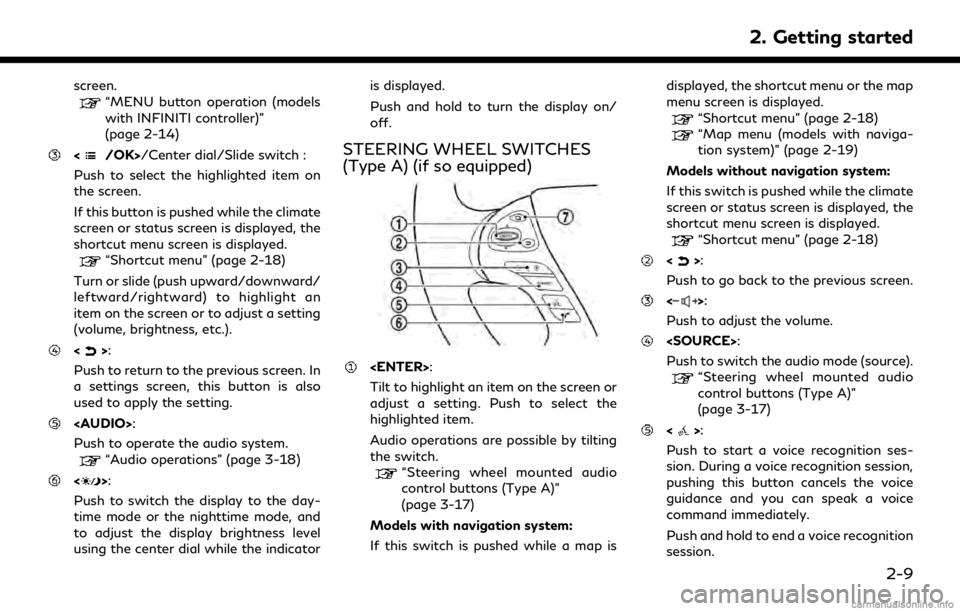
screen.“MENU button operation (models
with INFINITI controller)”
(page 2-14)
/Center dial/Slide switch :
Push to select the highlighted item on
the screen.
If this button is pushed while the climate
screen or status screen is displayed, the
shortcut menu screen is displayed.
“Shortcut menu” (page 2-18)
Turn or slide (push upward/downward/
leftward/rightward) to highlight an
item on the screen or to adjust a setting
(volume, brightness, etc.).
<>:
Push to return to the previous screen. In
a settings screen, this button is also
used to apply the setting.
Page 24 of 284
2. Getting started
“7. Voice Recognition”
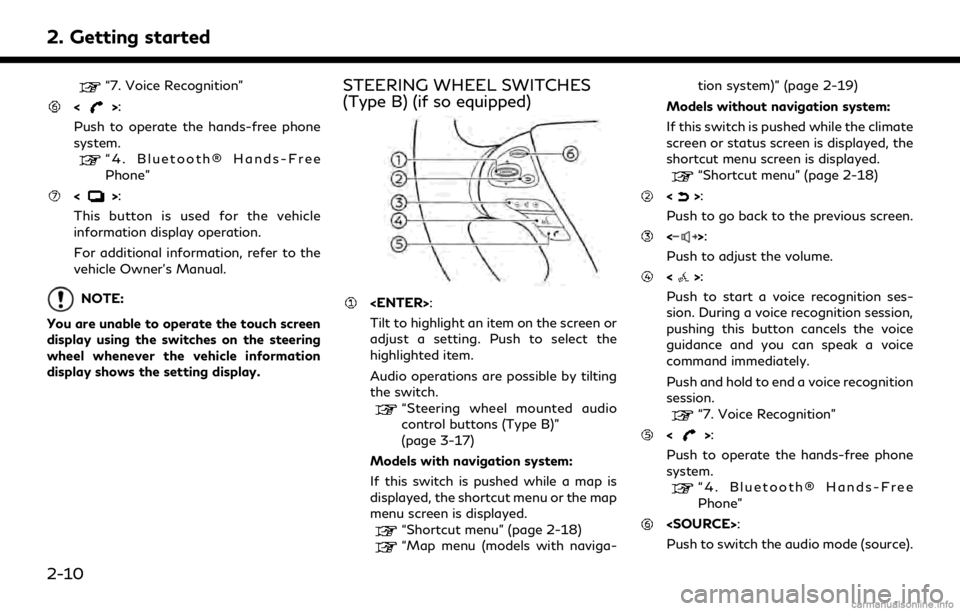
<>:
Push to operate the hands-free phone
system.
“4. Bluetooth® Hands-Free
Phone”
<>:
This button is used for the vehicle
information display operation.
For additional information, refer to the
vehicle Owner’s Manual.
NOTE:
You are unable to operate the touch screen
display using the switches on the steering
wheel whenever the vehicle information
display shows the setting display.
STEERING WHEEL SWITCHES
(Type B) (if so equipped)
Tilt to highlight an item on the screen or
adjust a setting. Push to select the
highlighted item.
Audio operations are possible by tilting
the switch.
“Steering wheel mounted audio
control buttons (Type B)”
(page 3-17)
Models with navigation system:
If this switch is pushed while a map is
displayed, the shortcut menu or the map
menu screen is displayed.
“Shortcut menu” (page 2-18)
“Map menu (models with naviga- tion system)” (page 2-19)
Models without navigation system:
If this switch is pushed while the climate
screen or status screen is displayed, the
shortcut menu screen is displayed.
“Shortcut menu” (page 2-18)
<>:
Push to go back to the previous screen.
<>:
Push to adjust the volume.
<>:
Push to start a voice recognition ses-
sion. During a voice recognition session,
pushing this button cancels the voice
guidance and you can speak a voice
command immediately.
Push and hold to end a voice recognition
session.
“7. Voice Recognition”
<>:
Push to operate the hands-free phone
system.
“4. Bluetooth® Hands-Free
Phone”
Push to switch the audio mode (source).
2-10
Page 25 of 284
“Steering wheel mounted audio
control buttons (Type B)”
(page 3-17)
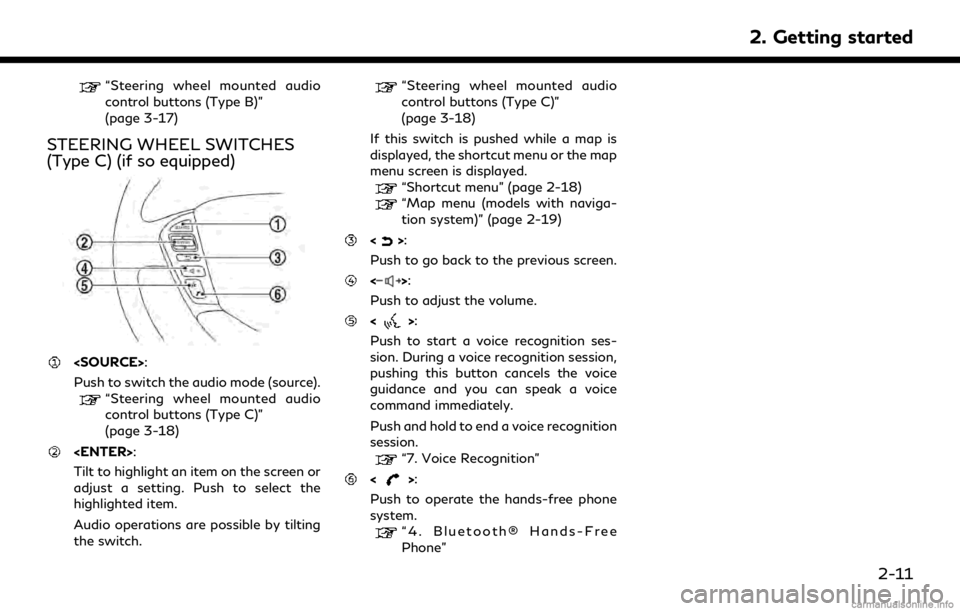
STEERING WHEEL SWITCHES
(Type C) (if so equipped)
Push to switch the audio mode (source).
“Steering wheel mounted audio
control buttons (Type C)”
(page 3-18)
Tilt to highlight an item on the screen or
adjust a setting. Push to select the
highlighted item.
Audio operations are possible by tilting
the switch.
“Steering wheel mounted audio
control buttons (Type C)”
(page 3-18)
If this switch is pushed while a map is
displayed, the shortcut menu or the map
menu screen is displayed.
“Shortcut menu” (page 2-18)
“Map menu (models with naviga-
tion system)” (page 2-19)
<>:
Push to go back to the previous screen.
<>:
Push to adjust the volume.
<>:
Push to start a voice recognition ses-
sion. During a voice recognition session,
pushing this button cancels the voice
guidance and you can speak a voice
command immediately.
Push and hold to end a voice recognition
session.
“7. Voice Recognition”
<>:
Push to operate the hands-free phone
system.
“4. Bluetooth® Hands-Free
Phone”
2. Getting started
2-11
Page 39 of 284

Vehicle settings (if so equipped)
This menu turns the vehicle setting on/off.
Available setting items may vary depending on models and specifications.
1. Display the Settings menu screen.
“Displaying operation screen” (page 2-14)
2. Touch [Vehicle].
Setting item Result
[Lamp ON When Door Unlocks] When this item is set to on, the interior lights illuminate when any door is unlocked.
[Light Sensitivity] Sets the auto light sensitivity.
[Light Off Delay] Sets the auto light delay timer.
[Speed Sensing Wiper Interval] Sets the wiper interval to be adjusted automatically according to the vehicle speed.
[Selective Door Unlock] Sets the selective door unlock.
[Intelligent Key Lock/Unlock] When this item is turned on, door lock/unlock function by pushing the door handle request switch will
be activated.
[Lift Steering Wheel on Exit] Sets the lift steering wheel on exit.
[Slide Driver’s Seat Back on Exit] Sets the driver’s seat back on exit.
[Reset Settings] All vehicle setting values are returned to the default settings.
2. Getting started
2-25
Page 44 of 284

2. Getting started
Clock settings
This changes the clock settings.
Available setting items may vary depending on models and specifications.
1. Display the Settings menu screen.
“Displaying operation screen” (page 2-14)
2. Touch [Clock].
Menu item Action
[On-Screen Clock] Sets the clock display on/off. When this item is on, the clock display appears.
[Daylight Savings Time] Select the setting for the daylight saving time from ON or OFF. Each time by touching this item
changes the setting.
[Clock Format (24h)] Select the clock format between 12-hour and 24-hour times. When the indicator light illuminates, the
clock is set to the 24-hour format.
[Time Zone] Select an appropriate time zone from the list. When selecting [AUTO], the system selects the time
zone automatically.
Offset Adjustment Adjust the offset value (hour and minutes).
[>] [Time Adjustment] Adjusts the time by increasing or decreasing the value.
[Calendar Adjustment] Adjusts the year, month and day.
2-30