buttons INFINITI QX80 2018 Infiniti Connection
[x] Cancel search | Manufacturer: INFINITI, Model Year: 2018, Model line: QX80, Model: INFINITI QX80 2018Pages: 284, PDF Size: 1.34 MB
Page 5 of 284

Table of Contents
1Introduction
How to use this manual ..... 1-2
Safety information ............... 1-3
Trademarks ........................... 1-4
Regulatory information ...... 1-5
Licenses ................................... 1-6
2Getting started
Control buttons and
touch screen display ........... 2-3
Displaying operation
screen .................................... 2-14
Starting system .................. 2-15
Touch panel operation ..... 2-15
System status screen ....... 2-17
Shortcut menu .................... 2-18
Map menu (models with
navigation system) ............ 2-19
Display View Bar
(models with navigation
system) ................................ 2-20How to input letters and
numbers ................................ 2-22
System settings ................. 2-23
Functions disabled while
driving ................................... 2-32
Additional system
information .......................... 2-33
3Audio system
Audio operation
precautions ............................ 3-2
Names and functions of
audio control buttons ...... 3-14
Audio operations ............... 3-18
Audio settings ................... 3-40
Disc/USB memory device
care and cleaning .............. 3-43
Gracenote® End User
License Agreement ........... 3-43
Mobile Entertainment
System (MES) (if so
equipped) ............................ 3-44
4Bluetooth® Hands-Free Phone
Bluetooth® Hands-Free
Phone System ...................... 4-2
Bluetooth®
information .......................... 4-14
5Information
Information menu ................ 5-2
SiriusXM Traffic
information (if so
equipped) ............................... 5-4
SiriusXM Travel Link®
(if so equipped) .................... 5-8
Infiniti InTouch
TMServices
(if so equipped) .................. 5-15
Infiniti InTouch
TMApps ... 5-29
6Navigation (if so equipped)
Safety information .............. 6-3
Map data authentication ... 6-3
Map operation ..................... 6-4
Page 15 of 284

2 Getting started
Control buttons and touch screen display ................ 2-3Liquid crystal display .................................................. 2-3
Center multi-function control panel (Type A)
(if so equipped) ............................................................ 2-4
Center multi-function control panel (Type B)
(if so equipped) ............................................................ 2-5
Center multi-function control panel (Type C)
(if so equipped) ............................................................ 2-6
INFINITI controller (Type A) (if so equipped) ....... 2-7
INFINITI controller (Type B) (if so equipped) ...... 2-8
Steering wheel switches (Type A) (if
so equipped) .................................................................. 2-9
Steering wheel switches (Type B) (if
so equipped) ................................................................ 2-10
Steering wheel switches (Type C) (if
so equipped) ................................................................ 2-11
Steering wheel switches (Type D) (if
so equipped) ................................................................ 2-12
Audio accessories ...................................................... 2-12
Displaying operation screen ........................................ 2-14 Control panel operation (models with
control panel) .............................................................. 2-14
MENU button operation (models with
INFINITI controller) .................................................. 2-14
Starting system ............................................................... 2-15 Start-up warning ....................................................... 2-15 Touch panel operation .................................................. 2-15
How to use touch screen ...................................... 2-15
Operating menu screen ......................................... 2-16
Scrolling list or message ........................................ 2-16
Selecting item ........................................................... 2-16
Adjusting settings ................................................... 2-16
System status screen .................................................... 2-17
Shortcut menu ................................................................ 2-18 Displaying shortcut menu screen
(models with navigation system) ........................ 2-18
Displaying shortcut menu screen
(models without navigation system) ................. 2-18
Edit shortcut menu ................................................. 2-18
Map menu (models with navigation system) ......... 2-19 Displaying map menu ............................................. 2-19
Display View Bar (models with
navigation system) ......................................................... 2-20 Customizing the Display View Bar ..................... 2-21
How to input letters and numbers ............................ 2-22
Alphanumeric character (letters and numbers)
input screen .............................................................. 2-22
System settings .............................................................. 2-23 Settings menu .......................................................... 2-23
Pairing Bluetooth® device .................................... 2-31
Functions disabled while driving ............................... 2-32
Page 17 of 284
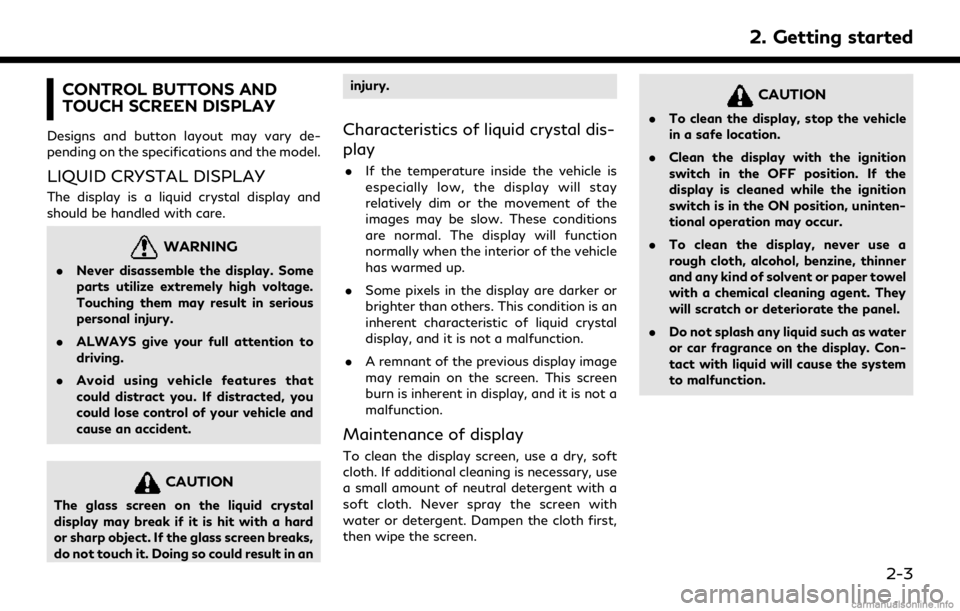
CONTROL BUTTONS AND
TOUCH SCREEN DISPLAY
Designs and button layout may vary de-
pending on the specifications and the model.
LIQUID CRYSTAL DISPLAY
The display is a liquid crystal display and
should be handled with care.
WARNING
.Never disassemble the display. Some
parts utilize extremely high voltage.
Touching them may result in serious
personal injury.
. ALWAYS give your full attention to
driving.
. Avoid using vehicle features that
could distract you. If distracted, you
could lose control of your vehicle and
cause an accident.
CAUTION
The glass screen on the liquid crystal
display may break if it is hit with a hard
or sharp object. If the glass screen breaks,
do not touch it. Doing so could result in an injury.
Characteristics of liquid crystal dis-
play
.
If the temperature inside the vehicle is
especially low, the display will stay
relatively dim or the movement of the
images may be slow. These conditions
are normal. The display will function
normally when the interior of the vehicle
has warmed up.
. Some pixels in the display are darker or
brighter than others. This condition is an
inherent characteristic of liquid crystal
display, and it is not a malfunction.
. A remnant of the previous display image
may remain on the screen. This screen
burn is inherent in display, and it is not a
malfunction.
Maintenance of display
To clean the display screen, use a dry, soft
cloth. If additional cleaning is necessary, use
a small amount of neutral detergent with a
soft cloth. Never spray the screen with
water or detergent. Dampen the cloth first,
then wipe the screen.
CAUTION
.To clean the display, stop the vehicle
in a safe location.
. Clean the display with the ignition
switch in the OFF position. If the
display is cleaned while the ignition
switch is in the ON position, uninten-
tional operation may occur.
. To clean the display, never use a
rough cloth, alcohol, benzine, thinner
and any kind of solvent or paper towel
with a chemical cleaning agent. They
will scratch or deteriorate the panel.
. Do not splash any liquid such as water
or car fragrance on the display. Con-
tact with liquid will cause the system
to malfunction.
2. Getting started
2-3
Page 23 of 284
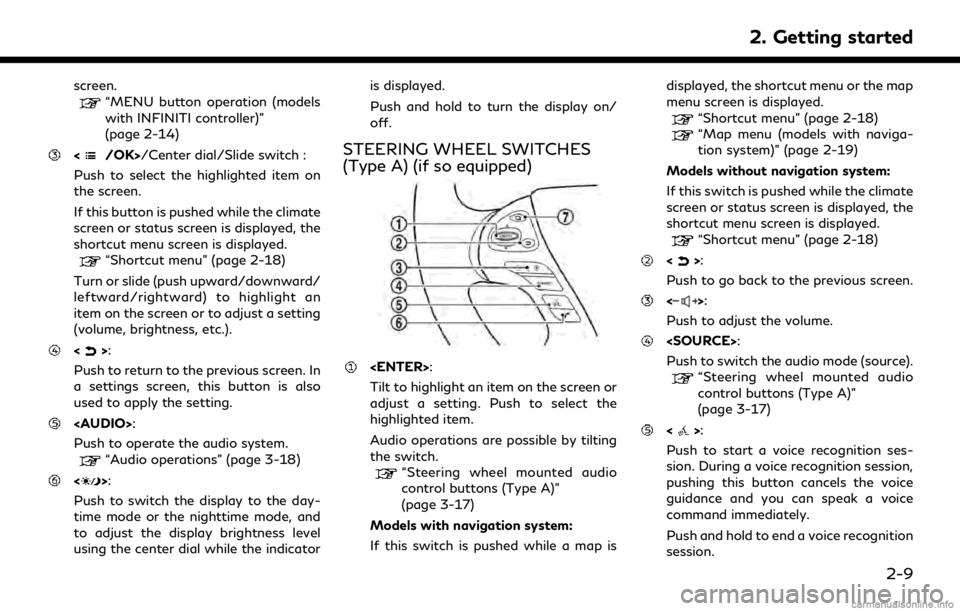
screen.“MENU button operation (models
with INFINITI controller)”
(page 2-14)
/Center dial/Slide switch :
Push to select the highlighted item on
the screen.
If this button is pushed while the climate
screen or status screen is displayed, the
shortcut menu screen is displayed.
“Shortcut menu” (page 2-18)
Turn or slide (push upward/downward/
leftward/rightward) to highlight an
item on the screen or to adjust a setting
(volume, brightness, etc.).
<>:
Push to return to the previous screen. In
a settings screen, this button is also
used to apply the setting.
Page 24 of 284
2. Getting started
“7. Voice Recognition”
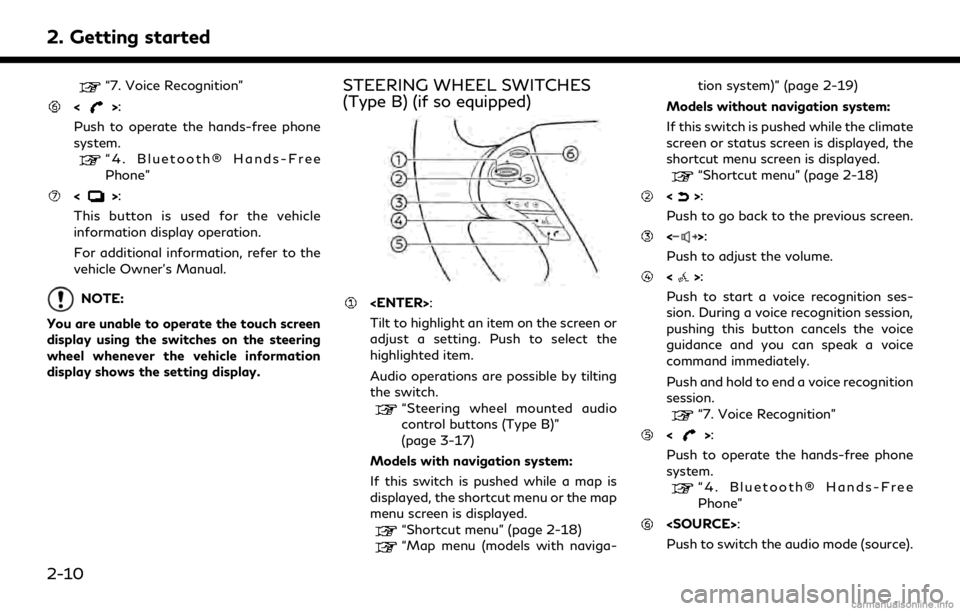
<>:
Push to operate the hands-free phone
system.
“4. Bluetooth® Hands-Free
Phone”
<>:
This button is used for the vehicle
information display operation.
For additional information, refer to the
vehicle Owner’s Manual.
NOTE:
You are unable to operate the touch screen
display using the switches on the steering
wheel whenever the vehicle information
display shows the setting display.
STEERING WHEEL SWITCHES
(Type B) (if so equipped)
Tilt to highlight an item on the screen or
adjust a setting. Push to select the
highlighted item.
Audio operations are possible by tilting
the switch.
“Steering wheel mounted audio
control buttons (Type B)”
(page 3-17)
Models with navigation system:
If this switch is pushed while a map is
displayed, the shortcut menu or the map
menu screen is displayed.
“Shortcut menu” (page 2-18)
“Map menu (models with naviga- tion system)” (page 2-19)
Models without navigation system:
If this switch is pushed while the climate
screen or status screen is displayed, the
shortcut menu screen is displayed.
“Shortcut menu” (page 2-18)
<>:
Push to go back to the previous screen.
<>:
Push to adjust the volume.
<>:
Push to start a voice recognition ses-
sion. During a voice recognition session,
pushing this button cancels the voice
guidance and you can speak a voice
command immediately.
Push and hold to end a voice recognition
session.
“7. Voice Recognition”
<>:
Push to operate the hands-free phone
system.
“4. Bluetooth® Hands-Free
Phone”
Push to switch the audio mode (source).
2-10
Page 25 of 284
“Steering wheel mounted audio
control buttons (Type B)”
(page 3-17)
STEERING WHEEL SWITCHES
(Type C) (if so equipped)
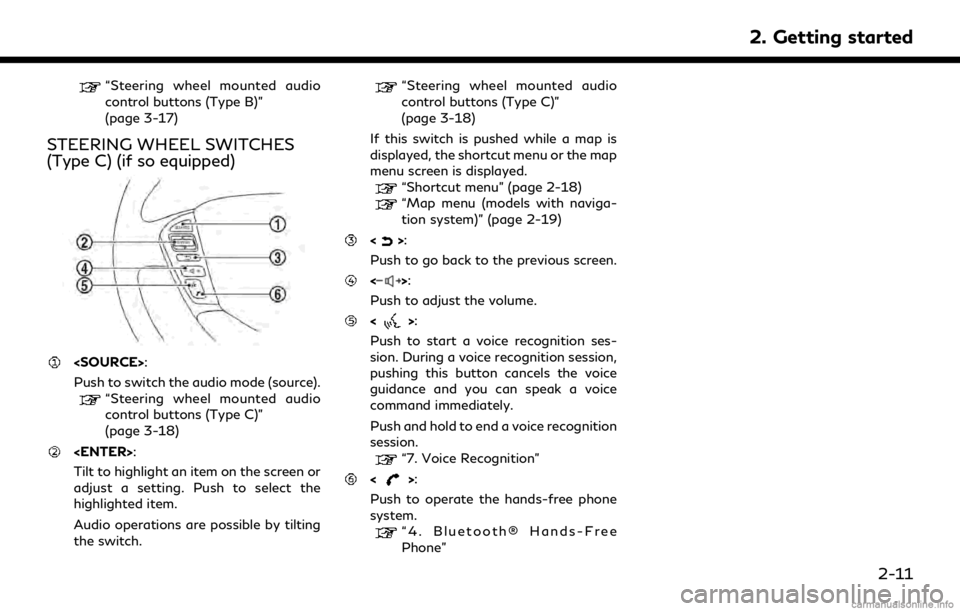
Push to switch the audio mode (source).
“Steering wheel mounted audio
control buttons (Type C)”
(page 3-18)
Tilt to highlight an item on the screen or
adjust a setting. Push to select the
highlighted item.
Audio operations are possible by tilting
the switch.
“Steering wheel mounted audio
control buttons (Type C)”
(page 3-18)
If this switch is pushed while a map is
displayed, the shortcut menu or the map
menu screen is displayed.
“Shortcut menu” (page 2-18)
“Map menu (models with naviga-
tion system)” (page 2-19)
<>:
Push to go back to the previous screen.
<>:
Push to adjust the volume.
<>:
Push to start a voice recognition ses-
sion. During a voice recognition session,
pushing this button cancels the voice
guidance and you can speak a voice
command immediately.
Push and hold to end a voice recognition
session.
“7. Voice Recognition”
<>:
Push to operate the hands-free phone
system.
“4. Bluetooth® Hands-Free
Phone”
2. Getting started
2-11
Page 28 of 284
2. Getting started
DISPLAYING OPERATION
SCREEN
CONTROL PANEL OPERATION
(models with control panel)
Push the buttons on the control panel to
display each operation screen.
“Control buttons and touch screen dis-
play” (page 2-3)
.
Push to display the Navigation menu
screen. The available functions will vary
based on the current navigation settings.
“Destination screen” (page 6-17)“Route menu screen” (page 6-36)
.
Push to display the Apps screen.
“Infiniti InTouchTMApps”
(page 5-29)
.
Push to display the Information menu
screen.
“Information menu” (page 5-2)
.
Push to display the Settings menu
screen.
“Settings menu” (page 2-23) .
<
>(if so equipped):
Push to display the Phone screen.
“4. Bluetooth® Hands-Free Phone”
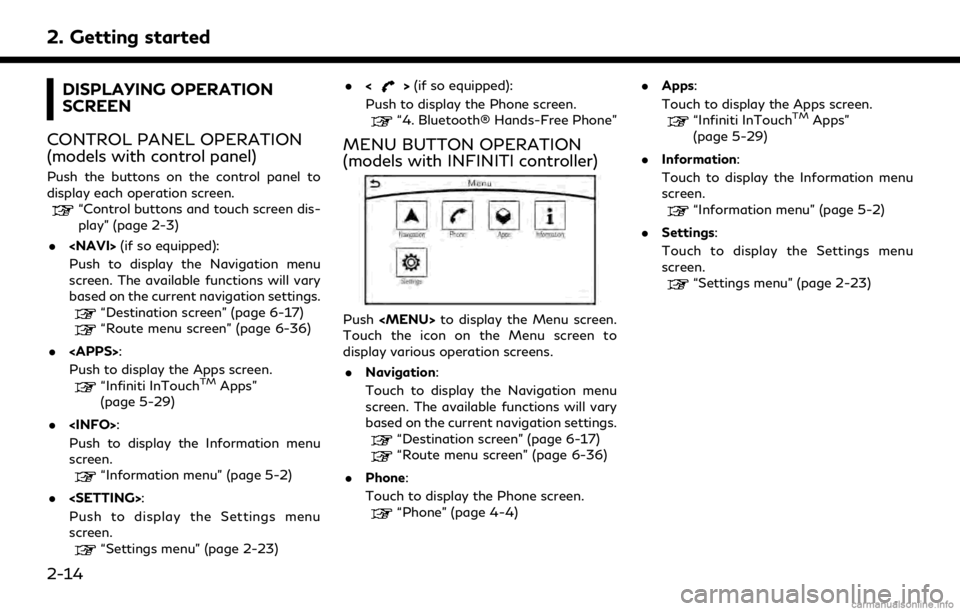
MENU BUTTON OPERATION
(models with INFINITI controller)
Push
Page 31 of 284
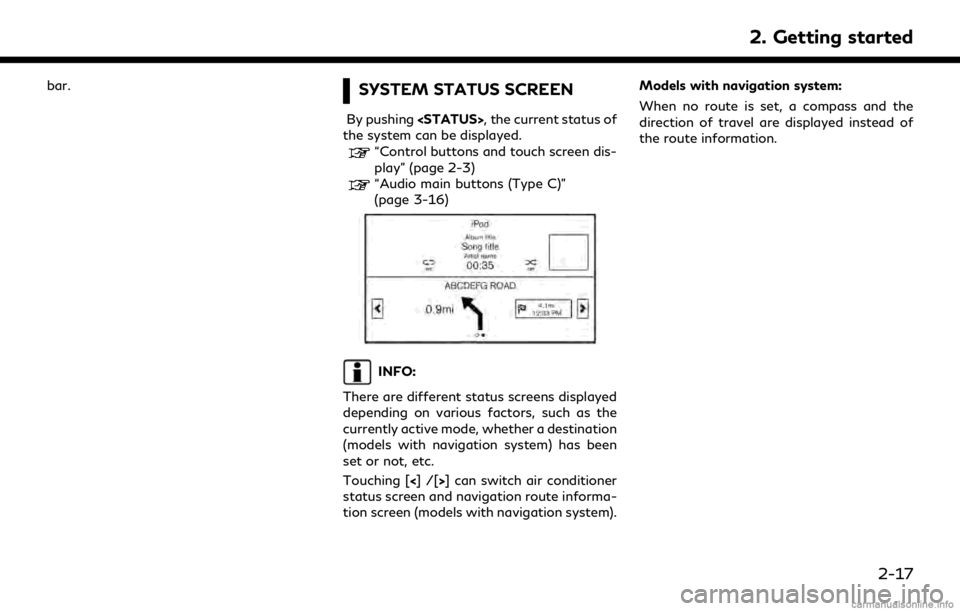
bar.SYSTEM STATUS SCREEN
By pushing
the system can be displayed.
“Control buttons and touch screen dis-
play” (page 2-3)
“Audio main buttons (Type C)”
(page 3-16)
INFO:
There are different status screens displayed
depending on various factors, such as the
currently active mode, whether a destination
(models with navigation system) has been
set or not, etc.
Touching [<]/[ >] can switch air conditioner
status screen and navigation route informa-
tion screen (models with navigation system). Models with navigation system:
When no route is set, a compass and the
direction of travel are displayed instead of
the route information.
2. Getting started
2-17
Page 49 of 284

3 Audio system
Audio operation precautions ......................................... 3-2Radio ........................................................................\
....... 3-2
Compact Disc (CD) player ........................................ 3-4
Digital Versatile Disc (DVD) player (if
so equipped) .................................................................. 3-5
USB (Universal Serial Bus) connection port ........ 3-8
Compressed Audio Files (MP3/WMA/AAC) ..... 3-9
Bluetooth® streaming audio .................................. 3-13
Names and functions of audio control buttons ..... 3-14 Audio main buttons (Type A) (if so equipped) ..... 3-14
Audio main buttons (Type B) (if so equipped) .... 3-15
Audio main buttons (Type C) (if so equipped) .... 3-16
Steering wheel mounted audio control buttons
(Type A) (if so equipped) ......................................... 3-17
Steering wheel mounted audio control buttons
(Type B) (if so equipped) ......................................... 3-17
Steering wheel mounted audio control buttons
(Type C) (if so equipped) ......................................... 3-18
Steering wheel mounted audio control buttons
(Type D) (if so equipped) ......................................... 3-18
Audio operations ............................................................ 3-18 Audio main operation .............................................. 3-18
Radio ........................................................................\
.... 3-20
Compact Disc (CD) player ...................................... 3-25 Digital Versatile Disc (DVD) player (if
so equipped) ............................................................. 3-27
USB (Universal Serial Bus) connection port .... 3-30
iPod® player ............................................................. 3-33
Bluetooth® streaming audio ................................ 3-36
Auxilliary (AUX) devices (if so equipped) .......... 3-39
Audio settings ................................................................ 3-40
Disc/USB memory device care and cleaning ......... 3-43 Discs ........................................................................\
.... 3-43
USB memory device ............................................... 3-43
Gracenote® End User License Agreement ............. 3-43
Mobile Entertainment System (MES) (if
so equipped) ................................................................... 3-44 Precautions ............................................................... 3-45
Technical information ............................................ 3-45
Remote controller and headphones ................... 3-54
Rear media interface .............................................. 3-59
Activating rear displays ......................................... 3-59
Operations on rear displays ................................ 3-60
Setting and information ........................................ 3-61
Controlling the rear system on the
front display .............................................................. 3-62
Operating tips .......................................................... 3-63
Care and maintenance ........................................... 3-65
Page 62 of 284
3. Audio system
NAMES AND FUNCTIONS OF AUDIO CONTROL BUTTONS
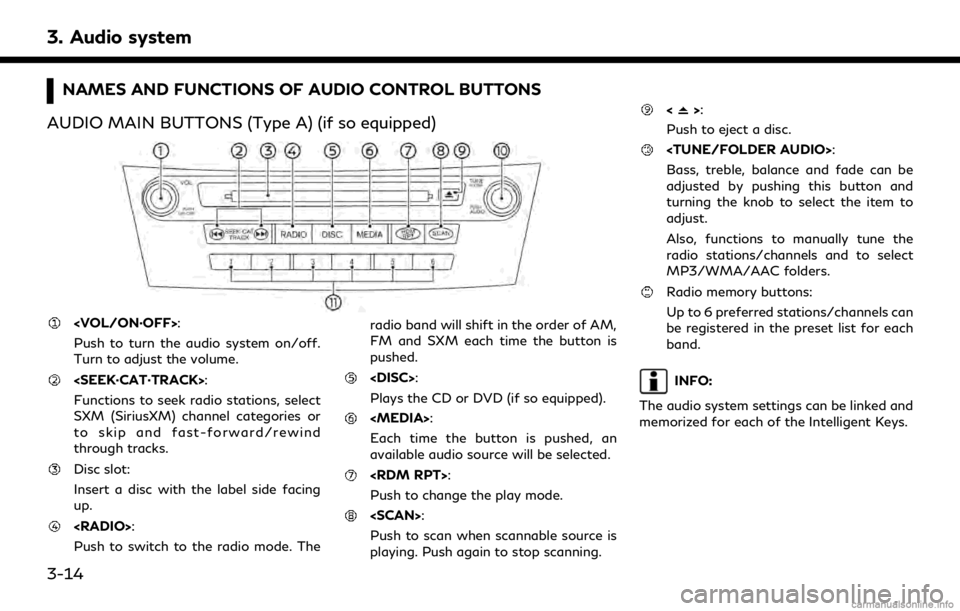
AUDIO MAIN BUTTONS (Type A) (if so equipped)
Push to turn the audio system on/off.
Turn to adjust the volume.
Functions to seek radio stations, select
SXM (SiriusXM) channel categories or
to skip and fast-forward/rewind
through tracks.
Disc slot:
Insert a disc with the label side facing
up.
Push to switch to the radio mode. The radio band will shift in the order of AM,
FM and SXM each time the button is
pushed.
Plays the CD or DVD (if so equipped).
Each time the button is pushed, an
available audio source will be selected.
Push to change the play mode.
Push to scan when scannable source is
playing. Push again to stop scanning.
<>:
Push to eject a disc.
Bass, treble, balance and fade can be
adjusted by pushing this button and
turning the knob to select the item to
adjust.
Also, functions to manually tune the
radio stations/channels and to select
MP3/WMA/AAC folders.
Radio memory buttons:
Up to 6 preferred stations/channels can
be registered in the preset list for each
band.
INFO:
The audio system settings can be linked and
memorized for each of the Intelligent Keys.
3-14