Oil JAGUAR X308 1998 2.G Owners Manual
[x] Cancel search | Manufacturer: JAGUAR, Model Year: 1998, Model line: X308, Model: JAGUAR X308 1998 2.GPages: 2490, PDF Size: 69.81 MB
Page 769 of 2490

1. Fit the new sealing ring (scarf jointed) to the carrier bush groove.
2. Fit a new O-ring to the carrier oil-way.
22. NOTE: Lubricate the seal (s carf jointed) and the bush.
Fit the VVT bush carrier to the cylinder block.
1. Fit the bush carrier assembly.
1. Check that the seals are in place and that the ring dowels are engaged squa rely. Fully locate the
assembly as much as possible by hand pressure.
2. Fit the two securing bolts and one nut. Tighten to 19 - 23 Nm.
23. Refit the Timing Cover. Refer to Operation 12.65.01 in this
Section.
24. Move the engine compartment cover from the service position
and connect the gas struts.
25. Remove the paint protection sheets and close the cover.
26. Connect the battery and fit the battery cover.
пЃ¬Refer to the Battery Reconnection Procedure 86.15.15.
Page 780 of 2490

2. Release the carrier from the two ring dowels and
remove it.
6. Remove the seals from the bush carrier.
1. Remove the sealing ring (scarf jointed) from the
carrier bush groove.
2. Remove the O-ring from the carrier oil-way recess.
7. Raise the vehicle on a ramp.
8. Remove the crankshaft position sensor.
1. Remove the bolt which secures the crankshaft position sensor to the flywheel housing.
пЃ¬Remove the sensor and allow it to hang free under the
engine.
2. Remove the access grommet (for torque converter bolts) from the housing.
9. Fit the damper securing bolt (old one) to the crankshaft, hand-
tight only.
10. Rotate the crankshaft until the triangular arrow indent on
the drive plate is visible thro ugh the access hole; confirm
that the timing flat on ea ch camshaft is uppermost.
11. Fit the crankshaft setting peg 303 - 531 to the crankshaft
position sensor location.
Page 784 of 2490

and chain, tighten the sprocket securing bolt to 115 -
125 Nm.
7. Tighten the VVT unit securing bolt.
1. Whilst still applying the opposing force to the
sprocket and chain (using 303 - 532), check that the
wedges are still in place, tighten the VVT unit
securing bolt to 115 - 125 Nm.
пЃ¬Remove the chain tensioning tool and the wedge(s).
8. Remove the camshaft locking tool 303 - 530.
9. Raise the vehicle on the ramp.
10. Remove the crankshaft setting tool 303 - 531.
11. Refit the crankshaft position sensor.
1. Fit the sensor to the fl ywheel housing and fit the
securing bolt. Tighten to 8-12 Nm.
2. Refit the access grommet to the housing.
12. Lower the ramp.
13. Fit new seals to the VVT bush carrier.
1. Fit the new sealing ring (scarf jointed) to the carrier bush groove.
2. Fit a new O-ring to the carrier oil-way.
14. Fit the VVT bush carrier to the cylinder block.
Page 830 of 2490

Engine - Upper Oil Pan3.2L NA V8 - AJ26
In-vehicle Repair
Removal
Special Tool(s)
Installer/remover, Oil Filter
303-752
1. Disconnect the batt ery ground cable.
пЃ¬Remove the battery cover.
2. Open the engine compartment and fit paintwork protection
sheets.
3. Set the engine compartment cover to the service access
position.
4. Remove the timing cover and al l associated components, as
detailed in Operation 12.65.01.
5. Remove both front wheel and tyre assemblies. Refer to
Operation 74.20.05.
6. Remove the undertray. Re fer to Operation 76.22.90.
7. Remove the two bolts which secu re the generator cooling duct
to the oil pan body and remove the duct.
8. Remove the front cross member for access. Refer to Operation
76.10.05.
9. Drain the engine oil.
1. Position the waste oil bowser.
2. Remove the drain plug from the oil pan and drain the engine oil.
пЃ¬Fit a new sealing washer to the drain plug.
Page 831 of 2490

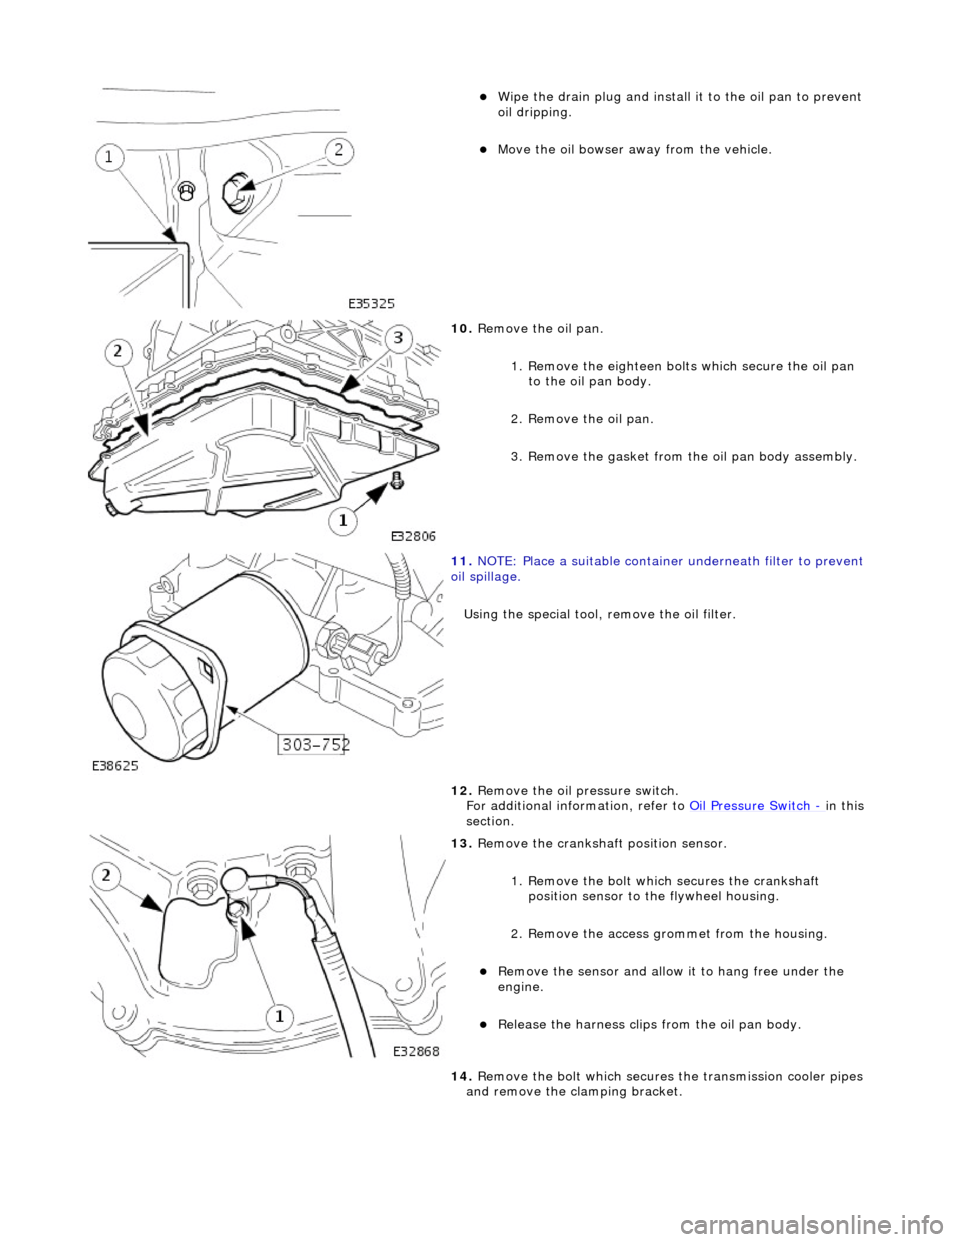
пЃ¬Wipe the drain plug and install it to the oil pan to prevent
oil dripping.
пЃ¬Move the oil bowser away from the vehicle.
10. Remove the oil pan.
1. Remove the eighteen bolt s which secure the oil pan
to the oil pan body.
2. Remove the oil pan.
3. Remove the gasket from the oil pan body assembly.
11. NOTE: Place a suitable container underneath filter to prevent
oil spillage.
Using the special tool, remove the oil filter.
12. Remove the oil pressure switch.
For additional information, refer to Oil Pressure Switch
- in this
section.
13. Remove the crankshaft position sensor.
1. Remove the bolt which secures the crankshaft position sensor to the flywheel housing.
2. Remove the access grommet from the housing.
пЃ¬Remove the sensor and allow it to hang free under the
engine.
пЃ¬Release the harness clips from the oil pan body.
14. Remove the bolt which secures the transmission cooler pipes
and remove the clamping bracket.
Page 832 of 2490

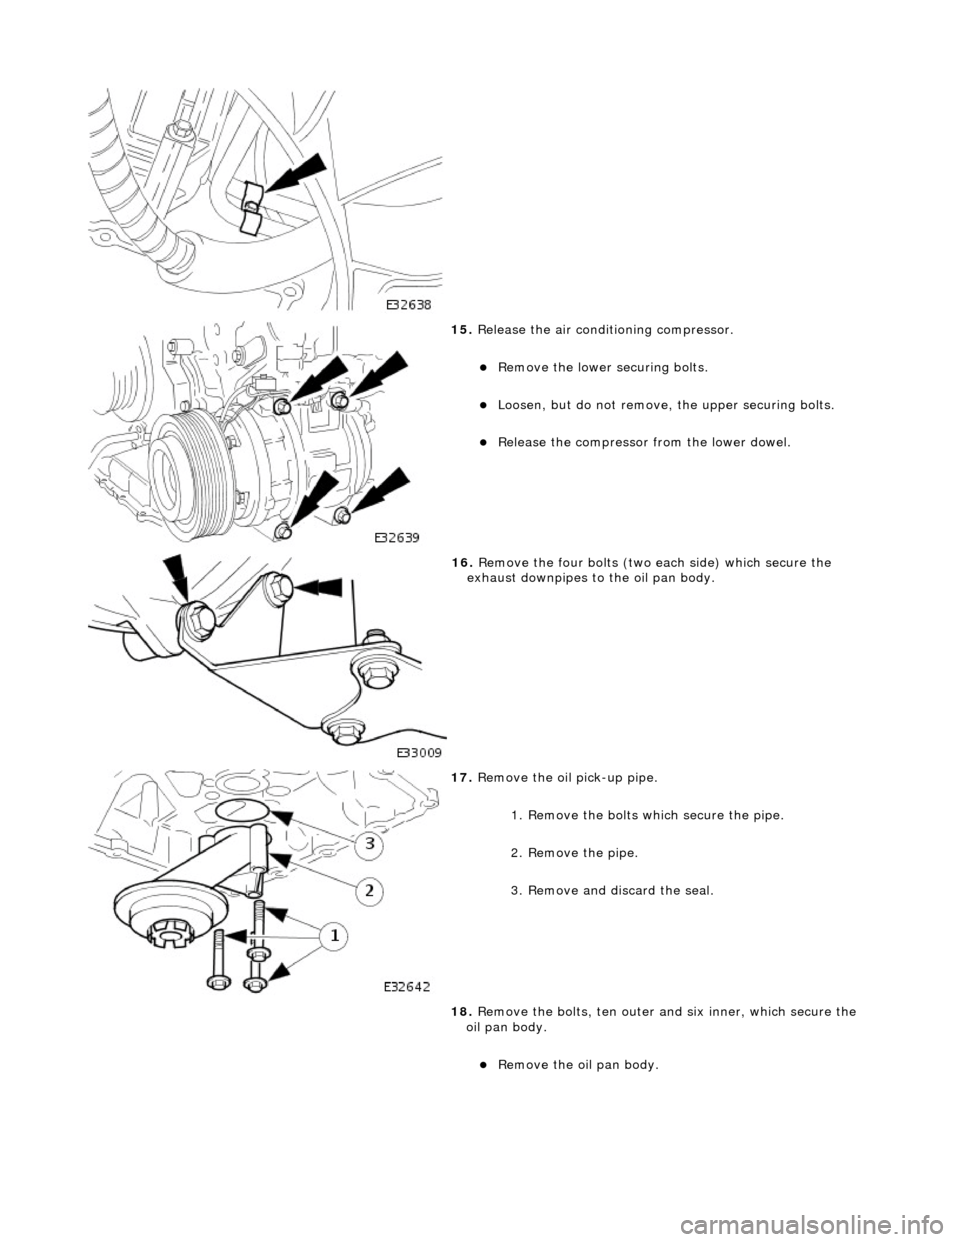
15. Release the air conditioning compressor.
пЃ¬Remove the lower securing bolts.
пЃ¬Loosen, but do not remove, th e upper securing bolts.
пЃ¬Release the compressor from the lower dowel.
16. Remove the four bolts (two each side) which secure the
exhaust downpipes to the oil pan body.
17. Remove the oil pick-up pipe.
1. Remove the bolts which secure the pipe.
2. Remove the pipe.
3. Remove and discard the seal.
18. Remove the bolts, ten outer an d six inner, which secure the
oil pan body.
пЃ¬Remove the oil pan body.
Page 833 of 2490

Installation
19. Remove the eight screws an d release the windage tray.
20. Remove the oil filter adaptor.
21. Clean all components and releva nt mating faces; cylinder
block, oil pan, oil pan body, wi ndage tray, oil pick-up pipe and
timing cover.
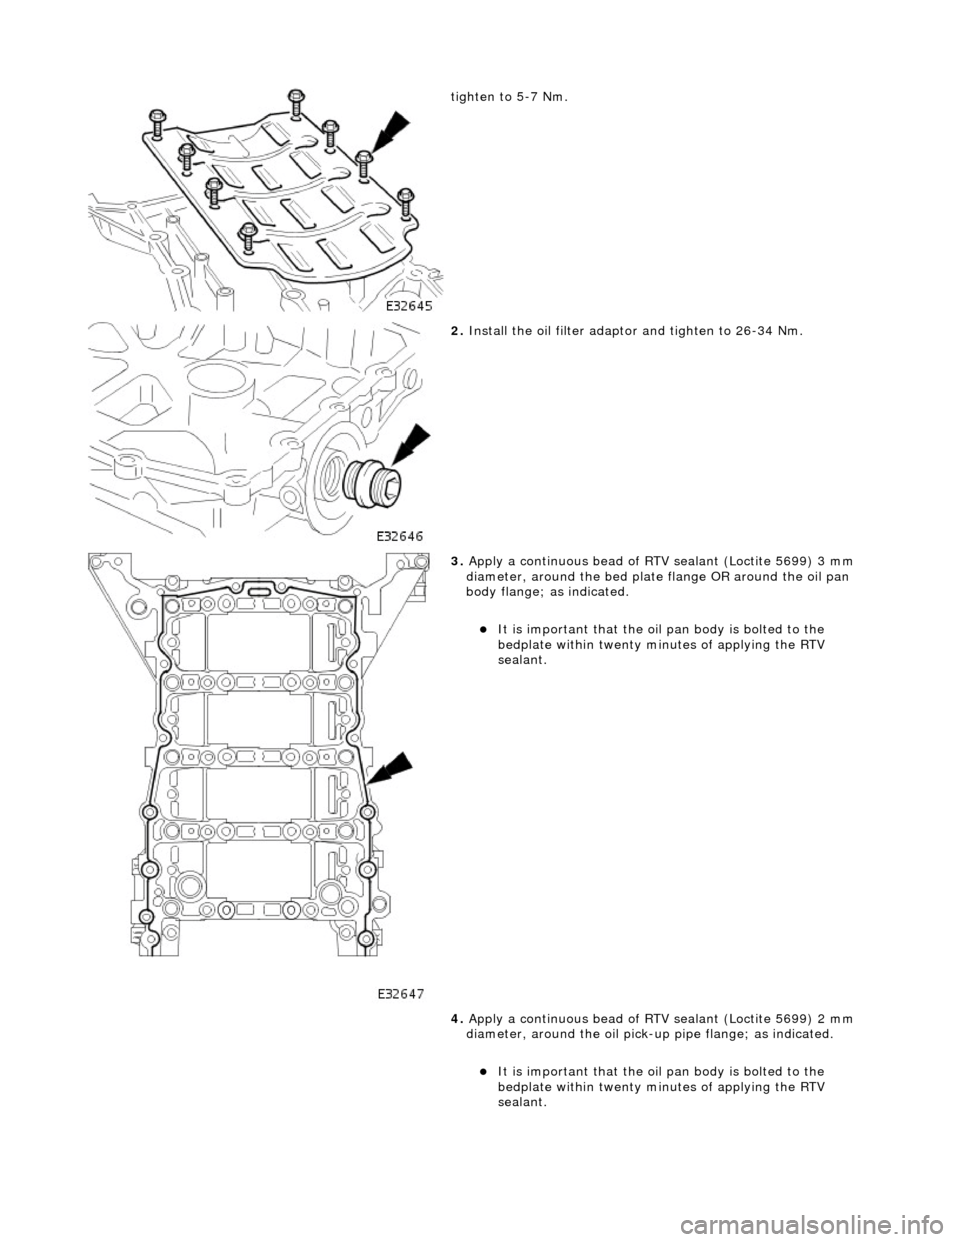
1. Reposition the windage tray and install the eight screws,
Page 834 of 2490

tighten to 5-7 Nm.
2. Install the oil filter adapto r and tighten to 26-34 Nm.
3. Apply a continuous bead of RTV sealant (Loctite 5699) 3 mm
diameter, around the bed plate flange OR around the oil pan
body flange; as indicated.
пЃ¬It is important that the oil pan body is bolted to the
bedplate within twenty minutes of applying the RTV
sealant.
4. Apply a continuous bead of RTV sealant (Loctite 5699) 2 mm
diameter, around the oil pick-u p pipe flange; as indicated.
пЃ¬It is important that the oil pan body is bolted to the
bedplate within twenty minutes of applying the RTV
sealant.
Page 835 of 2490

5. Position and align the oil pan body to the bedplate.
пЃ¬Install the sixteen bolts and tighten to 20-22 Nm in the
sequence indicated.
6. Install the oil pick-up pipe.
1. Install a new O-ring se al to the pick-up pipe.
2. Lubricate the O-ring seal with clean engine oil and install the pipe to the oil pan body.
Page 836 of 2490

3. Install and tighten the bolts to 11-13 Nm.
7. Install the oil pan gasket to the oil pan body assembly.
пЃ¬Insert the seal into the locating positions in the groove,
working around from a corner.
пЃ¬Press in the remainder of th e seal, following the same
procedure.
8. Install the oil pan to the oil pan body.
1. Position and align the oil pan.
2. Install, but do not tighte n, all eighteen bolts which
secure the oil pan.
9. Tighten the bolts to the correct torque figure 11-13 Nm, in the
sequence indicated.
пЃ¬Tighten the drain plug to 30-40 Nm.
10. Install the oil pressure switch.
For additional information, refer to Oil Pressure Switch
- in this
section.
11. NOTE: Apply a suitable amount of clean engine oil to lubricate
the oil filter O-ring seal.
Using the special tool, install the oil filter.