Oil JAGUAR X308 1998 2.G Workshop Manual
[x] Cancel search | Manufacturer: JAGUAR, Model Year: 1998, Model line: X308, Model: JAGUAR X308 1998 2.GPages: 2490, PDF Size: 69.81 MB
Page 918 of 2490
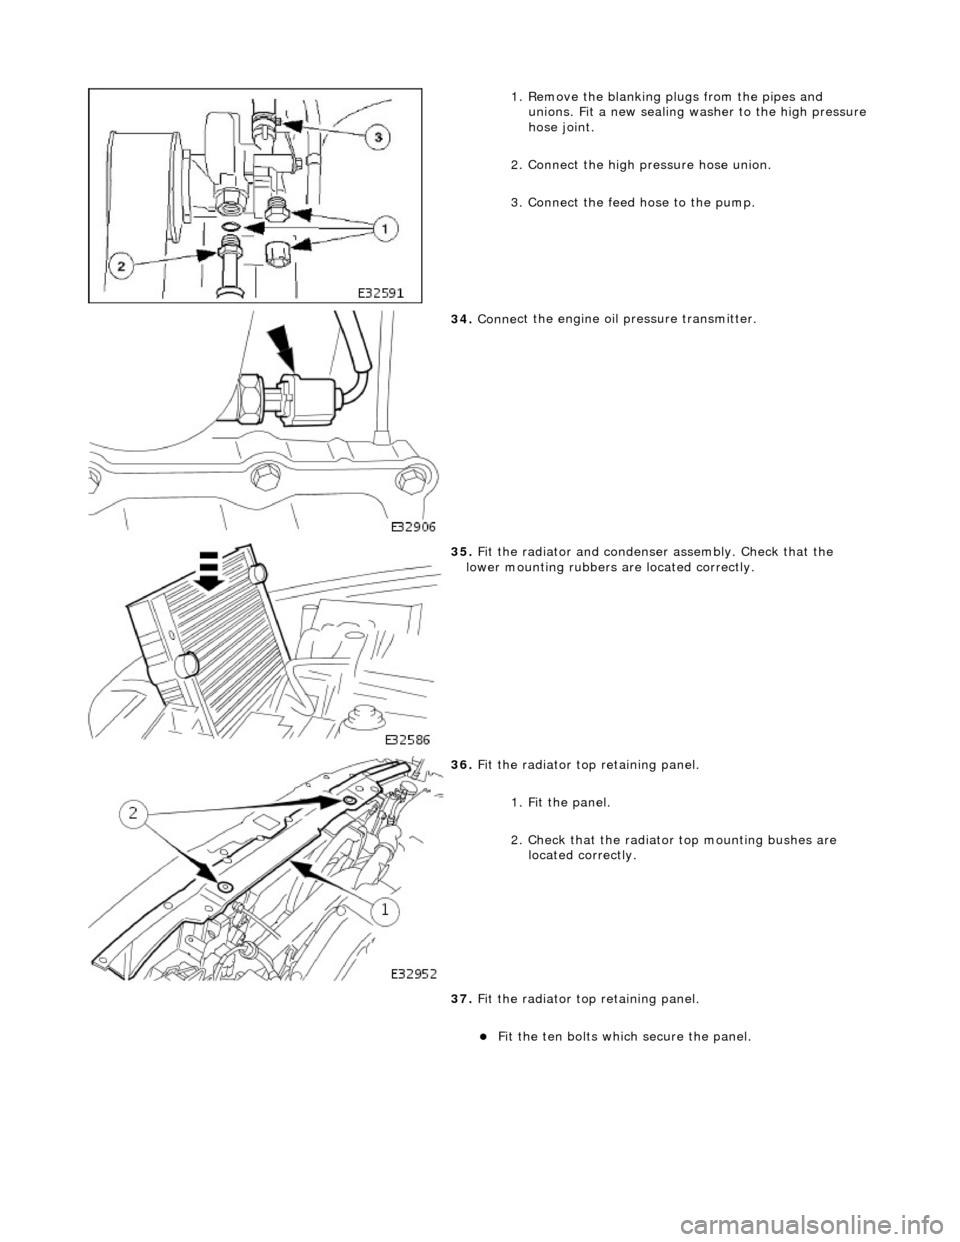
1.
Remove the blanking plugs from the pipes and
unions. Fit a new sealing washer to the high pressure
hose joint.
2. Connect the high pressure hose union.
3. Connect the feed hose to the pump.
34 . Conne
ct the engine oil
pressure transmitter.
35 .
Fit the radiator and
condense
r assembly. Check that the
lower mounting rubbers are located correctly.
36 . Fit the radiator top
retaining panel.
1. Fit the panel.
2. Check that the radiator top mounting bushes are
located correctly.
37. Fit the radiator top retaining panel.
пЃ¬Fit
the ten bolts which secure the panel.
Page 919 of 2490
38
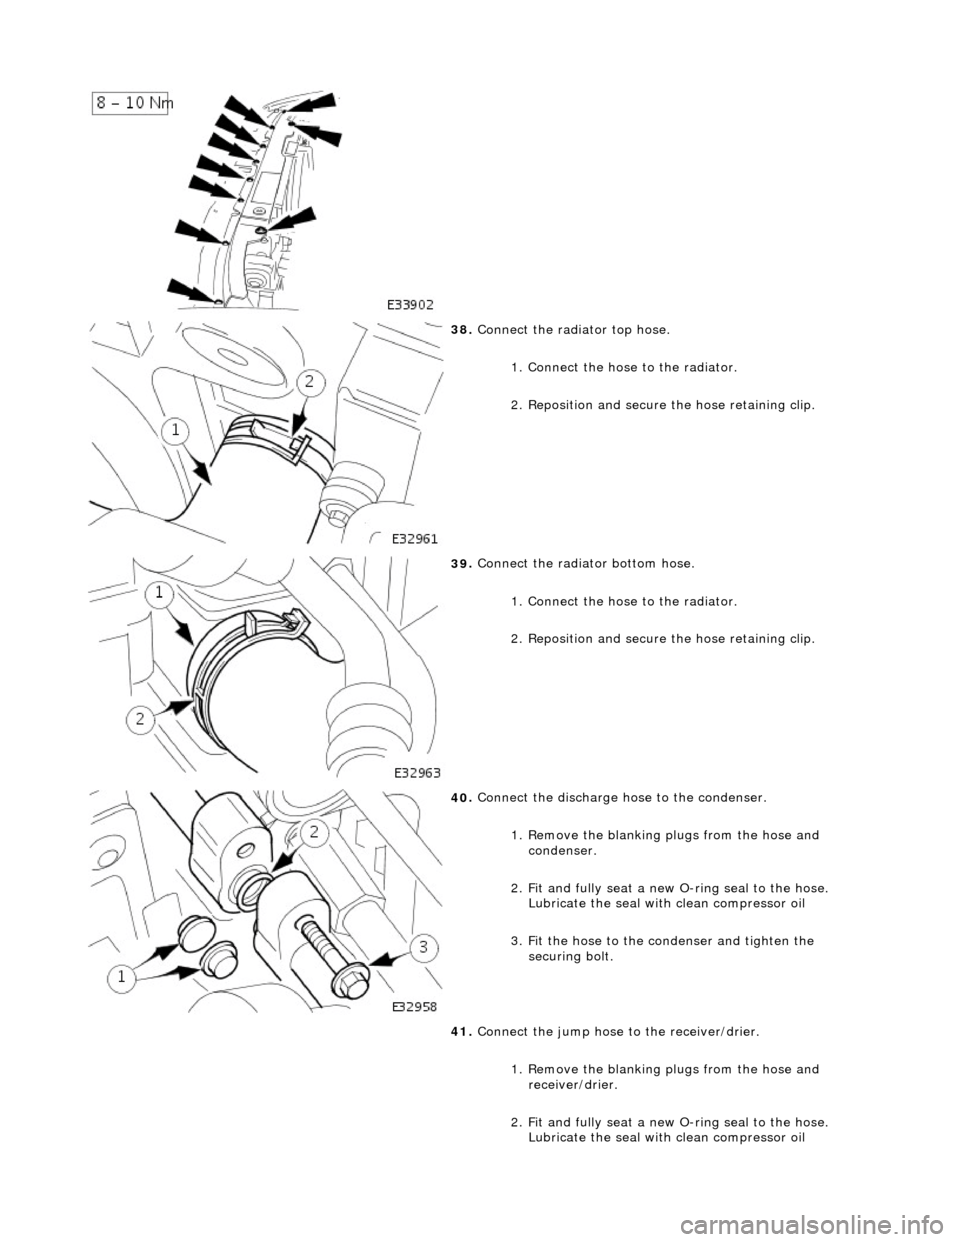
.
Connect the radiator top hose.
1. Connect the hose to the radiator.
2. Reposition and secure the hose retaining clip.
39
.
Connect the radiator bottom hose.
1. Connect the hose to the radiator.
2. Reposition and secure the hose retaining clip.
40
.
Connect the discharge hose to the condenser.
1. Remove the blanking plugs from the hose and condenser.
2. Fit and fully seat a new O-ring seal to the hose.
Lubricate the seal with clean compressor oil
3. Fit the hose to the condenser and tighten the securing bolt.
41. Connect the jump hose to the receiver/drier.
1. Remove the blanking plugs from the hose and receiver/drier.
2. Fit and fully seat a new O-ring seal to the hose.
Lubricate the seal with clean compressor oil
Page 920 of 2490
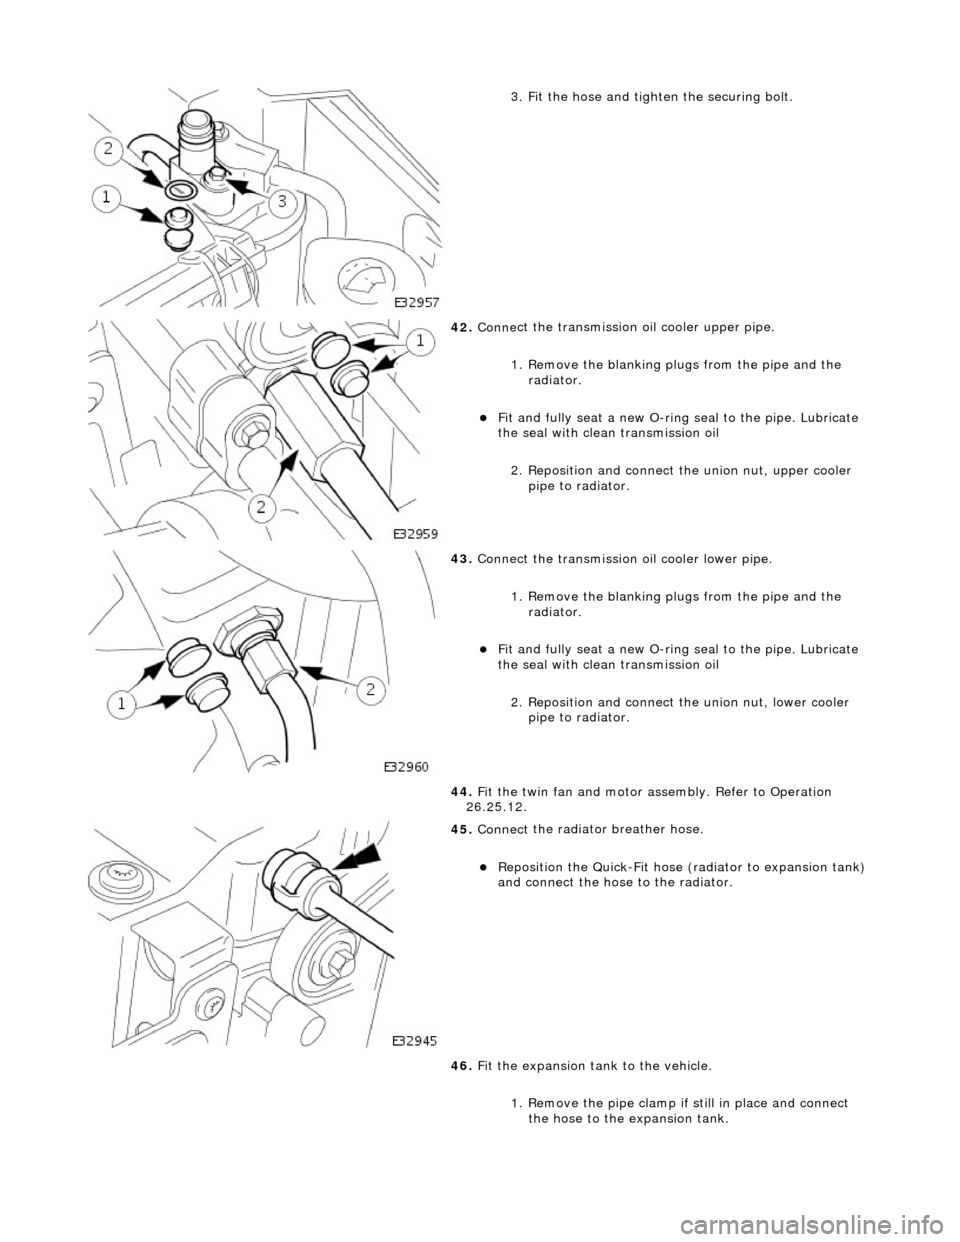
3.
Fit the hose and tighten the securing bolt.
42 . Conne
ct the transmission
oil cooler upper pipe.
1. Remove the blanking plugs from the pipe and the radiator.
пЃ¬Fit and
fully seat a new O-ring
seal to the pipe. Lubricate
the seal with clean transmission oil
2. Reposition and connect the union nut, upper cooler pipe to radiator.
43 . Conne
ct the transmission oil cooler lower pipe.
1. Remove the blanking plugs from the pipe and the radiator.
пЃ¬Fit and
fully seat a new O-ring
seal to the pipe. Lubricate
the seal with clean transmission oil
2. Reposition and connect the union nut, lower cooler
pipe to radiator.
44. Fit the twin fan and motor assembly. Refer to Operation
26.25.12.
45 . Connect
the radiator breather hose.
пЃ¬Re
po
sition the Quick-Fit hose (radiator to expansion tank)
and connect the hose to the radiator.
46. Fit the expansion tank to the vehicle.
1. Remove the pipe clamp if still in place and connect
the hose to the expansion tank.
Page 922 of 2490
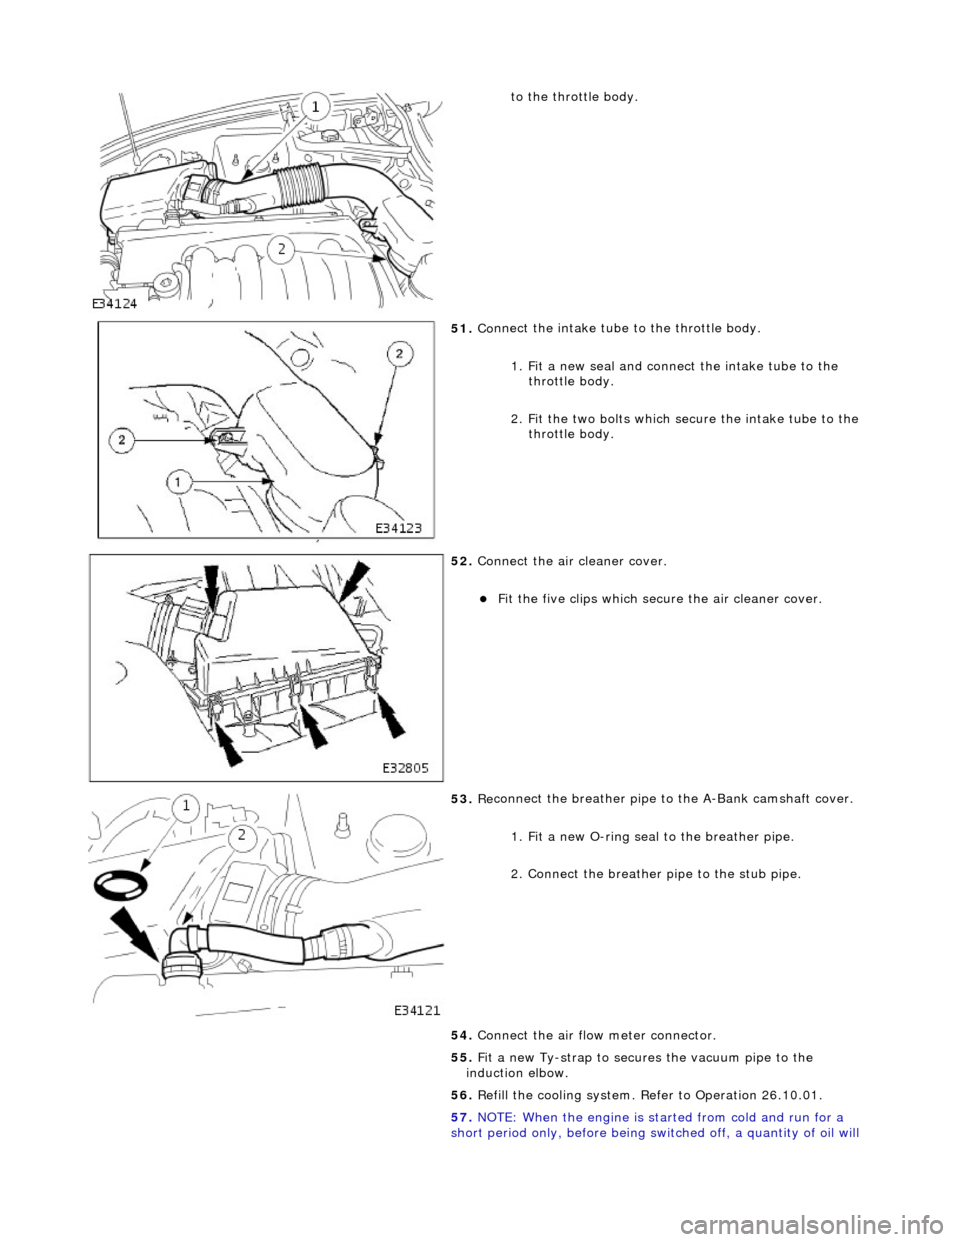
to th
e throttle body.
51 . Co
nnect the intake tube to the throttle body.
1. Fit a new seal and connect the intake tube to the throttle body.
2. Fit the two bolts which secure the intake tube to the throttle body.
52 . Conne
ct the air cleaner cover.
пЃ¬F
it
the five clips which secu
re the air cleaner cover.
53 . Re
connect the breather pipe to the A-Bank camshaft cover.
1. Fit a new O-ring seal to the breather pipe.
2. Connect the breather pipe to the stub pipe.
54. Connect the air flow meter connector.
55. Fit a new Ty-strap to secures the vacuum pipe to the
induction elbow.
56. Refill the cooling system. Refer to Operation 26.10.01.
57. NOTE: When the engine is star ted from cold and run for a
short period only, before being swit ched off, a quantity of oil will
Page 923 of 2490
be 'hun
g up' within the engine because it is not up to operating
temperature.
Should the oil level subsequently be topped-up, the level could
become too high, causing oil burning.
Typically, 0.875L is hung up.
Refill the engine with the correct specification engine oil.
58. Refill the automatic transmission. Refer to Section 307-01A,
Operation 44.24. 02.
59. Refill and bleed the power stee ring system. Refer to Section
211-02 General Procedures.
60. Repressurise the air conditioni ng system. Refer to Operation
82.30.30 and note all Wa rnings and Cautions.
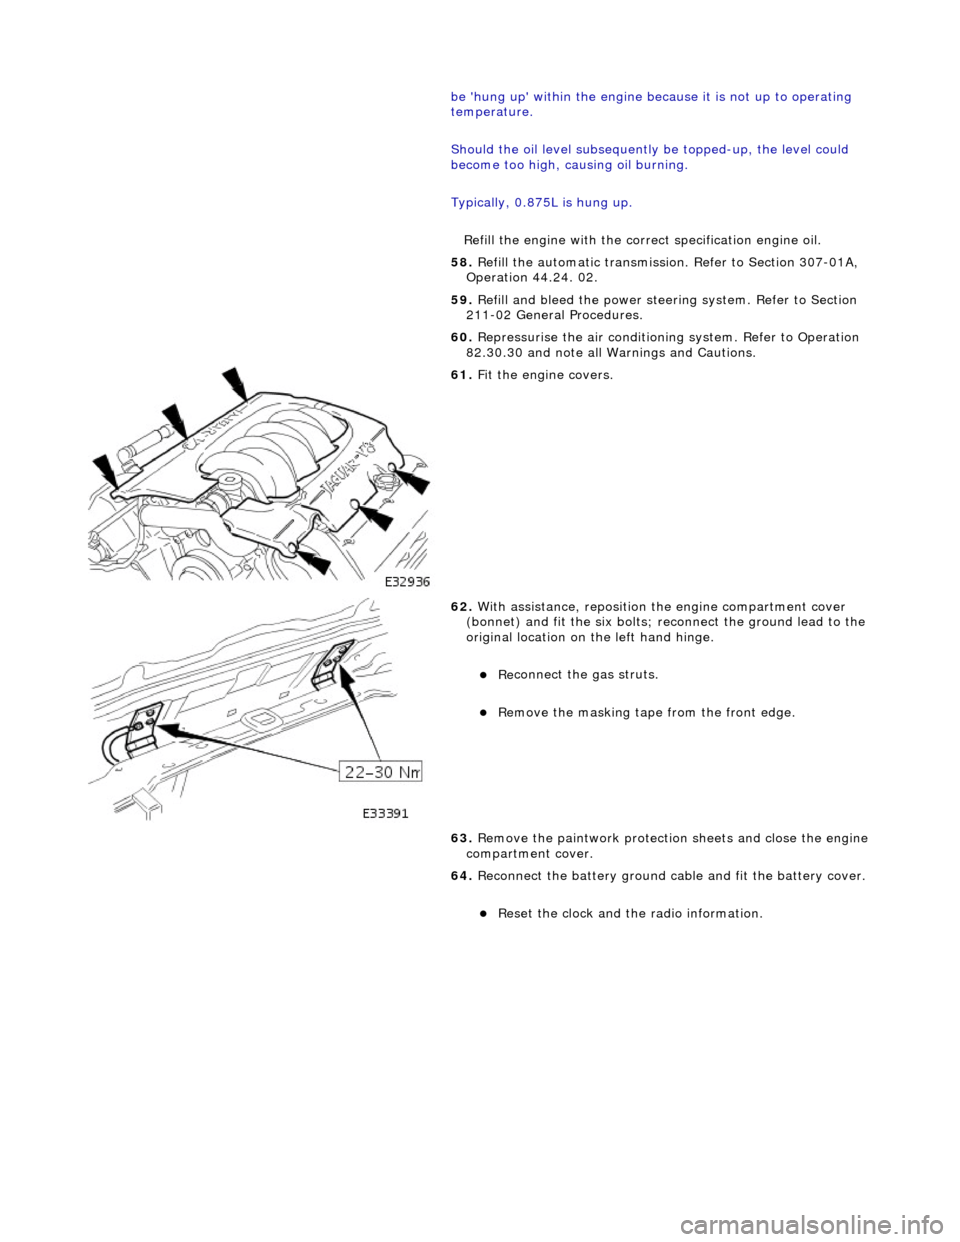
61
.
Fit the engine covers.
62
.
With assistance, reposition the engine compartment cover
(bonnet) and fit the si x bolts; reconnect the ground lead to the
original location on the left hand hinge.
пЃ¬Re
connect the gas struts.
пЃ¬R
emove the masking tape from the front edge.
63. Remove the paintwork protection sheets and close the engine
compartment cover.
64. Reconnect the battery ground cable and fit the battery cover.
пЃ¬Re
set the clock and the radio information.
Page 929 of 2490

The cooling
pack incorporates the radiator a
ssembly with integral transmission oil cool er (located in the radiator outlet tank),
an air conditioning condenser, and the cooling fans and cowl assembly.
The cooling pack on supercharged vehicles is the same as described above, but with the addition of a charge air cooler
coolant radiator located in front of the condenser.
Radiator Mounti
ng/Retention
T
he radiator is mounted on four rubber mounts, one on each
end of the upper and lower horizontal face. The two lower
mountings are supported on two isolated brackets mounted on the body; the lower cradle assembly has subsequently been
deleted.
A closing panel made from polypropylene, which retains the radiat or assembly, fits over the top of the radiator and is bolted
to the vehicle top panel.
Coolant Hoses - Engine
Page 935 of 2490
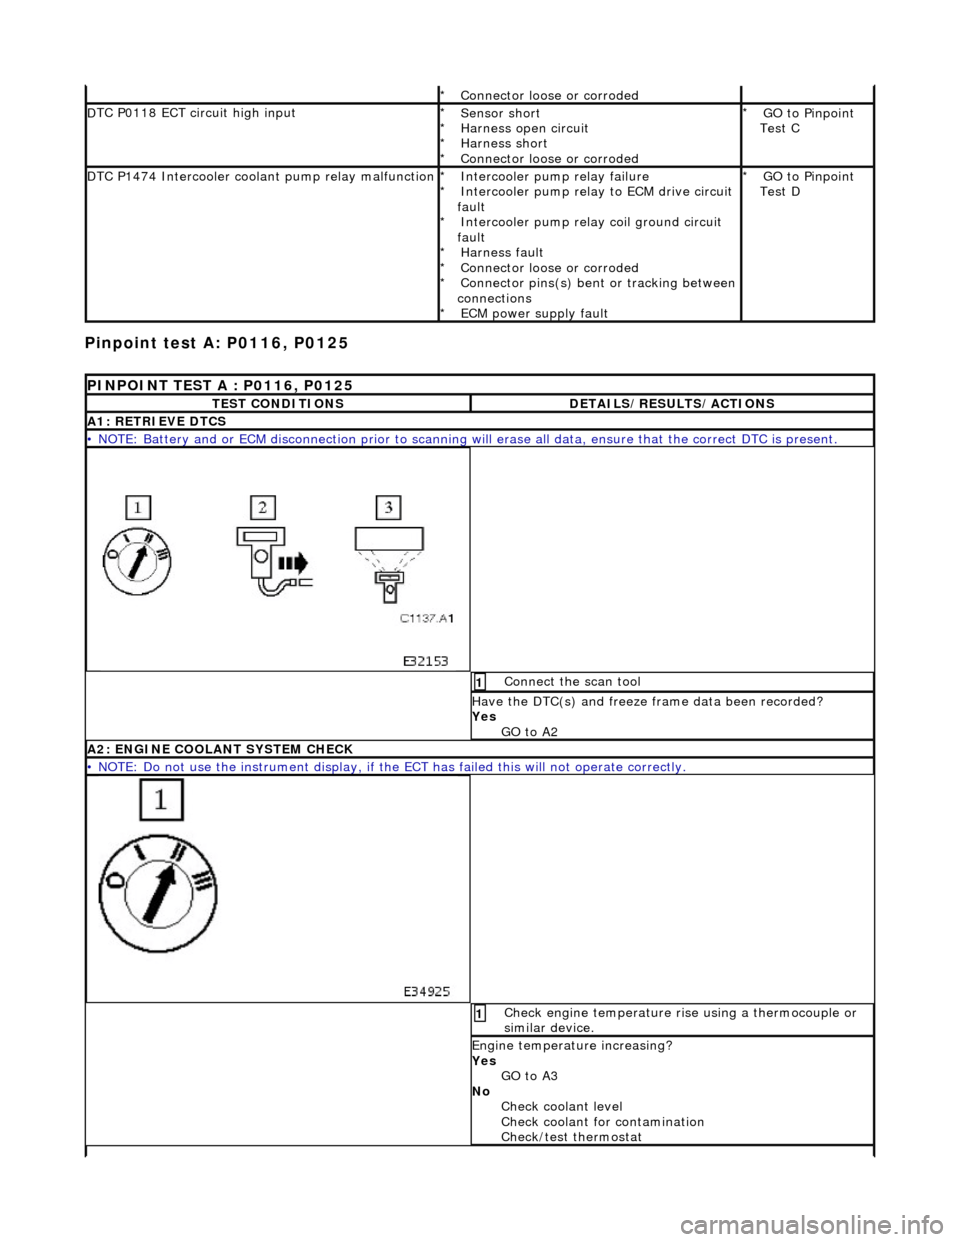
Pinpoint test
A: P0116, P0125
Connector
loose or corroded
*
D
TC P0118 ECT circuit high input
Sensor short
Harness open circui
t
Harness short
Connector loose or corroded
*
*
*
*
GO to Pinpoint
Test C
*
D
TC P1474 Intercooler coolant pump relay malfunction
Intercooler pump relay
failure
Intercooler pump relay to ECM drive circuit
fault Intercooler pump relay coil ground circuit
fault Harness fault
Connector loose or corroded
Connector pins(s) bent or tracking between
connections ECM power supply fault
*
*
*
*
*
*
*
GO to Pinpoint
Test D
*
P
INPOINT TEST A : P0116, P0125
T
EST CONDITIONS
D
ETAILS/RESULTS/ACTIONS
A1
: RETRIEVE DTCS
•
NOTE: Battery and or ECM disconnection prior to scanning wi
ll erase all data, ensure that the correct DTC is present.
Conne
ct the scan tool
1
Have the DTC(s) and fr
eeze
frame data been recorded?
Yes GO to A2
A2: ENGINE
COOLANT SYSTEM CHECK
•
NOTE: Do not use the instrument display, if th
e ECT has failed this will not operate correctly.
Chec
k engine temperature rise using a thermocouple or
similar device.
1
Engine
temperature increasing?
Yes GO to A3
No Check coolant level
Check coolant for contamination
Check/test thermostat
Page 950 of 2490
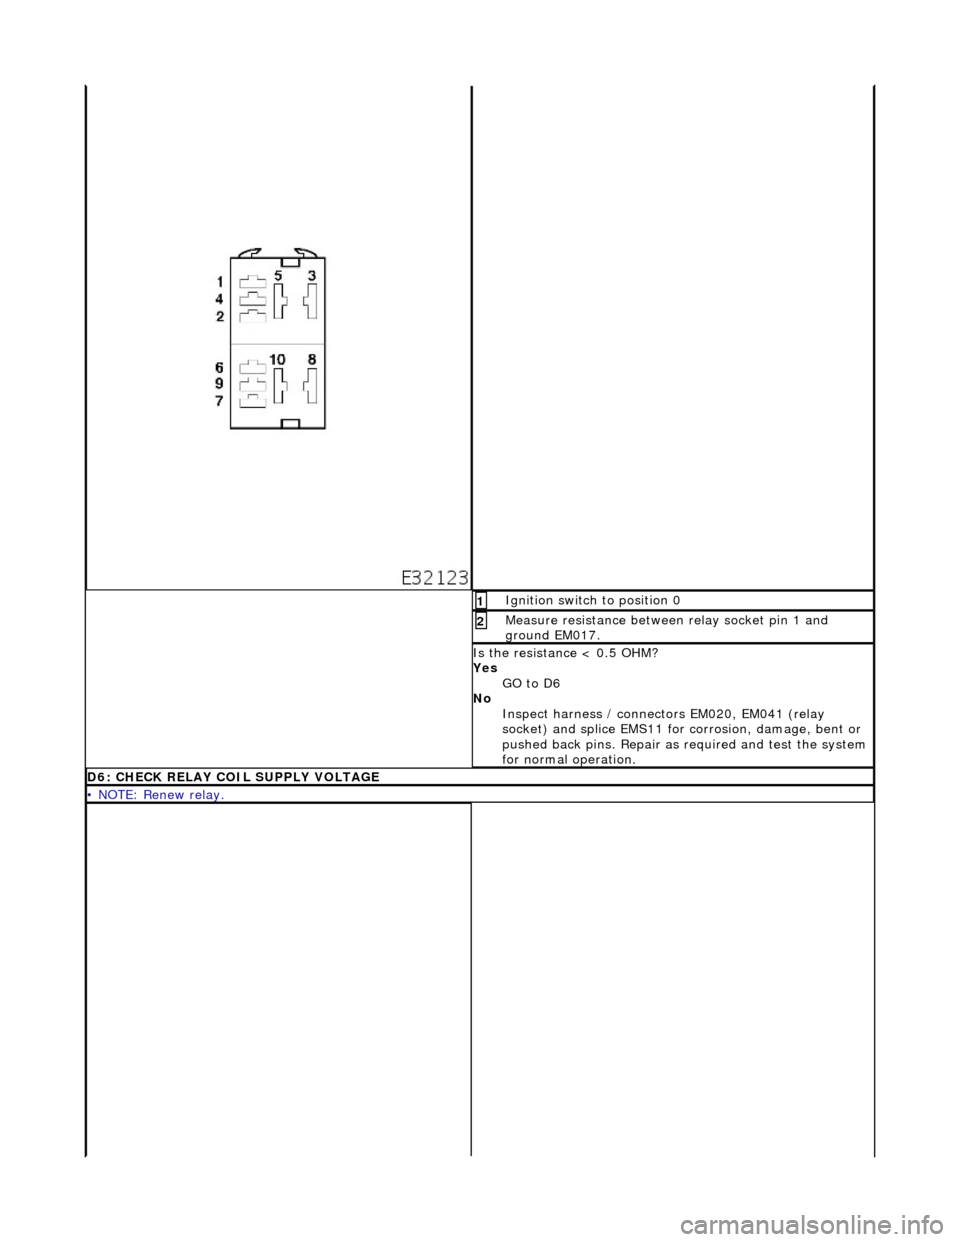
Ig
nition switch to position 0
1
Meas
ure re
sistance between relay socket pin 1 and
ground EM017.
2
I s
the resistance < 0.5 OHM?
Yes GO to D6
No Inspect harness / connec tors EM020, EM041 (relay
socket) and splice EMS11 for corrosion, damage, bent or
pushed back pins. Repair as required and test the system
for normal operation.
D6: CHECK
RELAY COIL SUPPLY VOLTAGE
• NO
TE: Renew relay.
Page 973 of 2490
Engine Cooling - Radiator4.0L NA V8 - AJ27/3.2L NA V8 - AJ26
Re
moval and Installation
Remov
al
1.
O
pen the engine compartment and fit paintwork protection
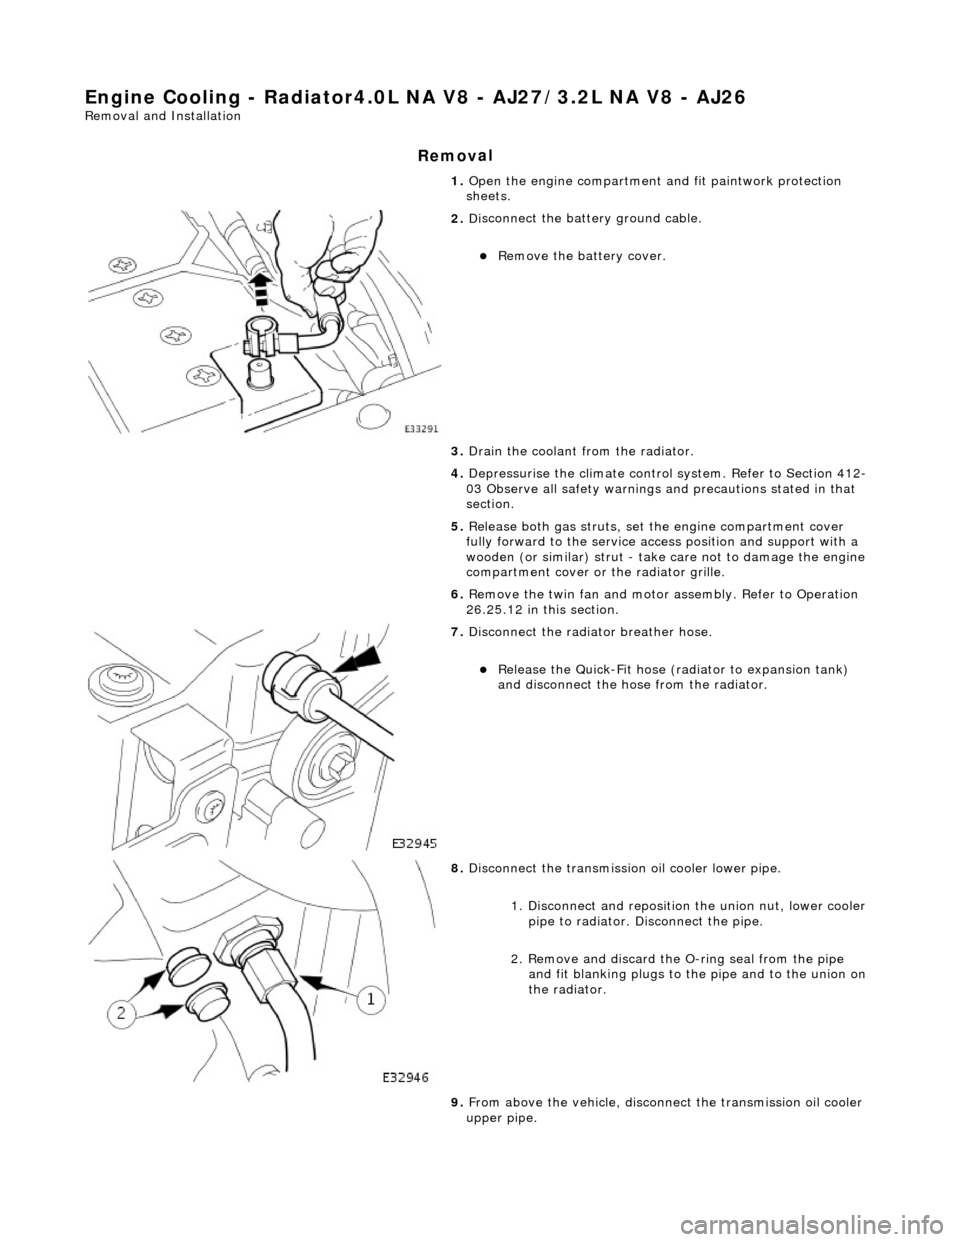
sheets.
2. Di
sconnect the batt
ery ground cable.
пЃ¬R
emove the battery cover.
3. Drain the coolant from the radiator.
4. Depressurise the climate control system. Refer to Section 412-
03 Observe all safety warnings and precautions stated in that
section.
5. Release both gas struts, set the engine compartment cover
fully forward to the service acce ss position and support with a
wooden (or similar) strut - take care not to damage the engine
compartment cover or the radiator grille.
6. Remove the twin fan and motor assembly. Refer to Operation
26.25.12 in this section.
7. D
isconnect the radiator breather hose.
пЃ¬R
elease the Quick-Fit hose (radiator to expansion tank)
and disconnect the hose from the radiator.
8. Di
sconnect the transmission oil cooler lower pipe.
1. Disconnect and reposition the union nut, lower cooler pipe to radiator. Di sconnect the pipe.
2. Remove and discard the O- ring seal from the pipe
and fit blanking plugs to the pipe and to the union on
the radiator.
9. From above the vehicle, disconne ct the transmission oil cooler
upper pipe.
Page 976 of 2490
In
stallation
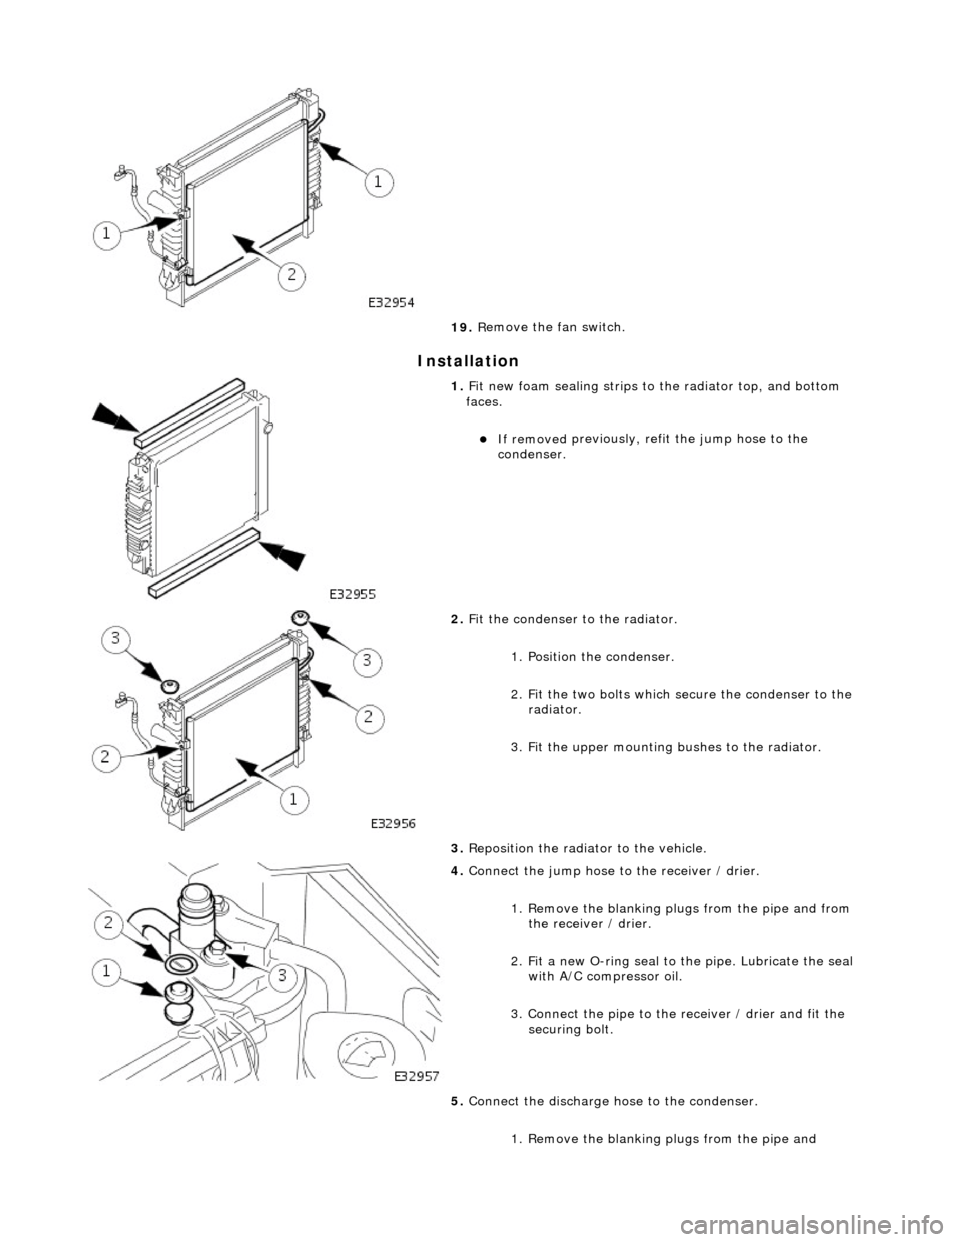
19
. R
emove the fan switch.
1. Fi
t new foam sealing strips to
the radiator top, and bottom
faces.
пЃ¬If removed
previously, refit the jump hose to the
condenser.
2. Fit t
he condenser to the radiator.
1. Position the condenser.
2. Fit the two bolts which secure the condenser to the radiator.
3. Fit the upper mounting bushes to the radiator.
3. Reposition the radiator to the vehicle.
4. Conne ct
the jump hose to
the receiver / drier.
1. Remove the blanking plugs from the pipe and from the receiver / drier.
2. Fit a new O-ring seal to the pipe. Lubricate the seal with A/C compressor oil.
3. Connect the pipe to the receiver / drier and fit the
securing bolt.
5. Connect the discharge hose to the condenser.
1. Remove the blanking plugs from the pipe and