accessory drive JAGUAR X308 1998 2.G User Guide
[x] Cancel search | Manufacturer: JAGUAR, Model Year: 1998, Model line: X308, Model: JAGUAR X308 1998 2.GPages: 2490, PDF Size: 69.81 MB
Page 596 of 2490
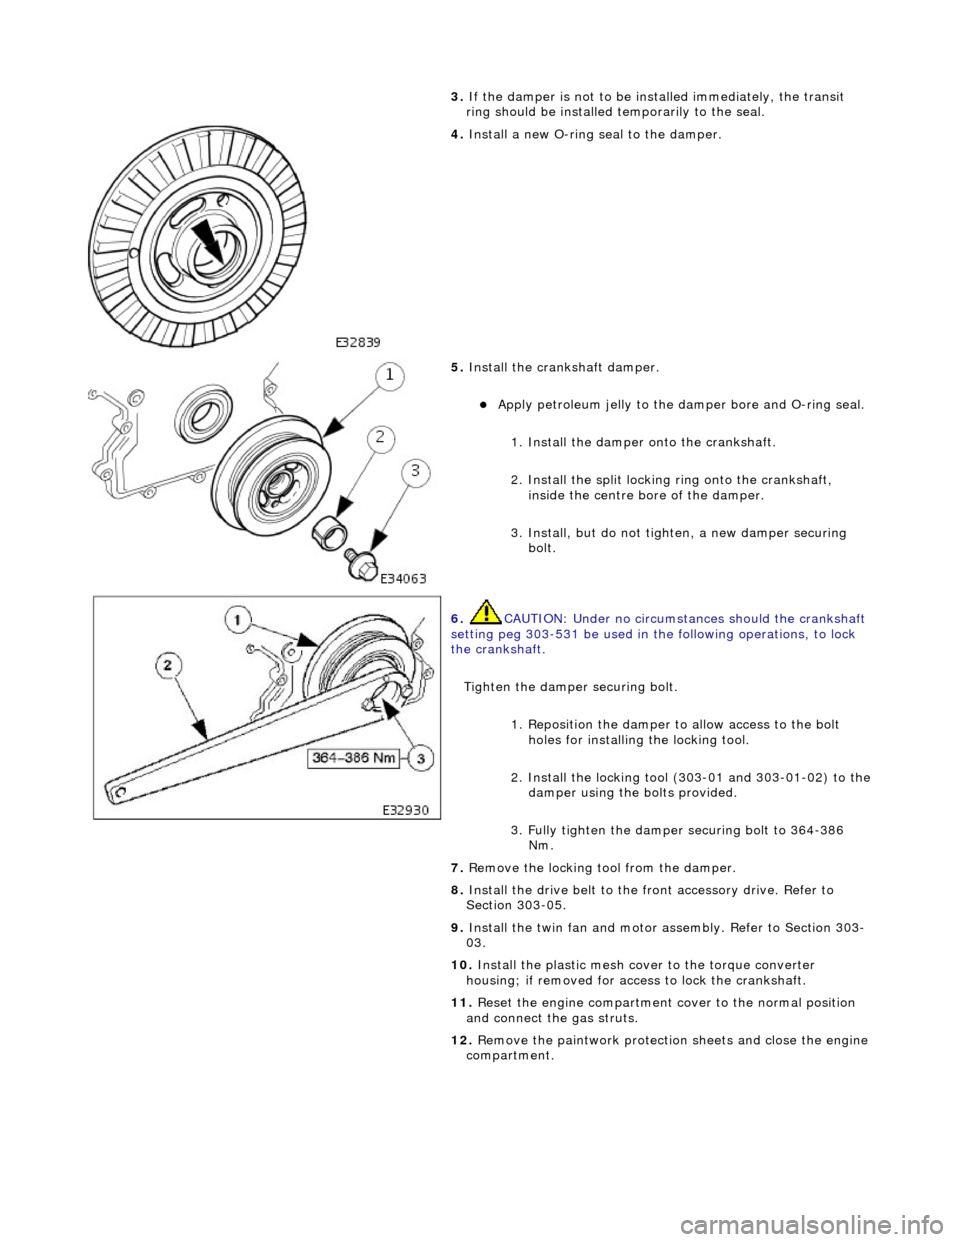
3.
If
the damper is not to be installed immediately, the transit
ring should be installed temporarily to the seal.
4. Install a new O-ri
ng seal to the damper.
5. Instal
l the crankshaft damper.
Apply petroleum jelly to the damper
bore and O-ring seal.
1. Install the damper onto the crankshaft.
2. Install the split locking ring onto the crankshaft,
inside the centre bo re of the damper.
3. Install, but do not tigh ten, a new damper securing
bolt.
6. CAUTIO
N: Under no circumstan
ces should the crankshaft
setting peg 303-531 be used in the following operations, to lock
the crankshaft.
Tighten the damper securing bolt. 1. Reposition the damper to allow access to the bolt holes for installing the locking tool.
2. Install the locking tool (303-01 and 303-01-02) to the
damper using the bolts provided.
3. Fully tighten the damper securing bolt to 364-386 Nm.
7. Re
move the locking tool from the damper.
8. Install the drive belt to the fr ont accessory drive. Refer to
Section 303-05.
9. Install the twin fan and motor assembly. Refer to Section 303-
03.
10. Install the plastic mesh cove r to the torque converter
housing; if removed for acce ss to lock the crankshaft.
11. Reset the engine compartment cover to the normal position
and connect the gas struts.
12. Remove the paintwork protection sheets and close the engine
compartment.
Page 598 of 2490

Cr
ankshaft front seal remover
303-541
Cr
ankshaft front seal replacer
303-542
Cr
ankshaft pulley/damper remover
303-588
Removal
1. Open the engine compartment and fit paintwork protection sheets.
2. Set the engine compartment cover to the service access position.
3. Remove the supercharger drive belt. Refer to Operation <<18.50.08>>.
4. Remove the drive belt from the front accessory drive. Refer to Operation <<12.10.40>>.
Page 604 of 2490

6.
CA
UTION:
Under no circumstances should the crankshaft setting peg 303-531 be used in the following
operations, to lock the crankshaft.
Tighten the damper securing bolt. 1. Reposition the damper to allow access to the bolt holes for installing the locking tool.
2. Install the locking tool (303-191 and 303-191-03) to the damper using the bolts provided.
3. Fully tighten the damper securing bolt to 364-386 Nm.
7. Remove the locking tool from the damper.
8. Install the drive belt to the front accessory drive. Refer to Operation <<12.10.40>>.
9. Install the supercharger drive belt. Refer to Operation <<18.50.08>>.
10. Install the twin fan and motor assembly. Refer to Section 303-03.
11. Install the plastic mesh cover to the torque converter housing; if removed for access to lock the
crankshaft.
12. Reset the engine compartment cover to the normal position and connect the gas struts.
13. Remove the paintwork protection sheets and close the engine compartment.
Page 643 of 2490
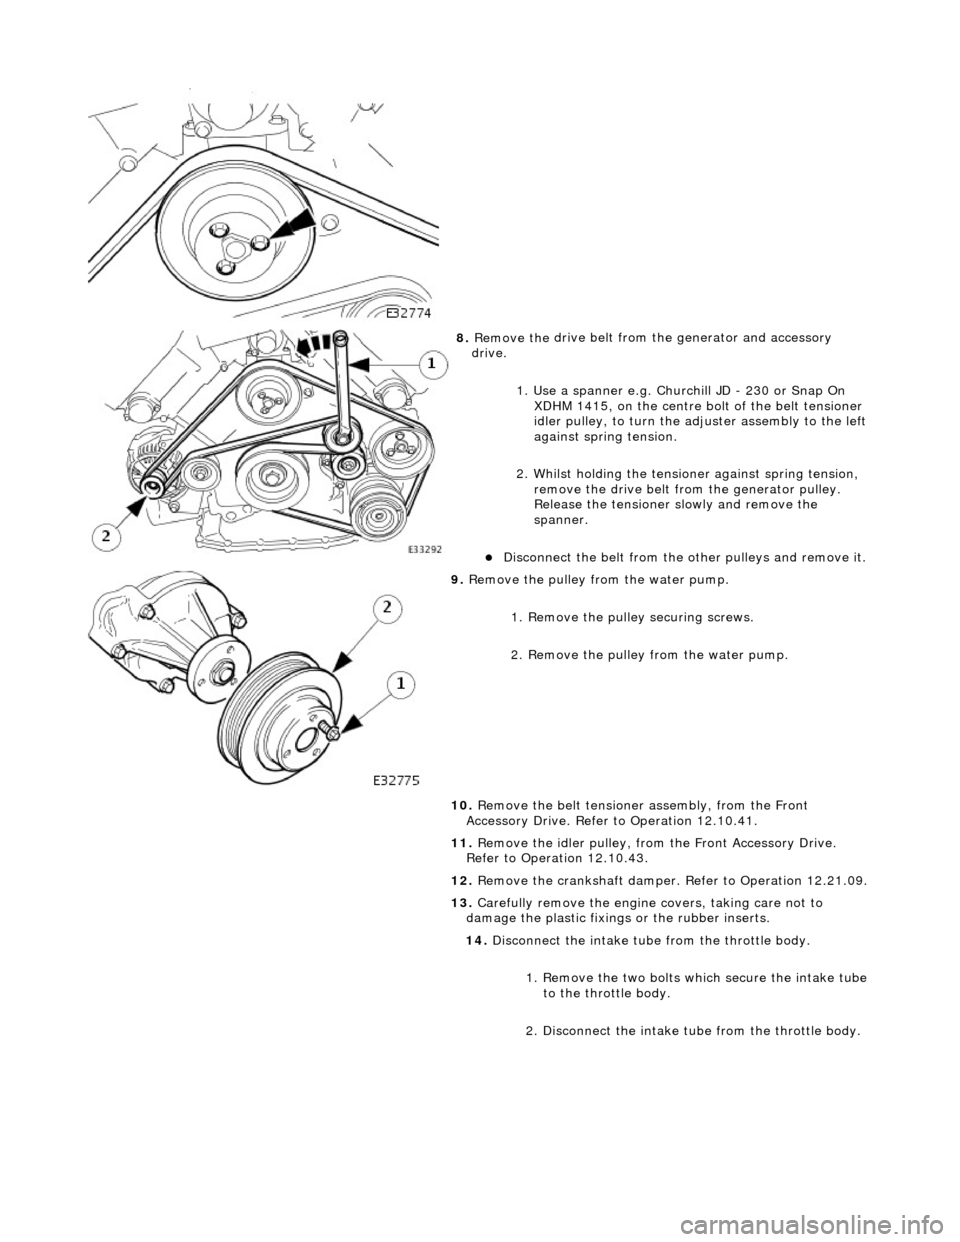
8. Remove the
drive belt from
the generator and accessory
drive.
1. Use a spanner e.g. Churchill JD - 230 or Snap On XDHM 1415, on the centre bo lt of the belt tensioner
idler pulley, to turn the adju ster assembly to the left
against spring tension.
2. Whilst holding the tensioner against spring tension, remove the drive belt from the generator pulley.
Release the tensioner sl owly and remove the
spanner.
D
isconnect the belt from the
other pulleys and remove it.
9. Re
move the pulley from the water pump.
1. Remove the pulley securing screws.
2. Remove the pulley from the water pump.
10. Remove the belt tensione r assembly, from the Front
Accessory Drive. Refer to Operation 12.10.41.
11. Remove the idler pulley, from the Front Accessory Drive.
Refer to Operation 12.10.43.
12. Remove the crankshaft damper. Refer to Operation 12.21.09.
13. Carefully remove the engine covers, taking care not to
damage the plasti c fixings or the rubber inserts.
14. Disconnect the intake tube from the throttle body.
1. Remove the two bolts which secure the intake tube to the throttle body.
2. Disconnect the intake tube from the throttle body.
Page 649 of 2490
15
.
Reconnect the air flow meter multi-plug.
16. Refit the engine covers.
17. Refit the crankshaft damper. Refer to Operation 12.21.09.
18. Refit the idler pulley, to the Front Accessory Drive. Refer to
Operation 12.10.43.
19. Refit the belt tensioner assembly, to the Front Accessory
Drive. Refer to Operation 12.10.41.
20
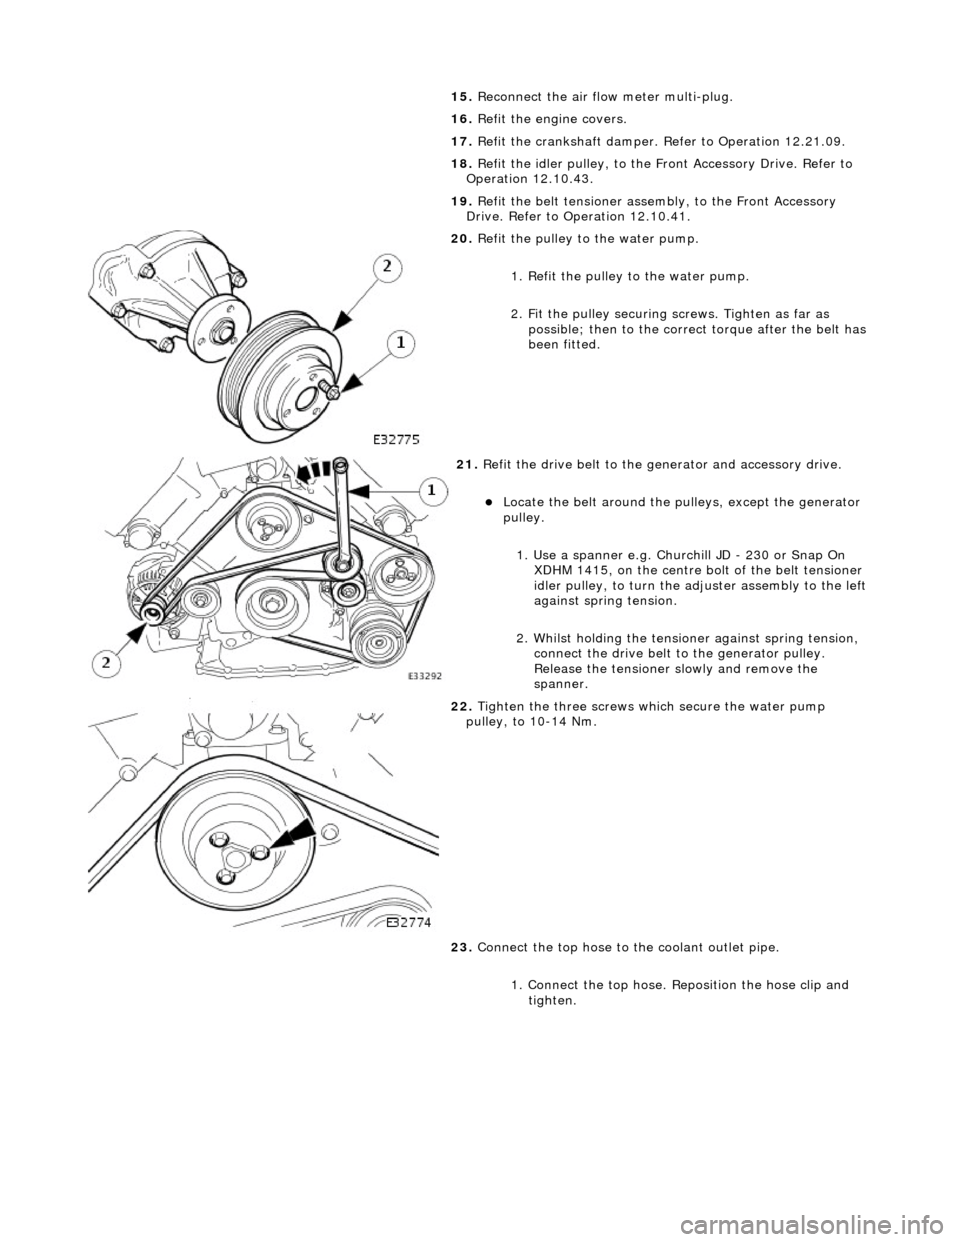
.
Refit the pulley to the water pump.
1. Refit the pulley to the water pump.
2. Fit the pulley securing screws. Tighten as far as
possible; then to the correct torque after the belt has
been fitted.
21
.
Refit the drive belt to the generator and accessory drive.
Locat
e the belt around the pulleys, except the generator
pulley.
1. Use a spanner e.g. Churchill JD - 230 or Snap On XDHM 1415, on the centre bo lt of the belt tensioner
idler pulley, to turn the adju ster assembly to the left
against spring tension.
2. Whilst holding the tensioner against spring tension, connect the drive belt to the generator pulley.
Release the tensioner sl owly and remove the
spanner.
22
.
Tighten the three screws wh ich secure the water pump
pulley, to 10-14 Nm.
23. Connect the top hose to the coolant outlet pipe.
1. Connect the top hose. Reposition the hose clip and tighten.
Page 652 of 2490
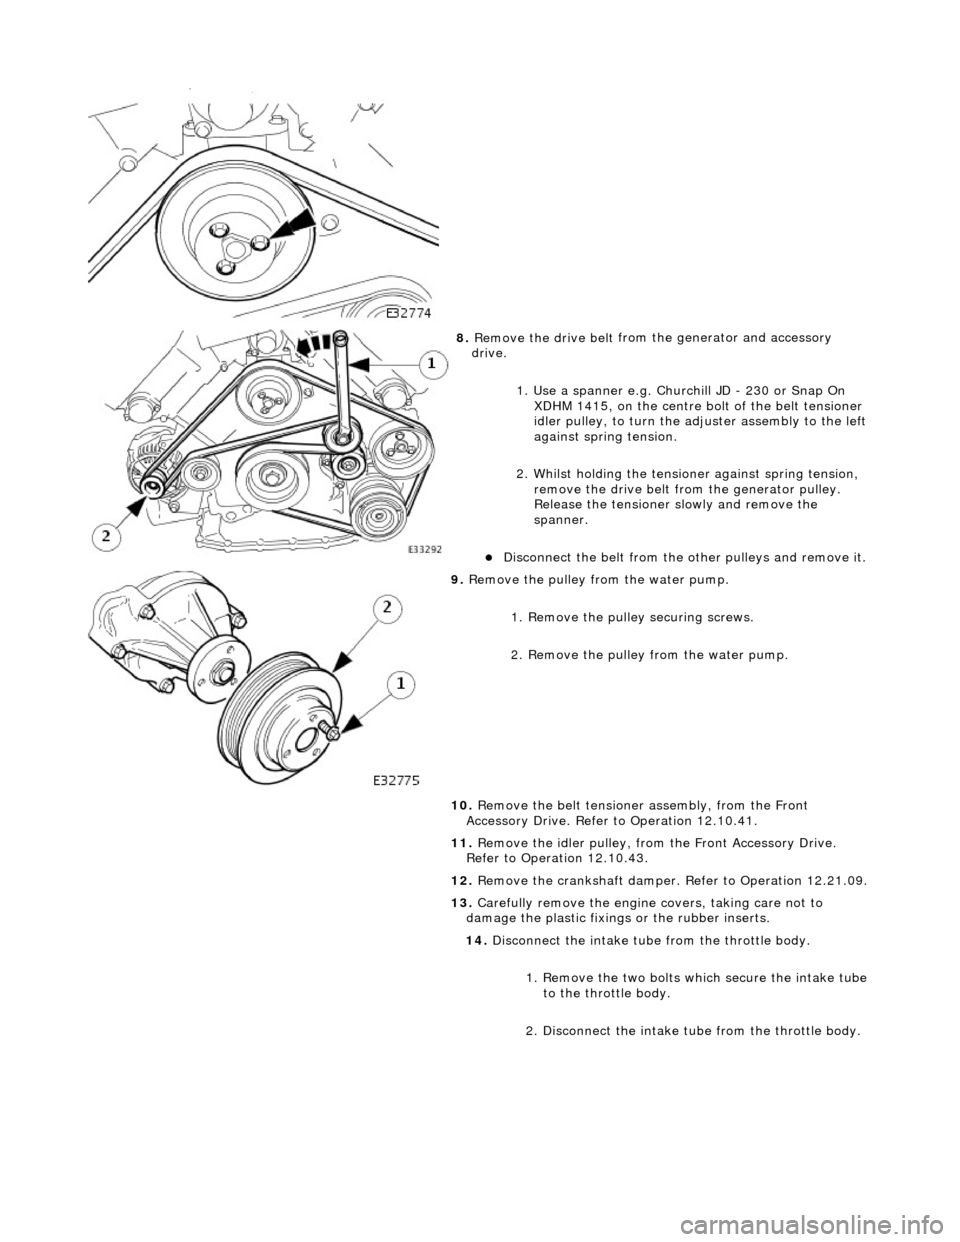
8. Remove the drive belt
from
the generator and accessory
drive.
1. Use a spanner e.g. Churchill JD - 230 or Snap On XDHM 1415, on the centre bo lt of the belt tensioner
idler pulley, to turn the adju ster assembly to the left
against spring tension.
2. Whilst holding the tensioner against spring tension, remove the drive belt from the generator pulley.
Release the tensioner sl owly and remove the
spanner.
D i
sconnect the belt from the
other pulleys and remove it.
9. Remove t
he pulley from the water pump.
1. Remove the pulley securing screws.
2. Remove the pulley from the water pump.
10. Remove the belt tensione r assembly, from the Front
Accessory Drive. Refer to Operation 12.10.41.
11. Remove the idler pulley, from the Front Accessory Drive.
Refer to Operation 12.10.43.
12. Remove the crankshaft damper. Refer to Operation 12.21.09.
13. Carefully remove the engine covers, taking care not to
damage the plasti c fixings or the rubber inserts.
14. Disconnect the intake tube from the throttle body.
1. Remove the two bolts which secure the intake tube to the throttle body.
2. Disconnect the intake tube from the throttle body.
Page 658 of 2490
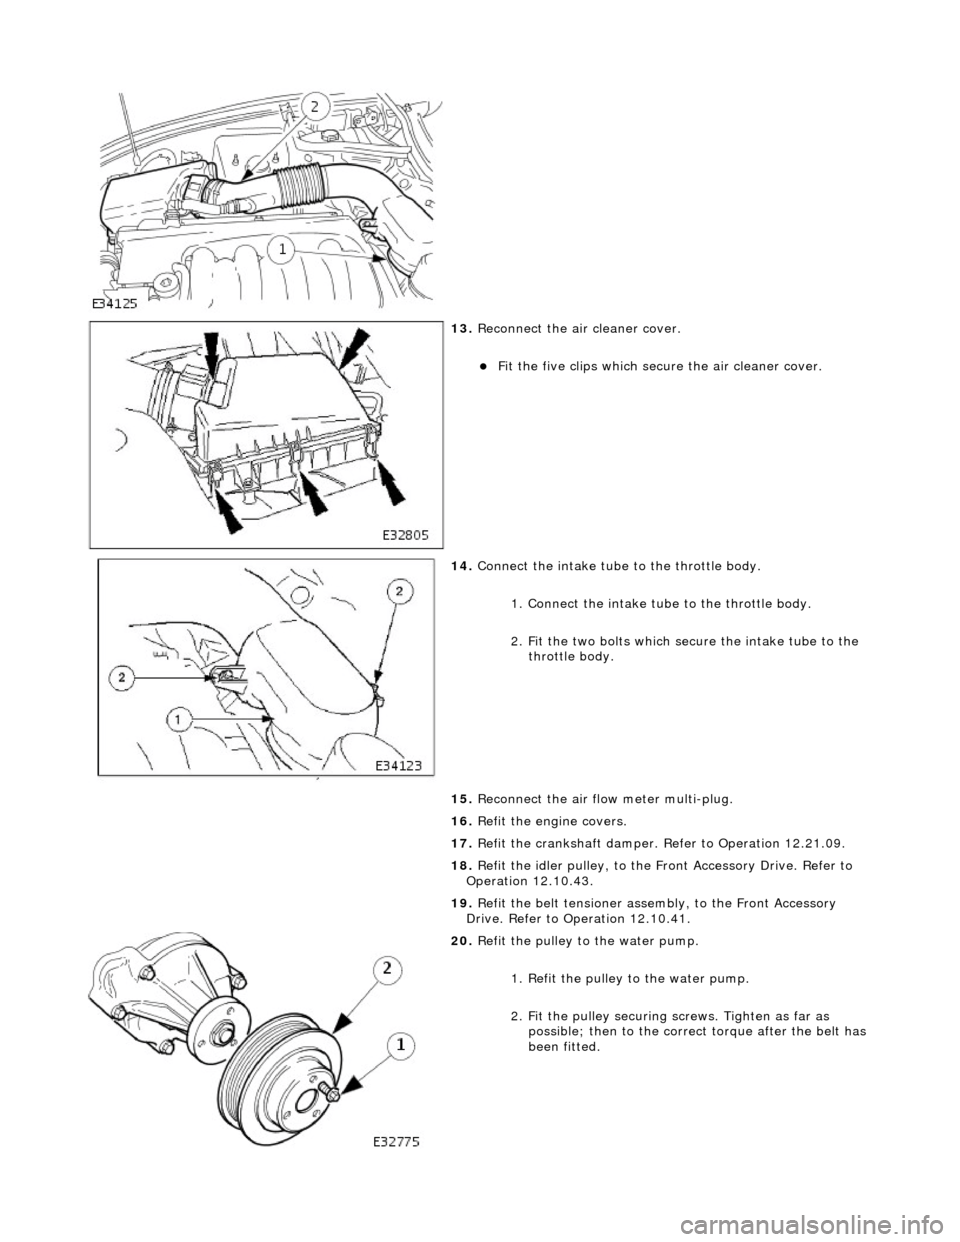
13. Reconnect the air cleaner cover.
Fit the five clips which secu re the air cleaner cover.
14. Connect the intake tube to the throttle body.
1. Connect the intake tube to the throttle body.
2. Fit the two bolts which secure the intake tube to the throttle body.
15. Reconnect the air flow meter multi-plug.
16. Refit the engine covers.
17. Refit the crankshaft damper. Refer to Operation 12.21.09.
18. Refit the idler pulley, to the Front Accessory Drive. Refer to
Operation 12.10.43.
19. Refit the belt tensioner assembly, to the Front Accessory
Drive. Refer to Operation 12.10.41.
20. Refit the pulley to the water pump.
1. Refit the pulley to the water pump.
2. Fit the pulley securing screws. Tighten as far as
possible; then to the correct torque after the belt has
been fitted.
Page 659 of 2490
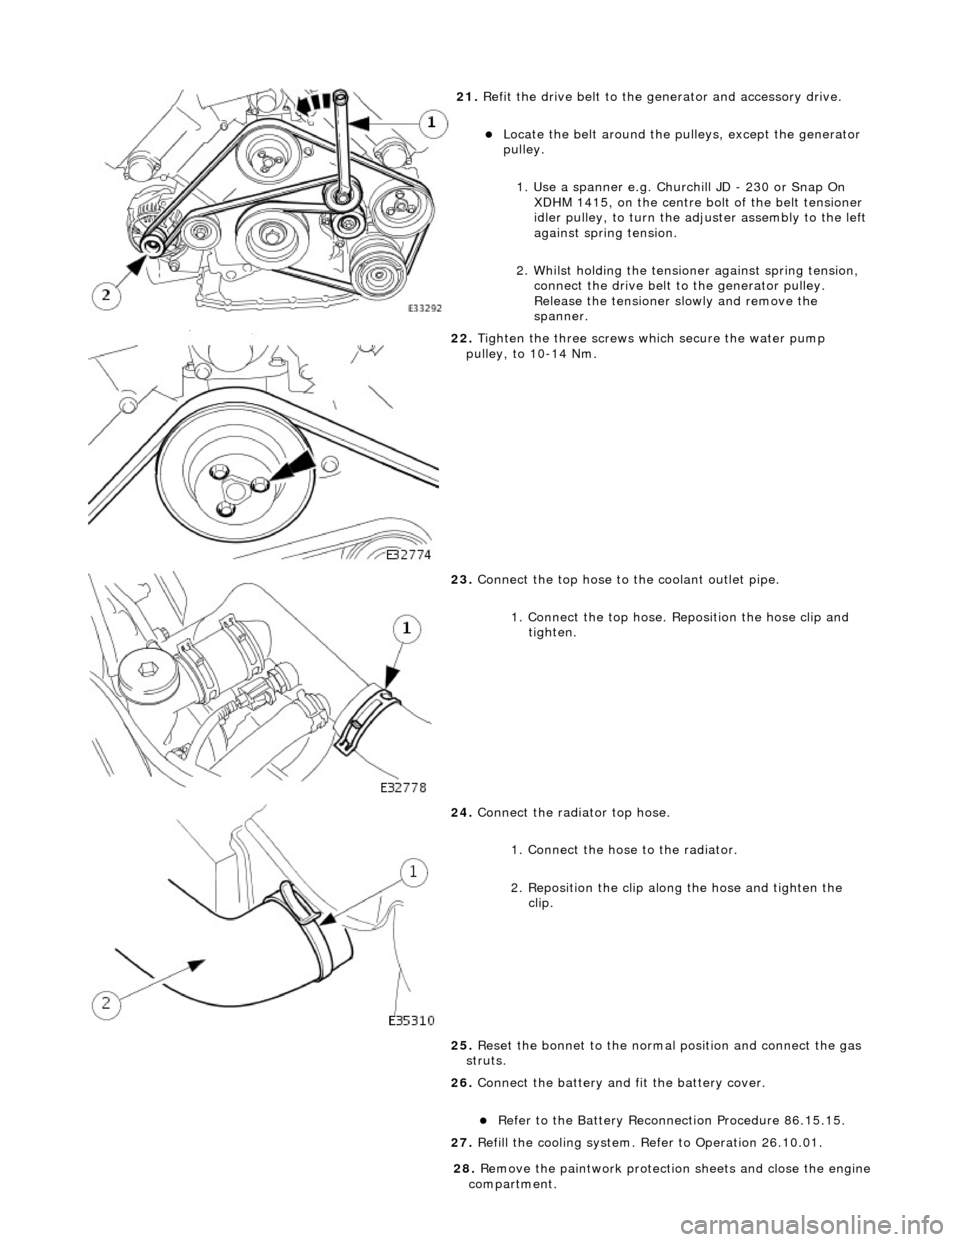
21
.
Refit the drive belt to the generator and accessory drive.
Locat
e the belt around the pulleys, except the generator
pulley.
1. Use a spanner e.g. Churchill JD - 230 or Snap On XDHM 1415, on the centre bo lt of the belt tensioner
idler pulley, to turn the adju ster assembly to the left
against spring tension.
2. Whilst holding the tensioner against spring tension, connect the drive belt to the generator pulley.
Release the tensioner sl owly and remove the
spanner.
22
.
Tighten the three screws wh ich secure the water pump
pulley, to 10-14 Nm.
23
.
Connect the top hose to the coolant outlet pipe.
1. Connect the top hose. Reposition the hose clip and tighten.
24
.
Connect the radiator top hose.
1. Connect the hose to the radiator.
2. Reposition the clip along the hose and tighten the clip.
25. Reset the bonnet to the normal position and connect the gas
struts.
26. Connect the battery and fit the battery cover.
Re
fer to the Battery Reconnection Procedure 86.15.15.
27. Refill the cooling system. Refer to Operation 26.10.01.
28
.
Remove the paintwork protection sheets and close the engine
compartment.
Page 1001 of 2490
Engine Cooling - Water Pump4.0L NA V8 - AJ27/ 3.2L NA V8 - AJ26
Re
moval and Installation
Remov
al
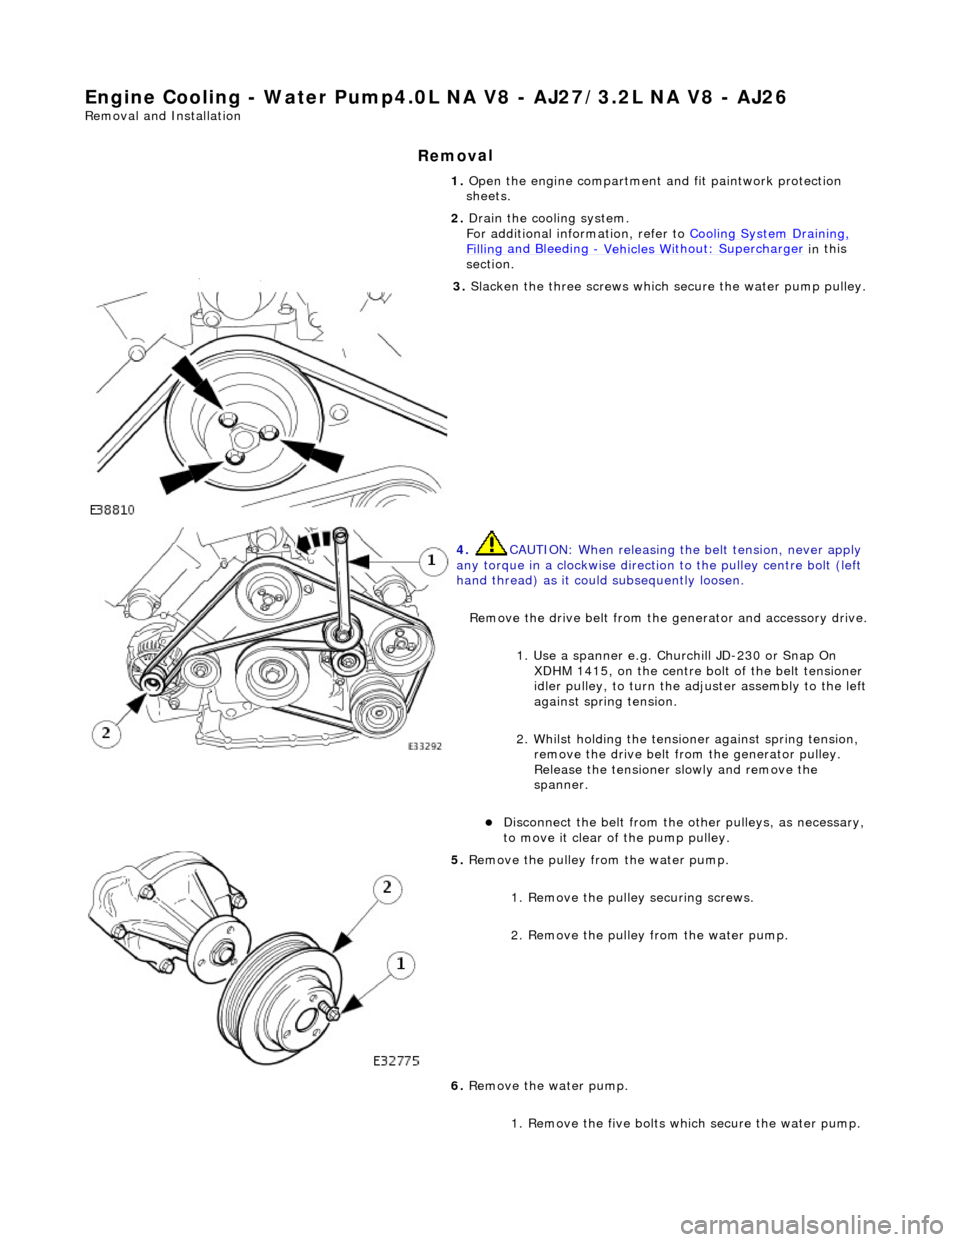
1.
O
pen the engine compartment and fit paintwork protection
sheets.
2. Drain the cooling system.
For additional information, refer to Cooling System Draining,
Fillin
g and Bleeding
- Vehicles W
ithout: Supercharger
in
this
section.
3. Sl
acken the three screws which
secure the water pump pulley.
4. CAUTI
ON: When releasing the
belt tension, never apply
any torque in a clockwise direction to the pulley ce ntre bolt (left
hand thread) as it could subsequently loosen.
Remove the drive belt from the generator and accessory drive.
1. Use a spanner e.g. Churchill JD-230 or Snap On XDHM 1415, on the centre bo lt of the belt tensioner
idler pulley, to turn the adju ster assembly to the left
against spring tension.
2. Whilst holding the tensioner against spring tension, remove the drive belt from the generator pulley.
Release the tensioner sl owly and remove the
spanner.
D
isconnect the belt from the ot
her pulleys, as necessary,
to move it clear of the pump pulley.
5. Re
move the pulley from the water pump.
1. Remove the pulley securing screws.
2. Remove the pulley from the water pump.
6. Remove the water pump.
1. Remove the five bolts wh ich secure the water pump.
Page 1004 of 2490

Engine Cooling - Water Pump4.0L SC V8 - AJ26
Remo
val and Installation
Remov
a
l
1.
Op
en the engine compartment and fit paintwork protection
sheets.
2. Drain the cooling system.
For additional information, refer to Cooling System Draining,
Filling and Bleedin
g
- Vehicles With
: Supercharger in this
section.
3. Remove the supercharger driv e belt. Refer to Operation
18.50.08.
4. Slacken the three screws whi
ch
secure the water pump pulley.
5. CAUTIO
N: When releasing the
belt tension, never apply
any torque in a clockwise direction to the pulley ce ntre bolt (left
hand thread) as it could subsequently loosen.
Remove the drive belt from the generator and accessory drive.
1. Use a spanner e.g. Churchill JD-230 or Snap On XDHM 1415, on the centre bo lt of the belt tensioner
idler pulley, to turn the adju ster assembly to the left
against spring tension.
2. Whilst holding the tensioner against spring tension, remove the drive belt from the generator pulley.
Release the tensioner sl owly and remove the
spanner.
Di
sconnect the belt from the ot
her pulleys, as necessary,
to move it clear of the pump pulley.
6. Remove t
he pulley from the water pump.
1. Remove the pulley securing screws.
2. Remove the pulley from the water pump.
7. Remove the water pump.