headlamp JAGUAR XJ6 1994 2.G Owner's Manual
[x] Cancel search | Manufacturer: JAGUAR, Model Year: 1994, Model line: XJ6, Model: JAGUAR XJ6 1994 2.GPages: 521, PDF Size: 17.35 MB
Page 495 of 521

Security System - RESTRICTED MU€ 84
-
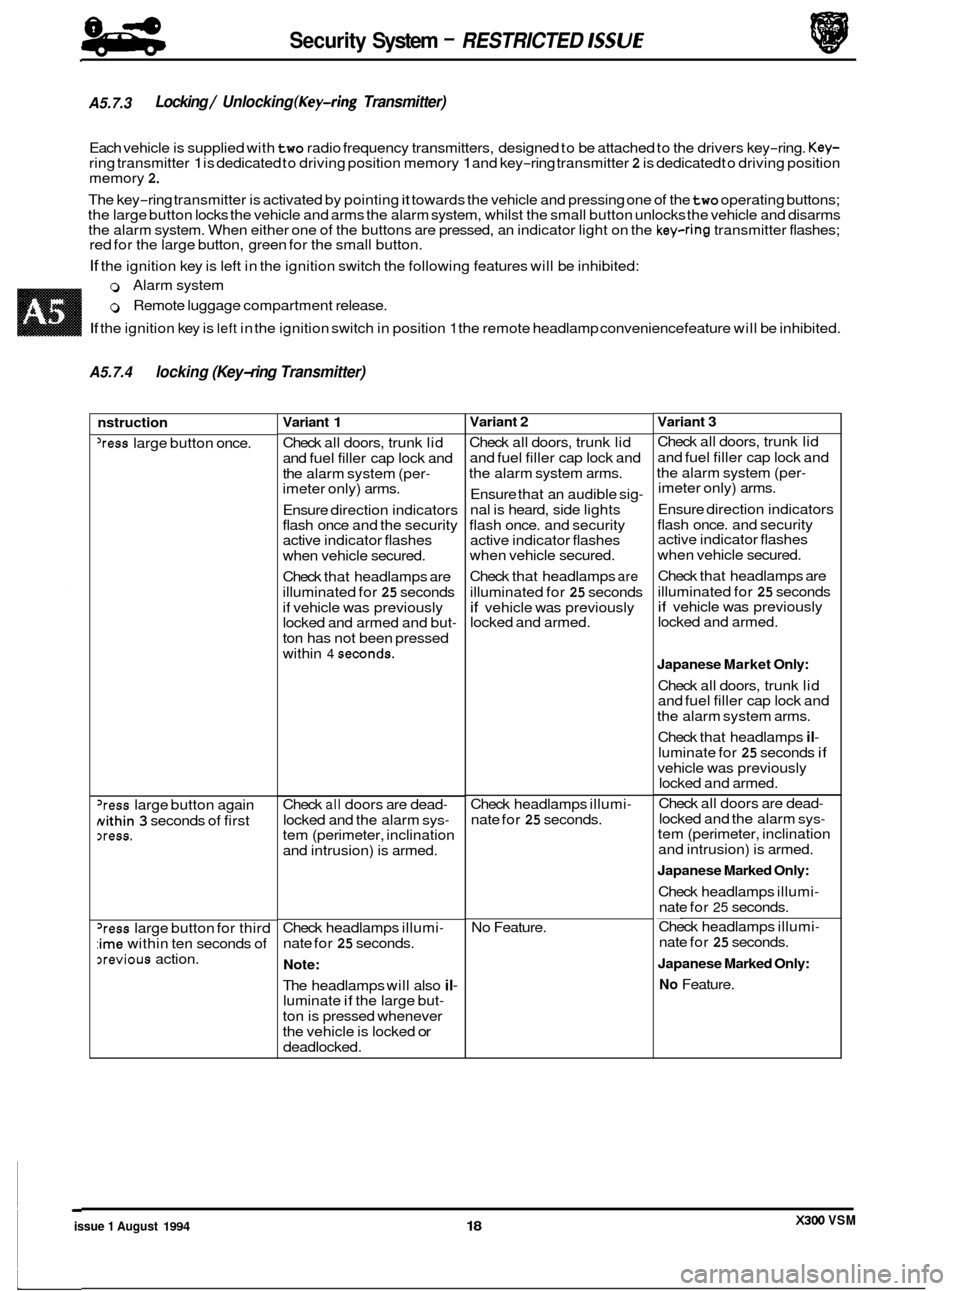
A5.7.3 Locking / Unlocking (Key-ring Transmitter)
Each vehicle is supplied with two radio frequency transmitters, designed to be attached to the drivers key-ring. Key- ring transmitter 1 is dedicated to driving position memory 1 and key-ring transmitter 2 is dedicated to driving position
memory 2.
The key-ring transmitter is activated by pointing it towards the vehicle and pressing one of the two operating buttons;
the large button locks the vehicle and arms the alarm system, whilst the small button unlocks the vehicle and disarms
the alarm system. When either one of the buttons are pressed, an indicator light on the
key-ring transmitter flashes;
red for the large button, green for the small button.
If the ignition key is left in the ignition switch the following features will be inhibited:
0 Alarm system
0 Remote luggage compartment release.
If the ignition key is left in the ignition switch in position 1 the remote headlamp convenience feature will be inhibited.
A5.7.4 locking (Key-ring Transmitter)
nstruction
'ress large button once.
'ress large button again
Nithin 3 seconds of first xess.
'ress large button for third
:ime within ten seconds of
3revious action.
Variant 1
Check all doors, trunk lid
and fuel filler cap lock and
the alarm system (per
- imeter only) arms.
Ensure direction indicators
flash once and the security
active indicator flashes
when vehicle secured.
Check that headlamps are
illuminated for
25 seconds
if vehicle was previously
locked and armed and but
-
ton has not been pressed
within
4 seconds.
Check all doors are dead-
locked and the alarm sys- tem (perimeter, inclination
and intrusion) is armed.
Check headlamps illumi
-
nate for 25 seconds.
Note:
The headlamps will also il- luminate if the large but-
ton is pressed whenever
the vehicle is locked
or
deadlocked.
Variant 2
Check all doors, trunk lid
and fuel filler cap lock and
the alarm system arms.
Ensure that an audible sig
-
nal is heard, side lights
flash once. and security
active indicator flashes
when vehicle secured.
Check that headlamps
are
illuminated for 25 seconds
if vehicle was previously
locked and armed.
Check headlamps illumi
-
nate for 25 seconds.
No Feature.
Variant 3
Check all doors, trunk lid
and fuel filler cap lock and
the alarm system (per
- imeter only) arms.
Ensure direction indicators
flash once. and security
active indicator flashes
when vehicle secured.
Check that headlamps are
illuminated for
25 seconds if vehicle was previously
locked and armed.
Japanese Market Only:
Check all doors, trunk lid
and fuel filler cap lock and
the alarm system arms.
Check that headlamps
il-
luminate for 25 seconds if
vehicle was previously
locked and armed.
Check all doors are dead
-
locked and the alarm sys- tem (perimeter, inclination
and intrusion) is armed.
Japanese Marked Only:
Check headlamps illumi-
nate for 25 seconds. __ Check headlamps illumi-
nate for 25 seconds.
Japanese Marked Only:
No Feature.
X300 VSM issue 1 August 1994 18
Page 519 of 521

Security System - RESTRICTED ISSUE 84
4!sw
A5.15 SECURITY SIREN
(12 CYL) - RENEW
SRO 86.52.03
= Open the trunk and remove the battery cover.
Disconnect the battery ground lead.
Open the hood and remove the headlamp
/ relay cover.
See
SRO 76.1 1.22, Section 13.
Remove the RH air cleaner element. See SRO 19.10.11, Section 5.2.
Remove the RH air cleaner assembly. See SRO 19.10.02, Section 5.2.
. Identify the RH forward harness relays (1 Fig. 1) for subse- quent refitting. Remove the relays and relay bases from
the mounting bracket.
. Disconnect the siren harness multi-plug (2 Fig. 1).
rn Reposition the side harness (3 Fig. 1) to gain access to the
. Undo the siren securing bolts (1 Fig. 2) and remove the
Note:
. Remove the captive washers and the siren securing bolts.
. Fit the siren securing bolts to a new siren.
. Fit and fully seat the captive washers.
. Align the siren securing bolts to the vehicle chassis.
Refitting the remaining components is the reverse of the re
-
moval procedure.
siren securing bolts.
siren
(2 Fig. 2).
The siren securing bolts remain captive.
Tighten the siren securing bolts.
AS. 16 SECURIN SIREN (6 CYL) - RENEW
SRO 8652.03
. Open the trunk and remove the battery cover.
rn Disconnect the battery ground lead.
. Open the hood and remove the headlamp / relay cover.
See SRO 76.1 1.22, Section 13.
. Identify the RH forward harness relays for subsequent re- fitting. Removethe relays and relay bases from the mount- ing bracket.
. Disconnect the siren harness multi-plug.
Reposition the side harness to gain access to the siren se-
. Undo the siren securing bolts and remove the siren.
curing
bolts.
The siren securing bolts remain captive.
Remove the captive washers and the siren securing bolts.
. Fit the siren securing bolts to a new siren.
. Fit and fully seat the captive washers.
= Align the siren securing bolts to the vehicle chassis.
Refitting the remaining components is the reverse of the re
-
moval procedure.
Tighten
the siren securing bolts.
Fig. 1
Fig. 2
X300 VSM Issue 1 August 1994 42