tow bar JAGUAR XJ6 1997 2.G Workshop Manual
[x] Cancel search | Manufacturer: JAGUAR, Model Year: 1997, Model line: XJ6, Model: JAGUAR XJ6 1997 2.GPages: 227, PDF Size: 7.2 MB
Page 29 of 227

position, a worn or weak shock absorber is
probably the reason.
4Repeat the above check at each of the
three remaining corners of the vehicle.
Under the vehicle
5Raise the vehicle with a trolley jack and
support it securely on axle stands. See
“Jacking and towing”for proper jacking
points.
6Check the shock absorbers for evidence of
fluid leakage. Make sure that any fluid noted is
from the shocks and not from any other
source. Also check the rubber mounts at each
end for deterioration If the shock absorbers
fail any of the tests above replace the shocks
as a set.
7Check the tyres for irregular wear patterns
and proper inflation. See “Weekly checks”for
information regarding tyre wear.
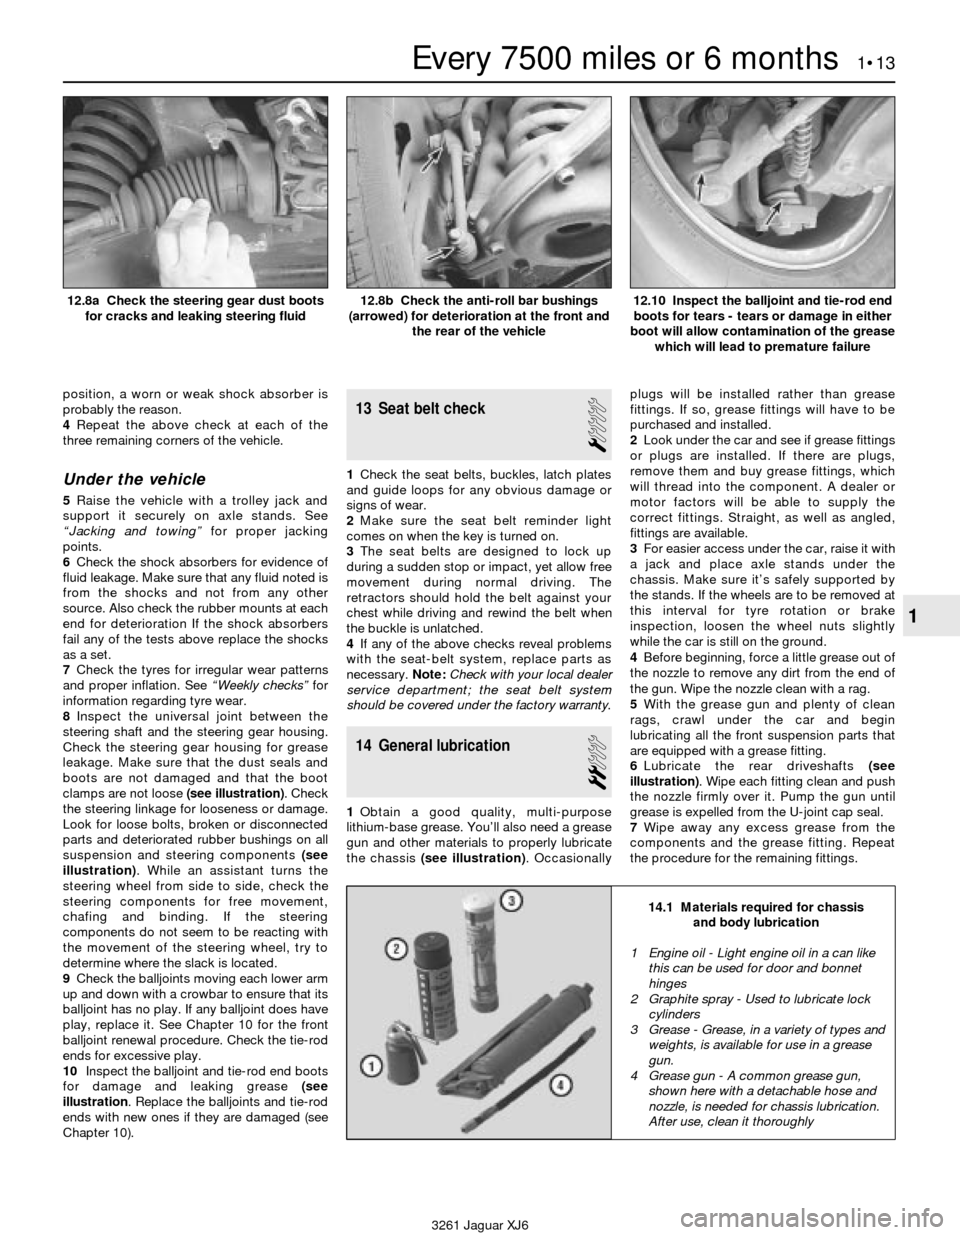
8Inspect the universal joint between the
steering shaft and the steering gear housing.
Check the steering gear housing for grease
leakage. Make sure that the dust seals and
boots are not damaged and that the boot
clamps are not loose (see illustration). Check
the steering linkage for looseness or damage.
Look for loose bolts, broken or disconnected
parts and deteriorated rubber bushings on all
suspension and steering components (see
illustration). While an assistant turns the
steering wheel from side to side, check the
steering components for free movement,
chafing and binding. If the steering
components do not seem to be reacting with
the movement of the steering wheel, try to
determine where the slack is located.
9Check the balljoints moving each lower arm
up and down with a crowbar to ensure that its
balljoint has no play. If any balljoint does have
play, replace it. See Chapter 10 for the front
balljoint renewal procedure. Check the tie-rod
ends for excessive play.
10Inspect the balljoint and tie-rod end boots
for damage and leaking grease (see
illustration. Replace the balljoints and tie-rod
ends with new ones if they are damaged (see
Chapter 10).
13 Seat belt check
1
1Check the seat belts, buckles, latch plates
and guide loops for any obvious damage or
signs of wear.
2Make sure the seat belt reminder light
comes on when the key is turned on.
3The seat belts are designed to lock up
during a sudden stop or impact, yet allow free
movement during normal driving. The
retractors should hold the belt against your
chest while driving and rewind the belt when
the buckle is unlatched.
4If any of the above checks reveal problems
with the seat-belt system, replace parts as
necessary.Note:Check with your local dealer
service department; the seat belt system
should be covered under the factory warranty.
14 General lubrication
2
1Obtain a good quality, multi-purpose
lithium-base grease. You’ll also need a grease
gun and other materials to properly lubricate
the chassis (see illustration). Occasionallyplugs will be installed rather than grease
fittings. If so, grease fittings will have to be
purchased and installed.
2Look under the car and see if grease fittings
or plugs are installed. If there are plugs,
remove them and buy grease fittings, which
will thread into the component. A dealer or
motor factors will be able to supply the
correct fittings. Straight, as well as angled,
fittings are available.
3For easier access under the car, raise it with
a jack and place axle stands under the
chassis. Make sure it’s safely supported by
the stands. If the wheels are to be removed at
this interval for tyre rotation or brake
inspection, loosen the wheel nuts slightly
while the car is still on the ground.
4Before beginning, force a little grease out of
the nozzle to remove any dirt from the end of
the gun. Wipe the nozzle clean with a rag.
5With the grease gun and plenty of clean
rags, crawl under the car and begin
lubricating all the front suspension parts that
are equipped with a grease fitting.
6Lubricate the rear driveshafts (see
illustration). Wipe each fitting clean and push
the nozzle firmly over it. Pump the gun until
grease is expelled from the U-joint cap seal.
7Wipe away any excess grease from the
components and the grease fitting. Repeat
the procedure for the remaining fittings.
Every 7500 miles or 6 months 1•13
1
14.1 Materials required for chassis
and body lubrication
3261 Jaguar XJ6 12.8a Check the steering gear dust boots
for cracks and leaking steering fluid
12.8b Check the anti-roll bar bushings
(arrowed) for deterioration at the front and
the rear of the vehicle12.10 Inspect the balljoint and tie-rod end
boots for tears - tears or damage in either
boot will allow contamination of the grease
which will lead to premature failure
1 Engine oil - Light engine oil in a can like
this can be used for door and bonnet
hinges
2 Graphite spray - Used to lubricate lock
cylinders
3 Grease - Grease, in a variety of types and
weights, is available for use in a grease
gun.
4 Grease gun - A common grease gun,
shown here with a detachable hose and
nozzle, is needed for chassis lubrication.
After use, clean it thoroughly
Page 42 of 227

Refitting
7Use a scraper to remove all traces of old
gasket material and carbon deposits from the
manifold and cylinder head mating surfaces. If
the gasket was leaking, have the manifold
checked for warpage at an automotive
machine workshop and resurfaced if
necessary.
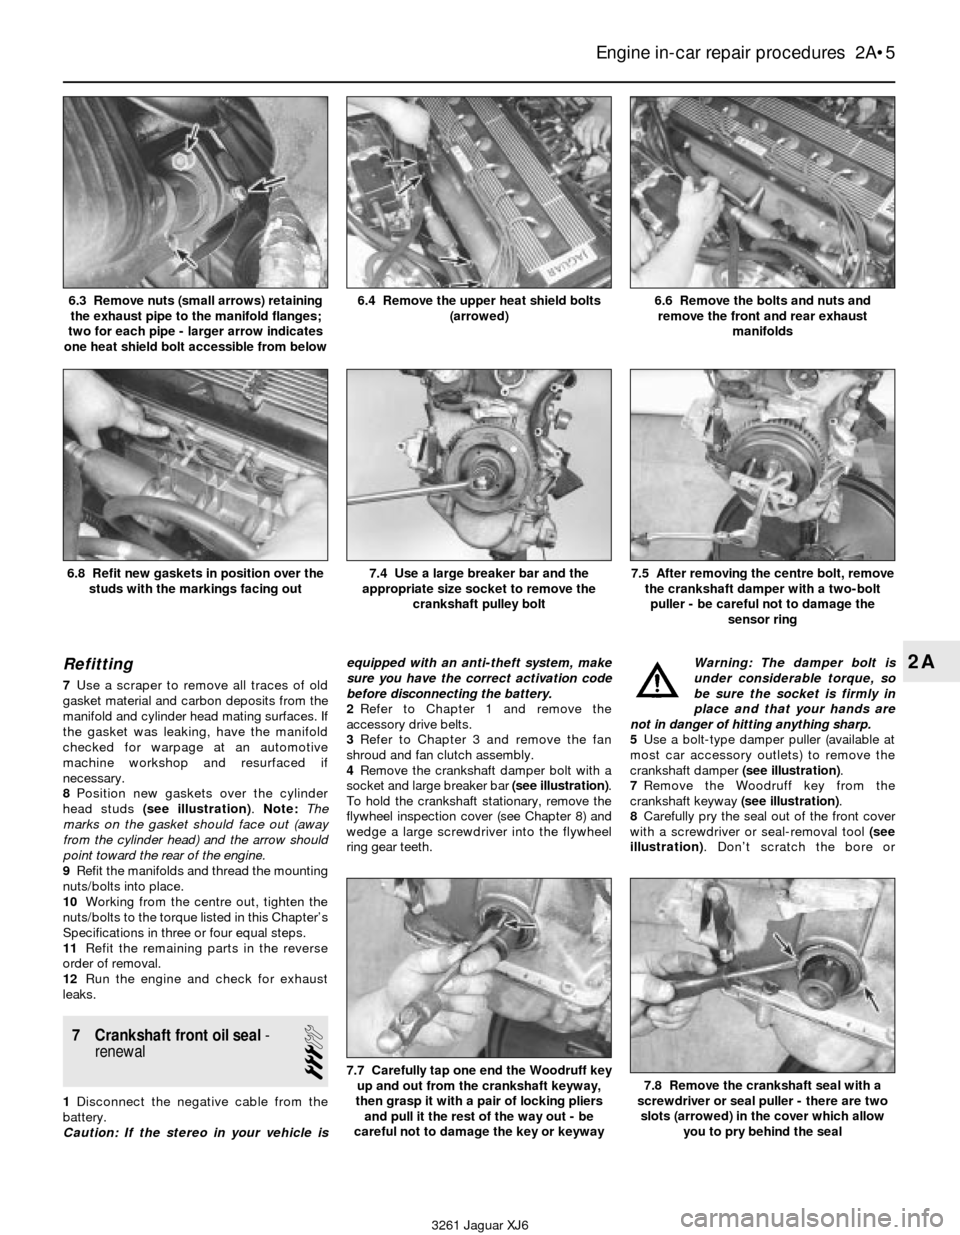
8Position new gaskets over the cylinder
head studs (see illustration). Note:The
marks on the gasket should face out (away
from the cylinder head) and the arrow should
point toward the rear of the engine.
9Refit the manifolds and thread the mounting
nuts/bolts into place.
10Working from the centre out, tighten the
nuts/bolts to the torque listed in this Chapter’s
Specifications in three or four equal steps.
11Refit the remaining parts in the reverse
order of removal.
12Run the engine and check for exhaust
leaks.
7 Crankshaft front oil seal-
renewal
3
1Disconnect the negative cable from the
battery.
Caution: If the stereo in your vehicle isequipped with an anti-theft system, make
sure you have the correct activation code
before disconnecting the battery.
2Refer to Chapter 1 and remove the
accessory drive belts.
3Refer to Chapter 3 and remove the fan
shroud and fan clutch assembly.
4Remove the crankshaft damper bolt with a
socket and large breaker bar (see illustration).
To hold the crankshaft stationary, remove the
flywheel inspection cover (see Chapter 8) and
wedge a large screwdriver into the flywheel
ring gear teeth. Warning: The damper bolt is
under considerable torque, so
be sure the socket is firmly in
place and that your hands are
not in danger of hitting anything sharp.
5Use a bolt-type damper puller (available at
most car accessory outlets) to remove the
crankshaft damper (see illustration).
7Remove the Woodruff key from the
crankshaft keyway (see illustration).
8Carefully pry the seal out of the front cover
with a screwdriver or seal-removal tool(see
illustration). Don’t scratch the bore or
Engine in-car repair procedures 2A•5
2A
6.3 Remove nuts (small arrows) retaining
the exhaust pipe to the manifold flanges;
two for each pipe - larger arrow indicates
one heat shield bolt accessible from below6.4 Remove the upper heat shield bolts
(arrowed)6.6 Remove the bolts and nuts and
remove the front and rear exhaust
manifolds
6.8 Refit new gaskets in position over the
studs with the markings facing out
7.7 Carefully tap one end the Woodruff key
up and out from the crankshaft keyway,
then grasp it with a pair of locking pliers
and pull it the rest of the way out - be
careful not to damage the key or keyway7.8 Remove the crankshaft seal with a
screwdriver or seal puller - there are two
slots (arrowed) in the cover which allow
you to pry behind the seal
7.4 Use a large breaker bar and the
appropriate size socket to remove the
crankshaft pulley bolt7.5 After removing the centre bolt, remove
the crankshaft damper with a two-bolt
puller - be careful not to damage the
sensor ring
3261 Jaguar XJ6