headlamp JEEP COMPASS 2008 1.G Owners Manual
[x] Cancel search | Manufacturer: JEEP, Model Year: 2008, Model line: COMPASS, Model: JEEP COMPASS 2008 1.GPages: 399, PDF Size: 6.59 MB
Page 20 of 399

To Unlock the Doors and Liftgate
Press and release the UNLOCK button on the key fob
once to unlock only the driver's door or twice to unlock
all the doors and liftgate. When the UNLOCK button is
pressed, the illuminated entry will initiate, and the
parking lights will flash on twice. The time for this
feature is programmable on vehicles equipped with the
Electronic Vehicle Information Center (EVIC). Refer to
ªTurn Headlamps on with Remote Key Unlockº under
ªPersonal Settingsº in the Electronic Vehicle Information
Center (EVIC) section of this manual for details.
NOTE:The system can also be programmed to unlock
all doors on the first press of the UNLOCK button. On
electronic vehicle information center (EVIC) equipped
vehicles refer to ªRemote Unlock Driver's Door 1stº
under ªPersonal Settingsº in the EVIC section of this
manual. On non EVIC ± equipped vehicles perform the
following steps:The system can be programmed to unlock all the doors
upon the first UNLOCK button press by using the
following procedure:
1. Press and hold the LOCK button on a programmed
key fob.
2. Continue to hold the LOCK button at least 4 seconds,
but not longer than 10 seconds, then press and hold the
UNLOCK button. A single chime will sound to indicate
that this feature has changed.
3. Release both buttons at the same time.
4. Test the feature while outside of the vehicle, by
pressing the LOCK/UNLOCK button on the keyfob.
20 THINGS TO KNOW BEFORE STARTING YOUR VEHICLE
Page 172 of 399

²Left Front Turn Signal Lamp Out (with a single chime)
²Left Rear Turn Signal Lamp Out (with a single chime)
²Right Front Turn Signal Lamp Out (with a single
chime)
²Right Rear Turn Signal Lamp Out (with a single
chime)
²RKE Battery Low (with a single chime)
²Personal Settings Not Available ± Vehicle Not in Park
(automatic transmissions) or vehicle is in motion
(manual transmissions).
²Left/Right Front Door Ajar (one or more, with a single
chime if speed is above 1 mph)
²Left/Right Rear Door Ajar (one or more, with a single
chime if speed is above 1 mph)
²Door (S) Ajar (with a single chime if vehicle is in
motion)
²Gate Ajar (with a single chime)
²Headlamps On
²Key In Ignition
²Check TPM System
Engine Oil Change Indicator System
Oil Change Required
Your vehicle is equipped with an engine oil change
indicator system. The ªOil Change Requiredº message
will flash in the EVIC display for approximately 10
seconds after a single chime has sounded to indicate the
next scheduled oil change interval. The engine oil change
indicator system is duty cycle based, which means the
engine oil change interval may fluctuate dependent upon
your personal driving style.
172 UNDERSTANDING YOUR INSTRUMENT PANEL
Page 177 of 399

Sound Horn with Remote Key Lock
When ON is selected a short horn sound will occur when
the remote keyless entry ªLockº button is pressed. This
feature may be selected with or without the flash lights
on lock/unlock feature. Press and hold the EVIC button
when in this display until ªONº or ªOFFº appears to
make your selection.
Flash Lights with Remote Key Lock
When ON is selected, the front and rear turn signals will
flash when the doors are locked or unlocked using the
remote keyless entry transmitter. This feature may be
selected with or without the sound horn on lock feature
selected. Press and hold the EVIC button when in this
display until ªONº or ªOFFº appears to make your
selection.
Delay Turning Headlamps Off
When this feature is selected the driver can choose to
have the headlamps remain on for 0, 30, 60, or 90 secondswhen exiting the vehicle. Press and hold the EVIC button
when in this display until 0, 30, 60, or 90 appears to make
your selection.
Headlamps On With Wipers (Available with Auto
Headlights Only)
When ON is selected and the headlight switch is in the
AUTO position, the headlights will turn on approxi-
mately 10 seconds after the wipers are turned on. The
headlights will also turn off when the wipers are turned
off if they were turned on by this feature. Press and hold
the EVIC button when in this display until ªONº or
ªOFFº appears to make your selection.
NOTE:Turning the headlights on during the daytime
causes the instrument panel lights to dim. To increase the
brightness, refer to ªLightsº in this section.
Delay Power Off to Accessories Until Exit
When this feature is selected, the power window
switches, radio, hands±free system, power sunroof, and
UNDERSTANDING YOUR INSTRUMENT PANEL 177
4
Page 178 of 399

power outlets will remain active for up to 60 minutes
after the ignition switch has been turned off. Opening a
vehicle door will cancel this feature. Press and hold the
EVIC button when in this display until ªOffº, ª45 sec.º,
ª5 min.º, or ª10 min.º appears to make your selection.
Turn Headlamps on with Remote Key Unlock
When this feature is selected the headlamps will activate
and remain on for up to 90 seconds when the doors are
unlocked using the remote keyless entry transmitter.
Press and hold the EVIC button when in this display until
ªOFFº, ª30 sec.º, ª60 sec.º, or ª90 sec.º appears to make
your selection.
Confirmation of Voice Commands Ð If Equipped
When ON is selected all voice commands from the
U-Connect system are confirmed. Press and hold the
EVIC button when in this display until ªONº or ªOFFº
appears to make your selection.
Display English or Metric
The EVIC, odometer, and navigation system units can be
changed between English and Metric.
Press and hold the EVIC button when in this display until
ªUSº or ªMETRICº appears to make your selection.
Compass Variance
Compass Variance is the difference between magnetic
North and Geographic North. In some areas of the
country, the difference between magnetic and geographic
North is great enough to cause the compass to give false
readings. In order to ensure compass accuracy, the com-
pass variance should be set to the zone number on the
compass variance map that corresponds to the current
location of the vehicle.
NOTE:Magnetic materials should be kept away from
the Instrument Panel. This is where the compass sensor is
located.
178 UNDERSTANDING YOUR INSTRUMENT PANEL
Page 310 of 399

NFront Suspension Ball Joints..............327
NBody Lubrication.....................327
NWindshield Wiper Blades................328
NWindshield Washer Reservoir.............328
NExhaust System......................328
NCooling System.......................329
NHoses And Vacuum/Vapor Harnesses.......335
NFuel System Connections................335
NBrake System........................335
NAutomatic Transaxle (CVT)..............339
NManual Transaxle.....................339
NRear Drive Assembly (RDA) ± AWD/4WD
Models Only........................340NPower Transfer Unit (PTU) ± AWD/4WD
Models Only........................341
NAppearance Care And Protection From
Corrosion...........................341
mFuses/Integrated Power Module (IPM).......347
mVehicle Storage........................350
mReplacement Bulbs......................350
mBulb Replacement......................351
NHeadlamps..........................351
NFog Lights..........................353
NTail Lights, Rear Turn Signals And Backup
Lights Ð Replacement..................354
NLicense Lights........................356
NCenter High-Mounted Stoplight...........358
310 MAINTAINING YOUR VEHICLE
Page 348 of 399

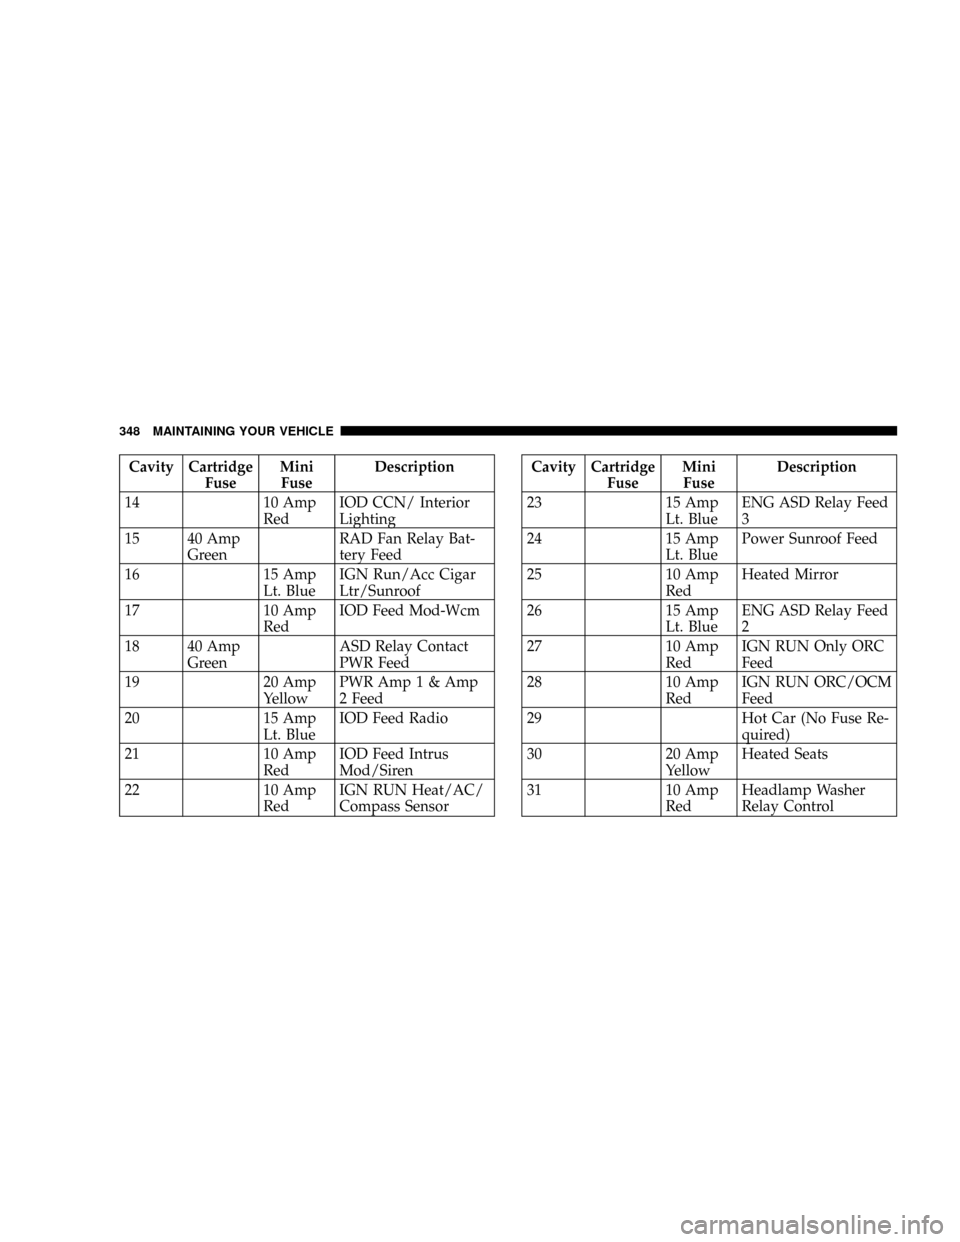
Cavity Cartridge
FuseMini
FuseDescription
14 10 Amp
RedIOD CCN/ Interior
Lighting
15 40 Amp
GreenRAD Fan Relay Bat-
tery Feed
16 15 Amp
Lt. BlueIGN Run/Acc Cigar
Ltr/Sunroof
17 10 Amp
RedIOD Feed Mod-Wcm
18 40 Amp
GreenASD Relay Contact
PWR Feed
19 20 Amp
YellowPWR Amp 1 & Amp
2 Feed
20 15 Amp
Lt. BlueIOD Feed Radio
21 10 Amp
RedIOD Feed Intrus
Mod/Siren
22 10 Amp
RedIGN RUN Heat/AC/
Compass SensorCavity Cartridge
FuseMini
FuseDescription
23 15 Amp
Lt. BlueENG ASD Relay Feed
3
24 15 Amp
Lt. BluePower Sunroof Feed
25 10 Amp
RedHeated Mirror
26 15 Amp
Lt. BlueENG ASD Relay Feed
2
27 10 Amp
RedIGN RUN Only ORC
Feed
28 10 Amp
RedIGN RUN ORC/OCM
Feed
29 Hot Car (No Fuse Re-
quired)
30 20 Amp
YellowHeated Seats
31 10 Amp
RedHeadlamp Washer
Relay Control
348 MAINTAINING YOUR VEHICLE
Page 349 of 399

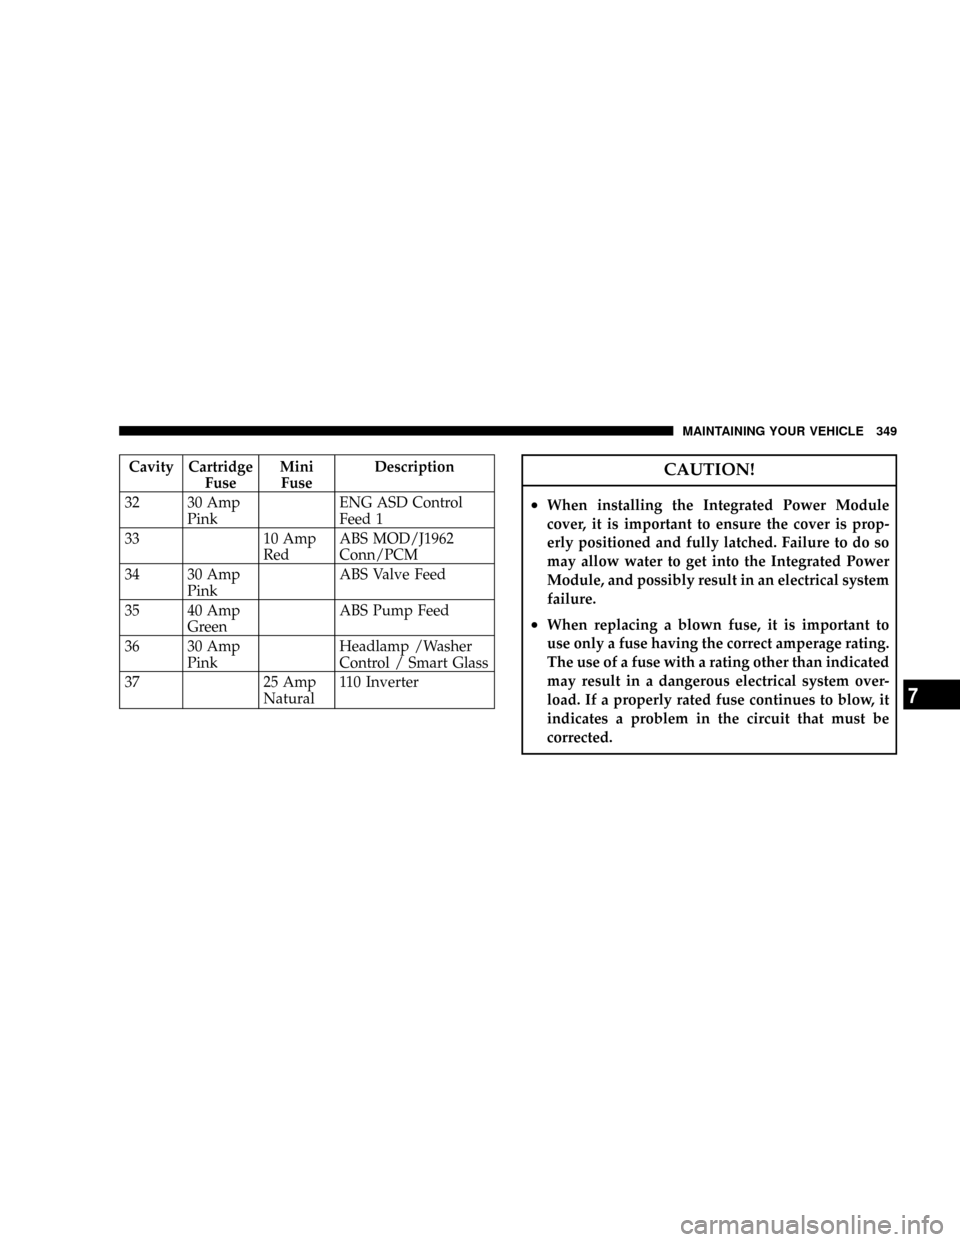
Cavity Cartridge
FuseMini
FuseDescription
32 30 Amp
PinkENG ASD Control
Feed 1
33 10 Amp
RedABS MOD/J1962
Conn/PCM
34 30 Amp
PinkABS Valve Feed
35 40 Amp
GreenABS Pump Feed
36 30 Amp
PinkHeadlamp /Washer
Control / Smart Glass
37 25 Amp
Natural110 InverterCAUTION!
²When installing the Integrated Power Module
cover, it is important to ensure the cover is prop-
erly positioned and fully latched. Failure to do so
may allow water to get into the Integrated Power
Module, and possibly result in an electrical system
failure.
²When replacing a blown fuse, it is important to
use only a fuse having the correct amperage rating.
The use of a fuse with a rating other than indicated
may result in a dangerous electrical system over-
load. If a properly rated fuse continues to blow, it
indicates a problem in the circuit that must be
corrected.
MAINTAINING YOUR VEHICLE 349
7
Page 351 of 399

BULB REPLACEMENT
Headlamps²Raise the hood and locate connector behind the head-
lamp.
Locating Headlamp ConnectorReleasing Red Lock Tab
MAINTAINING YOUR VEHICLE 351
7
Page 399 of 399

INTRODUCTION INTRODUCTION ROLLOVER WARNING HOW TO USE THIS MANUAL WARNINGS AND CAUTIONS VEHICLE IDENTIFICATION NUMBER VEHICLE MODIFICATIONS/ALTERATIONS THINGS TO KNOW BEFORE STARTING YOUR VEHICLE A WORD
ABOUT YOUR KEYS Ignition Key RemovalLocking Doors With The KeyKey-In-Ignition ReminderSTEERING WHEEL LOCK - MANUAL TRANSMISSION ONLY To Manually Lock the Steering WheelTo Release the Steering Wheel LockSENTRY KEY Replacement Keys
Customer Key ProgrammingGeneral InformationSECURITY ALARM SYSTEM - IF EQUIPPED To Set the AlarmTo Disarm the SystemSecurity System Manual OverrideREMOTE KEYLESS ENTRY - IF EQUIPPED To Unlock the Doors and LiftgateTo Lock the Doors and
LiftgateUsing The Panic AlarmTo Turn Off Flash Lights With LockProgramming Additional TransmittersGeneral InformationBattery ReplacementDOORLOCKS Manual Door LocksPower Door LocksChild-Protection Door Lock System (Rear Doors) - If EquippedPOWER
WINDOWS- IF EQUIPPED Power Window Switches Auto DownWindow Lockout SwitchLIFTGATE OCCUPANT RESTRAINTS Lap/Shoulder BeltsAdjustable Upper Shoulder Belt AnchorageSecond Row Center Lap/Shoulder Belt Operating InstructionsSeat Belt Pretensioners
Enhanced Driver Seat Belt Reminder System (BeltAlert) Seat Belt ExtenderSeat Belts And Pregnant WomenDriver and Front Passenger Supplemental Restraint System (SRS) - AirbagEvent Data Recorder (EDR)Child RestraintENGINE BREAK-IN RECOMMENDATIONS
SAFETY TIPS Exhaust GasSafety Checks You Should Make Inside The VehiclePeriodic Safety Checks You Should Make Outside The VehicleUNDERSTANDING THEFEATURES OF YOUR VEHICLE MIRRORS Inside Day/Night Mirror - If EquippedOutside Mirror-Drivers
SideOutside Mirror-Passengers SidePower Remote Control Mirrors - If EquippedVanity Mirrors - If EquippedSun Visor Sliding FeatureHANDS-FREE COMMUNICATION (UConnect) - IF EQUIPPED OperationPhone Call FeaturesUConnect System FeaturesAdvanced Phone
ConnectivityThings You Should Know About Your UConnect SystemGeneral InformationSEATS Front Seat AdjustmentManual Seat Height Adjustment - If EquippedManual Lumbar- If EquippedDrivers Seat Back ReclineAdjustable Head RestraintsHeated Seats - If Equipped
Fold Flat Front Passenger Seat Folding Rear SeatReclining Rear Seat - If Equipped TO OPEN AND CLOSE THE HOOD LIGHTS Map/Reading LightsMulti-FunctionControl LeverHeadlights, Parking Lights, Instrument Panel LightsDaytime Running Lights (DRL) - If Equipped
Lights-On ReminderFog Lights - If Equipped Turn Signals Highbeam/Lowbeam Select Switch Passing LightOff-Road lights - If equippedWINDSHIELD WIPERS AND WASHERS Windshield WashersMist FeatureWindshield Wiper OperationIntermittent Wiper SystemAdding
Washer FluidTILT STEERING COLUMN ELECTRONIC SPEED CONTROL - IF EQUIPPED To ActivateTo Set At A Desired SpeedTo DeactivateTo Resume SpeedTo Vary The Speed SettingManual TransaxleTo Accelerate For PassingANTI-LOCK BRAKE SYSTEM (ABS)
- IF EQUIPPED ELECTRONIC BRAKE CONTROL SYSTEM - ABS/TCS/BAS/ERM/ESP Anti-Lock Brake System - (ABS)Traction Control System (TCS)Brake Assist System (BAS)Electronic Roll Mitigation (ERM)ESP (Electronic Stability Program)GARAGE DOOR OPENER
- IF EQUIPPED Programming HomeLinkGate Operator/Canadian ProgrammingUsing HomeLinkReprogramming a Single HomeLink ButtonSecurityTroubleshooting TipsGeneral InformationPOWER SUNROOF - IF EQUIPPED Opening the SunroofClosing the SunroofPinch
Protect FeaturePinch Protect OverrideVenting Sunroof - ExpressSunshade OperationWind BuffetingSunroof MaintenanceIgnition Off OperationELECTRICAL POWER OUTLETS - IF EQUIPPED Electrical Outlet Use With Engine OffCONSOLE FEATURES CARGO AREA
FEATURES Cargo Light/Removable Self Recharging Flashlight - If EquippedCargo Cover - If EquippedRemovable Load FloorCargo Tie-Down LoopsFold Down Speakers - If EquippedREAR WINDOW FEATURES Rear Window Wiper/WasherRear Window DefrosterROOF
LUGGAGE RACK - IF EQUIPPED UNDERSTANDING YOUR INSTRUMENT PANEL INSTRUMENT PANEL FEATURES INSTRUMENT CLUSTER-PREMIUM INSTRUMENT CLUSTER DESCRIPTIONS ELECTRONIC VEHICLE INFORMATION CENTER (EVIC) - IF
EQUIPPED Engine Oil Change Indicator SystemEVIC Functions Compass/Temperature/AudioAverage Fuel EconomyDistance To Empty (DTE)Elapsed TimeTire Pressure Monitor (TPM)Personal Settings (Customer Programmable Features)RADIO GENERAL
INFORMATION Radio Broadcast SignalsTwo Types of SignalsElectrical DisturbancesAM ReceptionFM ReceptionELECTRONIC DIGITAL CLOCK Clock SettingProcedureSALES CODE REF - AM/FM/CD (SINGLE DISC) RADIO WITH OPTIONAL SATELLITE RADIO AND
HANDS FREE PHONE CAPABILITY Operating Instructions - Radio ModeOperation Instructions - CD ModeOperation Instructions - Auxiliary ModeOperatingInstructions - Hands Free Phone - If EquippedOperating Instructions - Satellite Radio - If EquippedSALES CODE
RAQ - AM/FM/CD (6-DISC) RADIO WITH OPTIONAL SATELLITE RADIO, HANDS FREE PHONE, AND VEHICLE ENTERTAINMENT SYSTEMS (VES) CAPABILITIES Operating Instructions - Radio ModeOperation Instructions - (CD MODE for CD Audio Play)LOAD/EJECT
Button (CD Mode for CD Audio Play)Notes On Playing MP3 FilesOperation Instructions - (CD Mode for MP3 Audio Play)LOAD/EJECT Button (CD Mode for MP3 Play)SALES CODE REC - AM/FM/CD (6-DISC) RADIO WITH NAVIGATION SYSTEM Operating Instructions
- Satellite Radio (If Equipped)REC Setting the ClockAudio Clock DisplaySATELLITE RADIO - IF EQUIPPED System ActivationElectronic Serial Number/Sirius Identification Number (ESN/SID)Selecting Satellite Mode in REF, and RAQ, RadiosSelecting a ChannelStoring
and Selecting Pre-Set ChannelsUsing the PTY (Program Type) Button (if equipped)PTY Button SCANPTY Button SEEKSatellite AntennaReception QualityREMOTE SOUND SYSTEM CONTROLS - IF EQUIPPED Radio OperationCD PlayerCD/DVD DISC MAINTENANCE
RADIO OPERATION AND CELLULAR PHONES CLIMATE CONTROLS Climate ControlsAir ConditioningAir Filtration System - If EquippedOperating Tips STARTINGAND OPERATING STARTING PROCEDURES Manual TransaxleAutomatic TransaxleNormal Starting
Extremely Cold Weather (below -20 degrees F or -29 degrees C)If Engine Fails to StartAfter StartingMANUAL TRANSAXLE - IF EQUIPPED Recommended Shift SpeedsDownshiftingAUTOMATIC TRANSAXLE - IF EQUIPPED Brake/Transmission Interlock SystemAutomatic
Transaxle Ignition Interlock SystemGear Ranges For Continuously Variable Automatic Transaxle (CVT)AUTOSTICK - IF EQUIPPED Autostick Operation Autostick General InformationFOUR WHEEL DRIVE OPERATION - IF EQUIPPED DRIVING ON SLIPPERY SURFACES
AccelerationTractionDRIVING THROUGH WATER Flowing/Rising WaterShallow Standing WaterPARKING BRAKE BRAKE SYSTEM Anti-Lock Brake System (ABS) -If EquippedPOWER STEERING TIRE SAFETY INFORMATION Tire Markings Tire Identification Number
(TIN)Tire Loading and Tire PressureTIRES - GENERAL INFORMATION Tire PressureTire Inflation PressuresRadial-Ply TiresCompact Spare Tire - If EquippedLimited Use Spare - If EquippedTire SpinningTread Wear IndicatorsLife of TireReplacement TiresAlignment And
BalanceTIRE CHAINS TIRE ROTATION RECOMMENDATIONS TIRE PRESSURE MONITORING SYSTEM (TPMS) - IF EQUIPPED Base System - If EquippedPremium System - If EquippedGeneral InformationSNOW TIRES FUEL REQUIREMENTS GASOLINE ENGINES
Reformulated GasolineGasoline/Oxygenate BlendsMMT In GasolineMaterials Added to FuelFuel System CautionsCarbon Monoxide WarningsADDING FUELFuel Filler Cap (Gas Cap)Loose Fuel Filler Cap MessageVEHICLE LOADING Gross Vehicle Weight Rating (GVWR)
TRAILER TOWING Common Towing DefinitionsTrailer Hitch ClassificationTrailer Towing Weights (Maximum Trailer Weight Ratings)Trailer and TongueWeightTowing RequirementsTowing TipsRECREATIONAL TOWING (BEHIND MOTORHOME, ETC.) Towing This Vehicle
Behind Another Vehicle (Flat towing with all four wheels on the ground)WHAT TO DO IN EMERGENCIES HAZARD WARNING FLASHER IF YOUR ENGINE OVERHEATS AUTOMATIC TRANSAXLE OVERHEATING JACKING AND TIRE CHANGING Jack LocationSpare
Tire StowagePreparations For JackingJacking InstructionsJUMP-STARTING PROCEDURES DUE TO A LOW BATTERY FREEING A STUCK VEHICLE TOWING A DISABLED VEHICLE With Ignition KeyWithout The Ignition KeyMAINTAINING YOUR VEHICLE ENGINE
COMPARTMENT - GASOLINE ONBOARD DIAGNOSTIC SYSTEM - OBD II Loose Fuel Filler Cap MessageEMISSIONS INSPECTION AND MAINTENANCE PROGRAMS REPLACEMENT PARTS DEALER SERVICE MAINTENANCE PROCEDURES Engine OilDrive Belt
- Check ConditionSpark PlugsCatalytic ConverterCrankcase Emission Control SystemFuel FilterAir Cleaner Element (Filter)Maintenance-Free BatteryAir Conditioner MaintenancePower Steering - Fluid CheckFront Suspension Ball JointsBody LubricationWindshield Wiper
BladesWindshield Washer ReservoirExhaust SystemCooling SystemHoses And Vacuum/Vapor HarnessesFuel System ConnectionsBrake SystemAutomaticTransaxle (CVT)Manual TransaxleRear Drive Assembly (RDA) - AWD/4WD Models OnlyPower Transfer Unit (PTU)
- AWD/4WD Models OnlyAppearance Care And Protection From CorrosionFUSES/INTEGRATED POWER MODULE (IPM) VEHICLE STORAGE REPLACEMENT BULBS BULB REPLACEMENT Headlamps Fog Lights Tail Lights, Rear Turn Signals And Backup Lights -
ReplacementLicense LightsCenter High-Mounted StoplightOff-Road LightFLUIDS AND CAPACITIES FLUIDS, LUBRICANTS, AND GENUINE PARTS EngineChassisMAINTENANCE SCHEDULES EMISSION CONTROL SYSTEM MAINTENANCE MAINTENANCE
SCHEDULE Required Maintenance IntervalsIF YOU NEED CONSUMER ASSISTANCE SUGGESTIONS FOR OBTAINING SERVICE FOR YOUR VEHICLE Prepare For The AppointmentPrepare A ListBe Reasonable With RequestsIF YOU NEED ASSISTANCE WARRANTY
INFORMATION (U.S. Vehicles Only) MOPAR PARTS REPORTING SAFETY DEFECTS In CanadaPUBLICATION ORDER FORMS DEPARTMENT OF TRANSPORTATION UNIFORM TIREQUALITY GRADES TreadwearTraction GradesTemperature GradesINDEX