flat tire JEEP GRAND CHEROKEE 2021 Owner handbook (in English)
[x] Cancel search | Manufacturer: JEEP, Model Year: 2021, Model line: GRAND CHEROKEE, Model: JEEP GRAND CHEROKEE 2021Pages: 378, PDF Size: 6.88 MB
Page 200 of 378
RECREATIONAL TOWING
(BEHIND MOTORHOME,
ETC.)
Towing This Vehicle Behind Another
Vehicle
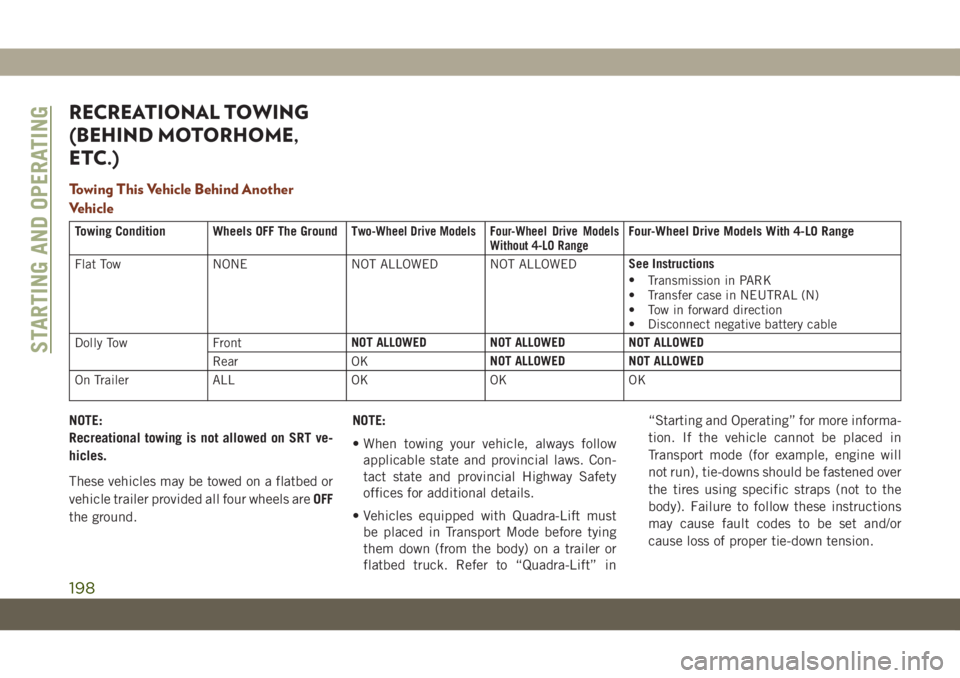
Towing Condition Wheels OFF The Ground Two-Wheel Drive ModelsFour-Wheel Drive Models
Without 4-LO RangeFour-Wheel Drive Models With 4-LO Range
Flat Tow NONE NOT ALLOWED NOT ALLOWEDSee Instructions
•
Transmission in PARK
• Transfer case in NEUTRAL (N)
• Tow in forward direction
• Disconnect negative battery cable
Dolly Tow FrontNOT ALLOWED NOT ALLOWED NOT ALLOWED
Rear OKNOT ALLOWED NOT ALLOWED
On Trailer ALL OK OK OK
NOTE:
Recreational towing is not allowed on SRT ve-
hicles.
These vehicles may be towed on a flatbed or
vehicle trailer provided all four wheels areOFF
the ground.NOTE:
• When towing your vehicle, always follow
applicable state and provincial laws. Con-
tact state and provincial Highway Safety
offices for additional details.
• Vehicles equipped with Quadra-Lift must
be placed in Transport Mode before tying
them down (from the body) on a trailer or
flatbed truck. Refer to “Quadra-Lift” in“Starting and Operating” for more informa-
tion. If the vehicle cannot be placed in
Transport mode (for example, engine will
not run), tie-downs should be fastened over
the tires using specific straps (not to the
body). Failure to follow these instructions
may cause fault codes to be set and/or
cause loss of proper tie-down tension.
STARTING AND OPERATING
198
Page 219 of 378
JACKING AND TIRE
CHANGING
WARNING!
• Do not attempt to change a tire on the
side of the vehicle close to moving traf-
fic. Pull far enough off the road to avoid
the danger of being hit when operating
the jack or changing the wheel.
• Being under a jacked-up vehicle is dan-
gerous. The vehicle could slip off the
jack and fall on you. You could be
crushed. Never put any part of your body
under a vehicle that is on a jack. If you
need to get under a raised vehicle, take
it to a service center where it can be
raised on a lift.
• Never start or run the engine while the
vehicle is on a jack.
• The jack is designed to be used as a tool
for changing tires only. The jack should
not be used to lift the vehicle for service
purposes. The vehicle should be jacked
on a firm level surface only. Avoid ice or
slippery areas.
Run Flat Tires — SRT Models
SRT models are equipped with “run flat”
tires. Run flat tires allow the vehicle to be
driven approximately 50 miles (80 km) at
55 mph (88 km/h). Tire service should be
obtained to avoid prolonged run flat feature
usage.
WARNING!
Do not exceed 50 mph (80 km/h) if the
“Tire Pressure Monitoring Telltale Light” is
illuminated. Vehicle handling and braking
may be reduced. You could have a collision
and be severely or fatally injured.
Jack Location
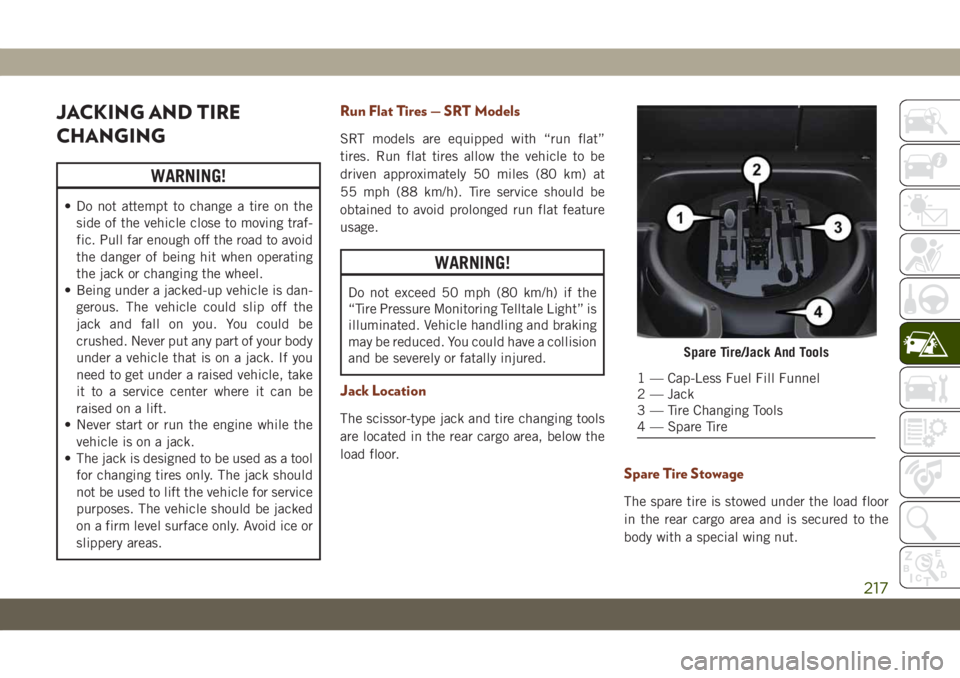
The scissor-type jack and tire changing tools
are located in the rear cargo area, below the
load floor.
Spare Tire Stowage
The spare tire is stowed under the load floor
in the rear cargo area and is secured to the
body with a special wing nut.
Spare Tire/Jack And Tools
1 — Cap-Less Fuel Fill Funnel
2 — Jack
3 — Tire Changing Tools
4 — Spare Tire
217
Page 221 of 378
WARNING!
raised vehicle, take it to a service center
where it can be raised on a lift.
• Only use the jack in the positions indi-
cated and for lifting this vehicle during a
tire change.
• If working on or near a roadway, be
extremely careful of motor traffic.
• To assure that spare tires, flat or in-
flated, are securely stowed, spares must
be stowed with the valve stem facing the
ground.
• The jack should be used on level firm
ground wherever possible.
• It is recommended that the wheels of
the vehicle be chocked, and that no
person should be remain in a vehicle
that is being jacked.
• No person should place any portion of
their body under a vehicle that is sup-
ported by a jack.
CAUTION!
Do not attempt to raise the vehicle by
jacking on locations other than those indi-
cated in the Jacking Instructions for this
vehicle.
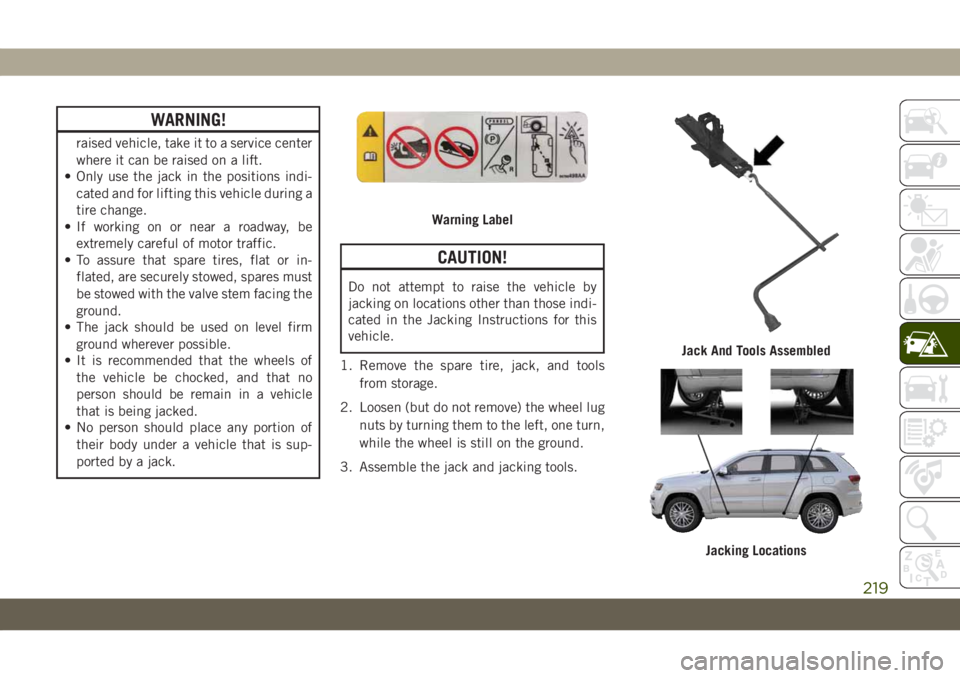
1. Remove the spare tire, jack, and tools
from storage.
2. Loosen (but do not remove) the wheel lug
nuts by turning them to the left, one turn,
while the wheel is still on the ground.
3. Assemble the jack and jacking tools.
Warning Label
Jack And Tools Assembled
Jacking Locations
219
Page 223 of 378
WARNING!
Raising the vehicle higher than necessary
can make the vehicle less stable. It could
slip off the jack and hurt someone near it.
Raise the vehicle only enough to remove
the tire.
7. Remove the lug nuts and wheel.
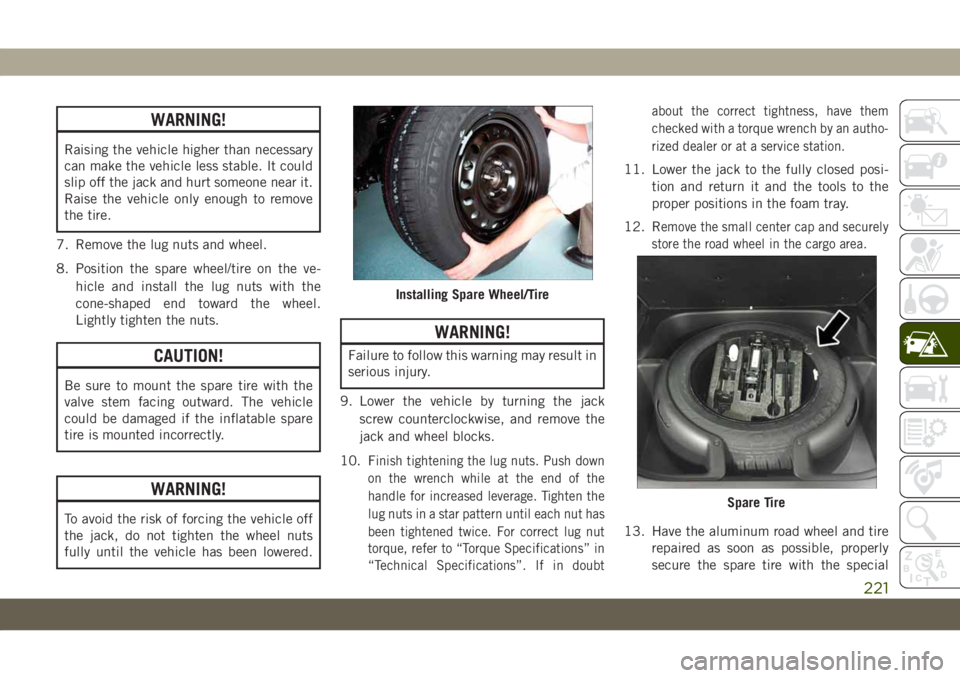
8. Position the spare wheel/tire on the ve-
hicle and install the lug nuts with the
cone-shaped end toward the wheel.
Lightly tighten the nuts.
CAUTION!
Be sure to mount the spare tire with the
valve stem facing outward. The vehicle
could be damaged if the inflatable spare
tire is mounted incorrectly.
WARNING!
To avoid the risk of forcing the vehicle off
the jack, do not tighten the wheel nuts
fully until the vehicle has been lowered.
WARNING!
Failure to follow this warning may result in
serious injury.
9. Lower the vehicle by turning the jack
screw counterclockwise, and remove the
jack and wheel blocks.
10. F
inish tightening the lug nuts. Push down
on the wrench while at the end of the
handle for increased leverage. Tighten the
lug nuts in a star pattern until each nut has
been tightened twice. For correct lug nut
torque, refer to “Torque Specifications” in
“Technical Specifications”. If in doubtabout the correct tightness, have them
checked with a torque wrench by an autho-
rized dealer or at a service station.
11. Lower the jack to the fully closed posi-
tion and return it and the tools to the
proper positions in the foam tray.
12. R
emove the small center cap and securely
store the road wheel in the cargo area.
13. Have the aluminum road wheel and tire
repaired as soon as possible, properly
secure the spare tire with the special
Installing Spare Wheel/Tire
Spare Tire
221
Page 224 of 378
wing nut torqued to 3.7 ft-lbs (5 N·m),
reinstall the jack and tool kit foam tray,
and latch the rear load floor cover.
NOTE:
Do not drive with the spare tire installed for
more than 50 miles (80 km) at a max speed
of 50 mph (80 km/h).
WARNING!
A loose tire or jack thrown forward in a
collision or hard stop could endanger the
occupants of the vehicle. Always stow the
jack parts and the spare tire in the places
provided. Have the deflated (flat) tire re-
paired or replaced immediately.
Road Tire Installation
1. Mount the road tire on the axle.
2. Install the remaining lug nuts with the
cone shaped end of the nut toward the
wheel. Lightly tighten the lug nuts.
WARNING!
To avoid the risk of forcing the vehicle off
the jack, do not tighten the wheel nuts
fully until the vehicle has been lowered.
Failure to follow this warning may result in
serious injury.
3. Lower the vehicle to the ground by turning
the jack handle counterclockwise.
4. Refer to “Torque Specifications” in
“Technical Specifications” for proper lug
nut torque.
5. After 25 miles (40 km), check the lug nut
torque with a torque wrench to ensure that
all lug nuts are properly seated against the
wheel.
Declaration Of Conformance
1. The undersigned, Tony Fabiano, repre-
senting the manufacturer, herewith de-
clares that the machinery described be-
low fulfills all relevant provisions of:
• The EC-directive 2006/42/EC on
Machinery
2. Description of machinery.
a) Generic Denomination: Vehicle Jack
b) Function: Lifting Vehicle
d)Vehicle
Modelc)Model
Codef)Working
Loade)Jack
Type
Jeep®
CompassMK 1200 kg
MaxFGMF1
Jeep
CherokeeKL 1000 kg
MaxFGLF1
Jeep
WranglerJK 1000 kg
MaxFGLF2
Jeep
Grand
CherokeeWK 1700 kg
MaxFGLF3
IN CASE OF EMERGENCY
222
Page 233 of 378
WARNING!
of the axle and tires. A tire could explode
and injure someone. Do not spin your
vehicle's wheels faster than 30 mph
(48 km/h) or for longer than 30 seconds
continuously without stopping when you
are stuck and do not let anyone near a
spinning wheel, no matter what the speed.
CAUTION!
• Racing the engine or spinning the
wheels may lead to transmission over-
heating and failure. Allow the engine to
idle with the transmission in NEUTRAL
for at least one minute after every five
rocking-motion cycles. This will mini-
mize overheating and reduce the risk of
transmission failure during prolonged
efforts to free a stuck vehicle.
CAUTION!
• When “rocking” a stuck vehicle by shift-
ing between DRIVE and REVERSE, do
not spin the wheels faster than 15 mph
(24 km/h), or drivetrain damage may
result.
• Revving the engine or spinning the
wheels too fast may lead to transmission
overheating and failure. It can also dam-
age the tires. Do not spin the wheels
above 30 mph (48 km/h) while in gear
(no transmission shifting occurring).
TOWING A DISABLED
VEHICLE
This section describes procedures for towing
a disabled vehicle using a commercial towing
service. If the transmission and drivetrain are
operable, disabled vehicles may also be
towed as described under “Recreational Tow-
ing” in the “Starting And Operating” section
of the Owner’s Manual.
NOTE:
Vehicles equipped with Quadra-Lift must be
placed in Transport mode, before tying them
down (from the body) on a trailer or flatbed
truck. Refer to the section on Quadra-Lift for
more information. If the vehicle cannot be
placed in Transport mode (for example, en-
gine will not run), tie-downs should be fas-
tened over the tires using specific tire tie-
down nets. Failure to follow these
instructions may cause fault codes to be set
and/or cause loss of proper tie-down tension.
231
Page 237 of 378
WARNING!
movements. Do not start the engine
while towing the car. Before tightening
the ring, clean the threaded housing
thoroughly. Make sure that the ring is
fully screwed into the housing before
towing the car.
Front Tow Eye Installation
The front tow eye receptacle is located be-
hind a door on the front bumper fascia.
To install the tow eye, open the door using the
vehicle key or a small screwdriver, and thread
the tow eye into the receptacle.
Insert the flat end of the jack handle through
the tow eye and tighten, refer to “Jacking And
Tire Changing” in this section for further
information. The tow eye must be fully seated
to the attaching bracket through the lower
front fascia. If the tow eye is not fully seated
to the attaching bracket, the vehicle should
not be moved.
Emergency Tow Hooks — If Equipped
If your vehicle is equipped with tow hooks,
there will be one in the rear and two mounted
on the front of the vehicle. The rear hook will
be located on the driver's side of the vehicle.
NOTE:
For off-road recovery, it is recommended to
use both of the front tow hooks to minimize
the risk of damage to the vehicle.
WARNING!
• Do not use a chain for freeing a stuck
vehicle. Chains may break, causing seri-
ous injury or death.
• Stand clear of vehicles when pulling
with tow hooks. Tow straps may become
disengaged, causing serious injury.
CAUTION!
Tow hooks are for emergency use only, to
rescue a vehicle stranded off road. Do not
use tow hooks for tow truck hookup or
highway towing. You could damage your
vehicle.
ENHANCED ACCIDENT
RESPONSE SYSTEM (EARS)
This vehicle is equipped with an Enhanced
Accident Response System.
Please refer to “Occupant Restraint Sys-
tems” in “Safety” for further information on
the Enhanced Accident Response System
(EARS) function.
EVENT DATA RECORDER
(EDR)
This vehicle is equipped with an Event Data
Recorder (EDR). The main purpose of an EDR
is to record data that will assist in under-
standing how a vehicle’s systems performed
under certain crash or near crash-like situa-
tions, such as an air bag deployment or hit-
ting a road obstacle.
Please refer to “Occupant Restraint Sys-
tems” in “Safety” for further information on
the Event Data Recorder (EDR).
235
Page 264 of 378
Cooling System
WARNING!
• You or others can be badly burned by hot
engine coolant (antifreeze) or steam
from your radiator. If you see or hear
steam coming from under the hood, do
not open the hood until the radiator has
had time to cool. Never open a cooling
system pressure cap when the radiator
or coolant bottle is hot.
• Keep hands, tools, clothing, and jewelry
away from the radiator cooling fan when
the hood is raised. The fan starts auto-
matically and may start at any time,
whether the engine is running or not.
• When working near the radiator cooling
fan, turn the ignition to the OFF mode.
The fan is temperature controlled and
can start at any time the ignition is in the
ON mode.
Engine Coolant Checks
Check the engine coolant (antifreeze) protec-
tion every 12 months (before the onset of
freezing weather, where applicable). If the
engine coolant (antifreeze) is dirty, the sys-
tem should be drained, flushed, and refilled
with fresh OAT coolant (conforming to
MS.90032) by an authorized dealer. Check
the front of the A/C condenser for any accu-
mulation of bugs, leaves, etc. If dirty, clean
by gently spraying water from a garden hose
vertically down the face of the condenser.
Check the engine cooling system hoses for
brittle rubber, cracking, tears, cuts, and
tightness of the connection at the coolant
recovery bottle and radiator. Inspect the en-
tire system for leaks. DO NOT REMOVE THE
COOLANT PRESSURE CAP WHEN THE
COOLING SYSTEM IS HOT.
RAISING THE VEHICLE
In the case where it is necessary to raise the
vehicle, go to an authorized dealer or service
station.
TIRES
Tires — General Information
Tire Pressure
Proper tire inflation pressure is essential to
the safe and satisfactory operation of your
vehicle. Four primary areas are affected by
improper tire pressure:
• Safety and Vehicle Stability
• Economy
• Tread Wear
• Ride Comfort
Safety
WARNING!
• Improperly inflated tires are dangerous
and can cause collisions.
• Underinflation increases tire flexing and
can result in overheating and tire failure.
• Overinflation reduces a tire's ability to
cushion shock. Objects on the road and
chuckholes can cause damage that re-
sult in tire failure.
SERVICING AND MAINTENANCE
262
Page 265 of 378
WARNING!
• Overinflated or underinflated tires can
affect vehicle handling and can fail sud-
denly, resulting in loss of vehicle
control.
• Unequal tire pressures can cause steer-
ing problems. You could lose control of
your vehicle.
• Unequal tire pressures from one side of
the vehicle to the other can cause the
vehicle to drift to the right or left.
• Always drive with each tire inflated to
the recommended cold tire inflation
pressure.
Both under-inflation and over-inflation affect
the stability of the vehicle and can produce a
feeling of sluggish response or over respon-
siveness in the steering.
NOTE:
• Unequal tire pressures from side to side
may cause erratic and unpredictable steer-
ing response.
• Unequal tire pressure from side to side may
cause the vehicle to drift left or right.Fuel Economy
Underinflated tires will increase tire rolling
resistance resulting in higher fuel consump-
tion.
Tread Wear
Improper cold tire inflation pressures can
cause abnormal wear patterns and reduced
tread life, resulting in the need for earlier tire
replacement.
Ride Comfort And Vehicle Stability
Proper tire inflation contributes to a comfort-
able ride. Over-inflation produces a jarring
and uncomfortable ride.
Tire Inflation Pressures
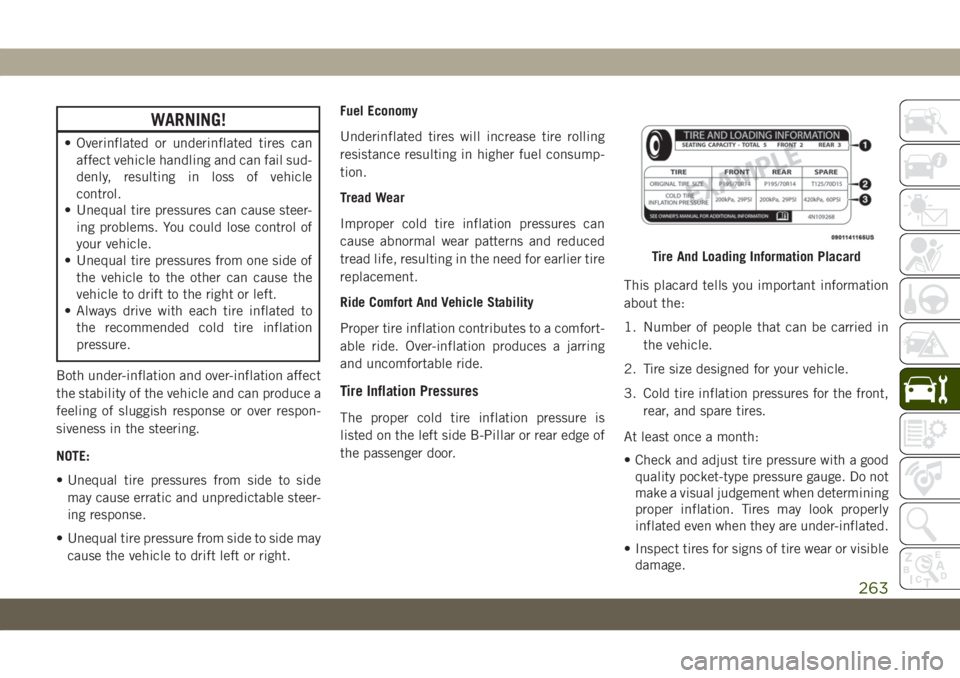
The proper cold tire inflation pressure is
listed on the left side B-Pillar or rear edge of
the passenger door.This placard tells you important information
about the:
1. Number of people that can be carried in
the vehicle.
2. Tire size designed for your vehicle.
3. Cold tire inflation pressures for the front,
rear, and spare tires.
At least once a month:
• Check and adjust tire pressure with a good
quality pocket-type pressure gauge. Do not
make a visual judgement when determining
proper inflation. Tires may look properly
inflated even when they are under-inflated.
• Inspect tires for signs of tire wear or visible
damage.
Tire And Loading Information Placard
263
Page 266 of 378
CAUTION!
After inspecting or adjusting the tire pres-
sure, always reinstall the valve stem cap.
This will prevent moisture and dirt from
entering the valve stem, which could dam-
age the valve stem.
Inflation pressures specified on the placard
are always “cold tire inflation pressure”. Cold
tire inflation pressure is defined as the tire
pressure after the vehicle has not been driven
for at least three hours, or driven less than
1 mile (1.6 km) after sitting for a minimum of
three hours. The cold tire inflation pressure
must not exceed the maximum inflation pres-
sure molded into the tire sidewall.
Check tire pressures more often if subject to
a wide range of outdoor temperatures, as tire
pressures vary with temperature changes.
Tire pressures change by approximately 1 psi
(7 kPa) per 12°F (7°C) of air temperature
change. Keep this in mind when checking
tire pressure inside a garage, especially in the
Winter.Example: If garage temperature = 68°F
(20°C) and the outside temperature = 32°F
(0°C) then the cold tire inflation pressure
should be increased by 3 psi (21 kPa), which
equals 1 psi (7 kPa) for every 12°F (7°C) for
this outside temperature condition.
Tire pressure may increase from 2 to 6 psi
(13 to 40 kPa) during operation. DO NOT
reduce this normal pressure build up or your
tire pressure will be too low.
Tire Pressures For High Speed Operation
The manufacturer advocates driving at safe
speeds and within posted speed limits.
Where speed limits or conditions are such
that the vehicle can be driven at high speeds,
maintaining correct tire inflation pressure is
very important. Increased tire pressure and
reduced vehicle loading may be required for
high-speed vehicle operation. Refer to an
authorized tire dealer or original equipment
vehicle dealer for recommended safe operat-
ing speeds, loading and cold tire inflation
pressures.
WARNING!
High speed driving with your vehicle under
maximum load is dangerous. The added
strain on your tires could cause them to
fail. You could have a serious collision. Do
not drive a vehicle loaded to the maximum
capacity at continuous speeds above
75 mph (120 km/h).
Loading
The vehicle maximum load on the tire must
not exceed the load carrying capacity of the
tire on your vehicle. You will not exceed the
tire's load carrying capacity if you adhere to
the loading conditions, tire size, and cold tire
inflation pressures specified on the Tire In-
formation placard.
NOTE:
Under a maximum loaded vehicle condition,
gross axle weight ratings (GAWRs) for the
front and rear axles must not be exceeded.
SERVICING AND MAINTENANCE
264