rear view mirror JEEP GRAND CHEROKEE 2023 User Guide
[x] Cancel search | Manufacturer: JEEP, Model Year: 2023, Model line: GRAND CHEROKEE, Model: JEEP GRAND CHEROKEE 2023Pages: 424, PDF Size: 15.48 MB
Page 183 of 424
STARTING AND OPERATING181
SURROUND VIEW CAMERA SYSTEM —
IF EQUIPPED
Your vehicle may be equipped with the Surround
View Camera system that allows you to see an
on-screen image of the surroundings and Top View
of your vehicle whenever the gear selector is put
into REVERSE or a different view is selected
through the touchscreen buttons. The Top View of
the vehicle will show which doors are open. The
image will be displayed on the Uconnect display
along with a caution note “Check Entire
Surroundings” across the top of the screen. After
five seconds, this note will disappear. The
Surround View Camera system is comprised of four
sequential cameras located in the front grille, rear
liftgate and side mirrors.
NOTE:The Surround View Camera system has program -
mable settings that may be selected through the
Uconnect system Ú page 204.
Press this button on the touchscreen to
enter the Surround View Camera menu in
the Uconnect system.
When the vehicle is shifted into REVERSE, the Rear
View or Top View is the default view of the system. When the vehicle is shifted out of REVERSE with
camera delay turned on, the camera image will
continue to be displayed for up to 10 seconds
unless the vehicle speed exceeds 8 mph
(13 km/h), the vehicle is shifted into PARK or the
ignition is placed in the OFF position. There is a
touchscreen X button to disable the display of the
camera image.
When the vehicle is shifted out of REVERSE with
camera delay turned off, the Surround View
Camera mode is exited and the last known screen
appears again.
When enabled, active guidelines are overlaid on
the image to illustrate the width of the vehicle,
including the side view mirrors and its projected
backup path based on the steering wheel position.
Different colored zones indicate the distance to
the rear of the vehicle.
The following table shows the approximate
distances for each zone:
Modes Of Operation
Manual activation of the Surround View Camera is
selected by pressing the Surround View Camera
button located in the Controls menu within the
Uconnect system.
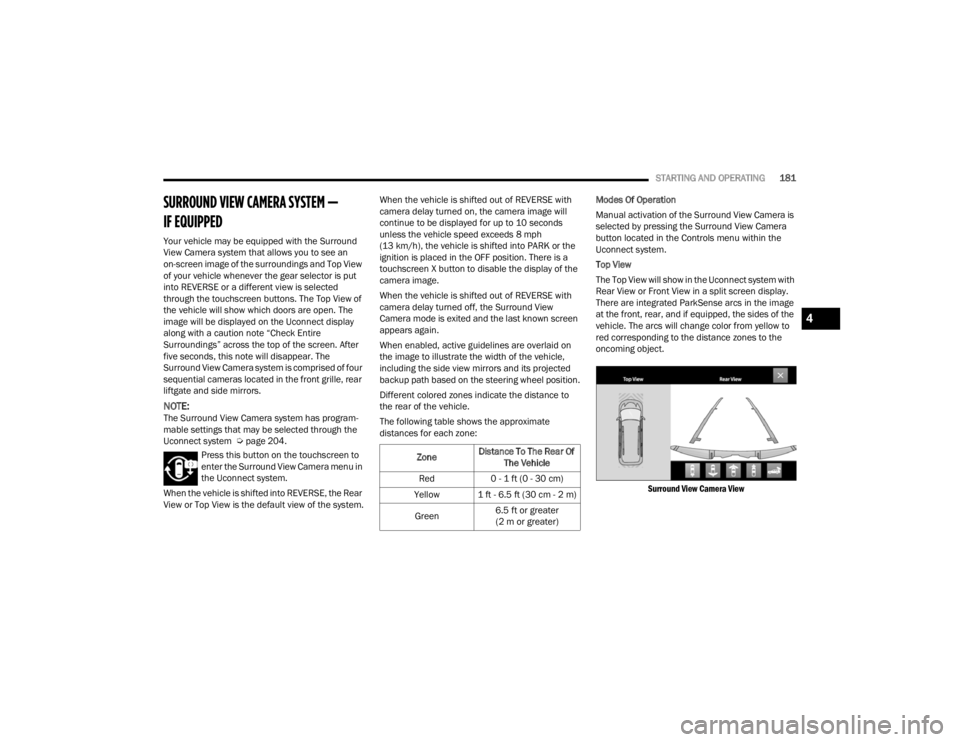
Top View
The Top View will show in the Uconnect system with
Rear View or Front View in a split screen display.
There are integrated ParkSense arcs in the image
at the front, rear, and if equipped, the sides of the
vehicle. The arcs will change color from yellow to
red corresponding to the distance zones to the
oncoming object.
Surround View Camera View
Zone Distance To The Rear Of
The Vehicle
Red 0 - 1 ft (0 - 30 cm)
Yellow 1 ft - 6.5 ft (30 cm - 2 m)
Green 6.5 ft or greater
(2 m or greater)
4
23_WL_OM_EN_USC_t.book Page 181
Page 184 of 424
182STARTING AND OPERATING
NOTE:
Front tires will be in image when the tires are
turned.
Due to wide angle cameras in the mirrors, the
image may appear distorted.
Top View will show which doors are open.
Open front doors and/or liftgate will cancel
outside image in Top View, but the standard
view remains unchanged.
Rear View Plus Top View This is the default view of the system in
REVERSE and is always paired with the
Top View of the vehicle with optional
active guidelines for the projected path
when enabled.
Rear Cross Path View
Pressing the Rear Cross Path button will
give the driver a wider angle view of the
rear camera system. The Top View will be
disabled when this is selected.
Front View Plus Top View The Front View will show you what is
immediately in front of the vehicle and is
always paired with the Top View of the
vehicle. Front Cross Path View
Pressing the Front Cross Path button will
give the driver a wider angle view of the
front camera system. The Top View will
be disabled when this is selected.
Back Up Camera View Pressing the Back Up Camera button will
provide a full screen rear view with Zoom
View.
NOTE:If the Rear View Camera view was selected through
the Surround View Camera menu, exiting out of the
Rear View screen will return to the Surround View
Camera menu. If the Back Up Camera was
manually activated through the Controls menu of
the Uconnect system, exiting out of the display
screen will return to the Controls menu.
Deactivation
The system can be deactivated under the following
conditions:
The speed of the vehicle is greater than 8 mph
(13 km/h).
The vehicle is shifted into PARK.
The vehicle is in any gear other than REVERSE
and the touchscreen X button is pressed.
The camera delay system is turned off manually
through Uconnect Settings Ú page 204.Front And Rear Camera Washers
When the front windshield washer is activated by
pulling the windshield wiper/washer lever
rearward, the front camera is also washed.
When the rear window washer is activated by
pushing the windshield wiper/washer lever
forward, the Rear Back Up camera and Digital
Rearview Mirror (if equipped) cameras are also
washed. For more information, see Ú
page 66.
NOTE:
If snow, ice, mud, or any foreign substance
builds up on the camera lenses, clean the
lenses, rinse with water, and dry with a soft
cloth. Do not cover the lenses.
If a malfunction with the system has occurred,
see an authorized dealer.
WARNING!
Drivers must be careful when backing up even
when using the Surround View Camera. Always
check carefully behind your vehicle, and be sure
to check for pedestrians, animals, other
vehicles, obstructions, or blind spots before
backing up. You are responsible for the safety of
your surroundings and must continue to pay
attention while backing up. Failure to do so can
result in serious injury or death.
23_WL_OM_EN_USC_t.book Page 182
Page 237 of 424
MULTIMEDIA235
music, get information, and watch downloaded
programs all while on the road. Two Voice Remotes
with Alexa are included with the system. Press the
Microphone button on the Voice Remote with Alexa
to easily find, launch, and control content. Check
sports scores, play music, control smart home
devices, or see your live camera feeds (compatible
smart home device required and sold separately).
In addition to streaming and downloaded content,
changing the input in Fire TV also enables you to:
Mirror what’s on your phone or tablet to Fire TV
via Miracast capable devices
Stream your favorite shows with Fire TV
Plug and play a variety of standard video games
or devices into the HDMI port
Listen to audio over wired or wireless head -
phones (not included, customer will have to
provide their own)
Plug and play a variety of devices into the front
seat Video USB port. USB ports located under
the rear screens are charge only
Watch content individually on each rear display
or mirror across both displays to watch together
NOTE:Vehicle must be in an active and usable cellular
range and properly equipped with a Uconnect
5 NAV system and Rear Seat Entertainment with
Fire TV package. Streaming requires a Wi-Fi
connection and registered Amazon account to run Fire TV in the vehicle. Streaming service subscrip
-
tions are not included. Services and features are
subject to change or withdrawal at any time, may
not be available in all areas and languages, and
may require separate subscriptions.
Please review this Owner's Manual to become
familiar with RSE features and operation.
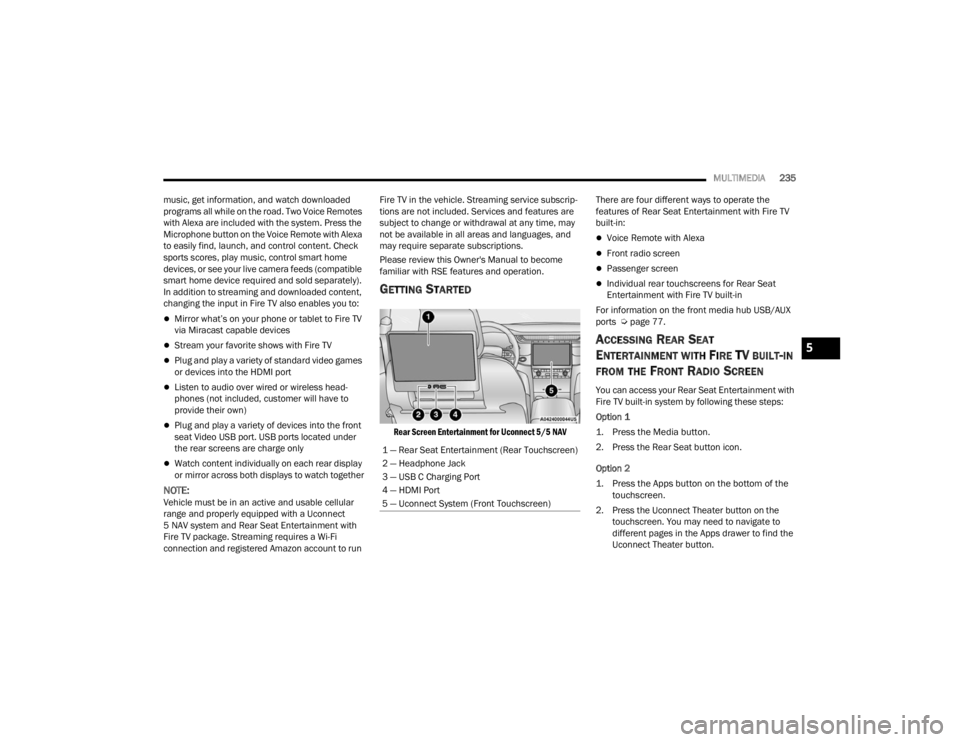
GETTING STARTED
Rear Screen Entertainment for Uconnect 5/5 NAV
There are four different ways to operate the
features of Rear Seat Entertainment with Fire TV
built-in:
Voice Remote with Alexa
Front radio screen
Passenger screen
Individual rear touchscreens for Rear Seat
Entertainment with Fire TV built-in
For information on the front media hub USB/AUX
ports Ú page 77.
ACCESSING REAR SEAT
E
NTERTAINMENT WITH FIRE TV BUILT-IN
FROM THE FRONT RADIO SCREEN
You can access your Rear Seat Entertainment with
Fire TV built-in system by following these steps:
Option 1
1. Press the Media button.
2. Press the Rear Seat button icon.
Option 2
1. Press the Apps button on the bottom of the
touchscreen.
2. Press the Uconnect Theater button on the touchscreen. You may need to navigate to
different pages in the Apps drawer to find the
Uconnect Theater button.
1 — Rear Seat Entertainment (Rear Touchscreen)
2 — Headphone Jack
3 — USB C Charging Port
4 — HDMI Port
5 — Uconnect System (Front Touchscreen)
5
23_WL_OM_EN_USC_t.book Page 235
Page 242 of 424
240MULTIMEDIA
REAR SEAT ENTERTAINMENT WITH FIRE
TV B
UILT-IN STREAMING (USING THE
F
RONT RADIO AND REAR SCREENS)
Access Using Launch Source
To access Rear Seat Entertainment with Fire TV
built-in from the front radio, press the Media tab
located on the bottom menu bar. Then select the
Rear Seat option located on the top menu bar.
Select “Launch Source”, and then under “Inputs”
select “Fire TV Home”.
Access Using Browse Media
Selecting “Browse Media” on the front radio
screen will give access to different media within
Rear Seat Entertainment with Fire TV built-in.
These options will be in the top menu of “Browse
Media” and include:
Fire TV — Selecting “Fire TV” will show streaming
options for categories and to select apps. This
option will be selectable on the left slider menu
in “Browse Media”. While in “Browse Media”
under Fire TV, it will display recent activity under
“Recent”. This will display recent videos viewed
from Fire TV and recent downloads as well.
USB Video — Under “USB Videos”, videos will
appear that are options with a USB device
connected to Rear Seat Entertainment with Fire
TV built-in.
USB Music — Under “USB Music”, music will
appear that are options with a USB device
connected to Rear Seat Entertainment with Fire
TV built-in.
Access Using the Voice Remote with Alexa and
Rear Screens
Rear passengers will be able to access some
options for streaming by pressing the “Prime
Video”, “App 1”, or “App 2” button on the Voice
Remote with Alexa. Selecting one of those buttons
on the Voice Remote with Alexa will take you to the
home page for that respective streaming service.
Turning on either of the rear screens will launch
Fire TV. By default, the rear screens will always
launch in Fire TV. More streaming options can be
selected on the Fire TV home page.
Fire TV
Fire TV is your source for online streaming with
Rear Seat Entertainment with Fire TV built-in.
NOTE:A data source needs to be connected to the system
for streaming to be accessible. This can be set up
when Fire TV is turned on for the first time from the
rear screens. Some of these options can be an
in-vehicle 4G Wi-Fi hot spot, capable Wi-Fi hot spot
from a mobile device, or Wi-Fi from an outside
source like a home or a garage. To access Fire TV on the front screen, select
“Launch Source” on the front radio rear seat
screen and then “Fire TV Home” under the Inputs.
Viewing from the front radio screen or passenger
screen mirrors or controls the Fire TV experience
from one of the rear Fire TV displays.
The menu bar for Fire TV will have the options for
“Home”, “Find”, “Library”, “Brand”, and “Live”.
Below the menu bar will be streaming options
linked to your Prime account like “Prime Video”.
The front radio screen offers some options:
Power — This will turn Fire TV on or off.
Screen 1 and Screen 2 Toggle
— This toggles
between the Rear Screens (for use with front
radio screen only).
Collapse — While viewing on the front radio
screen, this will collapse the screen to dash -
board view.
Source Drawer — This will open the “Source
Drawer” and the source logo will be displayed
on the icon.
Browse Media — This will open the “Browse
Media” pop-up.
Back — This will let you go back the previous
page.
23_WL_OM_EN_USC_t.book Page 240
Page 260 of 424
258SAFETY
AUXILIARY DRIVING SYSTEMS
BLIND SPOT MONITORING (BSM)
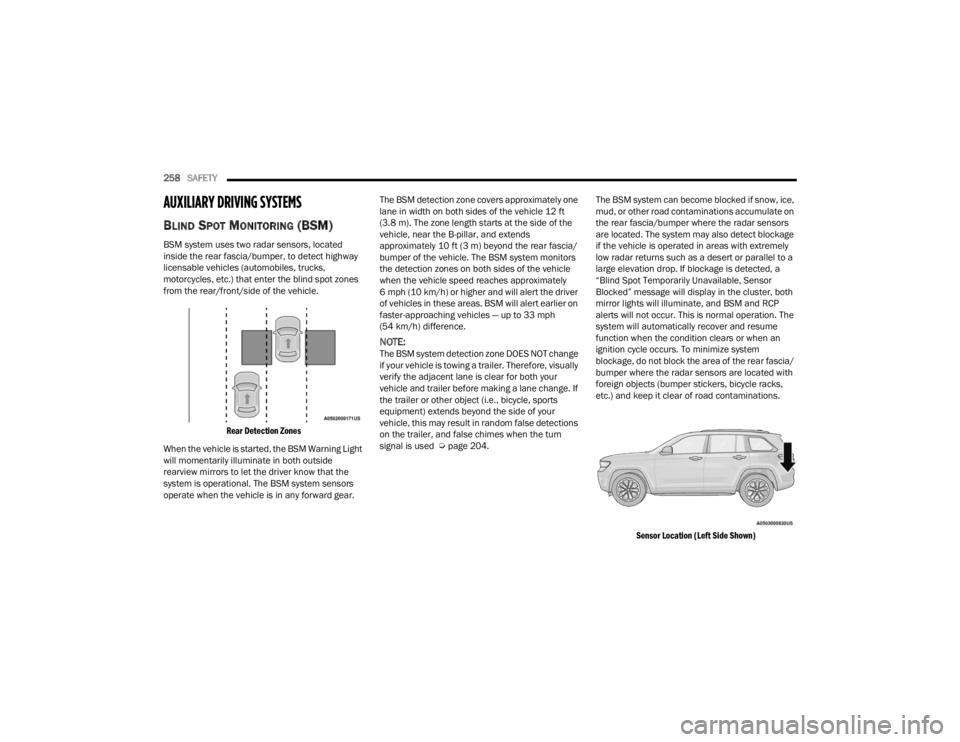
BSM system uses two radar sensors, located
inside the rear fascia/bumper, to detect highway
licensable vehicles (automobiles, trucks,
motorcycles, etc.) that enter the blind spot zones
from the rear/front/side of the vehicle.
Rear Detection Zones
When the vehicle is started, the BSM Warning Light
will momentarily illuminate in both outside
rearview mirrors to let the driver know that the
system is operational. The BSM system sensors
operate when the vehicle is in any forward gear. The BSM detection zone covers approximately one
lane in width on both sides of the vehicle 12 ft
(3.8 m). The zone length starts at the side of the
vehicle, near the B-pillar, and extends
approximately 10 ft (3 m) beyond the rear fascia/
bumper of the vehicle. The BSM system monitors
the detection zones on both sides of the vehicle
when the vehicle speed reaches approximately
6 mph (10 km/h) or higher and will alert the driver
of vehicles in these areas. BSM will alert earlier on
faster-approaching vehicles — up to 33 mph
(54 km/h) difference.
NOTE:The BSM system detection zone DOES NOT change
if your vehicle is towing a trailer. Therefore, visually
verify the adjacent lane is clear for both your
vehicle and trailer before making a lane change. If
the trailer or other object (i.e., bicycle, sports
equipment) extends beyond the side of your
vehicle, this may result in random false detections
on the trailer, and false chimes when the turn
signal is used Ú
page 204. The BSM system can become blocked if snow, ice,
mud, or other road contaminations accumulate on
the rear fascia/bumper where the radar sensors
are located. The system may also detect blockage
if the vehicle is operated in areas with extremely
low radar returns such as a desert or parallel to a
large elevation drop. If blockage is detected, a
“Blind Spot Temporarily Unavailable, Sensor
Blocked” message will display in the cluster, both
mirror lights will illuminate, and BSM and RCP
alerts will not occur. This is normal operation. The
system will automatically recover and resume
function when the condition clears or when an
ignition cycle occurs. To minimize system
blockage, do not block the area of the rear fascia/
bumper where the radar sensors are located with
foreign objects (bumper stickers, bicycle racks,
etc.) and keep it clear of road contaminations.
Sensor Location (Left Side Shown)
23_WL_OM_EN_USC_t.book Page 258
Page 262 of 424
260SAFETY
The BSM system is designed not to issue an alert on
stationary objects such as guardrails, posts, walls,
foliage, berms, etc. However, occasionally the
system may alert on such objects. This is normal
operation and your vehicle does not require service.
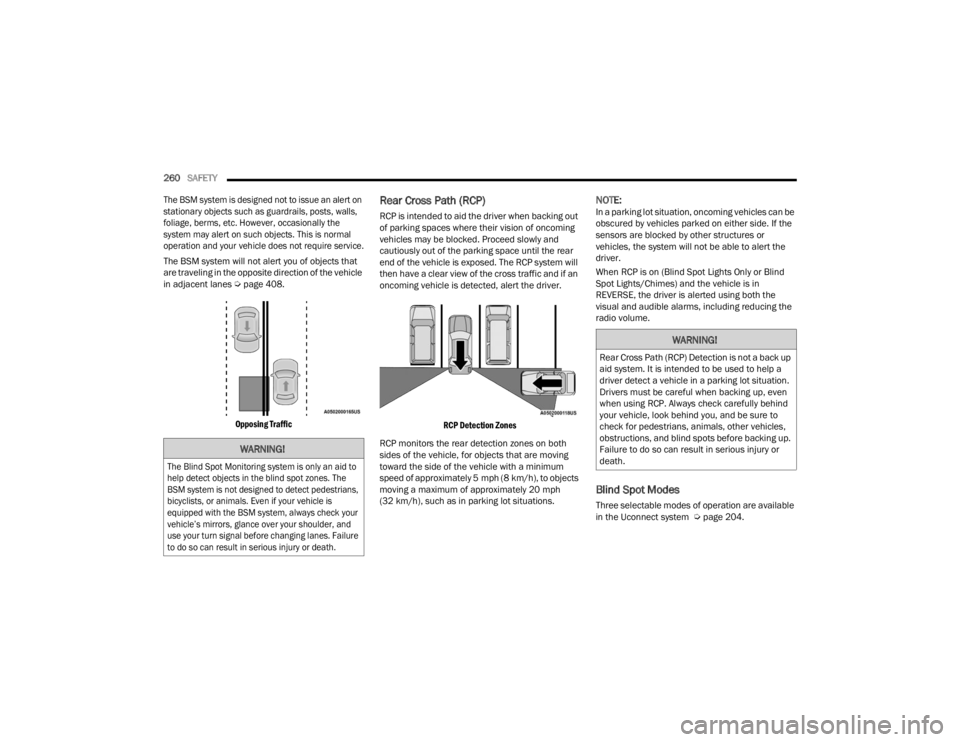
The BSM system will not alert you of objects that
are traveling in the opposite direction of the vehicle
in adjacent lanes Ú page 408.
Opposing Traffic
Rear Cross Path (RCP)
RCP is intended to aid the driver when backing out
of parking spaces where their vision of oncoming
vehicles may be blocked. Proceed slowly and
cautiously out of the parking space until the rear
end of the vehicle is exposed. The RCP system will
then have a clear view of the cross traffic and if an
oncoming vehicle is detected, alert the driver.
RCP Detection Zones
RCP monitors the rear detection zones on both
sides of the vehicle, for objects that are moving
toward the side of the vehicle with a minimum
speed of approximately 5 mph (8 km/h), to objects
moving a maximum of approximately 20 mph
(32 km/h), such as in parking lot situations.
NOTE:In a parking lot situation, oncoming vehicles can be
obscured by vehicles parked on either side. If the
sensors are blocked by other structures or
vehicles, the system will not be able to alert the
driver.
When RCP is on (Blind Spot Lights Only or Blind
Spot Lights/Chimes) and the vehicle is in
REVERSE, the driver is alerted using both the
visual and audible alarms, including reducing the
radio volume.
Blind Spot Modes
Three selectable modes of operation are available
in the Uconnect system Ú page 204.
WARNING!
The Blind Spot Monitoring system is only an aid to
help detect objects in the blind spot zones. The
BSM system is not designed to detect pedestrians,
bicyclists, or animals. Even if your vehicle is
equipped with the BSM system, always check your
vehicle’s mirrors, glance over your shoulder, and
use your turn signal before changing lanes. Failure
to do so can result in serious injury or death.
WARNING!
Rear Cross Path (RCP) Detection is not a back up
aid system. It is intended to be used to help a
driver detect a vehicle in a parking lot situation.
Drivers must be careful when backing up, even
when using RCP. Always check carefully behind
your vehicle, look behind you, and be sure to
check for pedestrians, animals, other vehicles,
obstructions, and blind spots before backing up.
Failure to do so can result in serious injury or
death.
23_WL_OM_EN_USC_t.book Page 260
Page 263 of 424
SAFETY261
Blind Spot Alert Lights Only
When operating in Blind Spot Alert mode, the BSM
system will provide a visual alert in the appropriate
side view mirror based on a detected object.
However, when the system is operating in Rear
Cross Path (RCP) mode, the system will respond
with both visual and audible alerts when a
detected object is present. Whenever an audible
alert is requested, the radio is muted.
Blind Spot Alert Lights/Chime
When operating in Blind Spot Alert Lights/Chime
mode, the BSM system will provide a visual alert in
the appropriate side view mirror based on a
detected object. If the turn signal is then activated,
and it corresponds to an alert present on that side
of the vehicle, an audible chime will also be
sounded. Whenever a turn signal and detected
object are present on the same side at the same
time, both the visual and audible alerts will be
issued. In addition to the audible alert the radio (if
on) will also be muted.
NOTE:Whenever an audible alert is requested by the
BSM system, the radio is also muted. When the system is in RCP, the system shall
respond with both visual and audible alerts when a
detected object is present. Whenever an audible
alert is requested, the radio is also muted. Turn/
hazard signal status is ignored; the RCP state
always requests the chime.
Blind Spot Alert Off
When the BSM system is turned off, there will be
no visual or audible alerts from either the BSM or
RCP systems.
NOTE:The BSM system will store the current operating
mode when the vehicle is shut off. Each time the
vehicle is started, the previously stored mode will
be recalled and used.
FORWARD COLLISION WARNING (FCW)
W
ITH MITIGATION
The FCW with Mitigation system provides the driver
with audible warnings, visual warnings (within the
instrument cluster display), and may apply a
limited braking to warn the driver when it detects a
potential frontal collision. The warnings and limited
braking are intended to provide the driver with
enough time to react, avoid or mitigate the
potential collision.
NOTE:If either FCW or Pedestrian Emergency Braking
(PEB) is turned off, the FCW OFF Indicator Light will
illuminate. The FCW OFF Indicator Light will only
shut off if both features are turned on and active
braking is enabled.
NOTE:FCW monitors the information from the forward
looking sensors as well as the Electronic Brake
Controller (EBC), to calculate the probability of a
forward collision. When the system determines
that a forward collision is probable, the driver will
be provided with audible and visual warnings and
may provide a brake jerk warning. If the driver does
not take action based upon these progressive
warnings, then the system will provide a limited
level of active braking to help slow the vehicle and
mitigate the potential forward collision. If the driver
reacts to the warnings by braking and the system
determines that the driver intends to avoid the
collision by braking but has not applied sufficient
brake force, the system will compensate and
provide additional brake force as required.
6
23_WL_OM_EN_USC_t.book Page 261
Page 364 of 424
362SERVICING AND MAINTENANCE
F10 40 Amp Green –HVAC Blower Motor
F11 ––Spare
F12 –20 Amp YellowAssy Cigar Lighter
F13 –10 Amp RedAssy Mirror Inside Rearview / Digital
TV (DTV) */ Sunroof Single - Dual
Pane / Port UC1 Dual USB RR /
Interior Monitoring Camera
F14 ––Spare
F15A ––Spare
F15B ––Spare
F16 –10 Amp RedMOD ORC
F17 ––Spare
F18 ––Spare
F19 ––Spare
F20 –10 Amp RedOverhead Console Assy (OHC) W/
Sunshade / Intrusion Module /
Intrusion Sensor / Siren / Head Up
Display (HUD) / Digital TV (DTV) *
F21 30 Amp Pink –Trailer Tow Electric Brake -
Aftermarket
F22 ––Spare
F23 ––Spare
Cavity Cartridge Fuse Micro FuseDescription
* If Equipped
23_WL_OM_EN_USC_t.book Page 362
Page 397 of 424
SERVICING AND MAINTENANCE395
Cleaning Plastic Instrument Cluster
Lenses
The lenses in front of the instruments in this
vehicle are molded in clear plastic. When cleaning
the lenses, care must be taken to avoid scratching
the plastic.
Clean with a wet soft cloth. A mild soap solution
may be used, but do not use high alcohol content
or abrasive cleaners. If soap is used, wipe clean
with a clean damp cloth. Dry with a soft cloth.
LEATHER SURFACES
Mopar® Total Clean is specifically recommended
for leather upholstery.
The leather upholstery can be best preserved by
regular cleaning with a damp soft cloth. Small
particles of dirt can act as an abrasive and damage
the leather upholstery and should be removed
promptly with a damp cloth. Stubborn soils can be
removed easily with a soft cloth and Mopar® Total
Clean. Care should be taken to avoid soaking your
leather upholstery with any liquid. Please do not
use polishes, oils, cleaning fluids, solvents,
detergents, or ammonia-based cleaners to clean
your leather upholstery.
NOTE:If equipped with light colored leather, it tends to
show any foreign material, dirt, and fabric dye
transfer more so than darker colors. The leather is
designed for easy cleaning, and the manufacturer
recommends Mopar® total care leather cleaner
applied on a cloth to clean the leather seats as
needed.GLASS SURFACES
All glass surfaces should be cleaned on a regular
basis with Mopar® Glass Cleaner, or any
commercial household-type glass cleaner. Never
use an abrasive type cleaner. Use caution when
cleaning the inside rear window equipped with
electric defrosters or windows equipped with radio
antennas. Do not use scrapers or other sharp
instruments that may scratch the elements.
When cleaning the rearview mirror, spray cleaner
on the towel or cloth that you are using. Do not
spray cleaner directly on the mirror.
CAUTION!
Do not use alcohol and alcohol-based and/or
ketone-based cleaning products to clean leather
upholstery, as damage to the upholstery may
result.
8
23_WL_OM_EN_USC_t.book Page 395
Page 412 of 424
410 Anti-Lock Brake System (ABS)
............. 111, 248Anti-Lock Warning Light................................. 111Apps.............................................................. 233Arming System Security Alarm............................................. 26Assist, Hill Start............................................. 254Audio Systems (Radio)......................... 104, 203Auto Down Power Windows............................. 82Auto Hold............................................. 115, 125Automatic Folding Mirrors............................... 53Automatic Headlights...................................... 59Automatic High Beams.................................... 59Automatic Temperature Control (ATC)............. 72Automatic Transmission...................... 119, 127Adding Fluid.............................................. 351Fluid And Filter Change............................. 351Fluid Change............................................. 351Fluid Level Check...................................... 351Fluid Type........................................ 351, 402Special Additives....................................... 351Automatic Transmission Limp Home Mode... 129AutoPark........................................................ 120Autostick........................................................ 130Operation.................................................. 130AUX Cord.......................................................... 77Auxiliary Driving Systems............................... 258
Auxiliary Electrical Outlet (Power Outlet).......... 78Auxiliary Power Outlet...................................... 78Axle Fluid...................................................... 402
B
Battery................................................. 109, 338Charging System Light.............................. 109Keyless Key Fob Replacement.................... 19Battery Saver Feature...................................... 62Belts, Seat.................................................... 303Body Mechanism Lubrication....................... 343Bodywork...................................................... 392B-Pillar Location............................................ 379Brake Assist System..................................... 250Brake Control System, Electronic.................. 250Brake Fluid.......................................... 350, 402Brake System...................................... 350, 396Anti-Lock (ABS)......................................... 396Fluid Check............................................... 350Master Cylinder........................................ 350Parking..................................................... 123Warning Light........................................... 108Brake/Transmission Interlock...................... 127Bulb Replacement........................................ 374Bulbs, Light................................................... 305
C
Camera, Front............................................... 176Camera, Night Vision..................................... 177Camera, Rear....................................... 174, 181Camera, Rear Washer................................... 174Camera, Surround View................................ 181Capacities, Fluid............................................ 400Caps, FillerOil (Engine)............................................... 334Radiator (Coolant Pressure)..................... 348Car Washes................................................... 393Carbon Monoxide Warning................... 305, 306Care And Maintenance................................. 392Cargo Area Cover.............................................92Cargo Area Storage..........................................90Cargo Compartment.........................................90Cargo Tie-Downs..............................................91Cellular Phone............................................... 247Center Console, Front......................................75Center Console, Rear.......................................75Chains, Tire................................................... 389ChargingWireless.......................................................80Chart, Tire Sizing........................................... 375Check Engine Light
(Malfunction Indicator Light)......................... 118
23_WL_OM_EN_USC_t.book Page 410