brake light JEEP LIBERTY 2011 KK / 2.G User Guide
[x] Cancel search | Manufacturer: JEEP, Model Year: 2011, Model line: LIBERTY, Model: JEEP LIBERTY 2011 KK / 2.GPages: 88, PDF Size: 3.24 MB
Page 8 of 88
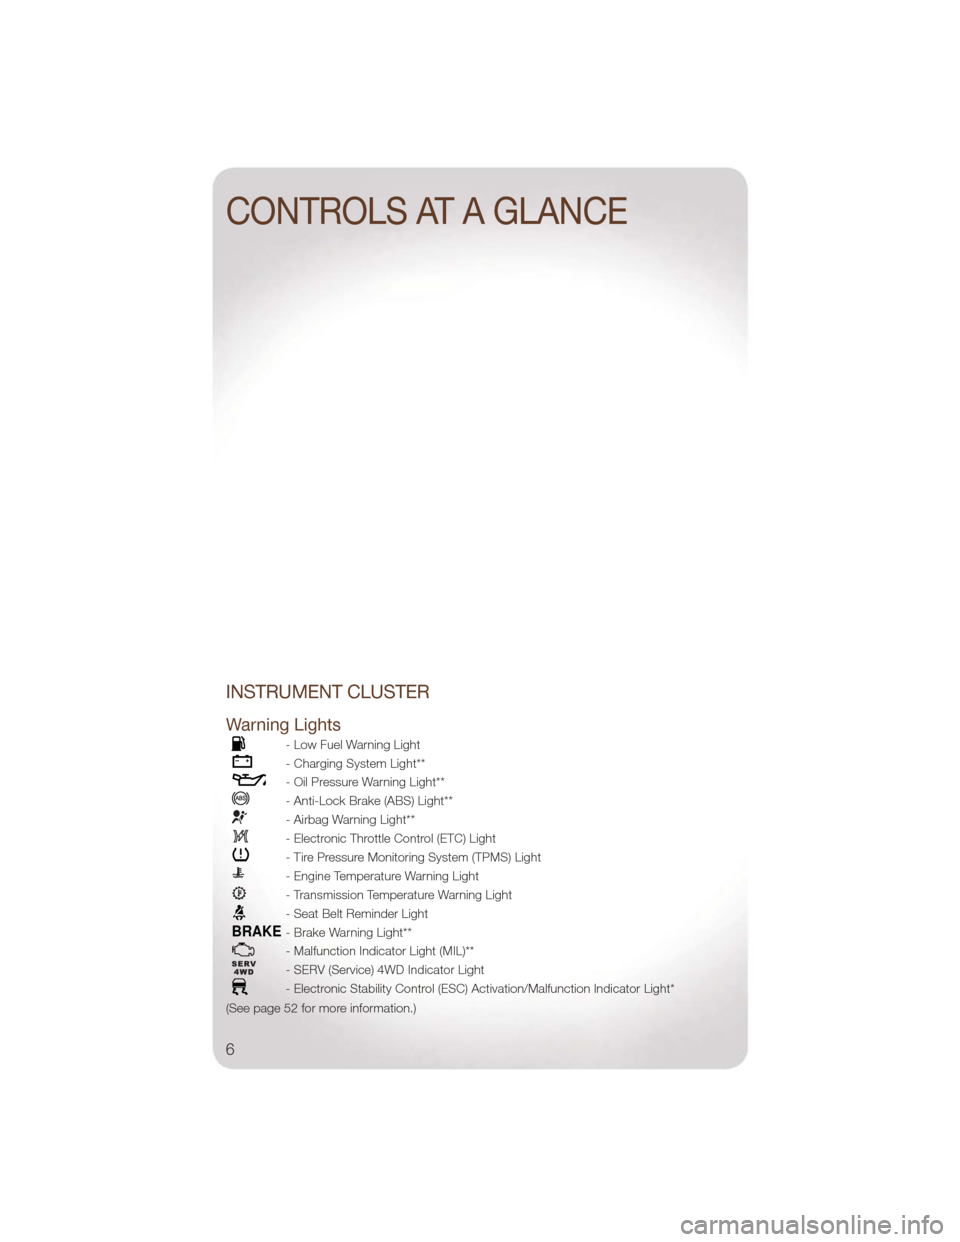
INSTRUMENT CLUSTER
Warning Lights
- Low Fuel Warning Light
- Charging System Light**
- Oil Pressure Warning Light**
- Anti-Lock Brake (ABS) Light**
- Airbag Warning Light**
- Electronic Throttle Control (ETC) Light
- Tire Pressure Monitoring System (TPMS) Light
- Engine Temperature Warning Light
- Transmission Temperature Warning Light
- Seat Belt Reminder Light
BRAKE- Brake Warning Light**
- Malfunction Indicator Light (MIL)**
- SERV (Service) 4WD Indicator Light
- Electronic Stability Control (ESC) Activation/Malfunction Indicator Light*
(See page 52 for more information.)
CONTROLS AT A GLANCE
6
Page 49 of 88
• When operating in 4WD LOW, theengine speed is approximately three
times that of the 4WD LOCK position
at a given road speed. Take care not
to over-speed the engine and do not
exceed 25 mph (40 km/h).
• Use the transfer case NEUTRAL position for recreational towing only.
2WD To 4WD AUTO
• Move transfer case lever to the desired position.
• Shifts between 2WD and 4WD AUTO can be done with the vehicle stopped
or in motion. With the vehicle in
motion, the transfer case will
engage/disengage faster if you
momentarily release the accelerator
pedal after moving the transfer case
lever.
• If the vehicle is stopped, the key must be in the ON/RUN position.
• Shifts can not be completed if the key is in the ACC position.
4WD AUTO To 4WD LOW
• With the engine running, slow the vehicle speed to 2 to 3 mph (3 to
5 km/h) and shift the transmission
into NEUTRAL. • While still rolling, move the transfer
case lever to the 4WD LOW position.
• After the indicator light is ON (not flashing) shift the transmission into
gear.
• If the indicator light in the instrument cluster is flashing, the shift did not
occur and the current transfer case
position will be maintained.
WARNING!
• You or others could be injured ifyou leave the vehicle unattended
with the transfer case in the
NEUTRAL position without first
fully engaging the parking brake.
The transfer case NEUTRAL
position disengages both the front
driveshaft and rear driveshaft from
the powertrain, and it will allow the
vehicle to move even if the
transmission is in PARK. The
parking brake should always be
applied when the driver is not in
the vehicle.
OFF-ROAD CAPABILITIES
47
Page 52 of 88
TOW/HAUL MODE
• When driving in hilly areas, towing atrailer, carrying a heavy load, etc., and
frequent transmission shifting occurs,
press the TOW/HAUL button. This will
improve performance and reduce the
potential for transmission overheating
or failure due to excessive shifting.
When operating in TOW/HAUL mode,
the transmission will shift into third
gear.
NOTE: The TOW/HAUL mode locks out
Overdrive.
• The “TOW/HAUL Indicator Light” willilluminate in the instrument cluster to
indicate when the switch has been
activated. Pressing the switch a
second time restores normal
operation. If the TOW/HAUL mode is
desired, the switch must be pressed
each time the engine is started.
RECREATIONAL TOWING
(BEHIND MOTORHOME,
ETC.)
Recreational Towing —
Two-Wheel Drive Models
• Recreational towing is allowed if therear wheels are OFFthe ground. This
may be accomplished using a tow
dolly or vehicle trailer. If using a tow
dolly, follow this procedure:
• Properly secure the dolly to the tow vehicle, following the dolly
manufacturer's instructions.
• Drive the rear wheels onto the tow dolly, firmly set the parking brake and
place the transmission in PARK.
• Turn the ignition switch to the unlocked OFF position.
• Install a suitable clamping device, designed for towing, to secure the
front wheels in the straight position.
• Disconnect the negative battery cable and secure it away from the battery
post.
• Flat towing (with all four wheels
on the ground) is allowed ONLY if
the driveshaft is removed. Towing
with the rear wheels on the ground
while the driveshaft is connected will
result in severe transmission damage.
• The parking brake mustbe firmly
engaged and the wheels chocked
during driveshaft removal and
installation. The parking brake must
remain engaged unless the vehicle is
securely and properly connected to
the tow vehicle, or the driveshaft is
completely reinstalled. See your
authorized dealer for proper driveshaft
removal and reinstallation procedures,
including flange orientation/alignment,
use of thread-locking compound,
proper bolt torque specifications, etc.
UTILITY
50
Page 55 of 88
• When the malfunction indicator is illuminated, the system may not be able to detector signal low tire pressure as intended. TPMS malfunctions may occur for a variety of
reasons, including the installation of replacement or alternate tires or wheels on the
vehicle that prevent the TPMS from functioning properly. Always check the TPMS
malfunction telltale after replacing one or more tires or wheels on your vehicle, to
ensure that the replacement or alternate tires and wheels allow the TPMS to
continue to function properly.
CAUTION!
The TPMS has been optimized for the original equipment tires and wheels. TPMS
pressures and warning have been established for the tire size equipped on your
vehicle. Undesirable system operation or sensor damage may result when using
replacement equipment that is not of the same size, type, and/or style.
Aftermarket wheels can cause sensor damage. Do not use tire sealant from a
can, or balance beads if your vehicle is equipped with a TPMS, as damage to the
sensors may result.
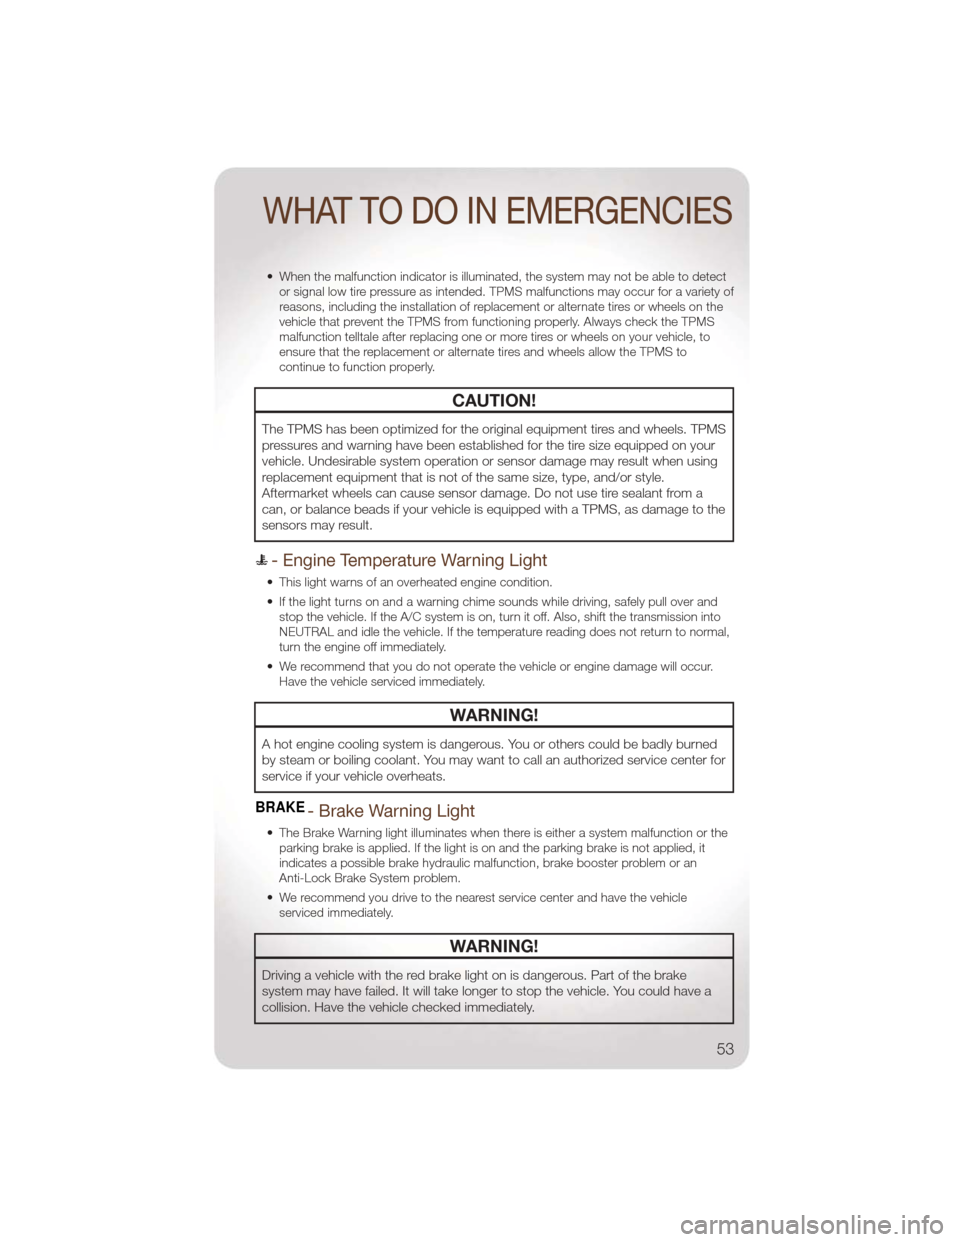
- Engine Temperature Warning Light
• This light warns of an overheated engine condition.
• If the light turns on and a warning chime sounds while driving, safely pull over andstop the vehicle. If the A/C system is on, turn it off. Also, shift the transmission into
NEUTRAL and idle the vehicle. If the temperature reading does not return to normal,
turn the engine off immediately.
• We recommend that you do not operate the vehicle or engine damage will occur. Have the vehicle serviced immediately.
WARNING!
A hot engine cooling system is dangerous. You or others could be badly burned
by steam or boiling coolant. You may want to call an authorized service center for
service if your vehicle overheats.
BRAKE- Brake Warning Light
• The Brake Warning light illuminates when there is either a system malfunction or theparking brake is applied. If the light is on and the parking brake is not applied, it
indicates a possible brake hydraulic malfunction, brake booster problem or an
Anti-Lock Brake System problem.
• We recommend you drive to the nearest service center and have the vehicle serviced immediately.
WARNING!
Driving a vehicle with the red brake light on is dangerous. Part of the brake
system may have failed. It will take longer to stop the vehicle. You could have a
collision. Have the vehicle checked immediately.
WHAT TO DO IN EMERGENCIES
53
Page 56 of 88
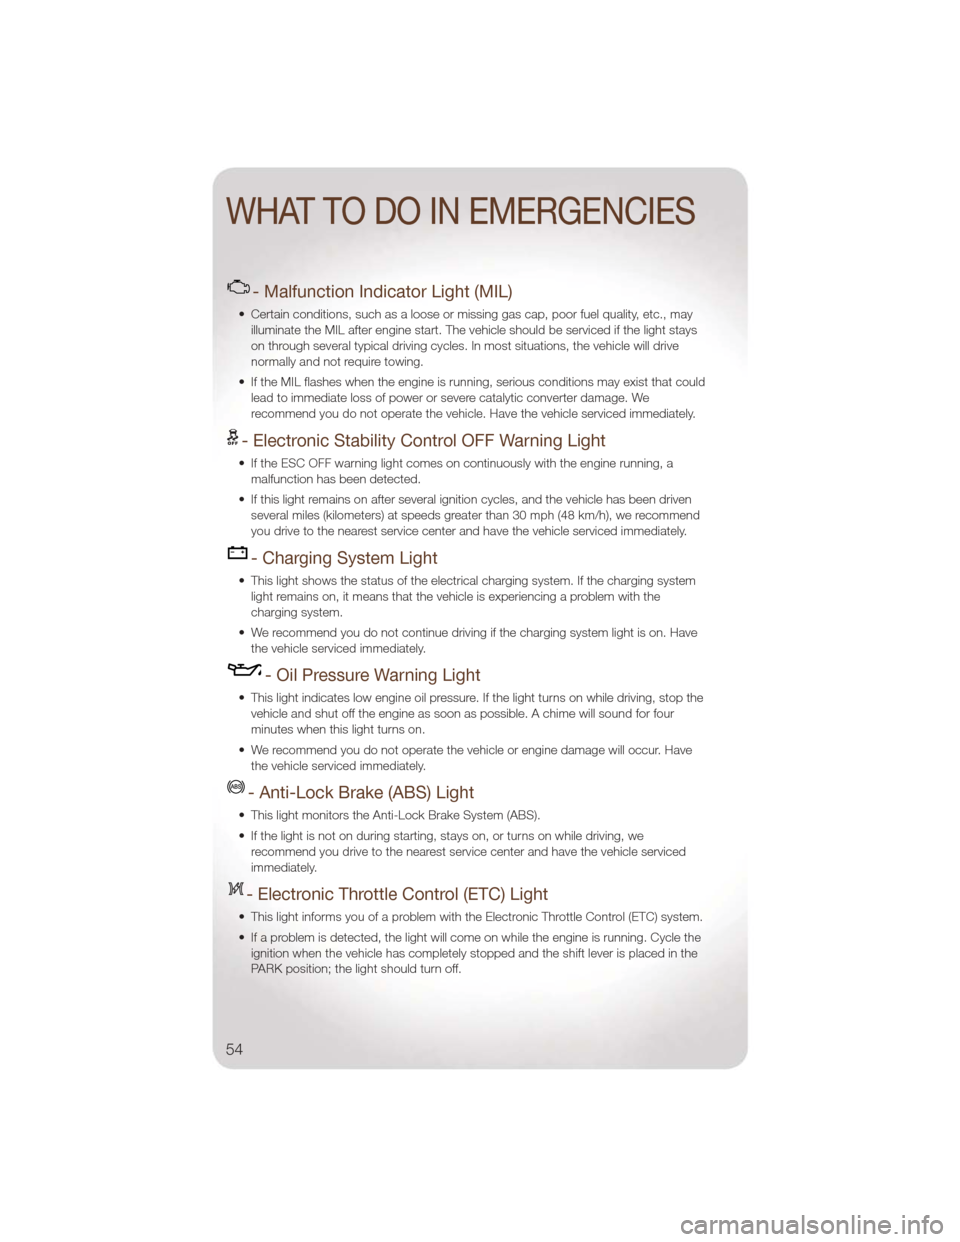
- Malfunction Indicator Light (MIL)
• Certain conditions, such as a loose or missing gas cap, poor fuel quality, etc., mayilluminate the MIL after engine start. The vehicle should be serviced if the light stays
on through several typical driving cycles. In most situations, the vehicle will drive
normally and not require towing.
• If the MIL flashes when the engine is running, serious conditions may exist that could lead to immediate loss of power or severe catalytic converter damage. We
recommend you do not operate the vehicle. Have the vehicle serviced immediately.
- Electronic Stability Control OFF Warning Light
• If the ESC OFF warning light comes on continuously with the engine running, amalfunction has been detected.
• If this light remains on after several ignition cycles, and the vehicle has been driven several miles (kilometers) at speeds greater than 30 mph (48 km/h), we recommend
you drive to the nearest service center and have the vehicle serviced immediately.
- Charging System Light
• This light shows the status of the electrical charging system. If the charging systemlight remains on, it means that the vehicle is experiencing a problem with the
charging system.
• We recommend you do not continue driving if the charging system light is on. Have the vehicle serviced immediately.
- Oil Pressure Warning Light
• This light indicates low engine oil pressure. If the light turns on while driving, stop thevehicle and shut off the engine as soon as possible. A chime will sound for four
minutes when this light turns on.
• We recommend you do not operate the vehicle or engine damage will occur. Have the vehicle serviced immediately.
- Anti-Lock Brake (ABS) Light
• This light monitors the Anti-Lock Brake System (ABS).
• If the light is not on during starting, stays on, or turns on while driving, werecommend you drive to the nearest service center and have the vehicle serviced
immediately.
- Electronic Throttle Control (ETC) Light
• This light informs you of a problem with the Electronic Throttle Control (ETC) system.
• If a problem is detected, the light will come on while the engine is running. Cycle theignition when the vehicle has completely stopped and the shift lever is placed in the
PARK position; the light should turn off.
WHAT TO DO IN EMERGENCIES
54
Page 62 of 88
JUMP-STARTING
• If your vehicle has a discharged battery it can be jump-started using a set of jumpercables and a battery in another vehicle or by using a portable battery booster pack.
• Jump-starting can be dangerous if done improperly so please follow the procedures in this section carefully.
NOTE: When using a portable battery booster pack follow the manufacturer’s operating
instructions and precautions.
Preparations for Jump-Start
• The battery in your vehicle is located in the front of the engine compartment, behind the left headlight assembly.
NOTE: The positive battery post is covered with a protective cap. Lift up on the cap to
gain access to the positive battery post.
• Set the parking brake, shift the automatic transmission into PARK and turn theignition to LOCK.
• Turn off the heater, radio, and all unnecessary electrical accessories.
• If using another vehicle to jump-start the battery, park the vehicle within the jumper cables reach, set the parking brake and make sure the ignition is OFF.
Jump-Starting Procedure
• Connect the positive (+) end of the jumper cable to the positive (+) post of thedischarged vehicle.
• Connect the opposite end of the positive (+) jumper cable to the positive (+) post of the booster battery.
WHAT TO DO IN EMERGENCIES
60
Page 75 of 88
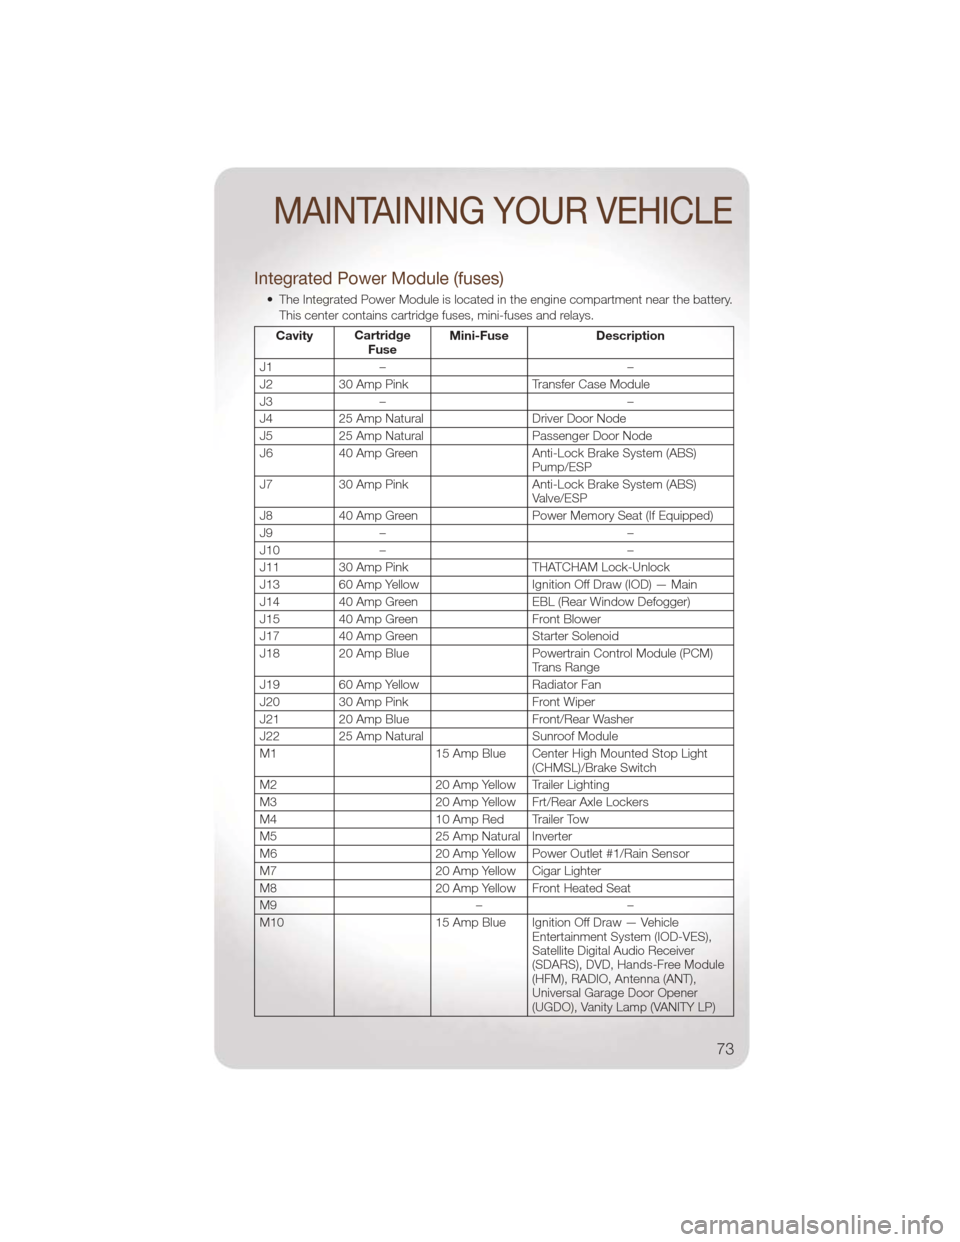
Integrated Power Module (fuses)
• The Integrated Power Module is located in the engine compartment near the battery.This center contains cartridge fuses, mini-fuses and relays.
Cavity Cartridge
Fuse Mini-Fuse Description
J1 – –
J2 30 Amp Pink Transfer Case Module
J3 – –
J4 25 Amp Natural Driver Door Node
J5 25 Amp Natural Passenger Door Node
J6 40 Amp Green Anti-Lock Brake System (ABS) Pump/ESP
J7 30 Amp Pink Anti-Lock Brake System (ABS)
Valve/ESP
J8 40 Amp Green Power Memory Seat (If Equipped)
J9 – –
J10 – –
J11 30 Amp Pink THATCHAM Lock-Unlock
J13 60 Amp Yellow Ignition Off Draw (IOD) — Main
J14 40 Amp Green EBL (Rear Window Defogger)
J15 40 Amp Green Front Blower
J17 40 Amp Green Starter Solenoid
J18 20 Amp Blue Powertrain Control Module (PCM)
Trans Range
J19 60 Amp Yellow Radiator Fan
J20 30 Amp Pink Front Wiper
J21 20 Amp Blue Front/Rear Washer
J22 25 Amp Natural Sunroof Module
M1 15 Amp Blue Center High Mounted Stop Light
(CHMSL)/Brake Switch
M2 20 Amp Yellow Trailer Lighting
M3 20 Amp Yellow Frt/Rear Axle Lockers
M4 10 Amp Red Trailer Tow
M5 25 Amp Natural Inverter
M6 20 Amp Yellow Power Outlet #1/Rain Sensor
M7 20 Amp Yellow Cigar Lighter
M8 20 Amp Yellow Front Heated Seat
M9 ––
M10 15 Amp Blue Ignition Off Draw — Vehicle
Entertainment System (IOD-VES),
Satellite Digital Audio Receiver
(SDARS), DVD, Hands-Free Module
(HFM), RADIO, Antenna (ANT),
Universal Garage Door Opener
(UGDO), Vanity Lamp (VANITY LP)
MAINTAINING YOUR VEHICLE
73
Page 83 of 88
Air Conditioning...........21,22
Airbag ..................10
AirbagLight ...............55
Alarm,Panic ...............8
Anti-Lock Brake System (ABS) ....54
Arming Theft System (Security Alarm) . 9
Audio Jack ...............32
Audio Settings ............29,30
Automatic Temperature Control (ATC) . 22
Automatic Transmission FluidType ...............68
AxleFluid ................68
Battery Charging System Light .......54
Belts, Seat ................9
BrakeFluid ...............68
Brake System WarningLight .............53
Bulb Replacement ...........77
Calibration, Compass ..........41
Change Oil Indicator ..........55
Charging System Light .........54
Check Engine Light (Malfunction
IndicatorLight) .............54
Child Restraint ..............11
Child Restraint Tether Anchors ....11
Climate Control ...........21,22
Clock Setting ............30,33
Compass Calibration ..........41
Cooling System Coolant Capacity ...........68
Cruise Control (Speed Control) ....20
CruiseLight ...............20
Customer Assistance ..........78
Defects, Reporting ...........79
Defroster, Rear Window ........21
Defroster,Windshield ..........21
Dimmer Control .............18
Dimmer Switch, Headlight .......18
Disarming, Theft System .........9
Driver Cockpit ..............4
ECO ...................42
Electronic Speed Control
(Cruise Control) .............20 Electronic Stability Program (ESP) . . . 52
Electronic Throttle Control Warning
Light ...................54
Electronic Vehicle Information
Center (EVIC)
............41,42
Electronics Your Vehicle's Sound System ....26
Engine Compartment .............67
Malfunction Indicator
(Check Engine) ............54
Oil Selection .............68
Overheating ..............55
Event Data Recorder ..........65
Express Down Windows .........8
Exterior Lights ..............77
Flash-To-Pass ..............18
Flipper Glass, Liftgate ........8,23
Fluid Capacities .............68
Fluids ...................68
FogLights ................18
Folding Front Passenger Seat .....14
Folding Rear Seat ............15
Four Wheel Drive Operation ......46
Freeing A Stuck Vehicle ........64
Front Heated Seats ...........16
Fuel Filler Cap (Gas Cap) .........55
Specifications .............
68
Garage Door Opener (HomeLink
®)..43
Gas Cap (Fuel Filler Cap) ........55
Hard Disk Drive .............33
Headlights ................18
Dimmer Switch ............18
High Beam ..............18
HeatedSeats ..............16
High Beam/Low Beam Select (Dimmer)
Switch ..................18
HomeLink
®(Garage Door Opener)
Transmitter ................43
Hood Release ..............66
Instrument Cluster ............6
Indicators ................7
INDEX
81