maintenance schedule JEEP WRANGLER 2015 JK / 3.G User Guide
[x] Cancel search | Manufacturer: JEEP, Model Year: 2015, Model line: WRANGLER, Model: JEEP WRANGLER 2015 JK / 3.GPages: 695, PDF Size: 20.64 MB
Page 594 of 695
Engine Air Cleaner Filter Inspection and
Replacement — Gasoline Engine
Follow the recommended maintenance intervals as
shown in the Maintenance Schedule.
Engine Air Cleaner Filter Removal
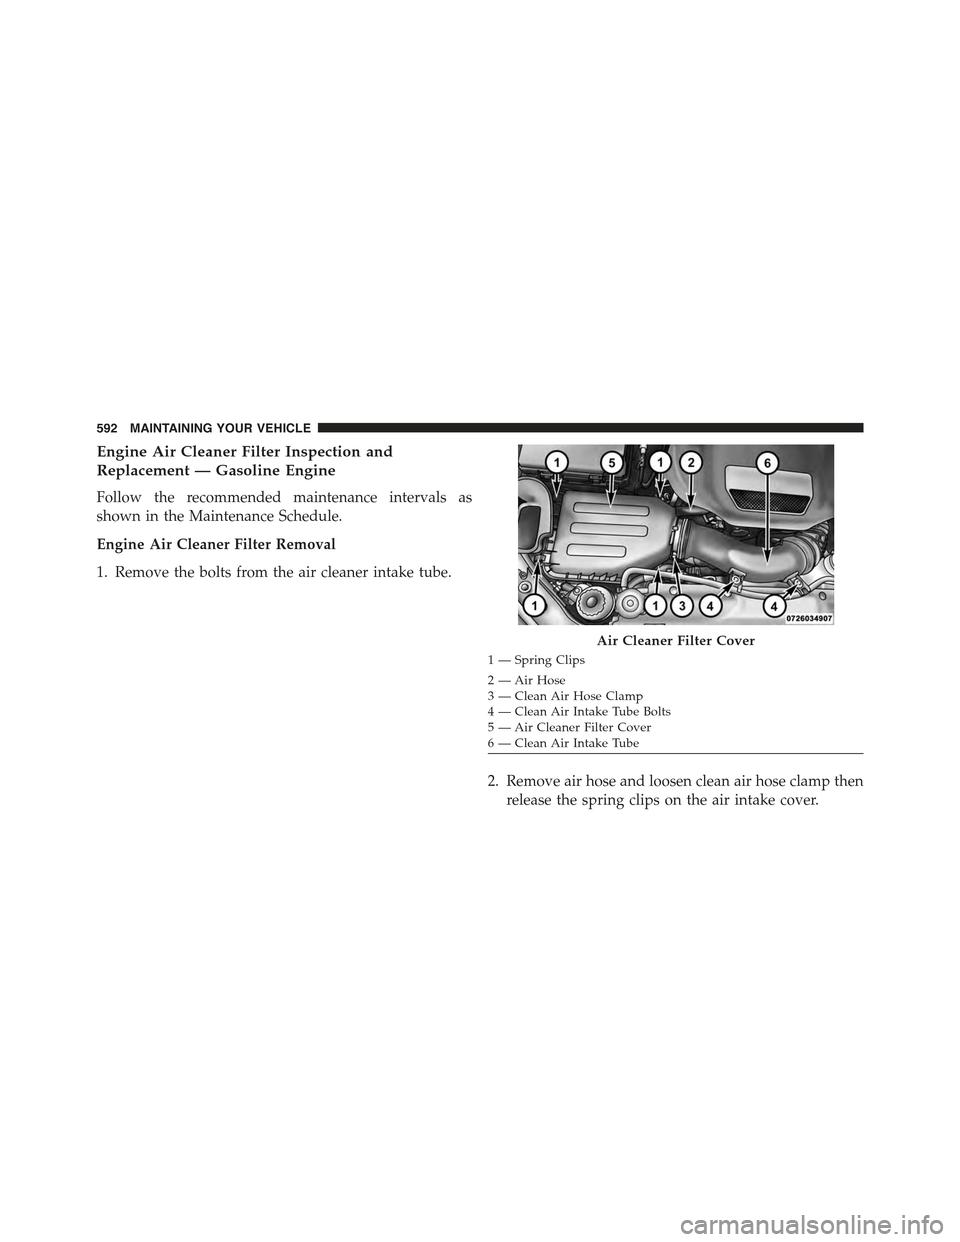
1. Remove the bolts from the air cleaner intake tube.
2. Remove air hose and loosen clean air hose clamp then
release the spring clips on the air intake cover.
Air Cleaner Filter Cover
1—SpringClips
2—AirHose3 — Clean Air Hose Clamp4 — Clean Air Intake Tube Bolts5 — Air Cleaner Filter Cover6—CleanAirIntakeTube
592 MAINTAINING YOUR VEHICLE
Page 603 of 695
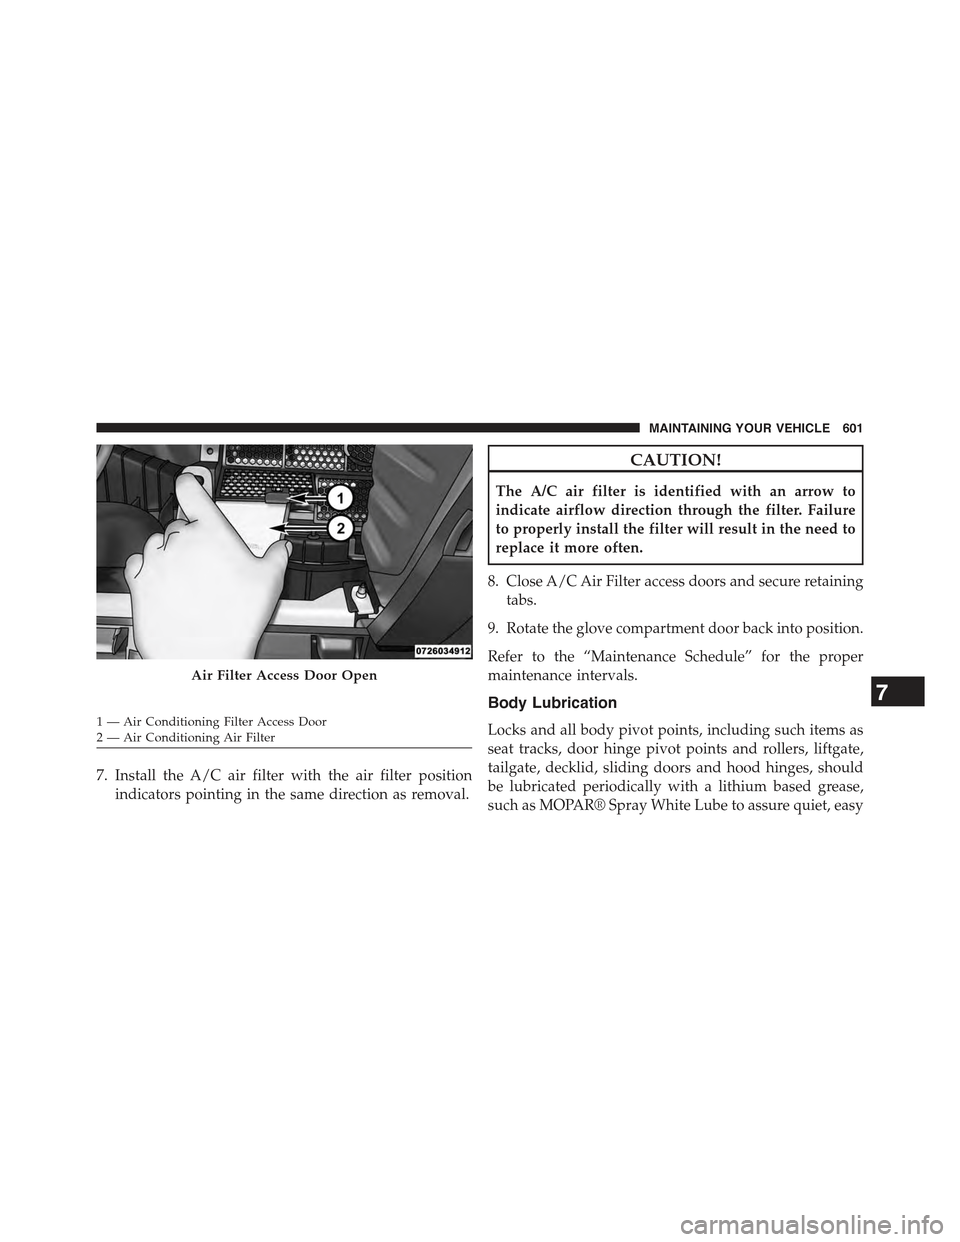
7. Install the A/C air filter with the air filter position
indicators pointing in the same direction as removal.
CAUTION!
The A/C air filter is identified with an arrow to
indicate airflow direction through the filter. Failure
to properly install the filter will result in the need to
replace it more often.
8. Close A/C Air Filter access doors and secure retaining
tabs.
9. Rotate the glove compartment door back into position.
Refer to the “Maintenance Schedule” for the proper
maintenance intervals.
Body Lubrication
Locks and all body pivot points, including such items as
seat tracks, door hinge pivot points and rollers, liftgate,
tailgate, decklid, sliding doors and hood hinges, should
be lubricated periodically with a lithium based grease,
such as MOPAR® Spray White Lube to assure quiet, easy
Air Filter Access Door Open
1—AirConditioningFilterAccessDoor2 — Air Conditioning Air Filter
7
MAINTAINING YOUR VEHICLE 601
Page 614 of 695
Engine Coolant Checks
Check the engine coolant (antifreeze) protection every 12
months (before the onset of freezing weather, where
applicable). If the engine coolant (antifreeze) is dirty or
rusty in appearance, the system should be drained,
flushed and refilled with fresh engine coolant (anti-
freeze). Check the front of the A/C condenser (if
equipped) or radiator for any accumulation of bugs,
leaves, etc. If dirty, clean by gently spraying water from a
garden hose vertically down the face of the A/C con-
denser (if equipped) or the back of the radiator core.
Check the engine cooling system hoses for brittle rubber,
cracking, tears, cuts, and tightness of the connection at
the coolant recovery bottle and radiator. Inspect the
entire system for leaks.
With the engine at normal operating temperature (but
not running), check the cooling system pressure cap for
proper vacuum sealing by draining a small amount of
engine coolant (antifreeze) from the radiator drain cock.
If the cap is sealing properly, the engine coolant (anti-
freeze) will begin to drain from the coolant recovery
bottle. DO NOT REMOVE THE COOLANT PRESSURE
CAP WHEN THE COOLING SYSTEM IS HOT.
Cooling System — Drain, Flush And Refill
NOTE:Some vehicles require special tools to add coolant
properly. Failure to fill these systems properly could lead
to severe internal engine damage. If any coolant is
needed to be added to the system please contact your
local authorized dealer.
If the engine coolant (antifreeze) is dirty or contains visible
sediment, have an authorized dealer clean and flush with
OAT coolant (antifreeze) (conforming to MS-12106).
Refer to the “Maintenance Schedule” for the proper
maintenance intervals.
612 MAINTAINING YOUR VEHICLE
Page 619 of 695
If an examination of your engine compartment shows no
evidence of radiator or hose leaks, the vehicle may be
safely driven. The vapor will soon dissipate.
•Do not overfill the coolant expansion bottle.
•Check the coolant freeze point in the radiator and in
the coolant expansion bottle. If engine coolant (anti-
freeze) needs to be added, the contents of the coolant
expansion bottle must also be protected against freez-
ing.
•If frequent engine coolant (antifreeze) additions are
required, the cooling system should be pressure tested
for leaks.
•Maintain engine coolant (antifreeze) concentration
at a minimum of 50% OAT coolant (conforming to
MS-12106) and distilled water for proper corrosion
protection of your engine which contains aluminum
components.
•Make sure that the coolant expansion bottle overflow
hoses are not kinked or obstructed.
•Keep the front of the radiator clean. If your vehicle is
equipped with air conditioning, keep the front of the
condenser clean.
•Do not change the thermostat for Summer or Winter
operation. If replacement is ever necessary, install
ONLY the correct type thermostat. Other designs may
result in unsatisfactory engine coolant (antifreeze)
performance, poor gas mileage, and increased emis-
sions.
Brake System
In order to assure brake system performance, all brake
system components should be inspected periodically.
Refer to the “Maintenance Schedule” for the proper
maintenance intervals.
7
MAINTAINING YOUR VEHICLE 617
Page 624 of 695
NOTE:
•The holes in the dipstick will be full of fluid if the
actual level is at or above the hole.
•If it is necessary to check the transmission below the
operating temperature, the fluid level should be
between the two COLD (lower) holes on the dipstick
with the fluid at approximately 80° F (27° C). If the
fluid level is correctly established at 80° F (27° C), it
should be between the HOT (upper) reference holes
when the transmission reaches 180° F (82° C). Re-
member it is best to check the level at the normal
operating temperature.
CAUTION!
If the fluid temperature is below 50°F (10°C) it may
not register on the dipstick. Do not add fluid until
(Continued)
CAUTION!(Continued)
the temperature is elevated enough to produce an
accurate reading. Run the engine at idle, in PARK, to
warm the fluid.
8. Reinstall the engine cover and snap it down securely
onto the four mounting studs.
9. Check for leaks. Release the parking brake.
NOTE:To prevent dirt and water from entering the
transmission after checking or replenishing fluid, make
sure that the dipstick cap is properly reseated. It is
normal for the dipstick cap to spring back slightly from
its fully seated position, as long as its seal remains
engaged in the dipstick tube.
Fluid And Filter Changes
Refer to the “Maintenance Schedule” for the proper
maintenance intervals.
622 MAINTAINING YOUR VEHICLE
Page 625 of 695
In addition, change the fluid and filter if the fluid
becomes contaminated (with water, etc.), or if the trans-
mission is disassembled for any reason.
Clutch Hydraulic System (Manual Transmission) —
If Equipped
The clutch hydraulic system is fed by a segregated
volume of fluid within the brake system master cylinder
reservoir. In the event of leakage or wear, use only the
manufacturer’s recommended brake fluid. Refer to “Flu-
ids, Lubricants, and Genuine Parts” in “Maintaining Your
Vehicle” for further information.
Manual Transmission — If Equipped
Selection Of Lubricant
Use only manufacturer’s recommended manual trans-
mission fluid. Refer to “Fluids, Lubricants, and Genuine
Parts” in “Maintaining Your Vehicle” for further informa-
tion.
Fluid Level Check
Check the fluid level by removing the fill plug. The fluid
level should be between the bottom of the fill hole and a
point not more than 3/16 in (4.76 mm) below the bottom
of the hole.
Add fluid, if necessary, to maintain the proper level.
Frequency Of Fluid Change
Under normal operating conditions, the fluid installed at
the factory will give satisfactory lubrication for the life of
the vehicle. If the fluid becomes contaminated with
water, it should be changed immediately. Otherwise,
change the fluid as recommended in the Maintenance
Schedule. Refer to the “Maintenance Schedule” for the
proper maintenance intervals.
7
MAINTAINING YOUR VEHICLE 623
Page 653 of 695
MAINTENANCE SCHEDULES
CONTENTS
!MAINTENANCE SCHEDULE.............652▫Maintenance Chart.....................654
8
MAINTENANCE
SCHEDULES
Page 654 of 695
MAINTENANCE SCHEDULE
Your vehicle is equipped with an automatic oil change
indicator system. The oil change indicator system will
remind you that it is time to take your vehicle in for
scheduled maintenance.
Based on engine operation conditions, the oil change
indicator message will illuminate. This means that service
is required for your vehicle. Operating conditions such as
frequent short-trips, trailer tow, extremely hot or cold
ambient temperatures, and E85 fuel usage will influence
when the “Change Oil” or “Oil Change Required” message
is displayed. Severe Operating Conditions can cause the
change oil message to illuminate as early as 3,500 miles
(5,600 km) since last reset. Have your vehicle serviced as
soon as possible, within the next 500 miles (805 km).
On Electronic Vehicle Information Center (EVIC) equipped
vehicles, “Oil Change Required” will be displayed in the
EVIC and a single chime will sound, indicating that an oil
change is necessary.
On Non-EVIC equipped vehicles, “Change Oil” will flash
in the instrument cluster odometer and a single chime
will sound, indicating that an oil change is necessary.
Your authorized dealer will reset the oil change indicator
message after completing the scheduled oil change. If a
scheduled oil change is performed by someone other
than your authorized dealer, the message can be reset by
referring to the steps described under “Instrument Clus-
ter Descriptions” or “Electronic Vehicle Information Cen-
ter (EVIC)” in “Understanding Your Instrument Panel”
for further information.
NOTE:Under no circumstances should oil change inter-
vals exceed 10,000 miles (16,000 km) or twelve months,
whichever comes first.
Severe Duty All Models
Change Engine Oil at 4000 miles (6,500 km) if the vehicle
is operated in a dusty and off road environment. This
type of vehicle use is considered Severe Duty
8
MAINTENANCE
SCHEDULES
652 MAINTENANCE SCHEDULES
Page 655 of 695
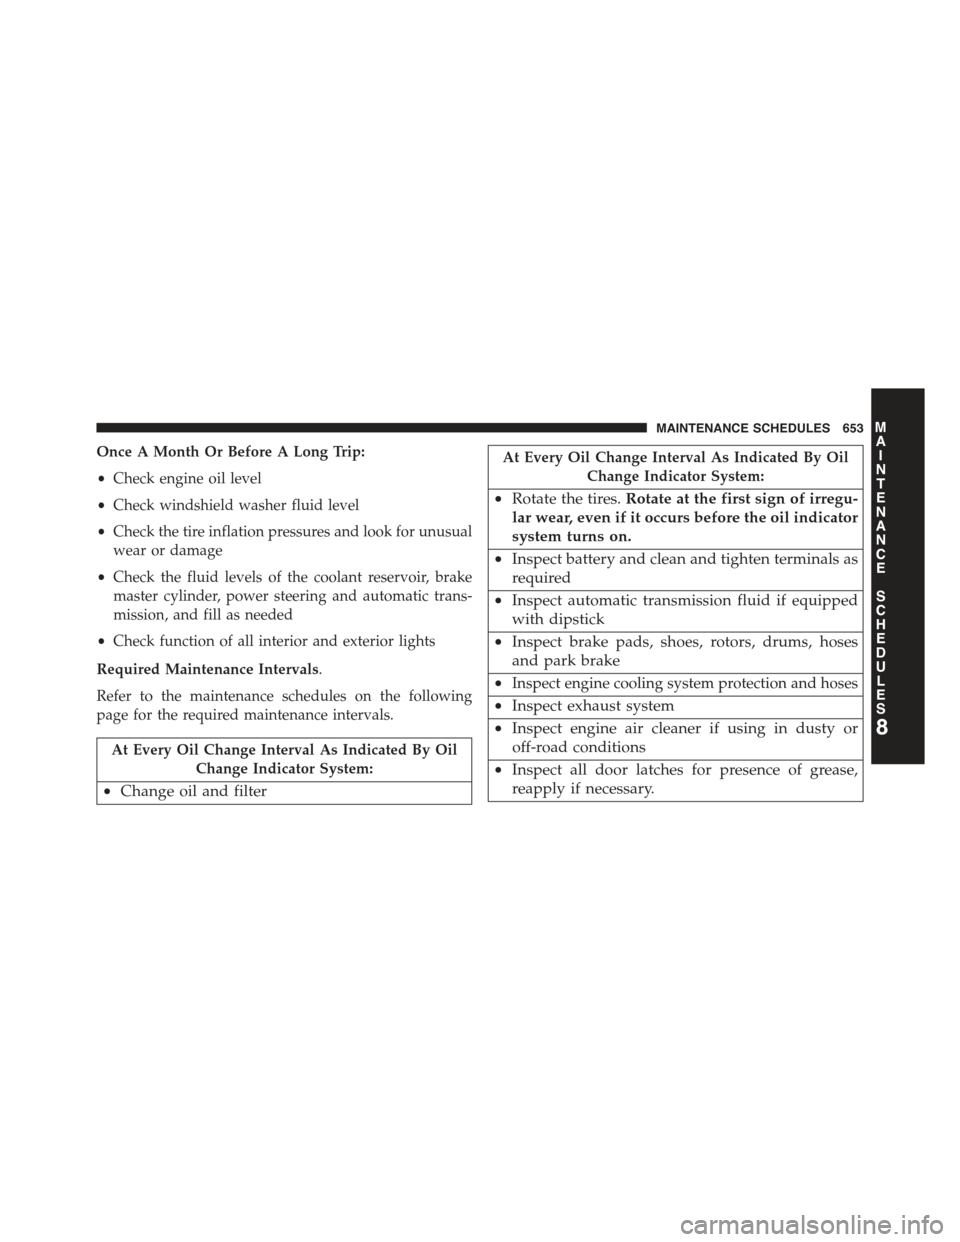
Once A Month Or Before A Long Trip:
•Check engine oil level
•Check windshield washer fluid level
•Check the tire inflation pressures and look for unusual
wear or damage
•Check the fluid levels of the coolant reservoir, brake
master cylinder, power steering and automatic trans-
mission, and fill as needed
•Check function of all interior and exterior lights
Required Maintenance Intervals.
Refer to the maintenance schedules on the following
page for the required maintenance intervals.
At Every Oil Change Interval As Indicated By Oil
Change Indicator System:
•Change oil and filter
At Every Oil Change Interval As Indicated By Oil
Change Indicator System:
•Rotate the tires.Rotate at the first sign of irregu-
lar wear, even if it occurs before the oil indicator
system turns on.
•Inspect battery and clean and tighten terminals as
required
•Inspect automatic transmission fluid if equipped
with dipstick
•Inspect brake pads, shoes, rotors, drums, hoses
and park brake
•Inspect engine cooling system protection and hoses
•Inspect exhaust system
•Inspect engine air cleaner if using in dusty or
off-road conditions
•Inspect all door latches for presence of grease,
reapply if necessary.
8
MAINTENANCE
SCHEDULES
MAINTENANCE SCHEDULES 653
Page 656 of 695
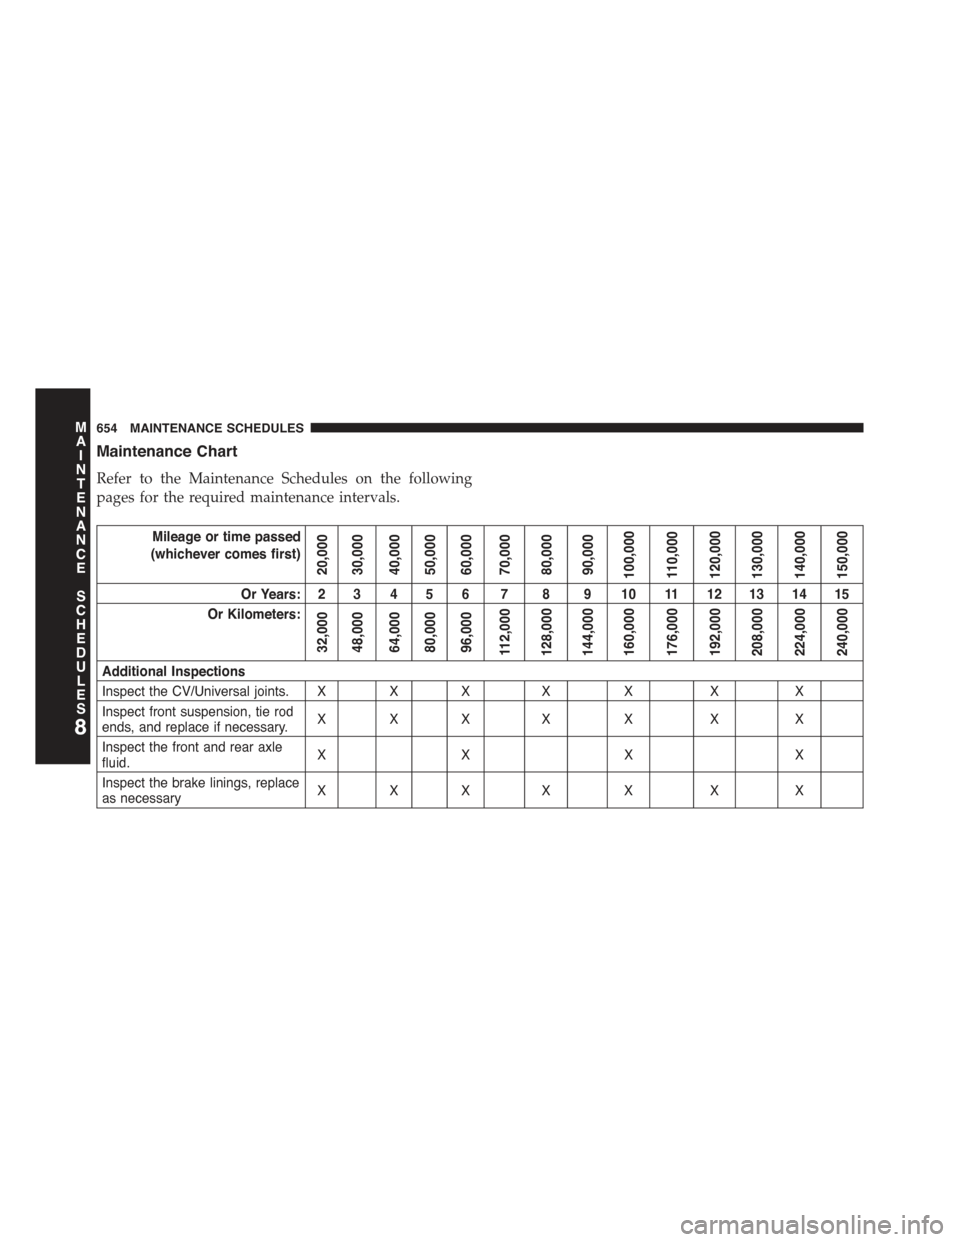
Maintenance Chart
Refer to the Maintenance Schedules on the following
pages for the required maintenance intervals.
Mileage or time passed
(whichever comes first)
20,00030,00040,00050,00060,00070,00080,00090,000100,000110,000120,000130,000140,000150,000
Or Years: 2 3 4 5 6 7 8 9 10 11 12 13 14 15
Or Kilometers:
32,00048,00064,00080,00096,000112,000128,000144,000160,000176,000192,000208,000224,000240,000
Additional Inspections
Inspect the CV/Universal joints. X X XXXXX
Inspect front suspension, tie rodends, and replace if necessary.XXX X X X X
Inspect the front and rear axlefluid.XX X X
Inspect the brake linings, replaceas necessaryXXX X X X X
8
MAINTENANCE
SCHEDULES
654 MAINTENANCE SCHEDULES