check engine KIA CEED 2013 Owners Manual
[x] Cancel search | Manufacturer: KIA, Model Year: 2013, Model line: CEED, Model: KIA CEED 2013Pages: 1168, PDF Size: 48.01 MB
Page 1114 of 1168
777
Maintenance
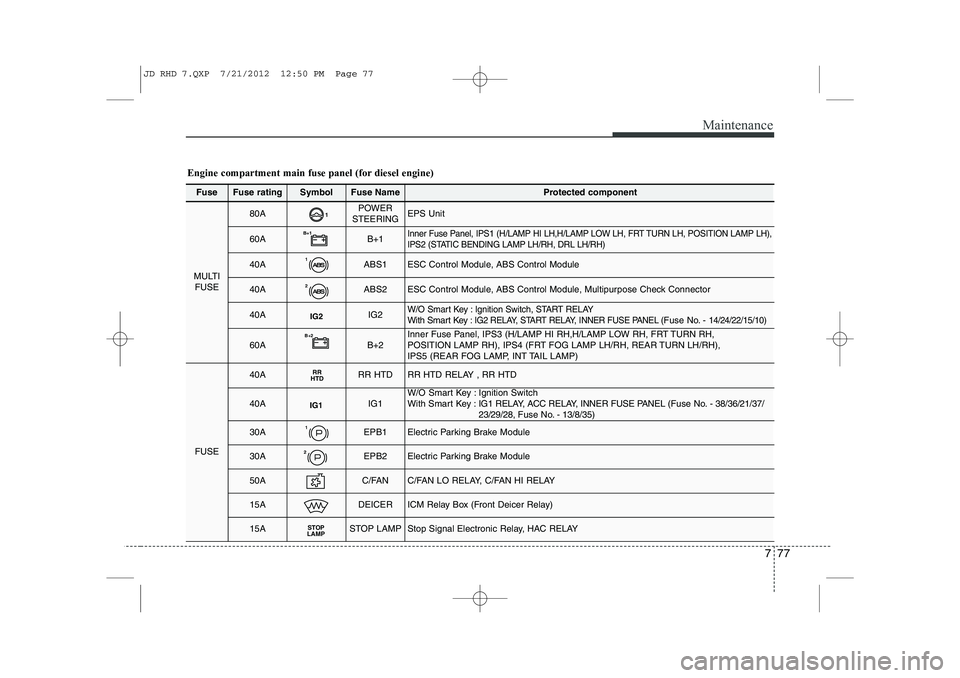
FuseFuse ratingSymbolFuse NameProtected component
MULTIFUSE
80A1POWER
STEERINGEPS Unit
60AB+1B+1Inner Fuse Panel, IPS1 (H/LAMP HI LH,H/LAMP LOW LH, FRT TURN LH, POSITION LAMP LH),
IPS2 (STATIC BENDING LAMP LH/RH, DRL LH/RH)
40A1ABS1ESC Control Module, ABS Control Module
40A2ABS2ESC Control Module, ABS Control Module, Multipurpose Check Connector
40AIG2IG2W/O Smart Key : Ignition Switch, START RELAYWith Smart Key : IG2 RELAY, START RELAY, INNER FUSE PANEL (Fuse No. - 14/24/22/15/10)
60AB+2B+2Inner Fuse Panel, IPS3 (H/LAMP HI RH,H/LAMP LOW RH, FRT TURN RH,
POSITION LAMP RH), IPS4 (FRT FOG LAMP LH/RH, REAR TURN LH/RH),
IPS5 (REAR FOG LAMP, INT TAIL LAMP)
FUSE
40ARR
HTDRR HTDRR HTD RELAY , RR HTD
40AIG1IG1W/O Smart Key : Ignition Switch
With Smart Key : IG1 RELAY, ACC RELAY, INNER FUSE PANEL ( Fuse No. - 38/36/21/37/
23/29/28, Fuse No. - 13/8/35)
30A1EPB1Electric Parking Brake Module
30A2EPB2Electric Parking Brake Module
50AC/FANC/FAN LO RELAY, C/FAN HI RELAY
15ADEICERICM Relay Box (Front Deicer Relay)
15ASTOP
LAMPSTOP LAMPStop Signal Electronic Relay, HAC RELAY
Engine compartment main fuse panel (for diesel engine)
JD RHD 7.QXP 7/21/2012 12:50 PM Page 77
Page 1118 of 1168
781
Maintenance
LIGHT BULBS
Use only the bulbs of the specifiedwattage.
✽✽ NOTICE
After driving in heavy rain or washing the vehicle, headlight and taillight lenses
could appear foggy. This condition is
caused by the temperature differencebetween the lamp inside and outside.
This is similar to the condensation on
your windows inside your vehicle during
rain and does not indicate a problem
with your vehicle. If the water leaks into
the lamp bulb circuitry, we recommendthat the system be checked by an autho-
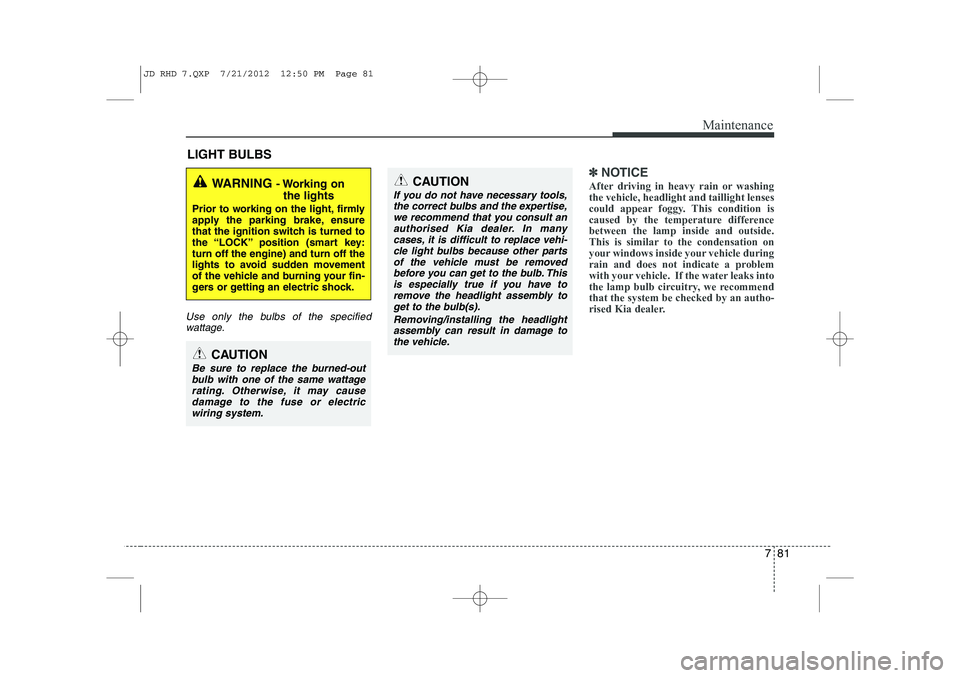
rised Kia dealer.WARNING - Working on
the lights
Prior to working on the light, firmly
apply the parking brake, ensure
that the ignition switch is turned to
the “LOCK” position (smart key:turn off the engine) and turn off the
lights to avoid sudden movement
of the vehicle and burning your fin-
gers or getting an electric shock.
CAUTION
Be sure to replace the burned-out bulb with one of the same wattage rating. Otherwise, it may causedamage to the fuse or electricwiring system.
CAUTION
If you do not have necessary tools, the correct bulbs and the expertise,
we recommend that you consult anauthorised Kia dealer. In many cases, it is difficult to replace vehi-cle light bulbs because other parts
of the vehicle must be removedbefore you can get to the bulb. This is especially true if you have to
remove the headlight assembly to get to the bulb(s).
Removing/installing the headlightassembly can result in damage to the vehicle.
JD RHD 7.QXP 7/21/2012 12:50 PM Page 81
Page 1130 of 1168
793
Maintenance
Side repeater light bulb replace- ment
If the light bulb does not operate, we rec-
ommend that the system be checked by
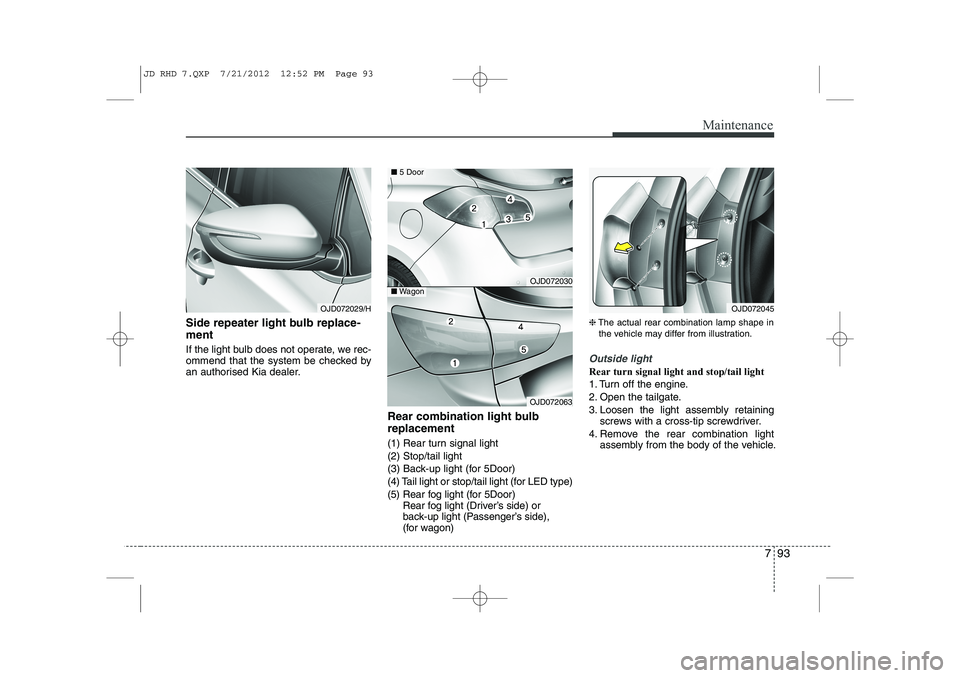
an authorised Kia dealer.Rear combination light bulb replacement
(1) Rear turn signal light (2) Stop/tail light
(3) Back-up light (for 5Door)
(4) Tail light or stop/tail light (for LED type)
(5) Rear fog light (for 5Door)Rear fog light (Driver’s side) or
back-up light (Passenger’s side),
(for wagon) ❈
The actual rear combination lamp shape in
the vehicle may differ from illustration.
Outside light
Rear turn signal light and stop/tail light
1. Turn off the engine.
2. Open the tailgate.
3. Loosen the light assembly retaining
screws with a cross-tip screwdriver.
4. Remove the rear combination light assembly from the body of the vehicle.
OJD072045OJD072029/H
OJD072030
OJD072063
■5 Door
■Wagon
JD RHD 7.QXP 7/21/2012 12:52 PM Page 93
Page 1131 of 1168
Maintenance
94
7
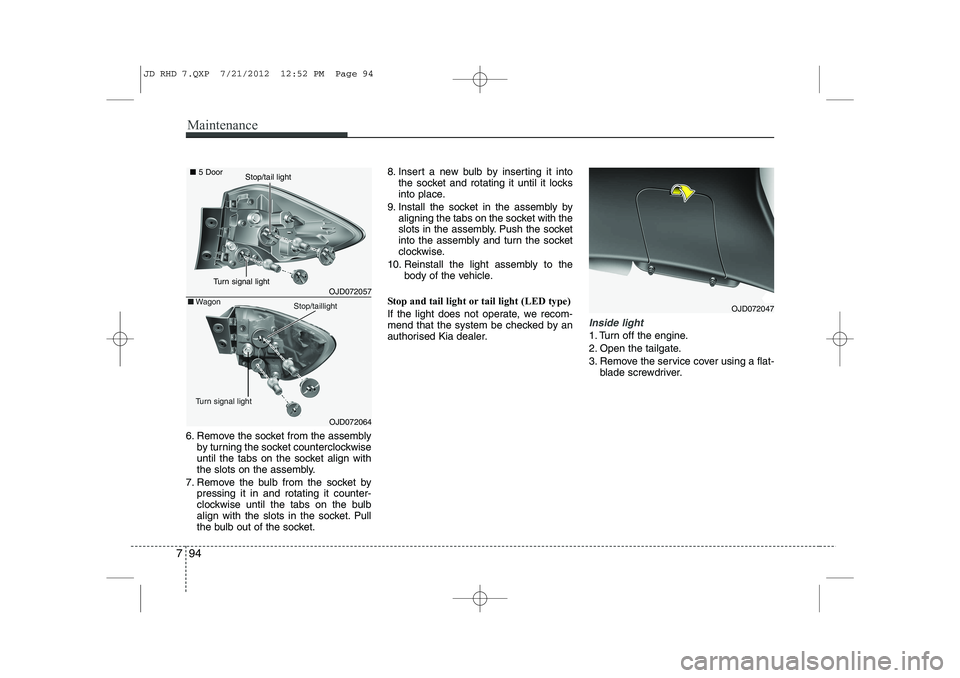
6. Remove the socket from the assembly
by turning the socket counterclockwise
until the tabs on the socket align with
the slots on the assembly.
7. Remove the bulb from the socket by pressing it in and rotating it counter-
clockwise until the tabs on the bulb
align with the slots in the socket. Pull
the bulb out of the socket. 8. Insert a new bulb by inserting it into
the socket and rotating it until it locks
into place.
9. Install the socket in the assembly by aligning the tabs on the socket with the
slots in the assembly. Push the socket
into the assembly and turn the socket
clockwise.
10. Reinstall the light assembly to the body of the vehicle.
Stop and tail light or tail light (LED type)
If the light does not operate, we recom-
mend that the system be checked by an
authorised Kia dealer.
Inside light
1. Turn off the engine.
2. Open the tailgate.
3. Remove the service cover using a flat- blade screwdriver.
OJD072047
OJD072057
OJD072064
■5 Door
■Wagon
Turn signal light
Stop/taillight
Turn signal light
Stop/tail light
JD RHD 7.QXP 7/21/2012 12:52 PM Page 94
Page 1133 of 1168
Maintenance
96
7
Back-up light and rear fog light (if equipped)
7. Remove the socket from the assembly
by turning the socket counterclockwise
until the tabs on the socket align with
the slots on the assembly.
8. Pull the bulb out of the socket.
9. Insert a new bulb into the socket.
10. Install the socket into the assembly by aligning the tabs on the socket
with the slots on the assembly and
turning the socket clockwise.
11. Reinstall the light assembly to the body of the vehicle
❈ Rear fog light is located only on the
driver’s side. (for wagon)
Tail light or stop and tail light (LED type)
If the light does not operate, we recom-
mend that the system be checked by an
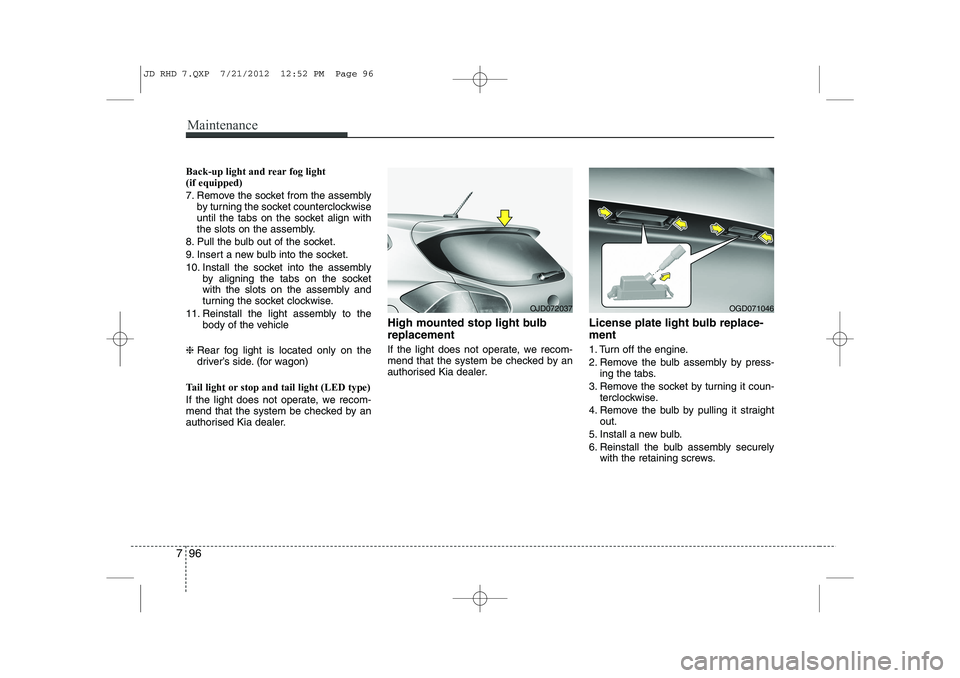
authorised Kia dealer. High mounted stop light bulb replacement
If the light does not operate, we recom-
mend that the system be checked by an
authorised Kia dealer.
License plate light bulb replace- ment
1. Turn off the engine.
2. Remove the bulb assembly by press-
ing the tabs.
3. Remove the socket by turning it coun- terclockwise.
4. Remove the bulb by pulling it straight out.
5. Install a new bulb.
6. Reinstall the bulb assembly securely with the retaining screws.
OJD072037OGD071046
JD RHD 7.QXP 7/21/2012 12:52 PM Page 96
Page 1142 of 1168
7 105
Maintenance
3. Exhaust emission control system
The Exhaust Emission Control System is
a highly effective system which controls
exhaust emissions whilst maintaining
good vehicle performance.
Vehicle modifications
This vehicle should not be modified.
Modification of your vehicle could affect
its performance, safety or durability and
may even violate governmental safety
and emissions regulations.
In addition, damage or performance
problems resulting from any modification
may not be covered under warranty.
If you use unauthorised electronic devices, it may cause the vehicle to
operate abnormally, wire damage, bat-
tery discharge or fire. For your safety,
do not use unauthorised electric
devices.
Engine exhaust gas precautions
(carbon monoxide)
Carbon monoxide can be present with other exhaust fumes. Therefore, if you
smell exhaust fumes of any kind inside
your vehicle, have it inspected and
repaired immediately. If you ever sus-
pect exhaust fumes are coming into
your vehicle, drive it only with all the
windows fully open. Have your vehicle
checked and repaired immediately. Do not operate the engine in confined
or closed areas (such as garages) any
more than what is necessary to move
the vehicle in or out of the area.
When the vehicle is stopped in an open area for more than a short time
with the engine running, adjust the
ventilation system (as needed) to draw
outside air into the vehicle.
Never sit in a parked or stopped vehi- cle for any extended time with the
engine running.
When the engine stalls or fails to start, excessive attempts to restart the
engine may cause damage to theemission control system.
WARNING - Exhaust
Engine exhaust gases contain car-
bon monoxide (CO). Though
colourless and odorless, it is dan-
gerous and could be lethal if
inhaled. Follow the instructions
following to avoid CO poisoning.
JD RHD 7.QXP 7/21/2012 12:53 PM Page 105
Page 1152 of 1168
Specifications & Consumer information
8
8
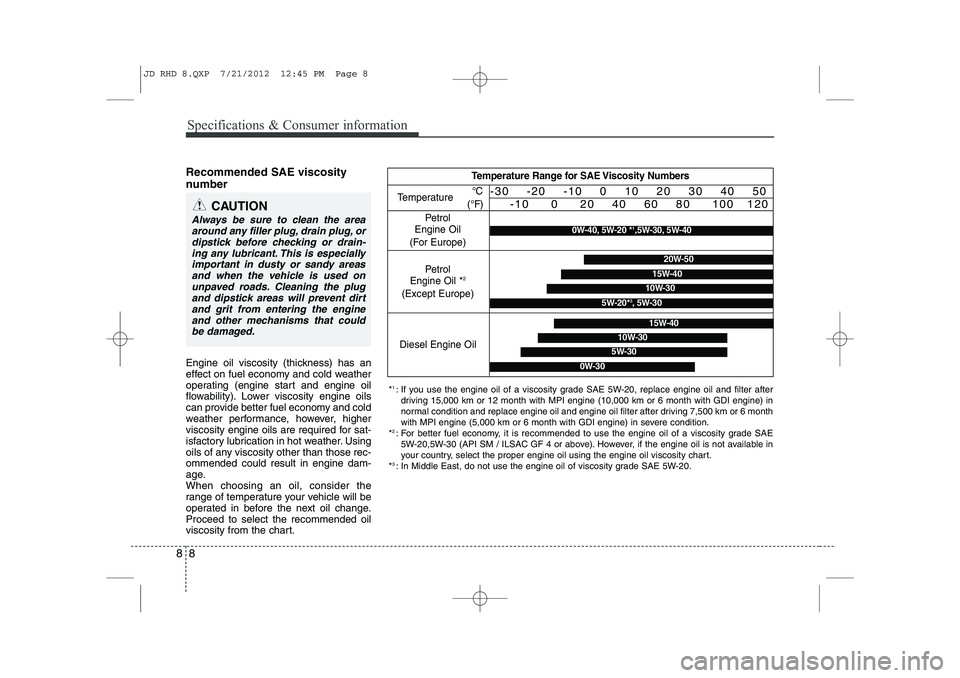
Recommended SAE viscosity
number
Engine oil viscosity (thickness) has an
effect on fuel economy and cold weather
operating (engine start and engine oil
flowability). Lower viscosity engine oils
can provide better fuel economy and cold
weather performance, however, higher
viscosity engine oils are required for sat-
isfactory lubrication in hot weather. Using
oils of any viscosity other than those rec-ommended could result in engine dam-
age.When choosing an oil, consider the
range of temperature your vehicle will be
operated in before the next oil change.Proceed to select the recommended oil
viscosity from the chart.
CAUTION
Always be sure to clean the area
around any filler plug, drain plug, or
dipstick before checking or drain-ing any lubricant. This is especiallyimportant in dusty or sandy areas
and when the vehicle is used onunpaved roads. Cleaning the plugand dipstick areas will prevent dirtand grit from entering the engine
and other mechanisms that couldbe damaged.
Temperature Range for SAE Viscosity Numbers
Temperature
Petrol
Engine Oil
(For Europe) °C
(°F)-30 -20 -10 0 10 20 30 40 50 -10 0 20 40 60 80 100 120
0W-40, 5W-20 * 1
,5W-30, 5W-40
Petrol
Engine Oil * 2
(Except Europe)20W-50
10W-30
15W-40
5W-20* 3
, 5W-30
* 1
: If you use the engine oil of a viscosity grade SAE 5W-20, replace engine oil and filter after
driving 15,000 km or 12 month with MPI engine (10,000 km or 6 month with GDI engine) in
normal condition and replace engine oil and engine oil filter after driving 7,500 km or 6 month
with MPI engine (5,000 km or 6 month with GDI engine) in severe condition.
* 2
: For better fuel economy, it is recommended to use the engine oil of a viscosity grade SAE
5W-20,5W-30 (API SM / ILSAC GF 4 or above). However, if the engine oil is not available in
your country, select the proper engine oil using the engine oil viscosity chart.
* 3
: In Middle East, do not use the engine oil of viscosity grade SAE 5W-20.
Diesel Engine Oil5W-30
15W-40
10W-30
0W-30
JD RHD 8.QXP 7/21/2012 12:45 PM Page 8
Page 1158 of 1168
I3
Index
Before driving . . . . . . . . . . . . . . . . . . . . . . . . . . . . . . . . 5-4
Bonnet . . . . . . . . . . . . . . . . . . . . . . . . . . . . . . . . . . . . . 4-28
Bottle holders . . . . . . . . . . . . . . . . . . . . . . . . . . . . . . 4-156
Brake system . . . . . . . . . . . . . . . . . . . . . . . . . . . . . . . . 5-33
Anti-lock brake system (ABS) . . . . . . . . . . . . . . . . . 5-41
Electric parking brake . . . . . . . . . . . . . . . . . . . . . . . 5-37
Electronic stability control (ESC) . . . . . . . . . . . . . . 5-44
Emergency Stop Signal (ESS) . . . . . . . . . . . . . . . . . 5-48
Hill-start assist control (HAC) . . . . . . . . . . . . . . . . 5-48
Power brakes. . . . . . . . . . . . . . . . . . . . . . . . . . . . . . . 5-33
Parking brakes (Hand type) . . . . . . . . . . . . . . . . . . 5-33
Vehicle stability management . . . . . . . . . . . . . . . . . 5-47
Brakes/clutch fluid . . . . . . . . . . . . . . . . . . . . . . . . . . . 7-40
Bulb replacement . . . . . . . . . . . . . . . . . . . . . . . . . . . . 7-82
Bulb wattage . . . . . . . . . . . . . . . . . . . . . . . . . . . . . . . . . 8-4
Button start/stop, see engine start/stop button . . . . . 5-9
Calender. . . . . . . . . . . . . . . . . . . . . . . . . . . . . . . . . . . . 4-88
Camera (Rear view) . . . . . . . . . . . . . . . . . . . . . . . . . 4-109
Capacities (Lubricants) . . . . . . . . . . . . . . . . . . . . . . . . 8-6
Care Exterior care . . . . . . . . . . . . . . . . . . . . . . . . . . . . . . . 7-98
Interior care . . . . . . . . . . . . . . . . . . . . . . . . . . . . . . 7-103
Tyre care . . . . . . . . . . . . . . . . . . . . . . . . . . . . . . . . . . 7-53
Cargo area cover . . . . . . . . . . . . . . . . . . . . . . . . . . . . 4-160
Cargo security screen . . . . . . . . . . . . . . . . . . . . . . . . 4-163 Centre console storage . . . . . . . . . . . . . . . . . . . . . . . 4-151
Central door lock switch . . . . . . . . . . . . . . . . . . . . . . 4-18
Certification label . . . . . . . . . . . . . . . . . . . . . . . . . . . . . 8-9Chains
Tyre chains . . . . . . . . . . . . . . . . . . . . . . . . . . . . . . . . 5-68
Changing tyres . . . . . . . . . . . . . . . . . . . . . . . . . . . . . . 6-10
Checking tyre inflation pressure . . . . . . . . . . . . . . . . 7-55
Child restraint system . . . . . . . . . . . . . . . . . . . . . . . . 3-29 ISOFIX system . . . . . . . . . . . . . . . . . . . . . . . . . . . . . 3-35
Seat belt . . . . . . . . . . . . . . . . . . . . . . . . . . . . . . . . . . . 3-31
Tether anchor system . . . . . . . . . . . . . . . . . . . . . . . . 3-34
Child-protector rear door lock . . . . . . . . . . . . . . . . . 4-21
Cigarette lighter . . . . . . . . . . . . . . . . . . . . . . . . . . . . 4-154
Clean air . . . . . . . . . . . . . . . . . . . . . . . . . . . . . . . . . . 4-150
Climate control air filter. . . . . . . . . . . . . 4-134, 146, 7-45
Clock . . . . . . . . . . . . . . . . . . . . . . . . . . . . . . . . . . . . . . 4-88
Clothes hanger . . . . . . . . . . . . . . . . . . . . . . . . . . . . . 4-158Combined instrument, see instrument cluster (Normal vision) . . . . . . . . . . . . . . . . . . . . . . . . . . . . . 4-46
Combined instrument, see instrument cluster (Super vision) . . . . . . . . . . . . . . . . . . . . . . . . . . . . . . 4-59
Compact spare tyre. . . . . . . . . . . . . . . . . . . . . . . . . . . 6-15
Compact spare tyre replacement . . . . . . . . . . . . . . . 7-58
Cool box . . . . . . . . . . . . . . . . . . . . . . . . . . . . . . . . . . . 4-152
Coolant . . . . . . . . . . . . . . . . . . . . . . . . . . . . . . . . . . . . . 7-37
Cooling fluid, see engine coolant . . . . . . . . . . . . . . . . 7-37
Crankcase emission control system. . . . . . . . . . . . . 7-104
Cruise control system . . . . . . . . . . . . . . . . . . . . . . . . . 5-51
C
JD RHD Index.QXP 7/21/2012 1:10 PM Page 3