light KIA Magnetis 2006 2.G Workshop Manual
[x] Cancel search | Manufacturer: KIA, Model Year: 2006, Model line: Magnetis, Model: KIA Magnetis 2006 2.GPages: 225, PDF Size: 3.77 MB
Page 127 of 225

AUTOMATIC OPERATION
(IF EQUIPPED)The FATC (Full Automatic Temperature
Control) system automatically controls
the heating and cooling. To activate it:
1. Push the "AUTO" switch. The
indicator light will come on
confirming that the Face, Floor and/
or Bi-Level modes as well as the
blower speed and air conditioner will
be controlled automatically.
2. Press the "temperature control"
switch to set the desired temperature.
The temperature will increase to the
maximum 32°C (90°F) by pressing
the red button. Each time the red
button is depressed, the set
temperature will increase by 0.5°C
(1°F).The temperature will decrease to the
minimum 17°C (62°F) by pressing
the blue button. Each time the blue
button is depressed, the set
temperature will decrease by 0.5°C
(1°F).
AMBIENT SWITCHPressing the AMB button displays the
ambient temperature on the LCD.MANUAL OPERATIONThe heating and cooling system can be
controlled manually if the “AUTO”
button is not selected. In the manual
state, the system works sequentially
according to the order of buttons
selected.
System function not manually selected
will be controlled automatically.
Press the "AUTO" button in order to
convert to automatic control of the
system.FAN SPEED CONTROLThe fan speed can be set to the desired
speed by pressing the appropriate fan
speed control button. The higher the fan
speed is, the more air is delivered.
Pressing the "OFF" button turns off the
fan.
DRIVING YOUR VEHICLE
4-48
✻
NOTICE
If the battery has been discharged
or disconnected, the temperature
mode will reset as Centigrade
degree.
This is normal condition and you
can adjust the temperature mode
from Centigrade to Fahrenheit as
follows;
Press the temperature down but-
ton 3 seconds or more with the
AMB button held down. The dis-
play shows that the unit of tem-
perature is adjusted to Centigrade
or Fahrenheit.
MS-CNA-Eng 4(40~).QXD 7/25/2005 5:15 PM Page 48
Page 131 of 225
DRIVING YOUR VEHICLE
4-52AIR CONDITIONING
SYSTEM OPERATING
TIPS:• If the vehicle has been parked in
direct sunlight during hot weather,
open the windows for a short time to
let hot air inside the vehicle escape.
• To help reduce moisture on the inside
of windows on rainy, humid days,
decrease the humidity inside the
vehicle by operating the air
conditioning system.
• During air conditioning system
operation, you may occasionally
notice a slight change in engine
speed at idle as the A/C compressor
cycles ON. This is a normal system
operating characteristic.
• Use the air conditioning system every
month if only for a few minutes.
• After air conditioning system use,
you may notice clear water dripping
(or even puddling) on the ground
under the passenger side of the
vehicle. This is a normal system
operating characteristic.• The air conditioning system includes
a function that will automatically turn
the A/C compressor OFF if engine
coolant temperature approaches an
overheating level. A/C compressor
operation will resume once engine
coolant temperature returns to the
“normal” range. Also, the A/C
compressor is automatically turned
off for a few seconds when the
accelerator is fully depressed.
• When operating the air conditioning
system use the outside (fresh) air
position.
• Operating the air conditioning system
in the recirculated air position does
provide maximum cooling, however,
continual operation in this mode may
cause the air inside the vehicle to
become stale.
MS-CNA-Eng 4(40~).QXD 7/25/2005 5:15 PM Page 52
Page 135 of 225

If you don’t want the outside (fresh) air
position when operating in either of these
modes, you can turn off the system
operation by performing the following:
1. Make sure the engine is running or
the ignition switch is in the ON
position.
2. Turn the fan speed control knob to
the “0” position.
3. Turn the mode selection knob to the
defrost ( ) position.
4. Push the air intake control button
( ) at least 5 times within 3
seconds.
5. Then the indicator light on the air
intake control button ( ) will blink
3 times with 0.5 second intervals
between blinks.
If you want to return to the outside
(fresh) air position, repeat the procedure
above.
WINDSHIELD DEFROST-
ING AND DEFOGGING
(AUTOMATIC TYPE)TO DEFOG INSIDE WINDSHIELD1. Select any fan speed except OFF
( ) position.
2. Select desired temperature.
3. Press the defrost button ( ).
4. The air conditioning will be turned
on according to the detected ambient
temperature and outside (fresh) air
position will be selected.
If you don’t want the air conditioning or
outside (fresh) air position press the
corresponding button to cancel the
operation.
TO DEFROST OUTSIDE
WINDSHIELD 1. Set temperature to the extreme hot
(25°C~32°C) position.
2. Set the fan speed to the or
position.
3. Press the defrost button ( ).
4. The air conditioning will be turned
on according to the detected ambient
temperature and outside (fresh) air
position will be selected.
If you don’t want the air conditioning or
outside (fresh) air position press the
corresponding button to cancel the
operation.
• Before driving, clear all snow and ice
from the windshield, rear window,
outside rear view mirrors, and all side
windows.
• Clear all snow and ice from the hood
and the air inlet in the cowl grille to
improve heater and defroster
efficiency and to reduce the
probability of fogging on the inside
of the windshield.
DRIVING YOUR VEHICLE
4-56
A/C
1
2
34
MMSA4055
MS-CNA-Eng 4(40~).QXD 7/25/2005 5:15 PM Page 56
Page 136 of 225
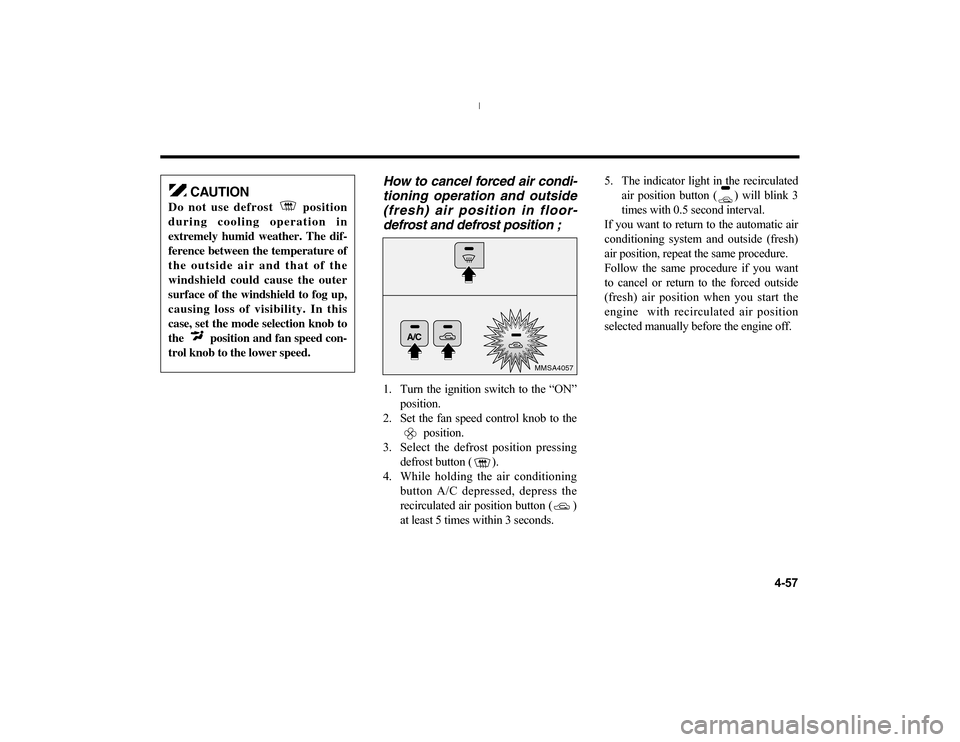
How to cancel forced air condi-
tioning operation and outside
(fresh) air position in floor-
defrost and defrost position ;1. Turn the ignition switch to the “ON”
position.
2. Set the fan speed control knob to the
position.
3. Select the defrost position pressing
defrost button ( ).
4. While holding the air conditioning
button A/C depressed, depress the
recirculated air position button ( )
at least 5 times within 3 seconds.5. The indicator light in the recirculated
air position button ( ) will blink 3
times with 0.5 second interval.
If you want to return to the automatic air
conditioning system and outside (fresh)
air position, repeat the same procedure.
Follow the same procedure if you want
to cancel or return to the forced outside
(fresh) air position when you start the
engine with recirculated air position
selected manually before the engine off.
4-57
A/C
MMSA4057
CAUTION
Do not use defrost position
during cooling operation in
extremely humid weather. The dif-
ference between the temperature of
the outside air and that of the
windshield could cause the outer
surface of the windshield to fog up,
causing loss of visibility. In this
case, set the mode selection knob to
the position and fan speed con-
trol knob to the lower speed.
MS-CNA-Eng 4(40~).QXD 7/25/2005 5:15 PM Page 57
Page 140 of 225
DRIVING TIPS
5-4 Do not operate the vehicle when
there are signs of engine malfunction,
such as misfire or a noticeable loss of
performance.
Do not misuse or abuse the engine.
Examples of misuse are coasting
with the ignition off and descending
steep grades in gear with the ignition
off.
Do not operate the engine at high idle
speed for extended periods (5
minutes or more).
Do not modify or tamper with any
part of the engine or emission control
system. All inspections and
adjustments must be made by a
qualified technician.
Failure to observe the above precautions
could result in damage to the catalytic
converter and to your vehicle and could
void your warranties.
BEFORE DRIVINGBefore entering vehicle:
Be sure that all windows, outside
mirror(s), and outside lights are clean.
Check the condition of the tires.
Check under the vehicle for any sign
of leaks.
Be sure there are no obstacles behind
you if you intend to back up.NECESSARY
INSPECTIONSFluid levels, such as engine oil, engine
coolant, brake/clutch fluid, and washer
fluid should be checked on a regular
basis, with the exact interval depending
on the fluid. Further details are provided
in Maintenance, Section 7.
BEFORE STARTING Close and lock all doors.
Position the seat so that all controls
are easily reached.
Adjust the inside and outside
rearview mirrors.
Be sure that all lights work.
Check all gauges.
Check the operation of warning
lights when the ignition switch is
turned to the ON position.
Release the parking brake and make
sure the brake warning light goes out.
For safe operation, be sure you are
familiar with your vehicle and its
equipment.
MS-CNA-Eng 5 New.qxd 7/25/2005 5:21 PM Page 4
Page 144 of 225
DRIVING TIPS
5-8
DRIVING AT NIGHTBecause night driving presents many
more hazards than driving in the
daylight, here are some important tips to
remember:
Slow down and keep more distance
between you and other vehicles as it
may be more difficult to see at night,
especially in rural areas where there
may not be any street lights.
Adjust your mirrors to reduce the
glare from other driver’s headlights.
Keep your headlights clean and
properly aimed. Dirty or misaimed
headlights will make it much more
difficult to see at night.
Avoid staring directly at the
headlights of oncoming vehicles.
You could be temporarily blinded
and it will take several seconds for
your eyes to readjust to the darkness.
DRIVING IN THE RAINRain and wet roads can make driving
dangerous, especially if you’re not
prepared for the slick pavement. Here are
a few things to consider when driving in
the rain:
Be sure your windshield wipers are
in good condition.
A heavy rainfall will make it harder
to see and will increase the distance
needed to stop your vehicle, so slow
down.
If your tires aren’t in good condition,
making a quick stop on wet
pavement can cause a skid and
possibly lead to an accident. Be sure
your tires and windshield wipers are
in good shape.
Turn on your headlights to make it
easier for others to see you.
Driving too fast through large
puddles can affect your brakes. If
you must go through puddles, try to
drive through them slowly.
WARNING -
Spinning
Tires
Do not spin the wheels
especially at speeds more than
35 mph (56 km/h). Spinning the
wheels at high speeds when the
vehicle is stationary could
cause a tire to overheat,
explode and injure by standers.
MS-CNA-Eng 5 New.qxd 7/25/2005 5:21 PM Page 8
Page 145 of 225
5-9
If you believe you may have gottenyour brakes wet, apply them lightly
while driving until normal braking
operation returns.WINTER DRIVING We recommend that you carryemergency equipment. Some things
you might include are tire chains, a
window scraper, windshield de-icer,
a bag of sand or salt, flares, a small
shovel and jumper cables.
Make sure you have sufficient ethylene glycol coolant in the
radiator.
Check the battery condition and cables. Cold temperatures reduce the
capacity of any battery, so it must be
in top shape to provide enough
winter starting power.
Make sure the engine oil viscosity is suitable for cold weather.
Check the ignition system for loose connections and damage. Use antifreeze-formulated windshield
washer fluid and make sure you have
sufficient fluid for your trip. (Do not
use engine coolant antifreeze.)
Do not use the parking brake if it might freeze. This is most likely to
happen after driving in slushy or wet
conditions and temperatures drop into
the freezing range. When parking,
shift to P (Park) with automatic
transaxle, or to 1 (First) or R
(Reverse) with a manual transaxle
and block the rear wheels.
SNOW TIRESWhen snow tires are used, select the size
and construction specified on the Tire
Pressure Label. It is strongly
recommended that snow tires be used on
all four wheels, or poor handling may
result. Snow tires should not be operated
at speeds exceeding 120 km/h (75 mph).
These tires should be inflated 4 psi (28
kPa, 0.3 kg/cm
2) above the recommended pressures shown on the Tire
Specification/Pressure Label, but inflation
should never exceed the maximum cold-
tire pressure shown on the tire sidewalls.
Do not install studded tires without first
checking local, provincial and municipal
regulations for possible restrictions
against their use.
WARNING - Snow Tire
Size
Snow tires should be
equivalent in size and type to
the vehicle’s standard tires.
Otherwise, the safety and
handling of your vehicle may be
adversely affected.
MS-CNA-Eng 5 New.qxd 7/25/2005 5:21 PM Page 9
Page 148 of 225

DRIVING TIPS
5-12Vehicle Emission Control Information
and Vacuum Hose Routing Diagram
HOMELINK® WIRELESS
CONTROL SYSTEM (IF
EQUIPPED)Your new mirror also comes with an
integrated HomeLink Universal
Transceiver, which allows you to
program the mirror to activate your
garage door(s), estate gate, home
lighting, etc. The mirror actually learns
the codes from your various existing
transmitters.
HOMELINK PROGRAMMING
MMSA5002
MMSA5007
Underside of hood
Emission Control
Information Vacuum Hose
Routing Diagram
CAUTION
Make sure people and/or objects
are out of the way of any garage
doors or gates you may be
operating during the
programming procedures.
Keep original transmitters for
potential future programming
needs, or in case you sell the
vehicle.
In the event you do sell your
vehicle, it's recommended you
erase your programmed
HomeLink mirror buttons.
Homelink buttonsGlare detection sensorIndicator light
MS-CNA-Eng 5 New.qxd 7/25/2005 5:21 PM Page 12
Page 149 of 225
5-13
ProgrammingYour vehicles may require the ignition
switch to be turned to the "ACC"
position for programming and/or
operation of HomeLink. It is also
recommended that a new battery be
replaced in the hand-held transmitter of
the device being programmed to
HomeLink for quicker training and
accurate transmission of the radio-
frequency.
Follow these steps to train your
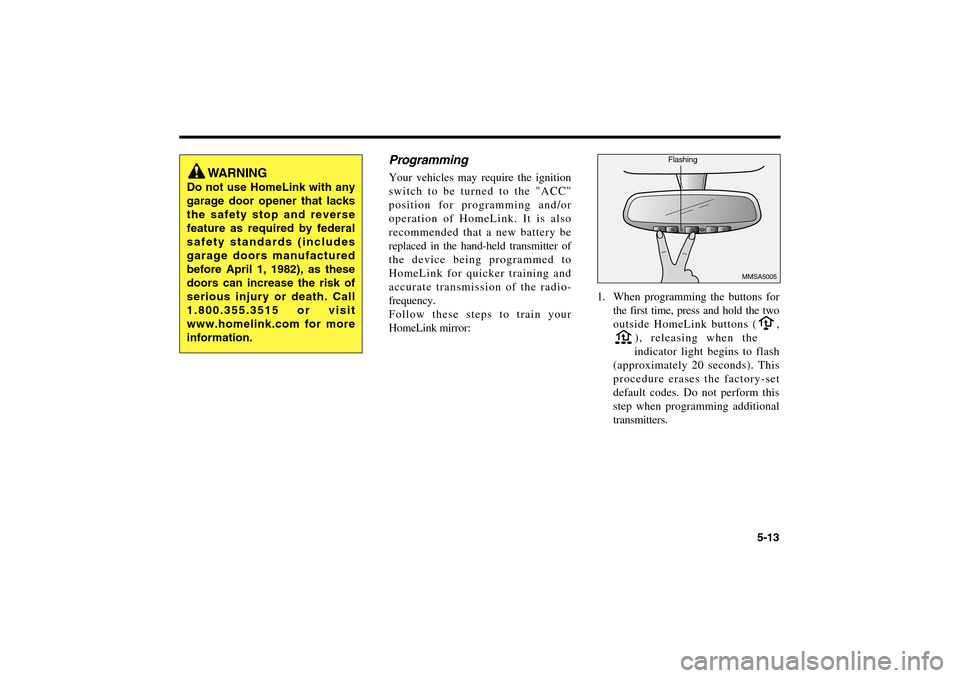
HomeLink mirror:1. When programming the buttons for
the first time, press and hold the two
outside HomeLink buttons ( ,
), releasing when the
indicator light begins to flash
(approximately 20 seconds). This
procedure erases the factory-set
default codes. Do not perform this
step when programming additional
transmitters.
MMSA5005
WARNING
Do not use HomeLink with any
garage door opener that lacks
the safety stop and reverse
feature as required by federal
safety standards (includes
garage doors manufactured
before April 1, 1982), as these
doors can increase the risk of
serious injury or death. Call
1.800.355.3515 or visit
www.homelink.com for more
information.
Flashing
MS-CNA-Eng 5 New.qxd 7/25/2005 5:21 PM Page 13
Page 150 of 225
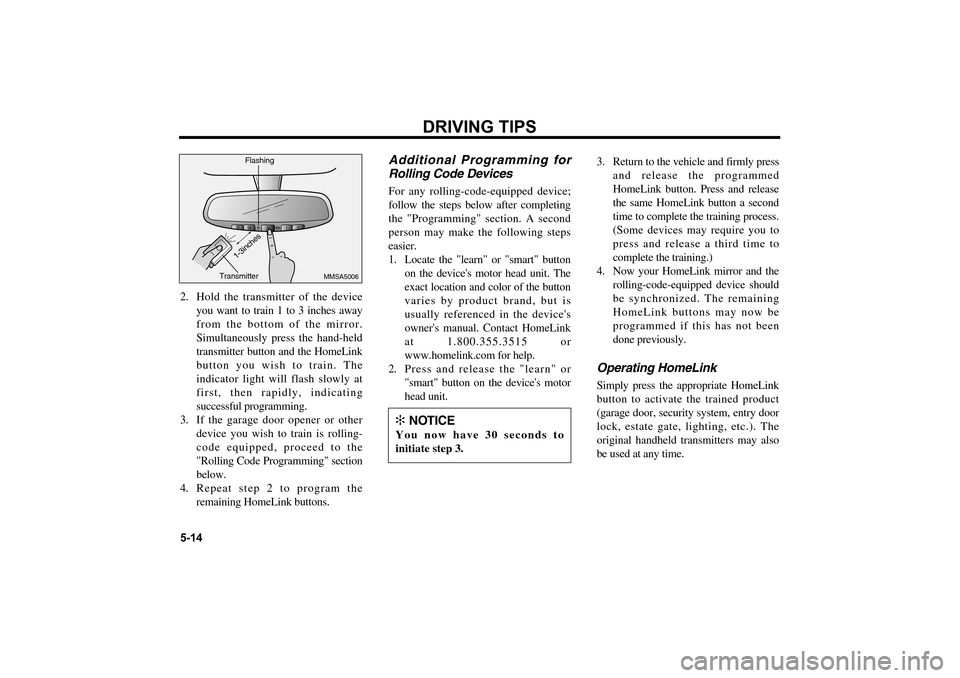
2. Hold the transmitter of the device
you want to train 1 to 3 inches away
from the bottom of the mirror.
Simultaneously press the hand-held
transmitter button and the HomeLink
button you wish to train. The
indicator light will flash slowly at
first, then rapidly, indicating
successful programming.
3. If the garage door opener or other
device you wish to train is rolling-
code equipped, proceed to the
"Rolling Code Programming" section
below.
4. Repeat step 2 to program the
remaining HomeLink buttons.
Additional Programming for
Rolling Code DevicesFor any rolling-code-equipped device;
follow the steps below after completing
the "Programming" section. A second
person may make the following steps
easier.
1. Locate the "learn" or "smart" button
on the device's motor head unit. The
exact location and color of the button
varies by product brand, but is
usually referenced in the device's
owner's manual. Contact HomeLink
at 1.800.355.3515 or
www.homelink.com for help.
2. Press and release the "learn" or
"smart" button on the device's motor
head unit.3. Return to the vehicle and firmly press
and release the programmed
HomeLink button. Press and release
the same HomeLink button a second
time to complete the training process.
(Some devices may require you to
press and release a third time to
complete the training.)
4. Now your HomeLink mirror and the
rolling-code-equipped device should
be synchronized. The remaining
HomeLink buttons may now be
programmed if this has not been
done previously.
Operating HomeLinkSimply press the appropriate HomeLink
button to activate the trained product
(garage door, security system, entry door
lock, estate gate, lighting, etc.). The
original handheld transmitters may also
be used at any time.
DRIVING TIPS
5-14
MMSA5006
✻
NOTICE
You now have 30 seconds to
initiate step 3.
Flashing
Transmitter
1-3inches
MS-CNA-Eng 5 New.qxd 7/25/2005 5:21 PM Page 14