KIA Rondo 2014 3.G Owner's Manual
Manufacturer: KIA, Model Year: 2014, Model line: Rondo, Model: KIA Rondo 2014 3.GPages: 517, PDF Size: 13.98 MB
Page 181 of 517
Features of your vehicle
94
4
Non-operational conditions of
parking assist system
Parking assist system may not
operate normally when:
1. Moisture is frozen to the sensor. (It will operate normally when mois-
ture melts.)
2. Sensor is covered with foreign matter, such as snow or water, or
the sensor cover is blocked. (It will
operate normally when the materi-
al is removed or the sensor is no
longer blocked.)
3. Sensor is stained with foreign mat- ter such as snow or water.
(Sensing range will return to nor-
mal when removed.)
4.The parking assist button is off.
There is a possibility of parking assist system malfunction when:
1. Driving on uneven road surfaces such as unpaved roads, gravel,
bumps, or gradient.
2. Objects generating excessive noise such as vehicle horns, loud motor-
cycle engines, or truck air brakes
can interfere with the sensor.
3. Heavy rain or water spray.
4. Wireless transmitters or mobile phones present near the sensor.
5. Sensor is covered with snow.
Detecting range may decrease when:
1. Outside air temperature is extremely hot or cold.
2. Undetectable objects smaller than 1 m and narrower than 14 cm in
diameter.
The following objects may not be
recognized by the sensor:
1. Sharp or slim objects such as ropes, chains or small poles.
2. Objects, which tend to absorb sen- sor frequency such as clothes,
spongy material or snow.
Page 182 of 517
495
Features of your vehicle
✽
✽NOTICE
1. The warning may not sound
sequentially depending on the
speed and shapes of the objects
detected.
2. The parking assist system may malfunction if the vehicle bumper
height or sensor installation has
been modified. Any non-factory
installed equipment or accessories
may also interfere with the sensor
performance.
3. Sensor may not recognize objects less than 30 cm from the sensor,
or it may sense an incorrect dis-
tance. Use with caution.
4. When the sensor is frozen or stained with snow or water, the
sensor may be inoperative until
the stains are removed using a
soft cloth.
5. Do not push, scratch or strike the sensor with any hard objects that
could damage the surface of the
sensor. Sensor damage could occur.
✽ ✽NOTICE
This system can only sense objects
within the range and location of the
sensors, it can not detect objects in
other areas where sensors are not
installed. Also, small or slim objects,
or objects located between sensors
may not be detected.
Always visually check in front and
behind the vehicle when driving.
Be sure to inform any drivers in the
vehicle that may be unfamiliar with
the system regarding the systems
capabilities and limitations.WARNING
Pay close attention when the
vehicle is driven close to
objects on the road, particularly
pedestrians, and especially
children. Be aware that some
objects may not be detected by
the sensors, due to the objects
distance, size or material, all of
which can limit the effective-
ness of the sensor. Always per-
form a visual inspection to
make sure the vehicle is clear of
all obstructions before moving
the vehicle in any direction.
Page 183 of 517
Features of your vehicle
96
4
Self-diagnosis
When you shift the gear to the R
(Reverse) position and if one or more
of the below occurs you may have a
malfunction in the parking assist sys-
tem.
You don't hear an audible warning
sound or if the buzzer sounds inter-
mittently.
If this occurs, we recommend that
the system be checked by an author-
ized Kia dealer.
WARNING
Your new vehicle warranty does
not cover any accidents or dam-
age to the vehicle or injuries to
its occupants related to a park-
ing assist system. Always drive
safely and cautiously.
(blinks)
is displayed. (if equipped)
Page 184 of 517
497
Features of your vehicle
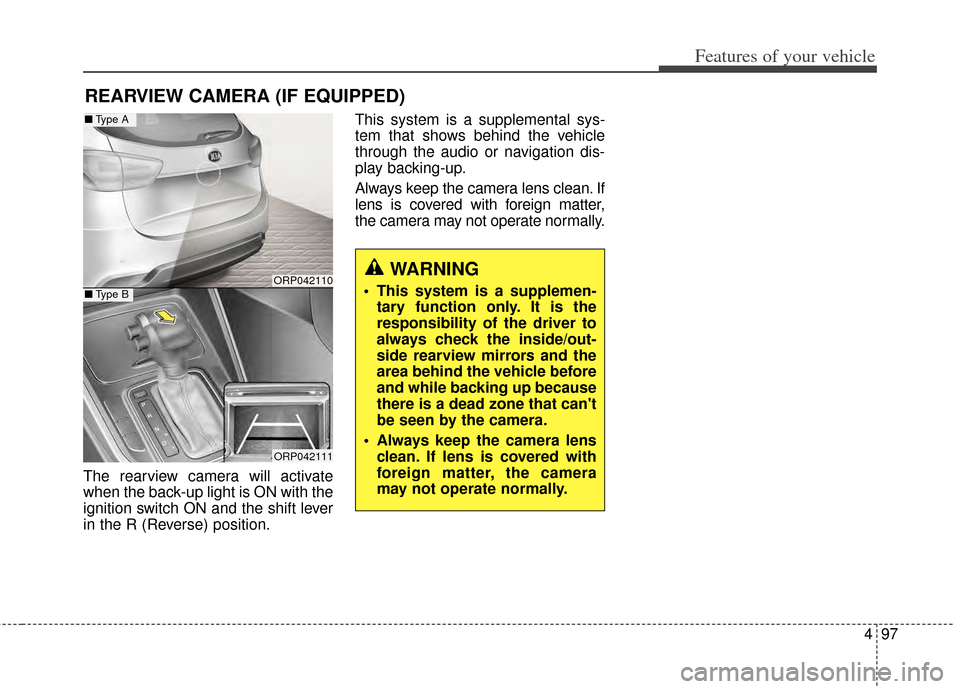
The rearview camera will activate
when the back-up light is ON with the
ignition switch ON and the shift lever
in the R (Reverse) position.This system is a supplemental sys-
tem that shows behind the vehicle
through the audio or navigation dis-
play backing-up.
Always keep the camera lens clean. If
lens is covered with foreign matter,
the camera may not operate normally.
REARVIEW CAMERA (IF EQUIPPED)
ORP042110
ORP042111
■
Type A
■Type B
WARNING
This system is a supplemen-
tary function only. It is the
responsibility of the driver to
always check the inside/out-
side rearview mirrors and the
area behind the vehicle before
and while backing up because
there is a dead zone that can't
be seen by the camera.
Always keep the camera lens clean. If lens is covered with
foreign matter, the camera
may not operate normally.
Page 185 of 517
Features of your vehicle
98
4
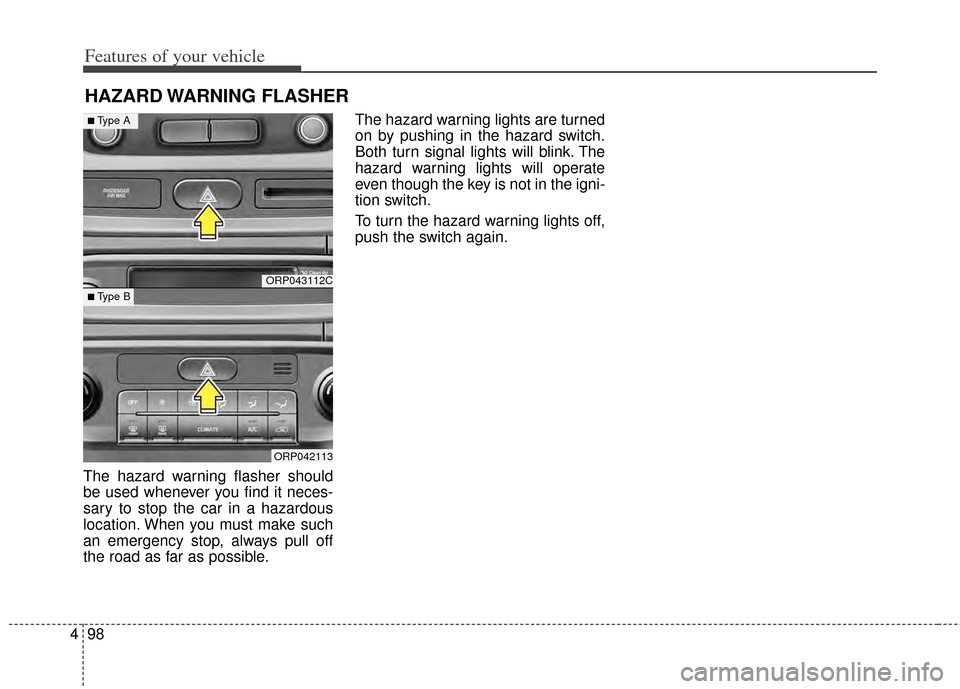
The hazard warning flasher should
be used whenever you find it neces-
sary to stop the car in a hazardous
location. When you must make such
an emergency stop, always pull off
the road as far as possible. The hazard warning lights are turned
on by pushing in the hazard switch.
Both turn signal lights will blink. The
hazard warning lights will operate
even though the key is not in the igni-
tion switch.
To turn the hazard warning lights off,
push the switch again.
HAZARD WARNING FLASHER
ORP043112C
ORP042113
■Type A
■ Type B
Page 186 of 517
499
Features of your vehicle
Battery saver function
The purpose of this feature is toprevent the battery from being dis-
charged. The system automatically
turns off the parking lights when
the driver removes the ignition key
and opens the driver- side door.
With this feature, the parking lights will turn off automatically if the driver
parks on the side of the road at night.
If necessary, to keep the lights on
when the ignition key is removed,
perform the following :
1) Open the driver-side door.
2) Turn the parking lights OFF and ON again using the light switch
on the steering column.
Headlamp delay function
(if equipped)
The headlamps (and/or taillights)
remain on for same minutes (5 min-
utes) after the ignition key is removed
or turned to the ACC or LOCK posi-
tion. However, if the driver’s door is
opened and closed, the headlights
are turned off after 15 seconds.
The headlights can be turned off by
pressing the lock button on the trans-
mitter or smart key twice or turning
off the light switch from the headlight
or Auto light position.
You can activate or deactivate the
headlamp delay function. Refer to
“User setting” in this chapter.
LIGHTING
CAUTION
If the driver gets out of the vehi-cle through other doors (exceptdriver’s door), the battery saverfunction does not operate andthe headlamp delay functiondoes not turn off automatically.Therefore, it causes the batteryto be discharged. In this case,make sure to turn off the lampbefore getting out of the vehicle.
Page 187 of 517
Features of your vehicle
100
4
Headlight welcome function
(if equipped)
When the headlight switch is in the
ON or AUTO position and all doors
(and tailgate) are closed and locked,
if you press the door unlock button
on the transmitter (or smart key), the
headlights will come on for about 15
seconds.
If the headlight switch is in the AUTO
position, the function can only oper-
ate at night.
At this time, if you press the door lock
button or unlock button (once or
twice) on the transmitter (or smart
key), the headlights will turn off
immediately.
Daytime running light
Daytime Running Lights (DRL) can
make it easier for others to see the
front of your vehicle during the day.
DRL can be helpful in many different
driving conditions, and it is especially
helpful after dawn and before sunset.
The DRL system turns OFF when:
1. The front fog light or headlight (low
beam) switch is ON.
2. The engine is OFF.
Lighting control
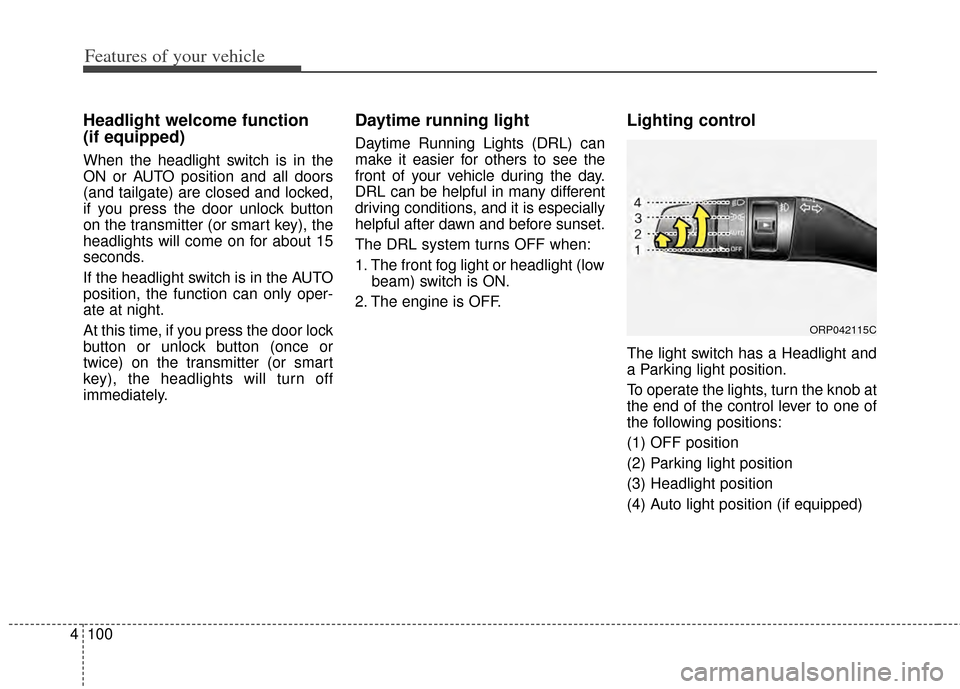
The light switch has a Headlight and
a Parking light position.
To operate the lights, turn the knob at
the end of the control lever to one of
the following positions:
(1) OFF position
(2) Parking light position
(3) Headlight position
(4) Auto light position (if equipped)
ORP042115C
Page 188 of 517
4101
Features of your vehicle
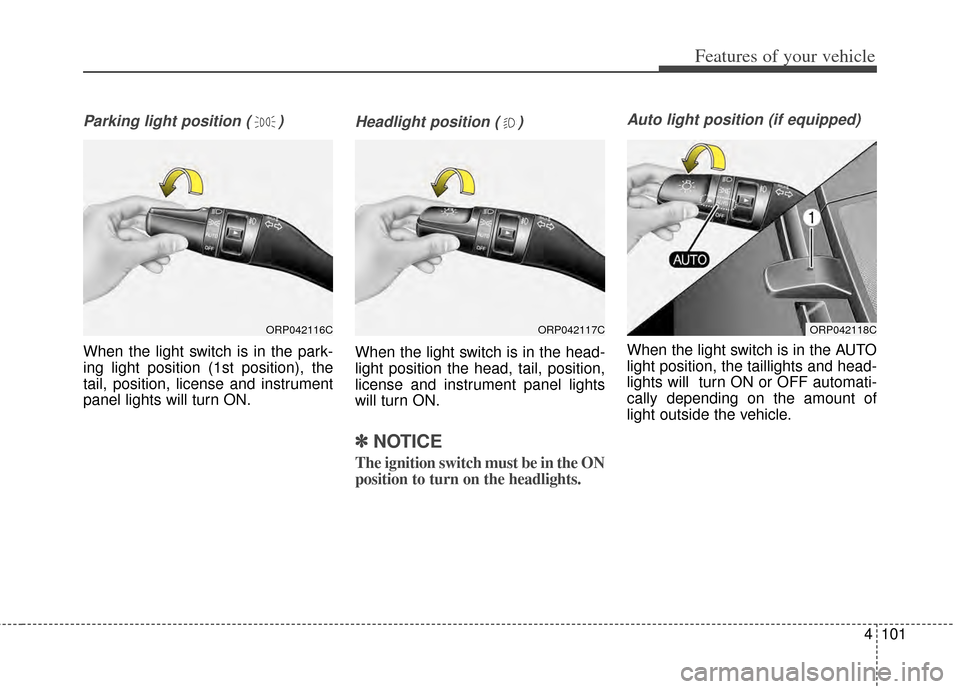
Parking light position ( )
When the light switch is in the park-
ing light position (1st position), the
tail, position, license and instrument
panel lights will turn ON.
Headlight position ( )
When the light switch is in the head-
light position the head, tail, position,
license and instrument panel lights
will turn ON.
✽ ✽NOTICE
The ignition switch must be in the ON
position to turn on the headlights.
Auto light position (if equipped)
When the light switch is in the AUTO
light position, the taillights and head-
lights will turn ON or OFF automati-
cally depending on the amount of
light outside the vehicle.
ORP042116CORP042117CORP042118C
Page 189 of 517
Features of your vehicle
102
4
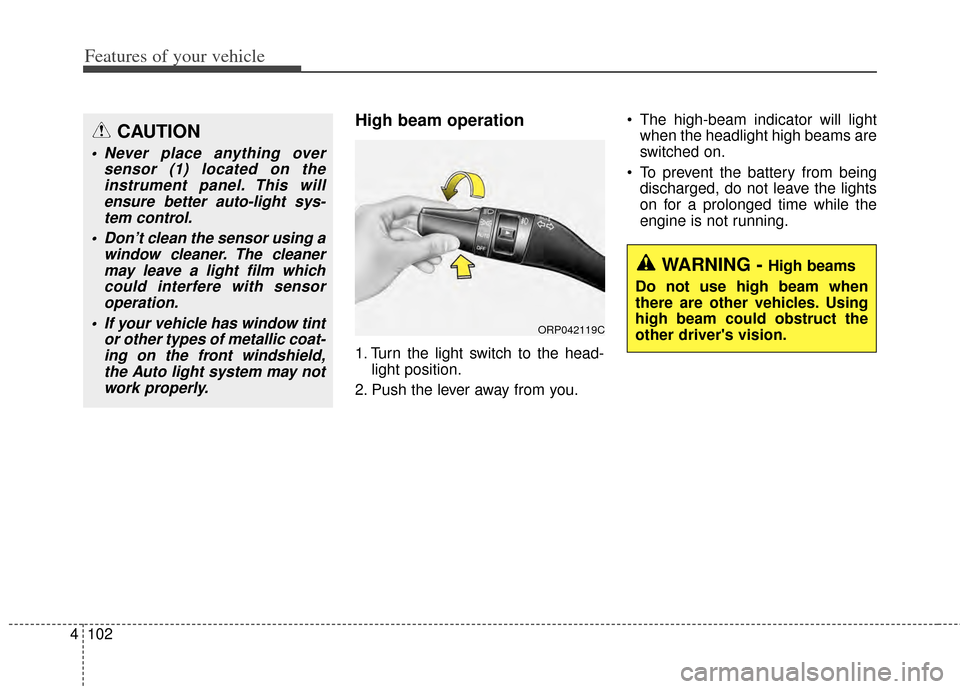
High beam operation
1. Turn the light switch to the head-
light position.
2. Push the lever away from you. The high-beam indicator will light
when the headlight high beams are
switched on.
To prevent the battery from being discharged, do not leave the lights
on for a prolonged time while the
engine is not running.
CAUTION
Never place anything over sensor (1) located on theinstrument panel. This willensure better auto-light sys-tem control.
Don’t clean the sensor using a window cleaner. The cleanermay leave a light film whichcould interfere with sensoroperation.
If your vehicle has window tint or other types of metallic coat-ing on the front windshield,the Auto light system may notwork properly.
WARNING - High beams
Do not use high beam when
there are other vehicles. Using
high beam could obstruct the
other driver's vision.
ORP042119C
Page 190 of 517
4103
Features of your vehicle
Flashing headlights
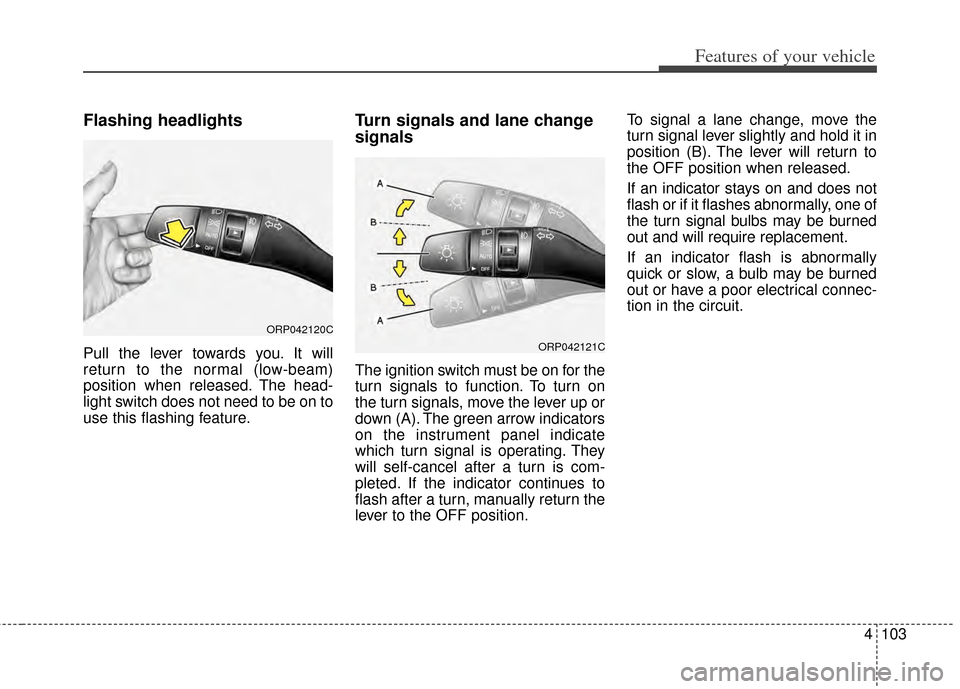
Pull the lever towards you. It will
return to the normal (low-beam)
position when released. The head-
light switch does not need to be on to
use this flashing feature.
Turn signals and lane change
signals
The ignition switch must be on for the
turn signals to function. To turn on
the turn signals, move the lever up or
down (A). The green arrow indicators
on the instrument panel indicate
which turn signal is operating. They
will self-cancel after a turn is com-
pleted. If the indicator continues to
flash after a turn, manually return the
lever to the OFF position.To signal a lane change, move the
turn signal lever slightly and hold it in
position (B). The lever will return to
the OFF position when released.
If an indicator stays on and does not
flash or if it flashes abnormally, one of
the turn signal bulbs may be burned
out and will require replacement.
If an indicator flash is abnormally
quick or slow, a bulb may be burned
out or have a poor electrical connec-
tion in the circuit.
ORP042120C
ORP042121C