ignition switch KIA Sorento 2007 1.G User Guide
[x] Cancel search | Manufacturer: KIA, Model Year: 2007, Model line: Sorento, Model: KIA Sorento 2007 1.GPages: 325, PDF Size: 5.01 MB
Page 34 of 325
325
Knowing your vehicle
Pre-tensioner safety belt Your vehicle is equipped with driver's and
front passenger's pre-tensioner safety
belts. The purpose of the pre-tensioner
is to make sure that excess slack is taken
up in certain frontal collisions. The pre-
tensioners may activate along with the
front air bags in frontal collisions based
on angle of impact, seat belt usage and
impact severity.
✽ ✽NOTICEThe pre-tensioner seat belt is installed at
the front seats, and the sensor is
equipped inside the buckle, where pres-
ence of passenger is sensed by the fas-
tening of the seat belts. Therefore, pre-
tensioner will not activate if the passen-
ger is not fastened with the seat belts.
Likewise, it will activate if buckled even
without a passenger in the seat. Pre-ten-
sioner seat belt is designed to activate
when the seatbelt is in use. To ensure the
pretensioner seatbelts activate in event
of a possible seatbelt buckle switch mal-
function, the system is designed to acti-
vate regardless of whether a seat belt is
in use or if no seat belt use is detected
within 6 seconds of turning the ignition
switch ON.
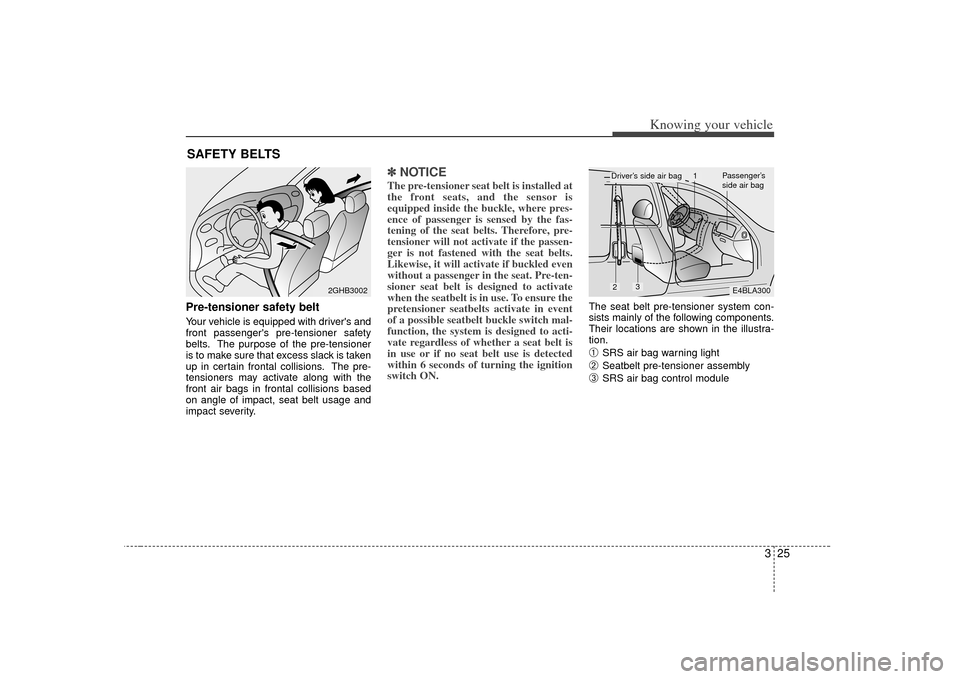
The seat belt pre-tensioner system con-
sists mainly of the following components.
Their locations are shown in the illustra-
tion.➀
SRS air bag warning light
➁
Seatbelt pre-tensioner assembly
➂
SRS air bag control module
SAFETY BELTS
2GHB3002
E4BLA300
2
3
1
Passenger’s
side air bag
Driver’s side air bag
Page 73 of 325
Knowing your vehicle64
3How does the air bag system
operate Air bag only operates when the ignition
switch is turned to ON or START posi-
tion.
Air bags inflate instantly in the event of serious frontal or side collision in order
to help protect the occupants from seri-
ous physical injury.
There is no single speed at which the air bags will inflate.
Generally, air bags are designed to
inflate by the severity of a collision and
its direction. These two factors deter-
mine whether the sensors send out an
electronic deployment/inflation signal.
Air bag deployment depends on a number of factors including vehicle
speed, angles of impact and the densi-
ty and stiffness of the vehicles or
objects which your vehicle hits in the
collision. Though, factors are not limit-
ed to those mentioned above.
The front air bags will completely inflate and deflate in an instant.
It is virtually impossible for you to see
the air bags inflate during an accident.
It is much more likely that you will sim-
ply see the deflated air bags hanging
out of their storage compartments after
the collision. In order to help provide protection in a
severe collision, the air bags must
inflate rapidly. The speed of air bag
inflation has been determined by the
Canadian Motor Vehicle Safety
Standards (CMVSS) to reduce the like-
lihood of serious or life-threatening
injuries and is thus a mandatory part of
the air bag design.
However, air bag inflation can also
cause injuries which normally can
include facial abrasions, bruises and
broken bones, and sometimes more
serious injuries because the inflation
speed also causes the air bags to
expand with a great deal of force.
There are even circumstances under which contact with the steer-
ing wheel air bag can cause fatal
injuries, especially if the occupant
is positioned excessively close to
the steering wheel.
WARNING
To avoid severe personal injury ordeath caused by deploying air
bags in a collision, the driver
should sit as far back from the
steering wheel air bag as possi-
ble (at least 250 mm (10 inches)
away). The front passenger
should always move their seat as
far back as possible and sit back
in their seat.
Air bag inflates instantly in an event of collision, passengers
may be injured by the air bag
expansion force if they are not in
proper position.
Air bag inflation may cause injuries which normally include
facial or bodily abrasions, injuries
by broken glass or burns by the
explosives.
Page 75 of 325
Knowing your vehicle66
3
Air bag warning lightThe purpose of air bag warning light in
your instrument panel is to alert you of a
potential problem with your air bag -
Supplemental Restraint System (SRS).
When the ignition switch is turned ON,
the indicator light should blink or illumi-
nate for approximately 6 seconds, then
go off.
Have the system checked if:
The light does not turn on briefly when
you turn the ignition ON.
The light stays on after the engine starts.
The light comes on while the vehicle is in motion.
Air bag (Supplemental Restraint
System) service Your Supplemental Restraint System is
virtually maintenance-free. There are no
parts which you can service.
You must have the system serviced
under the following circumstances:
If an air bag ever inflates, the air bagmust be replaced. Do not try to remove
or discard the air bag by yourself. This
must be done by an authorized Kia
dealer.
If the air bag warning indicator light alerts you to a problem, have the air
bag system checked as soon as possi-
ble. Otherwise, your air bag system
may be ineffective.
WARNING
Never put child restraint in thefront passenger seat. If the front
passenger air bag inflates, it may
cause severe or fatal injuries.
When children are seated in the rear outboard seats in which cur-
tain air bags are equipped, be
sure to put the child restraint sys-
tem as far away from the door
side as possible, and secure the
child restraint system to be
locked in position.
Inflation of curtain air bag could
cause severe injury or death due
to the expansion impact.
AIR
BAG
CAUTION
Do not modify any part of the air bag system. Modification could make the air bag system ineffectiveor could cause unnecessary deployment.
Page 87 of 325
Knowing your vehicle78
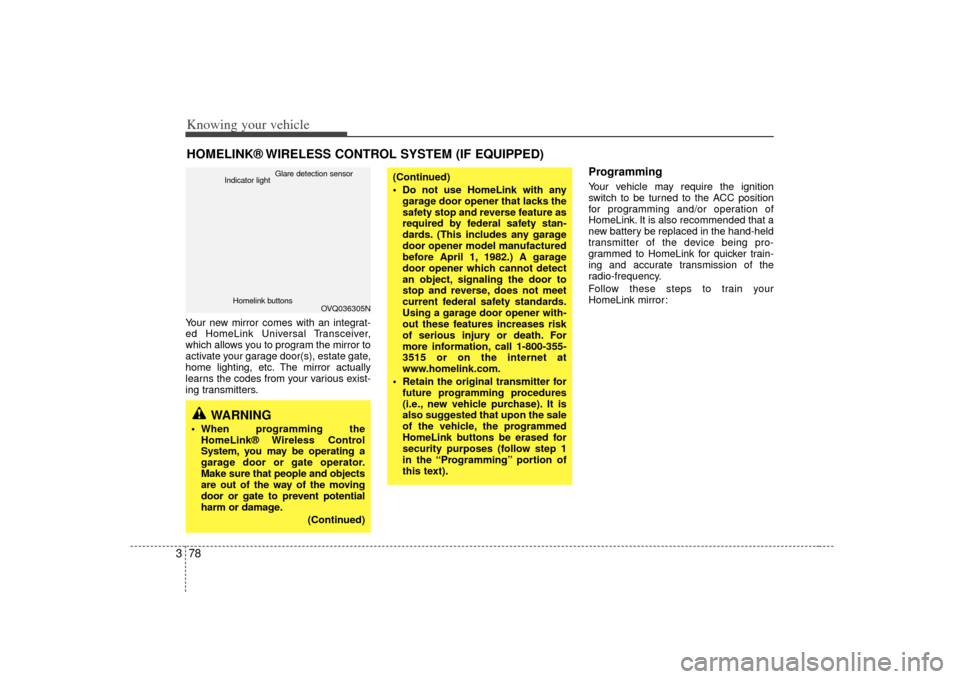
3Your new mirror comes with an integrat-
ed HomeLink Universal Transceiver,
which allows you to program the mirror to
activate your garage door(s), estate gate,
home lighting, etc. The mirror actually
learns the codes from your various exist-
ing transmitters.
ProgrammingYour vehicle may require the ignition
switch to be turned to the ACC position
for programming and/or operation of
HomeLink. It is also recommended that a
new battery be replaced in the hand-held
transmitter of the device being pro-
grammed to HomeLink for quicker train-
ing and accurate transmission of the
radio-frequency.
Follow these steps to train your
HomeLink mirror:
HOMELINK® WIRELESS CONTROL SYSTEM (IF EQUIPPED)
WARNING
When programming the
HomeLink® Wireless Control
System, you may be operating a
garage door or gate operator.
Make sure that people and objects
are out of the way of the moving
door or gate to prevent potential
harm or damage.
(Continued)
(Continued)
Do not use HomeLink with anygarage door opener that lacks the
safety stop and reverse feature as
required by federal safety stan-
dards. (This includes any garage
door opener model manufactured
before April 1, 1982.) A garage
door opener which cannot detect
an object, signaling the door to
stop and reverse, does not meet
current federal safety standards.
Using a garage door opener with-
out these features increases risk
of serious injury or death. For
more information, call 1-800-355-
3515 or on the internet at
www.homelink.com.
Retain the original transmitter for future programming procedures
(i.e., new vehicle purchase). It is
also suggested that upon the sale
of the vehicle, the programmed
HomeLink buttons be erased for
security purposes (follow step 1
in the “Programming” portion of
this text).
OVQ036305N
Glare detection sensor
Indicator light
Homelink buttons
Page 91 of 325

Knowing your vehicle82
3Room lightFront (map light)The lights are turned ON or OFF by
pressing the corresponding switch.
Center (dome light) /
Rear cargo area light(1) OFF
: The light stays off even when a dooris open. (2) DOOR/
: The light turns on when a door isopened or when a door is unlocked
by the transmitter (if equipped).
Interior light goes out slowly after 30
seconds if the doors including the
rear hatch and rear hatch window are
all closed. However if the ignition
switch is ON or all vehicle doors are
locked when the door is closed, inte-
rior light will turn off even within 30
seconds.
(3) ON
: The light turns on and stays on even when the doors are all closed.
INTERIOR LIGHTS
PUSHT IL TSLIDE
E2BLA430JE2BLA430E
OFF DOOR ON
E2BLA324
Type A
Center
Type B
OFF ON
ON
OFFE2BLA325
➀
➁
➂
➀
➁
➂
Rear
Page 95 of 325
Knowing your vehicle86
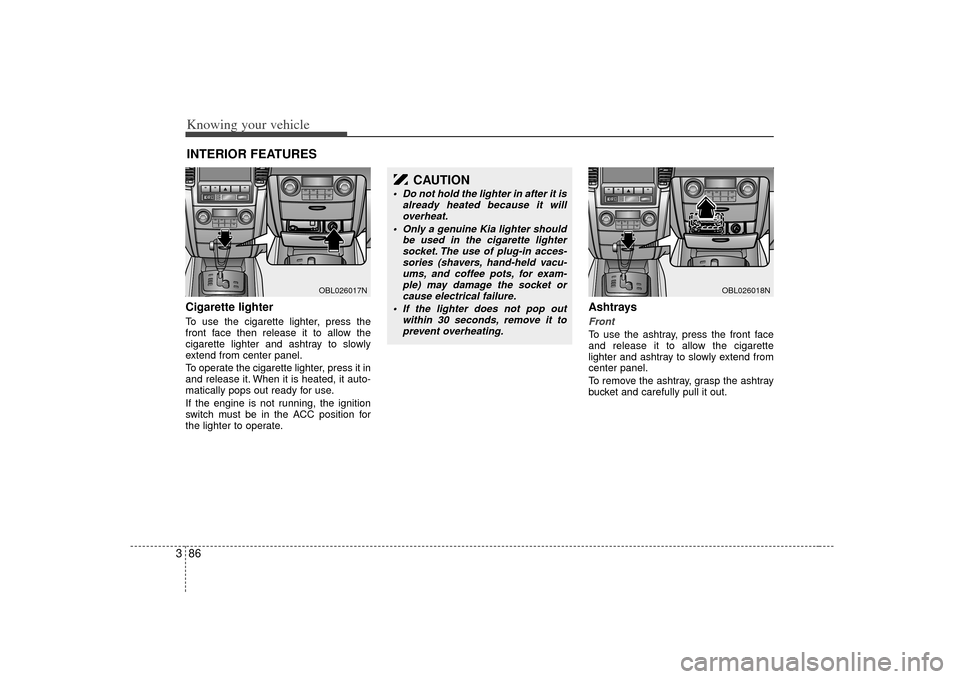
3Cigarette lighterTo use the cigarette lighter, press the
front face then release it to allow the
cigarette lighter and ashtray to slowly
extend from center panel.
To operate the cigarette lighter, press it in
and release it. When it is heated, it auto-
matically pops out ready for use.
If the engine is not running, the ignition
switch must be in the ACC position for
the lighter to operate.
Ashtrays Front To use the ashtray, press the front face
and release it to allow the cigarette
lighter and ashtray to slowly extend from
center panel.
To remove the ashtray, grasp the ashtray
bucket and carefully pull it out.
INTERIOR FEATURES
OBL026017N
CAUTION
Do not hold the lighter in after it is
already heated because it willoverheat.
Only a genuine Kia lighter should be used in the cigarette lightersocket. The use of plug-in acces-sories (shavers, hand-held vacu-ums, and coffee pots, for exam- ple) may damage the socket orcause electrical failure.
If the lighter does not pop out within 30 seconds, remove it toprevent overheating.
OBL026018N
Page 99 of 325
Knowing your vehicle90
3Digital clockWhen the ignition switch is in the ACC or
ON position, the clock buttons operates
as follows:
HOUR:
Pressing the “H” button with your fin-
ger, a pencil or similar object will
advance the time displayed by one
hour.
MINUTE: Pressing the “M” button with your fin-
ger, a pencil or similar object will
advance the time displayed by one
minute. RESET:
To clear away minutes, press the “R”
button with your finger, a pencil or sim-
ilar object. Then the clock will be set
precisely on the hour.
For example, if the “R” button is
pressed while the time is between 9:01
and 9:29, the display will be reset to
9:00.
9:01 ~ 9:29 ➾ 9:00
9:30 ~ 9:59 ➾ 10:00
OBL026016N
Page 100 of 325

391
Knowing your vehicle
If your vehicle is equipped with this fea-
ture, you can slide or tilt your sunroof
with the sunroof control buttons located
on the overhead console.
The sunroof can only be opened, closed,
or tilted when the ignition switch is in the
ON position.
Sliding the sunroof The sunroof can be opened or closed
when the ignition switch is in the “ON”
position. To slide the sunroof, momentar-
ily press “OPEN” ( ) on the SLIDE
switch. The sunroof will slide all the way
open. To stop the sunroof sliding at any
point, press any sunroof switch. To close
the sunroof, press “CLOSE” ( ) on
the SLIDE switch and hold it until it is
closed completely.
Tilting the sunroof To tilt the sunroof, momentarily press
“UP”
()
on the TILT switch. The sun-
roof will tilt all the way up. To stop the
sunroof tilting at any point, press any
sunroof switches.
To close it, press “DOWN”
()
on the
TILT switch and hold it until it is closed
completely.
✽ ✽ NOTICEThe sunroof cannot slide when it is in
the tilt position nor can it be tilted while
in an open or slide position.
SUNROOF (IF EQUIPPED)
CAUTION
Do not continue to press the sun-
roof control button(s) after the sun-roof is in the fully open, closed, ortilt position(s). Damage to the motoror system components couldoccur.
PUSHTILTSLIDE
E2BLA430C
PUSHTILTSLIDE
E2BLA430G
Page 131 of 325
4
Ignition switch / 4-2
Starting the engine / 4-4
Automatic transmission / 4-5
Four wheel drive (4WD) / 4-10
Limited slip differential / 4-19
Brake system / 4-20
Steering wheel / 4-25
Cruise control system / 4-27
Electronic stability control / 4-30
Rear parking assist system / 4-33
Instrument cluster / 4-36
Gauges / 4-37
Warnings and indicators / 4-39
Multi-meter / 4-45
Lighting / 4-51
Wipers and washers / 4-54
Defroster / 4-57
Hazard warning flasher / 4-58
Manual climate control system / 4-59
Automatic climate control system / 4-66
Windshield defrosting and defogging / 4-75
Driving your vehicle
Page 132 of 325
Driving your vehicle24Illuminated ignition switch
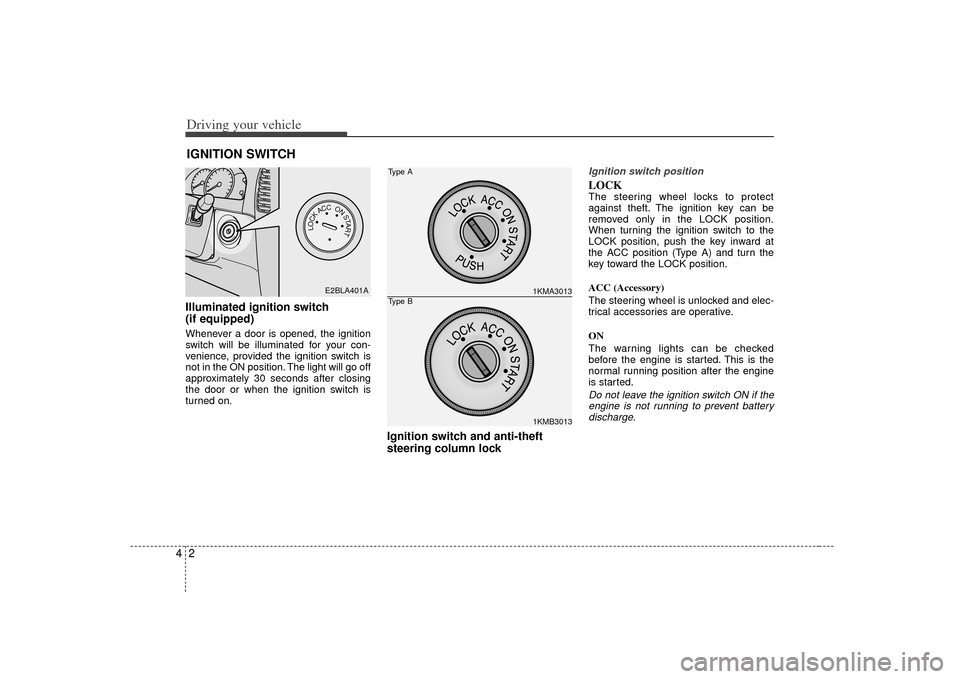
(if equipped)Whenever a door is opened, the ignition
switch will be illuminated for your con-
venience, provided the ignition switch is
not in the ON position. The light will go off
approximately 30 seconds after closing
the door or when the ignition switch is
turned on.
Ignition switch and anti-theft
steering column lock
Ignition switch positionLOCKThe steering wheel locks to protect
against theft. The ignition key can be
removed only in the LOCK position.
When turning the ignition switch to the
LOCK position, push the key inward at
the ACC position (Type A) and turn the
key toward the LOCK position.
ACC (Accessory)
The steering wheel is unlocked and elec-
trical accessories are operative.
ON
The warning lights can be checked
before the engine is started. This is the
normal running position after the engine
is started.Do not leave the ignition switch ON if theengine is not running to prevent batterydischarge.
IGNITION SWITCH
PUSH
LOCKACCONSTART
E2BLA401A
1KMA30131KMB3013
Type AType B