tow KIA Sorento 2009 2.G User Guide
[x] Cancel search | Manufacturer: KIA, Model Year: 2009, Model line: Sorento, Model: KIA Sorento 2009 2.GPages: 327, PDF Size: 5.03 MB
Page 85 of 327
Knowing your vehicle76
3Outside rearview mirror heater
(if equipped) The outside rearview mirror heater is
actuated in connection with the rear win-
dow defroster. To heat the outside
rearview mirror glass, push the button for
the rear window defroster.
The rearview mirror heater (and rear win-
dow defroster) will not operate unless the
engine is running.
The outside rearview mirror glass will be
heated for defrosting or defogging and
will give you improved rear vision in
inclement weather conditions. Push the
button again to turn the heater off. The
outside rearview mirror heater automati-
cally turns off after 20 minutes.
Inside rearview mirror Adjust the rearview mirror to center on
the view through the rear window. Make
this adjustment before you start driving.
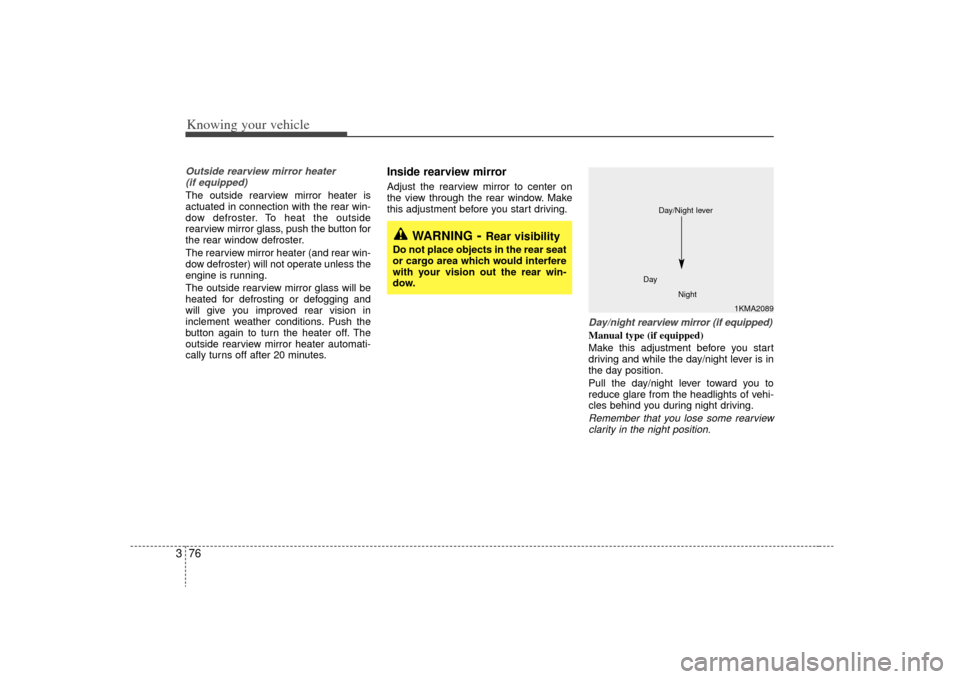
Day/night rearview mirror (if equipped) Manual type (if equipped)
Make this adjustment before you start
driving and while the day/night lever is in
the day position.
Pull the day/night lever toward you to
reduce glare from the headlights of vehi-
cles behind you during night driving.Remember that you lose some rearviewclarity in the night position.
1KMA2089
Day
Night
Day/Night lever
WARNING
- Rear visibility
Do not place objects in the rear seat
or cargo area which would interfere
with your vision out the rear win-
dow.
Page 86 of 327
377
Knowing your vehicle
Electric type (if equipped)
The electric day/night rearview mirror
automatically controls the glare from the
headlights of the car behind you in night-
time or low light driving conditions. The
sensor mounted in the mirror senses the
light level around the vehicle, and
through a chemical reaction, automati-
cally controls the headlight glare from
vehicles behind you.
When the engine is running, the glare is
automatically controlled by the sensor
mounted in the rearview mirror.
Whenever the shift lever is shifted into
reverse (R), the mirror will automatically
go to the brightest setting in order to
improve the drivers view behind the vehi-
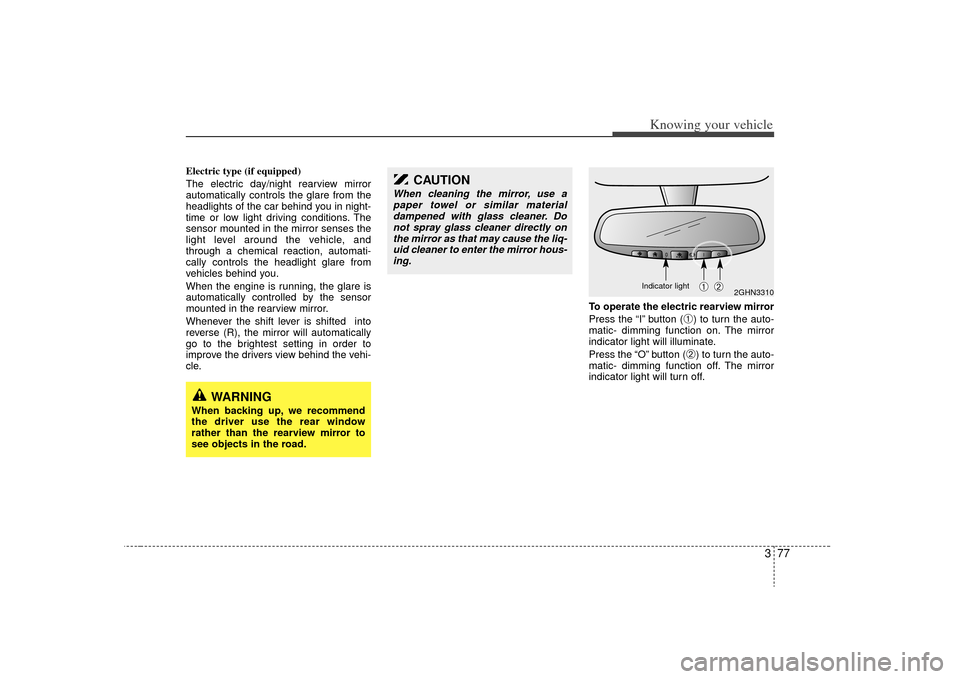
cle.To operate the electric rearview mirror
Press the “I” button (
➀) to turn the auto-
matic- dimming function on. The mirror
indicator light will illuminate.
Press the “O” button (➁) to turn the auto-
matic- dimming function off. The mirror
indicator light will turn off.
2GHN3310
➀
➁
CAUTION
When cleaning the mirror, use a paper towel or similar materialdampened with glass cleaner. Do not spray glass cleaner directly onthe mirror as that may cause the liq-uid cleaner to enter the mirror hous-ing.
WARNING
When backing up, we recommend
the driver use the rear window
rather than the rearview mirror to
see objects in the road.
Indicator light
Page 107 of 327
Knowing your vehicle98
3AUDIO SYSTEMUnderstanding Radio ReceptionYour vehicle's radio is able to receive AM
and FM transmissions. To optimize the
enjoyment of your vehicle's radio, you
should have a basic understanding of
how radio signals are transmitted and
received.
Radio signals (AM and FM) are broad-
cast from the transmitter towers of radio
stations in your vicinity. Your car radio
receives these signals through the radio
antenna. These signals received are
directed to the audio system where they
are processed, amplified and then con-
verted into sound that is emitted from the
audio system's speakers. The quality of the audio reproduction that
you hear depends on many factors. One
important factor is signal strength. A
clear and strong signal results in clear,
static-free sound. A weak signal normal-
ly results in garbled sound with frequent
breaks and also static. The radio anten-
na's ability to receive clear and strong
radio signals depends on how close it is
to the transmitting source and also
whether there are physical obstructions
(buildings or mountains) between the
transmitter and antenna. For example, if
you are driving away from the transmit-
ting source, you can expect gradual dete-
rioration in the quality of the reception.
AM mode Amplitude Modulation (AM) broadcasts
makes use of low-frequency radio waves
to carry the signals to your car antenna.
Low frequency radio waves typically trav-
el further and better than higher frequen-
cy radio waves (e.g. FM radio signals).
This means that, compared to FM broad-
casts, your car can travel further from an
AM transmitting source before you expe-
rience deterioration in signal strength
and clarity. One reason why AM radio
signals can travel further is because they
can 'bend' or 'go around' physical
obstructions in their path to your car
radio antenna.
DCM06004
Page 126 of 327
3 117
Knowing your vehicle
Troubleshooting Poor Radio
ReceptionProblem:
Fading Signals / Interference /
Increased interference/ Static
FM Broadcasts - The further you move
away from the radio station's transmitting
source (normally within a city or town),
the weaker the signal will be. You might
experience abrupt breaks in transmis-
sion, garbled sound and also static even
though your radio remains tuned to the
same frequency.
AM Broadcasts - Even though AM radio
signals travel further and stronger than
FM radio signals, weather or terrain con-
ditions might adversely affect your radio's
ability to receive the signals.
Solution:
Use your audio system's Scan function to
automatically search for and select
another radio station with good signal
strength. Problem:
High-pitched static, distortion or a
'fluttering' sound (Multi-Path
Cancellation)
Radio stations transmitting on frequen-
cies that are very close to each other
may cause distortion or 'fluttering'. This
effect is known as Multi-Path
Cancellation. This normally occurs when
your tuner is receiving a station's trans-
mission as both direct and 'reflected'
radio signals or when your tuner receives
signals from more than 1 radio station
transmitting on frequencies that are very
close to each other.
Solution:
If the problem is caused by a temporary
deterioration in the signal strength of one
station's transmission, reduce the levels
of your audio system's Treble and Middle
settings to suppress the sound. If the
problem is caused by interference from
another station, select another radio sta-
tion with good and clear signal strength.
Problem:
Interference from another FM radio
broadcast ('station-swapping')
FM radio stations transmit on frequen-
cies that are very close to each other on
the FM band. When you travel further
and further away from a transmitting
source, the signal strength of that trans-
mission decreases. Your radio's ability to
'lock' on to that specific frequency is
affected. This is because your radio is
designed to lock on to the strongest sig-
nal it can detect. Therefore, another radio
station broadcasting on a frequency very
close to your original station could 'inter-
fere' with your reception and you might
start to hear the broadcast of the second
station. You will normally experience this
when you are moving away from a weak
signal and towards a stronger one.
Page 130 of 327
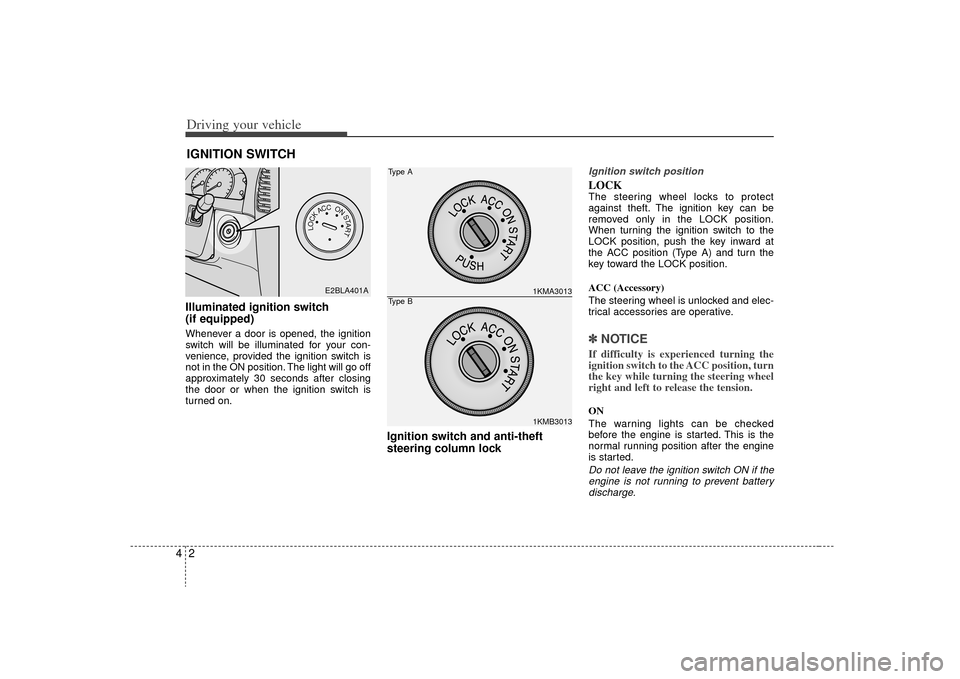
Driving your vehicle24Illuminated ignition switch
(if equipped)Whenever a door is opened, the ignition
switch will be illuminated for your con-
venience, provided the ignition switch is
not in the ON position. The light will go off
approximately 30 seconds after closing
the door or when the ignition switch is
turned on.
Ignition switch and anti-theft
steering column lock
Ignition switch positionLOCKThe steering wheel locks to protect
against theft. The ignition key can be
removed only in the LOCK position.
When turning the ignition switch to the
LOCK position, push the key inward at
the ACC position (Type A) and turn the
key toward the LOCK position.
ACC (Accessory)
The steering wheel is unlocked and elec-
trical accessories are operative.✽ ✽
NOTICEIf difficulty is experienced turning the
ignition switch to the ACC position, turn
the key while turning the steering wheel
right and left to release the tension.ON
The warning lights can be checked
before the engine is started. This is the
normal running position after the engine
is started.Do not leave the ignition switch ON if the
engine is not running to prevent batterydischarge.
IGNITION SWITCH
PUSH
LOCKACCONSTART
E2BLA401A
1KMA30131KMB3013
Type AType B
Page 142 of 327
Driving your vehicle14
4Knob positionThis is used to set different positions.
2HI (Rear-wheel drive)
This mode is used, when driving on nor-
mal roads and highway.
4HI (High-range 4-wheel drive)
This mode is used, when driving off-
roads, wet or snow covered roads with
normal speed.
The 4WD indicator light
()
will be
turned on to remind you that you are in
the 4HI mode.
4LO (Low-range 4-wheel drive)
Use 4LO for climbing or descending hills,
off-roads driving and towing the vehicle,
especially when increased power is
required.
The 4WD LOW indicator light
( )
will
be turned on to remind you that you are
in the 4LO mode.
Transfer shift knob operationBy turning the transfer knob (4HI, 4LO),
both front and rear axles are engaged.
This improves the traction characteristic.
2HI ➝ ➝
4HI
Turn the transfer knob from the 2HI mode
to 4HI mode at speed below 80 km/h (50
mph).
It is not necessary to depress the clutch
pedal or put the shift lever into N
(Neutral) position (Manual transmission)
or put the shift lever into N (Neutral) posi-
tion (Automatic transmission).
Perform this operation when driving
straight. There will be a few seconds of
time delay before come into 4HI mode
when you shift the knob to 4 HI from 2HI. 4HI
➝ ➝
2HI
Turn the transfer knob from the 4HI mode
to the 2HI mode at speed below 80 km/h
(50 mph). It is not necessary to depress
the clutch pedal (Manual transmission) or
put the shift lever into N (Neutral)
(Automatic transmission). Perform this
operation when driving straight.
If the transfer mode does not shift into
2HI mode when you turn the transfer
knob to 2HI, drive straight ahead with
accelerating or decelerating, or drive in
reverse.
4WD
LOW
Page 145 of 327
417
Driving your vehicle
If you need to drive in water, stop yourvehicle, set your transfer knob to 4LO
or LOW and drive at less than 8 km/h
(5 mph). Do not drive in water if the level is high-
er than the bottom of the wheel hubs.
Check your brake condition once you are out of mud or water. Press the
brake pedal several times as you move
slowly until you feel normal braking
forces return.
Shorten your scheduled maintenance interval if you drive off-road in condi-
tions such as sand, mud or water (see
“Scheduled Maintenance’’ in the
Index). Always wash your car thor-
oughly.
The full time four wheel drive vehicle cannot be towed by an ordinarily tow
truck. Make sure that the vehicle is
towed with its four wheels raised off the
ground.
Since the driving torque is always applied to the 4 wheels the perform-
ance of the 4WD vehicle is greatly
affected by the condition of the tires.
Be sure to equip them with all four tires
with same size and type.
WARNING
If you are driving in heavy wind, the
vehicle’s higher center of gravity
decreases your steering control.
Drive more slowly than you would
in calm conditions.
WARNING
- Drivingthrough water
If you are driving too fast in water,
the water spray can get into the
engine compartment and wet the
ignition system, causing your vehi-
cle to suddenly stop. If this hap-
pens and your vehicle is in a tilted
position, your vehicle may roll over.
WARNING
Your vehicle is equipped with tires
designed to provide for safe ride
and handling capability.
Do not use a size and type of tire
and wheel that is different from the
one that is originally installed on
your vehicle. It can affect the safety
and performance of your vehicle,
which could lead to handling failure
or rollover and serious injury.
When replacing the tires, be sure to
equip all four tires with the tire and
wheel of the same size, type, tread,
brand and load-carrying capacity. If
you nevertheless decide to equip
your vehicle with any tire/wheel
combination not recommended by
Kia for off road driving, you should
not use these tires for highway driv-
ing.
Page 151 of 327
423
Driving your vehicle
Parking on curbed streets When parking your vehicle on an uphillgrade, park as close to the curb as
possible and turn the front wheels
away from the curb so that the front
wheels will contact the curb if the vehi-
cle moves backward.
When parking your vehicle on a down- hill grade, park as close to the curb as
possible and turn the front wheels
toward the curb so that the front
wheels will contact the curb if the vehi-
cle moves forward.
Anti-lock brake system (ABS)
(if equipped)
The ABS system continuously senses
the speed of the wheels. If the wheels are
going to lock, the ABS system repeated-
ly modulates the hydraulic brake pres-
sure to the wheels.
When you apply your brakes under con-
ditions which may lock the wheels, you
may hear a “tik-tik’’ sound from the
brakes, or feel a corresponding sensation
in the brake pedal. This is normal and it
means your ABS system is active.
In order to obtain the maximum benefit
from your ABS system in an emergency
situation, do not attempt to modulate
your brake pressure and do not try to
pump your brakes. Press your brake
pedal as hard as possible or as hard as
the situation warrants and allow the ABS
system to control the force being deliv-
ered to the brakes.
WARNING
- ABS Brakes
Your ABS is not a substitute for
good driving judgement. You can
still have an accident. In fact, your
ABS system will not be able to pre-
vent an accident. You must espe-
cially avoid:
Dangerous driving, such asneglecting safety precautions,
speeding, or driving too close to
the vehicle in front of you.
Driving at high speed in situa- tions providing considerably less
traction, such as wet conditions
where hydroplaning could occur.
Driving too fast on poor road sur- faces. The ABS is designed to
improve maximum braking effec-
tiveness on typical highways and
roads in good condition. On poor
road surfaces, the ABS may actu-
ally reduce braking effectiveness.
Page 162 of 327
Driving your vehicle34
4Non-operational conditions of
rear parking assist systemRear parking assist system may not
operate normally when:1. Moisture is frozen to the sensor. (It will operate normally when moisture
melts.)
2. Sensor is covered with foreign matter, such as snow or water, or the sensor
cover is blocked. (It will operate nor-
mally when the material is removed or
the sensor is no longer blocked.)
3. Driving on uneven road surfaces (unpaved roads, gravel, bumps, gradi-
ent).
4. Objects generating excessive noise (vehicle horns, loud motorcycle
engines, or truck air brakes) are within
range of the sensor.
5. Heavy rain or water spray exists.
6. Wireless transmitters or mobile phones are within range of the sensor.
7. Sensor is covered with snow.
8. Trailer towing
Detecting range may decrease when:1. Sensor is coverd with foreign matter such as snow or water. (Sensing range
will return to normal when removed.)
2. Outside air temperature is extremely hot or cold.Following objects may not be recog-nized by the sensor:1. Sharp or slim objects such as ropes, chains or small poles.
2. Objects which tend to absorb sensor frequency such as clothes, spongy
material or snow.
3. Undetectable objects smaller than 1 m (40 in.) and narrower than 14 cm (6 in.)
in diameter.
CAUTION
1. The rear parking assist system may not sound sequentiallydepending on the speed andshapes of the objects detected.
2. The rear parking assist system may malfunction if the vehiclebumper height or sensor installa-tion has been modified or dam- aged. Any non-factory installedequipment or accessories mayalso interfere with the sensor per-formance.
3. Sensor may not recognize objects less than 40 cm (15 in.)from the sensor, or it may sensean incorrect distance. Use cau- tion.
4. When the sensor is covered with snow, dirt or water, sensor maybe inoperative until the debris isremoved using a soft cloth.
5. Do not push, scratch or strike the sensor. Sensor damage couldoccur.
Page 165 of 327
437
Driving your vehicle
Speedometer The speedometer indicates the forward
speed of the vehicle.Odometer/Trip odometerYou can choose the odometer, trip
odometer A or trip odometer B by press-
ing the tripmeter mode button.OdometerThe odometer indicates the total dis-
tance the vehicle has been driven.Trip odometerTRIP A: Trip odometer A
TRIP B: Trip odometer B
The trip odometer indicates the distance
of individual trips selected by the driver.
Trip odometer A and B can be reset to 0
by pressing the reset button for 1 second
or more, and then releasing.
Tachometer The tachometer indicates the approxi-
mate number of engine revolutions per
minute (rpm).
Use the tachometer to select the correct
shift points and to prevent lugging and/or
over-revving the engine.
The tachometer pointer may move slight-
ly when the ignition switch is in ACC or
ON position with the engine OFF. This
movement is normal and will not affect
the accuracy of the tachometer once the
engine is running.
Engine temperature gauge This gauge shows the temperature of the
engine coolant when the ignition switch
is ON.
Do not continue driving with an overheat-
ed engine. If your vehicle overheats, refer
to “Overheating” in the Index.
GAUGES
CAUTION
Do not operate the engine withinthe tachometer's RED ZONE.
This may cause severe engine dam-age.
CAUTION
If the gauge pointer moves beyond the normal range area toward the“H” position, it indicates overheat-ing that may damage the engine.