KIA SOUL 2017 Owners Manual
Manufacturer: KIA, Model Year: 2017, Model line: SOUL, Model: KIA SOUL 2017Pages: 589, PDF Size: 13.3 MB
Page 231 of 589
4145
Features of your vehicle
Removal and installation
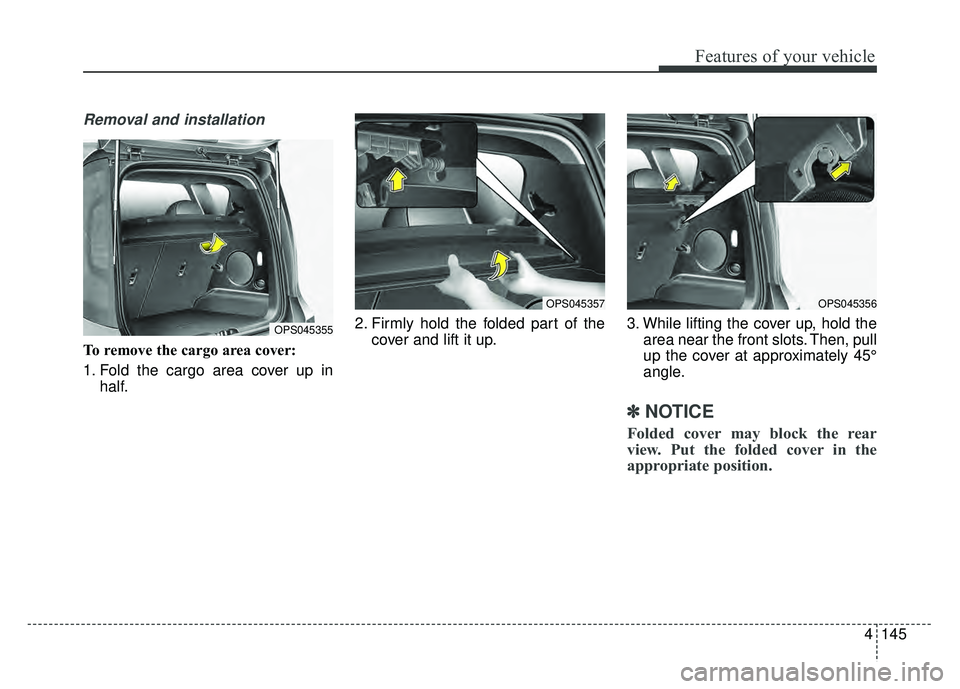
To remove the cargo area cover:
1. Fold the cargo area cover up inhalf. 2. Firmly hold the folded part of the
cover and lift it up. 3. While lifting the cover up, hold the
area near the front slots. Then, pull
up the cover at approximately 45°
angle.
✽ ✽NOTICE
Folded cover may block the rear
view. Put the folded cover in the
appropriate position.
OPS045355
OPS045357OPS045356
Page 232 of 589
Features of your vehicle
146
4
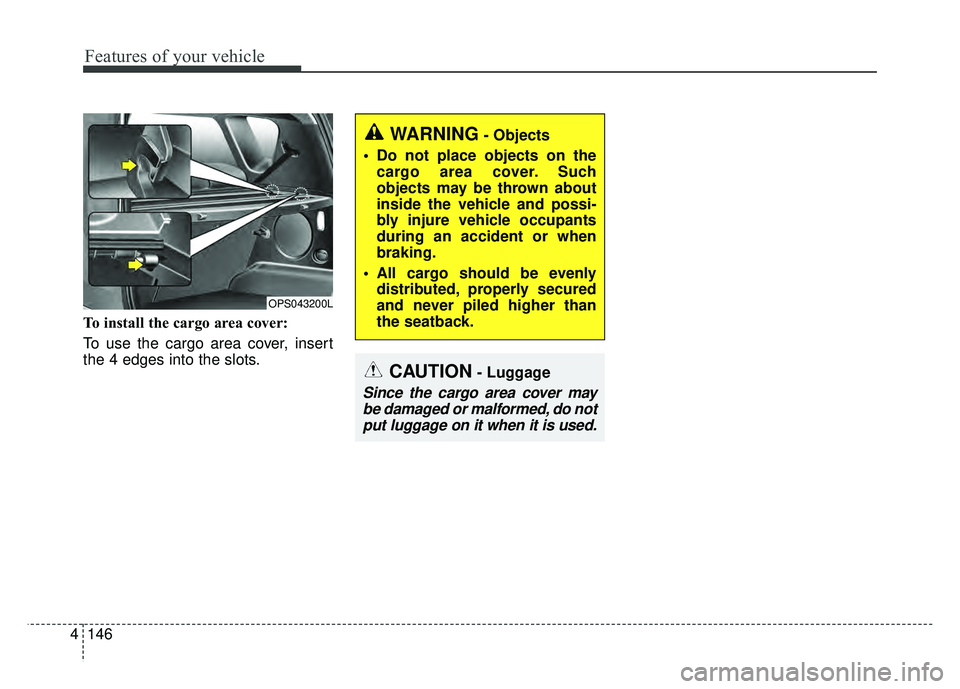
To install the cargo area cover:
To use the cargo area cover, insert
the 4 edges into the slots.
CAUTION- Luggage
Since the cargo area cover may
be damaged or malformed, do notput luggage on it when it is used.
WARNING- Objects
Do not place objects on the cargo area cover. Such
objects may be thrown about
inside the vehicle and possi-
bly injure vehicle occupants
during an accident or when
braking.
All cargo should be evenly distributed, properly secured
and never piled higher than
the seatback.
OPS043200L
Page 233 of 589
4147
Features of your vehicle
EXTERIOR FEATURES
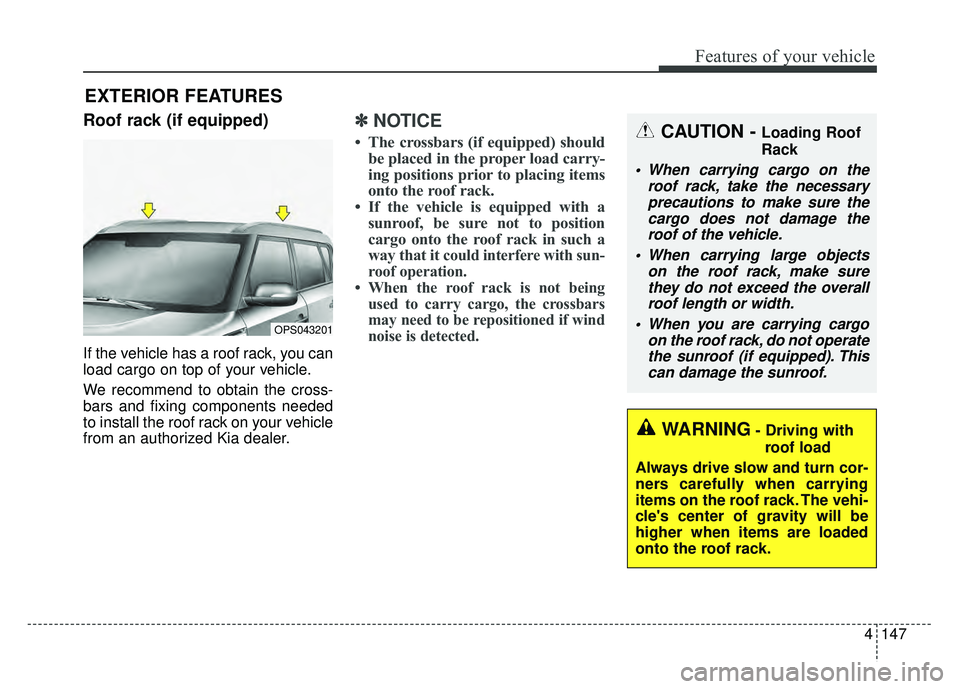
Roof rack (if equipped)
If the vehicle has a roof rack, you can
load cargo on top of your vehicle.
We recommend to obtain the cross-
bars and fixing components needed
to install the roof rack on your vehicle
from an authorized Kia dealer.
✽ ✽NOTICE
• The crossbars (if equipped) should
be placed in the proper load carry-
ing positions prior to placing items
onto the roof rack.
• If the vehicle is equipped with a sunroof, be sure not to position
cargo onto the roof rack in such a
way that it
could interfere with sun-
roof operation.
• When the roof rack is not being used to carry cargo, the crossbars
may need to be repositioned if wind
noise is detected.
OPS043201
CAUTION - Loading Roof
Rack
When carrying cargo on the
roof rack, take the necessaryprecautions to make sure thecargo does not damage theroof of the vehicle.
When carrying large objects on the roof rack, make surethey do not exceed the overallroof length or width.
When you are carrying cargo on the roof rack, do not operatethe sunroof (if equipped). Thiscan damage the sunroof.
WARNING- Driving with
roof load
Always drive slow and turn cor-
ners carefully when carrying
items on the roof rack. The vehi-
cle's center of gravity will be
higher when items are loaded
onto the roof rack.
Page 234 of 589
Features of your vehicle
148
4
The following specification is the
maximum weight that can be
loaded onto the roof rack.
Distribute the load as evenly as
possible across the crossbars (if
equipped) and roof rack and
secure the load firmly.
Loading cargo or luggage in
excess of the specified weight limit
on the roof rack may damage your
vehicle.
The vehicle center of gravity will be higher when items are loaded onto
the roof rack. Avoid sudden starts,
braking, sharp turns, abrupt
maneuvers or high speeds that
may result in loss of vehicle control
or rollover resulting in an accident. Always drive slowly and turn cor-
ners carefully when carrying items
on the roof rack. Severe wind
updrafts, caused by passing vehi-
cles or natural causes, can cause
sudden upward pressure on items
loaded on the roof rack. This is
especially true when carrying
large, flat items such as wood pan-
els or mattresses. This could cause
the items to fall off the roof rack
and cause damage to your vehicle
or others around you.
To prevent damage or loss of cargo while driving, check frequently
before or while driving to make
sure the items on the roof rack are
securely fastened.Mounting bracket for roof carrier
(if equipped)
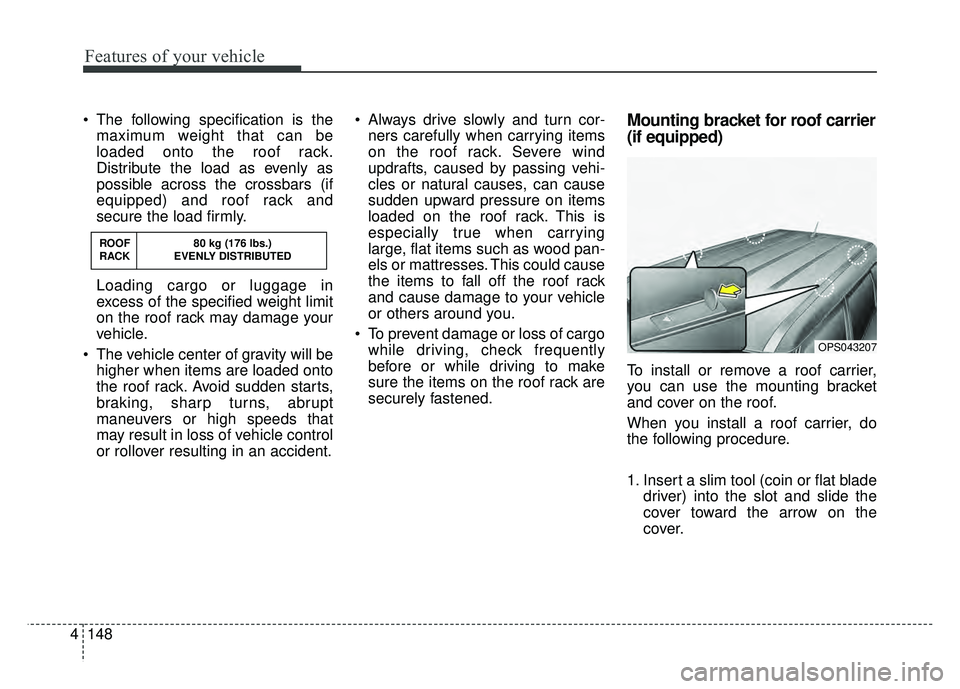
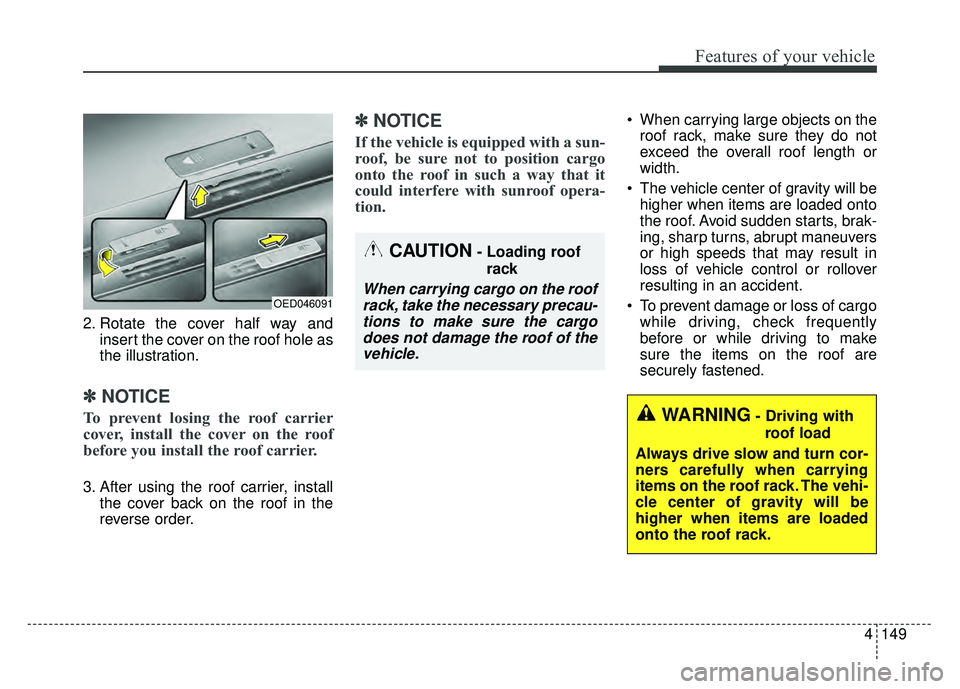
To install or remove a roof carrier,
you can use the mounting bracket
and cover on the roof.
When you install a roof carrier, do
the following procedure.
1. Insert a slim tool (coin or flat blade driver) into the slot and slide the
cover toward the arrow on the
cover.
OPS043207
ROOF 80 kg (176 lbs.)
RACK EVENLY DISTRIBUTED
Page 235 of 589
4149
Features of your vehicle
2. Rotate the cover half way andinsert the cover on the roof hole as
the illustration.
✽ ✽NOTICE
To prevent losing the roof carrier
cover, install the cover on the roof
before you install the roof carrier.
3. After using the roof carrier, install
the cover back on the roof in the
reverse order.
✽ ✽NOTICE
If the vehicle is equipped with a sun-
roof, be sure not to position cargo
onto the roof in such a way that it
could interfere with sunroof opera-
tion.
When carrying large objects on the
roof rack, make sure they do not
exceed the overall roof length or
width.
The vehicle center of gravity will be higher when items are loaded onto
the roof. Avoid sudden starts, brak-
ing, sharp turns, abrupt maneuvers
or high speeds that may result in
loss of vehicle control or rollover
resulting in an accident.
To prevent damage or loss of cargo while driving, check frequently
before or while driving to make
sure the items on the roof are
securely fastened.
WARNING- Driving with
roof load
Always drive slow and turn cor-
ners carefully when carrying
items on the roof rack. The vehi-
cle center of gravity will be
higher when items are loaded
onto the roof rack.
OED046091
CAUTION- Loading roof rack
When carrying cargo on the roofrack, take the necessary precau-tions to make sure the cargodoes not damage the roof of thevehicle.
Page 236 of 589
Audio system
Audio System . . . . . . . . . . . . . . . . . . . . . . . . . . . . . . 5-2
• Antenna . . . . . . . . . . . . . . . . . . . . . . . . . . . . . . . . . . . . \
. 5-2
• Audio remote control . . . . . . . . . . . . . . . . . . . . . . . . . . 5-3
• AUX and USB port . . . . . . . . . . . . . . . . . . . . . . . . . . . . 5-4
• Speaker lights. . . . . . . . . . . . . . . . . . . . . . . . . . . . . . . . . 5-4
• How vehicle audio works . . . . . . . . . . . . . . . . . . . . . . . 5-6
Audio (Without Touch Screen) . . . . . . . . . . . . . . . 5-10
• Feature of Your Audio . . . . . . . . . . . . . . . . . . . . . . . . . 5-11
• Radio . . . . . . . . . . . . . . . . . . . . . . . . . . . . . . . . . . . . \
. . . 5-16
• SiriusXM . . . . . . . . . . . . . . . . . . . . . . . . . . . . . . . . . . . 5-\
18
• Media . . . . . . . . . . . . . . . . . . . . . . . . . . . . . . . . . . . . \
. . 5-20
• Phone . . . . . . . . . . . . . . . . . . . . . . . . . . . . . . . . . . . . \
. . 5-35
• Siri . . . . . . . . . . . . . . . . . . . . . . . . . . . . . . . . . . . . \
. . . . . 5-43
• Setup . . . . . . . . . . . . . . . . . . . . . . . . . . . . . . . . . . . . \
. . . 5-44
Audio (With Touch Screen) . . . . . . . . . . . . . . . . . . 5-46
• Feature of Your Audio. . . . . . . . . . . . . . . . . . . . . . . . . 5-47
• Radio . . . . . . . . . . . . . . . . . . . . . . . . . . . . . . . . . . . . \
. . . 5-53
• SiriusXM . . . . . . . . . . . . . . . . . . . . . . . . . . . . . . . . . . . 5-\
55
• Media . . . . . . . . . . . . . . . . . . . . . . . . . . . . . . . . . . . . \
. . 5-57
• Phone . . . . . . . . . . . . . . . . . . . . . . . . . . . . . . . . . . . . \
. . 5-73
• Siri . . . . . . . . . . . . . . . . . . . . . . . . . . . . . . . . . . . . \
. . . . . 5-81
• Setup . . . . . . . . . . . . . . . . . . . . . . . . . . . . . . . . . . . . \
. . . 5-82
Declaration of Conformity . . . . . . . . . . . . . . . . . . 5-84
• FCC . . . . . . . . . . . . . . . . . . . . . . . . . . . . . . . . . . . . \
. . . . 5-84
5
Page 237 of 589
Audio system
25
If you install aftermarket HID head
lamps, your vehicle’s audio and elec-
tronic devices may malfunction.
Antenna (if equipped)
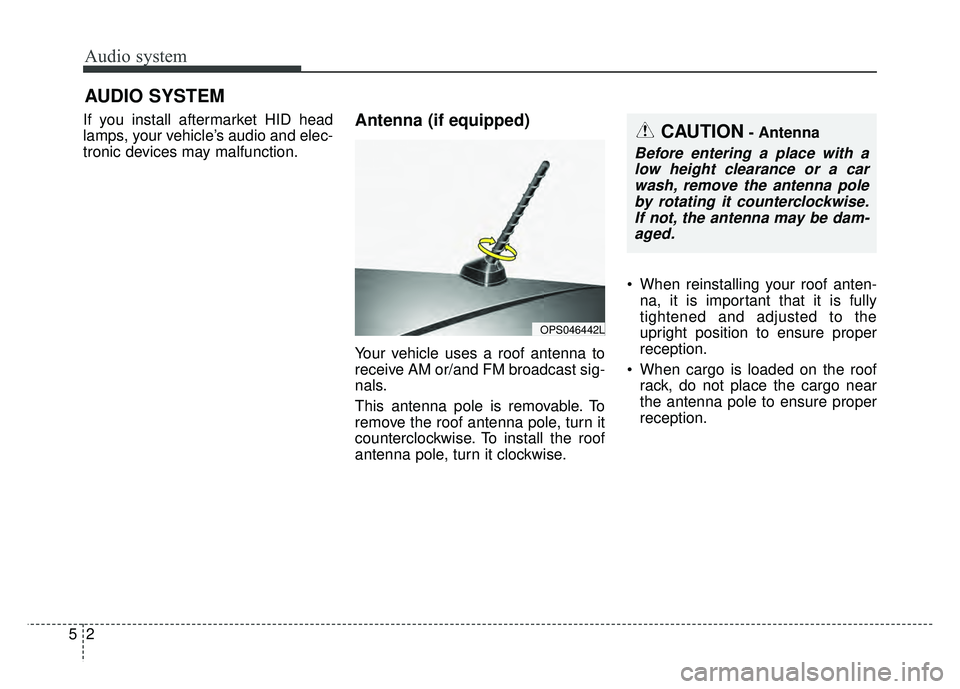
Your vehicle uses a roof antenna to
receive AM or/and FM broadcast sig-
nals.
This antenna pole is removable. To
remove the roof antenna pole, turn it
counterclockwise. To install the roof
antenna pole, turn it clockwise.
When reinstalling your roof anten-
na, it is important that it is fully
tightened and adjusted to the
upright position to ensure proper
reception.
When cargo is loaded on the roof rack, do not place the cargo near
the antenna pole to ensure proper
reception.
AUDIO SYSTEM
OPS046442L
CAUTION- Antenna
Before entering a place with alow height clearance or a carwash, remove the antenna poleby rotating it counterclockwise.If not, the antenna may be dam-aged.
Page 238 of 589
Audio system
53
Audio remote control
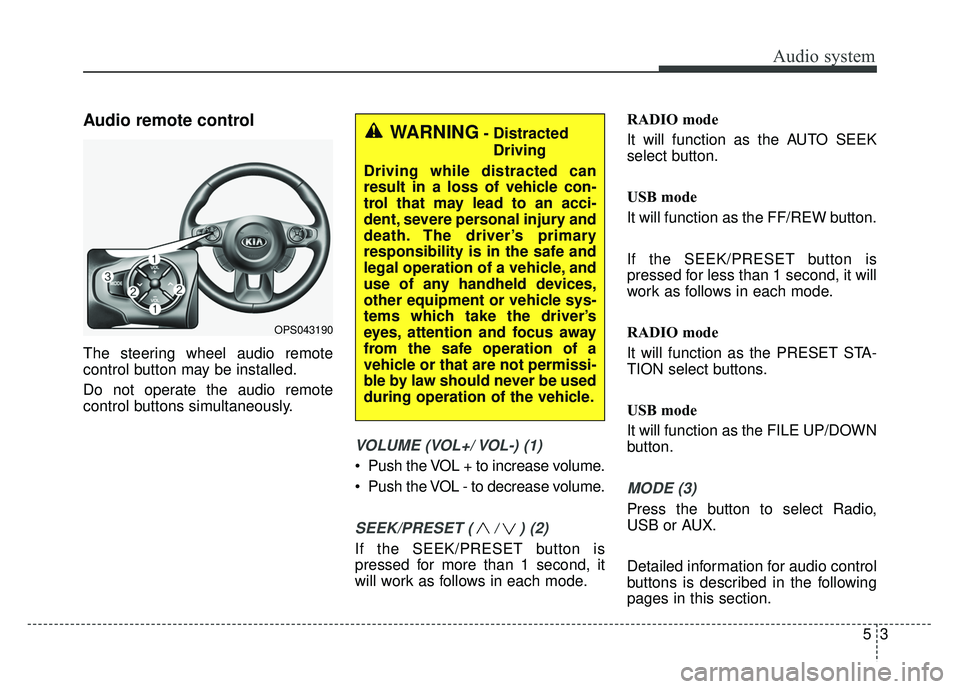
The steering wheel audio remote
control button may be installed.
Do not operate the audio remote
control buttons simultaneously.
VOLUME (VOL+/ VOL-) (1)
Push the VOL + to increase volume.
Push the VOL - to decrease volume.
SEEK/PRESET ( / ) (2)
If the SEEK/PRESET button is
pressed for more than 1 second, it
will work as follows in each mode.RADIO mode
It will function as the AUTO SEEK
select button.
USB mode
It will function as the FF/REW button.
If the SEEK/PRESET button is
pressed for less than 1 second, it will
work as follows in each mode.
RADIO mode
It will function as the PRESET STA-
TION select buttons.
USB mode
It will function as the FILE UP/DOWN
button.
MODE (3)
Press the button to select Radio,
USB or AUX.
Detailed information for audio control
buttons is described in the following
pages in this section.
OPS043190
WARNING- Distracted
Driving
Driving while distracted can
result in a loss of vehicle con-
trol that may lead to an acci-
dent, severe personal injury and
death. The driver’s primary
responsibility is in the safe and
legal operation of a vehicle, and
use of any handheld devices,
other equipment or vehicle sys-
tems which take the driver’s
eyes, attention and focus away
from the safe operation of a
vehicle or that are not permissi-
ble by law should never be used
during operation of the vehicle.
Page 239 of 589
Audio system
45
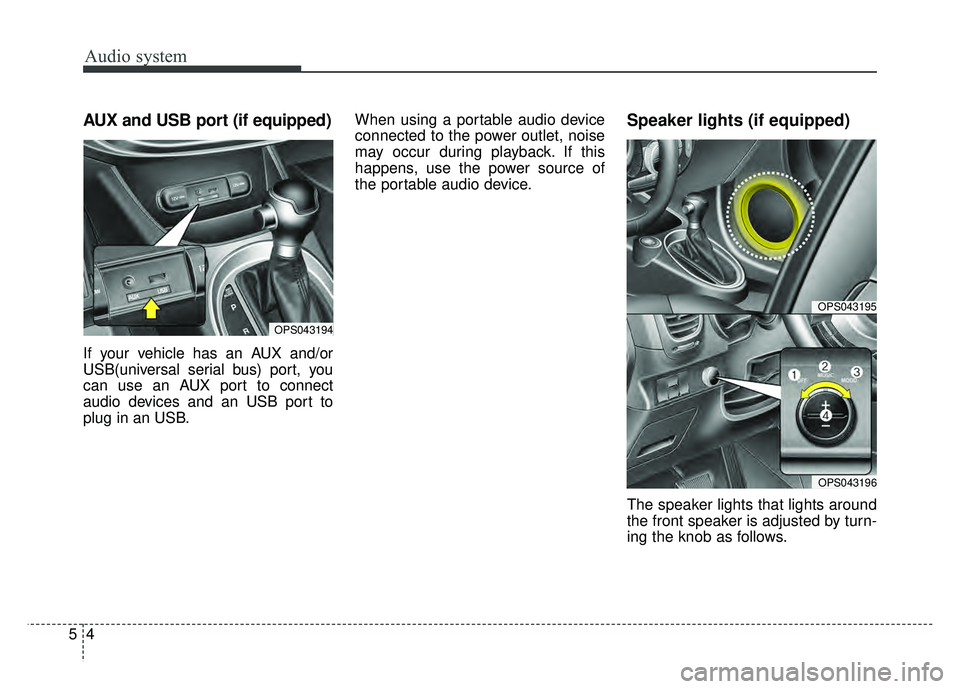
AUX and USB port (if equipped)
If your vehicle has an AUX and/or
USB(universal serial bus) port, you
can use an AUX port to connect
audio devices and an USB port to
plug in an USB.When using a portable audio device
connected to the power outlet, noise
may occur during playback. If this
happens, use the power source of
the portable audio device.
Speaker lights (if equipped)
The speaker lights that lights around
the front speaker is adjusted by turn-
ing the knob as follows.
OPS043194
OPS043195
OPS043196
Page 240 of 589
Audio system
55
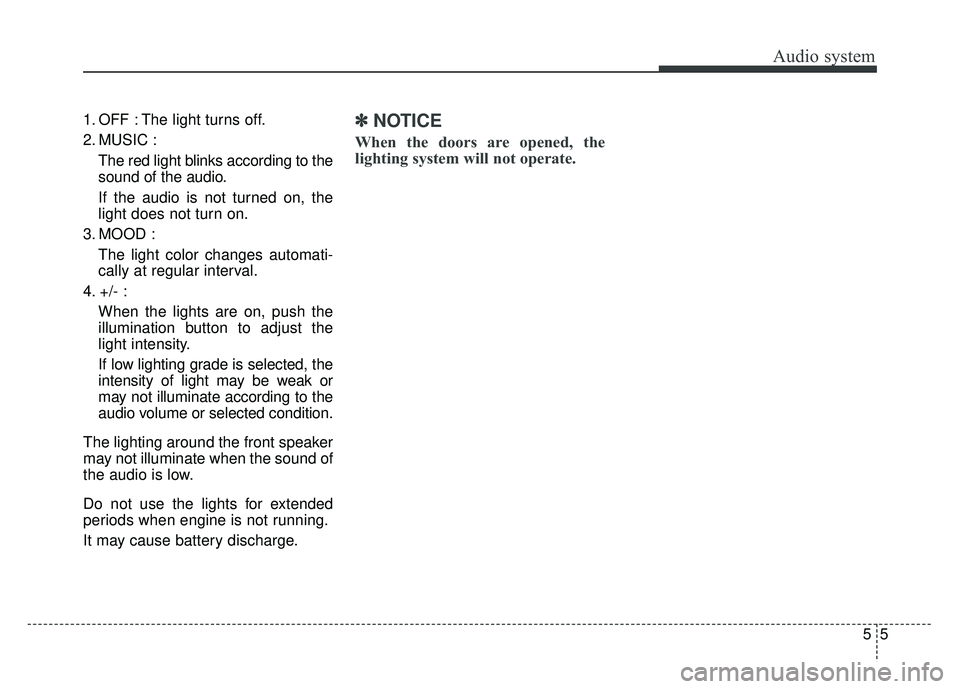
1. OFF : The light turns off.
2. MUSIC :
The red light blinks according to the
sound of the audio.
If the audio is not turned on, the
light does not turn on.
3. MOOD : The light color changes automati-
cally at regular interval.
4. +/- : When the lights are on, push the
illumination button to adjust the
light intensity.
If low lighting grade is selected, the
intensity of light may be weak or
may not illuminate according to the
audio volume or selected condition.
The lighting around the front speaker
may not illuminate when the sound of
the audio is low.
Do not use the lights for extended
periods when engine is not running.
It may cause battery discharge.
✽ ✽ NOTICE
When the doors are opened, the
lighting system will not operate.