navigation system Lexus CT200h 2012 Navigation Manual (in English)
[x] Cancel search | Manufacturer: LEXUS, Model Year: 2012, Model line: CT200h, Model: Lexus CT200h 2012Pages: 436, PDF Size: 28.25 MB
Page 101 of 436
101
1. DESTINATION SEARCH
3
NAVIGATION SYSTEM
CT200h_Navi_OM76078E_(EE)
14.02.06 12:29
1Press the “MENU” button on the
Remote Touch. (See “Remote
Touch” on page 12.)
2Select “Navi”, and select “Menu” if
the map screen is displayed.
3Select “Destination” on the naviga-
tion menu screen.
4Select “UK Postal Code” on the sec-
ond page of the “Destination”
screen.
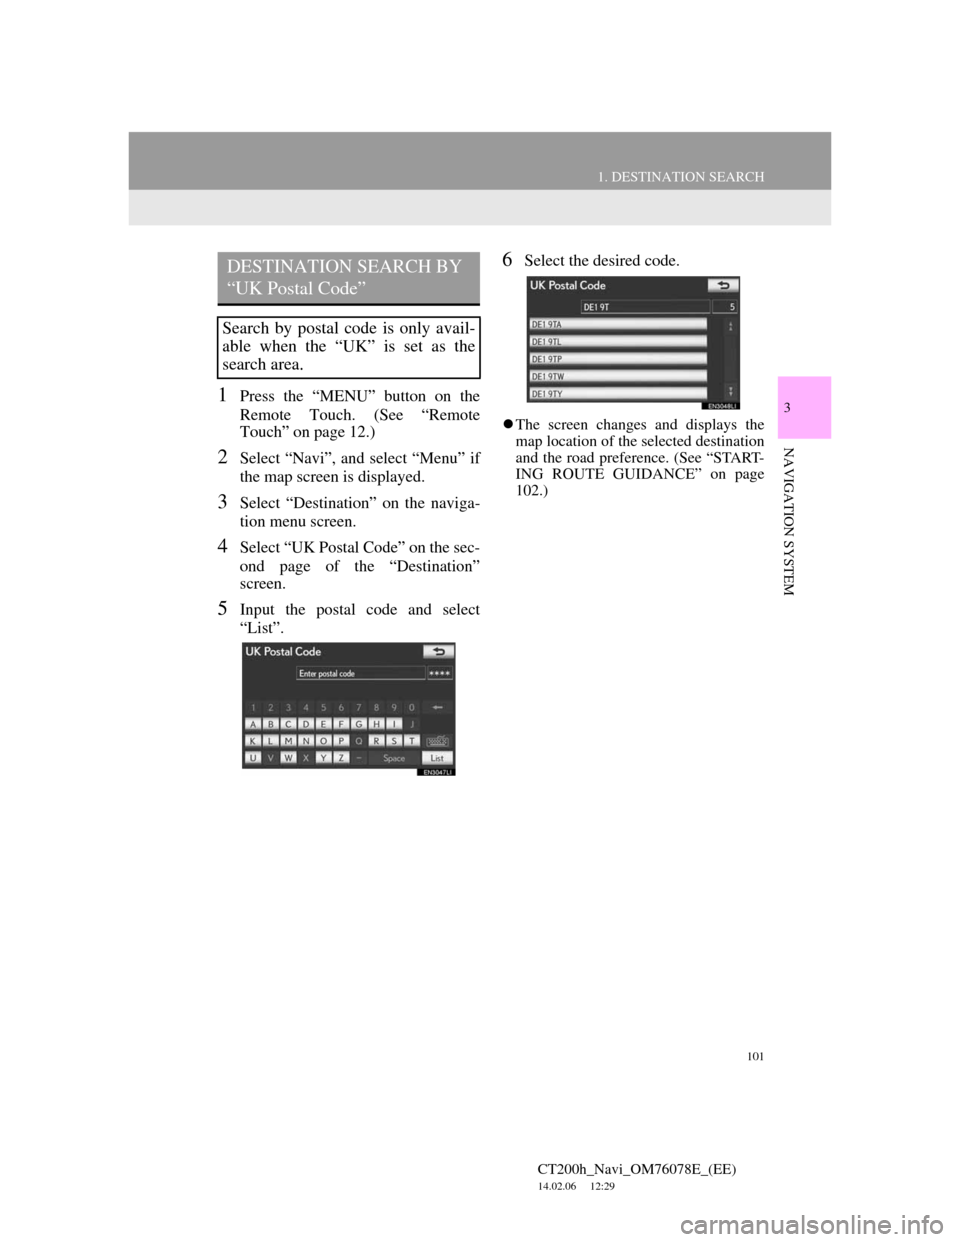
5Input the postal code and select
“List”.
6Select the desired code.
The screen changes and displays the
map location of the selected destination
and the road preference. (See “START-
ING ROUTE GUIDANCE” on page
102.)
DESTINATION SEARCH BY
“UK Postal Code”
Search by postal code is only avail-
able when the “UK” is set as the
search area.
Page 103 of 436
103
1. DESTINATION SEARCH
3
NAVIGATION SYSTEM
CT200h_Navi_OM76078E_(EE)
14.02.06 12:29
ROAD PREFERENCES
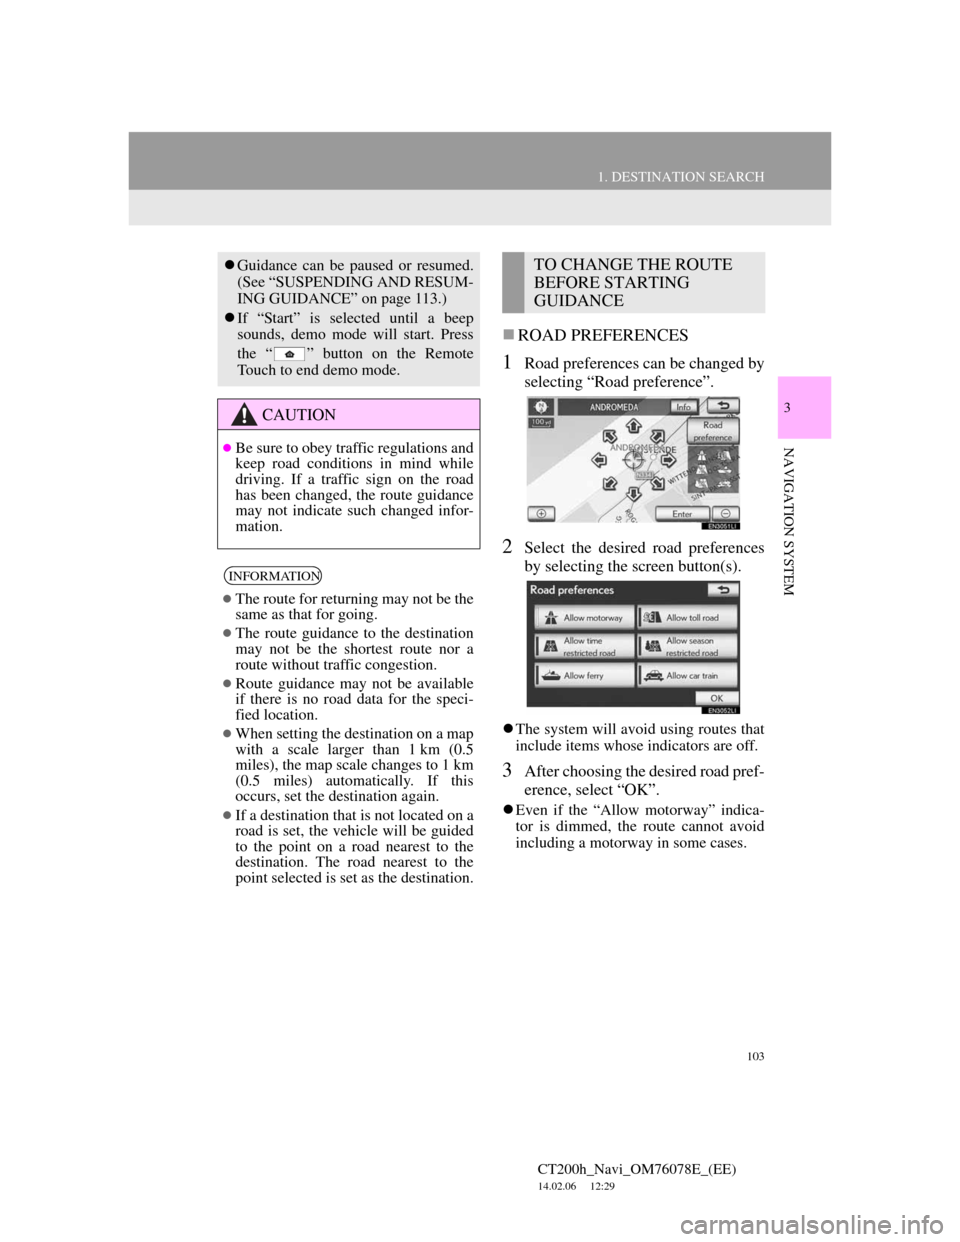
1Road preferences can be changed by
selecting “Road preference”.
2Select the desired road preferences
by selecting the screen button(s).
The system will avoid using routes that
include items whose indicators are off.
3After choosing the desired road pref-
erence, select “OK”.
Even if the “Allow motorway” indica-
tor is dimmed, the route cannot avoid
including a motorway in some cases.
Guidance can be paused or resumed.
(See “SUSPENDING AND RESUM-
ING GUIDANCE” on page 113.)
If “Start” is selected until a beep
sounds, demo mode will start. Press
the “ ” button on the Remote
Touch to end demo mode.
CAUTION
Be sure to obey traffic regulations and
keep road conditions in mind while
driving. If a traffic sign on the road
has been changed, the route guidance
may not indicate such changed infor-
mation.
INFORMATION
The route for returning may not be the
same as that for going.
The route guidance to the destination
may not be the shortest route nor a
route without traffic congestion.
Route guidance may not be available
if there is no road data for the speci-
fied location.
When setting the destination on a map
with a scale larger than 1 km (0.5
miles), the map scale changes to 1 km
(0.5 miles) automatically. If this
occurs, set the destination again.
If a destination that is not located on a
road is set, the vehicle will be guided
to the point on a road nearest to the
destination. The road nearest to the
point selected is set as the destination.
TO CHANGE THE ROUTE
BEFORE STARTING
GUIDANCE
Page 105 of 436
105
CT200h_Navi_OM76078E_(EE)
14.02.06 12:29
3
NAVIGATION SYSTEM
2. ROUTE GUIDANCE
1. ROUTE GUIDANCE SCREEN
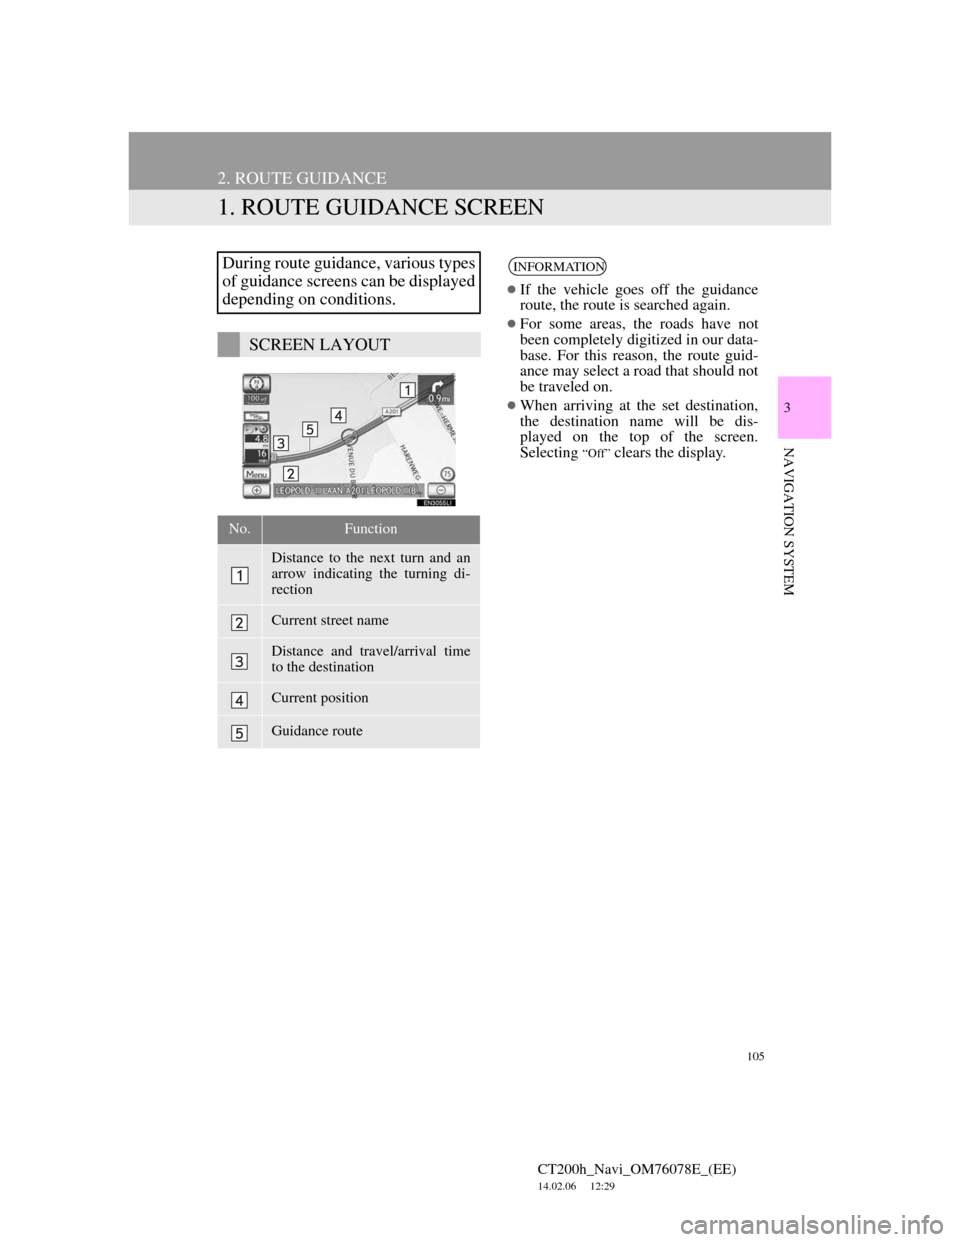
During route guidance, various types
of guidance screens can be displayed
depending on conditions.
SCREEN LAYOUT
No.Function
Distance to the next turn and an
arrow indicating the turning di-
rection
Current street name
Distance and travel/arrival time
to the destination
Current position
Guidance route
INFORMATION
If the vehicle goes off the guidance
route, the route is searched again.
For some areas, the roads have not
been completely digitized in our data-
base. For this reason, the route guid-
ance may select a road that should not
be traveled on.
When arriving at the set destination,
the destination name will be dis-
played on the top of the screen.
Selecting
“Off” clears the display.
Page 107 of 436
107
2. ROUTE GUIDANCE
CT200h_Navi_OM76078E_(EE)
14.02.06 12:29
3
NAVIGATION SYSTEM
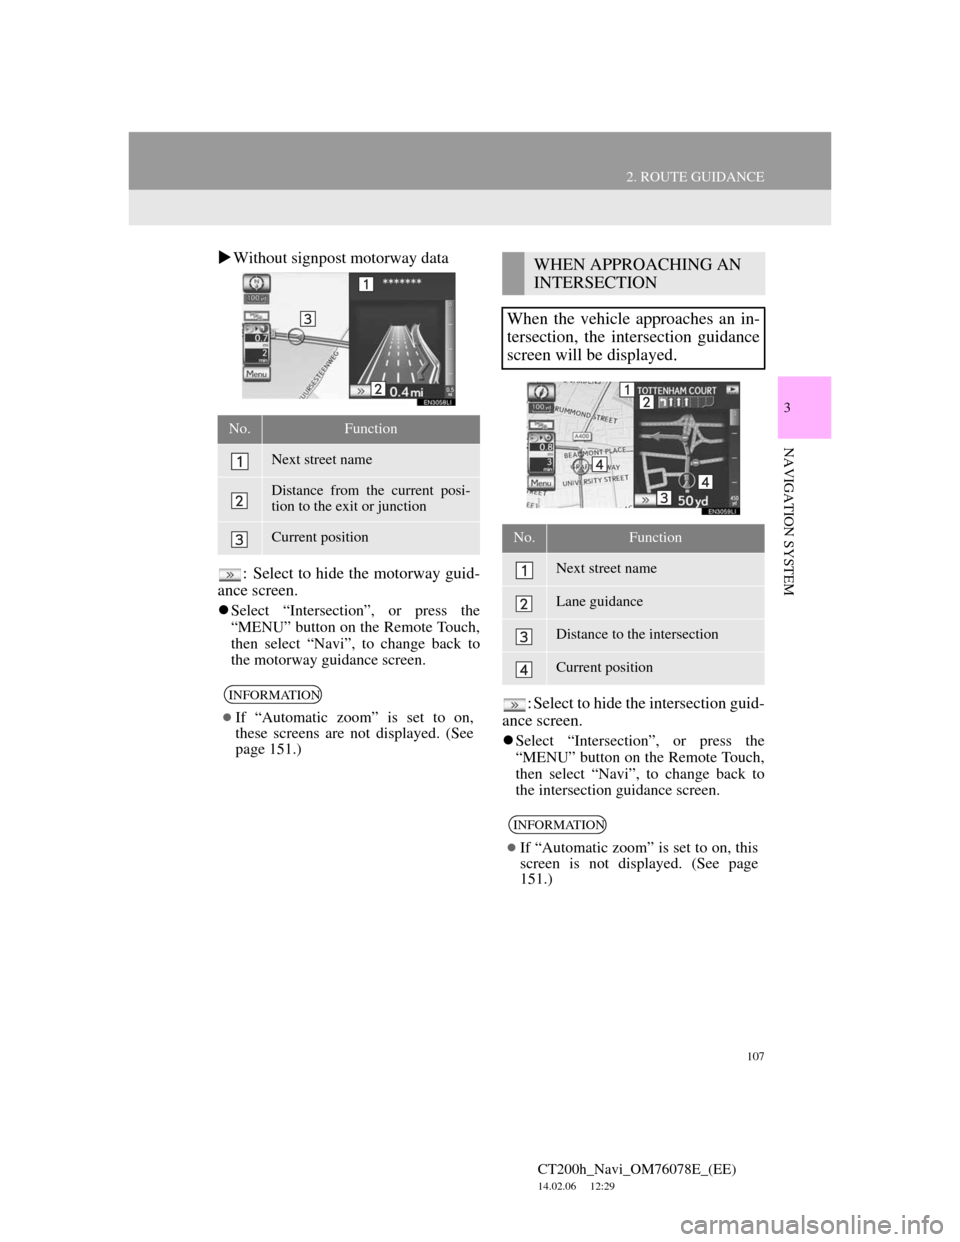
Without signpost motorway data
: Select to hide the motorway guid-
ance screen.
Select “Intersection”, or press the
“MENU” button on the Remote Touch,
then select “Navi”, to change back to
the motorway guidance screen.
: Select to hide the intersection guid-
ance screen.
Select “Intersection”, or press the
“MENU” button on the Remote Touch,
then select “Navi”, to change back to
the intersection guidance screen.
No.Function
Next street name
Distance from the current posi-
tion to the exit or junction
Current position
INFORMATION
If “Automatic zoom” is set to on,
these screens are not displayed. (See
page 151.)
WHEN APPROACHING AN
INTERSECTION
When the vehicle approaches an in-
tersection, the intersection guidance
screen will be displayed.
No.Function
Next street name
Lane guidance
Distance to the intersection
Current position
INFORMATION
If “Automatic zoom” is set to on, this
screen is not displayed. (See page
151.)
Page 109 of 436
109
2. ROUTE GUIDANCE
CT200h_Navi_OM76078E_(EE)
14.02.06 12:29
3
NAVIGATION SYSTEM
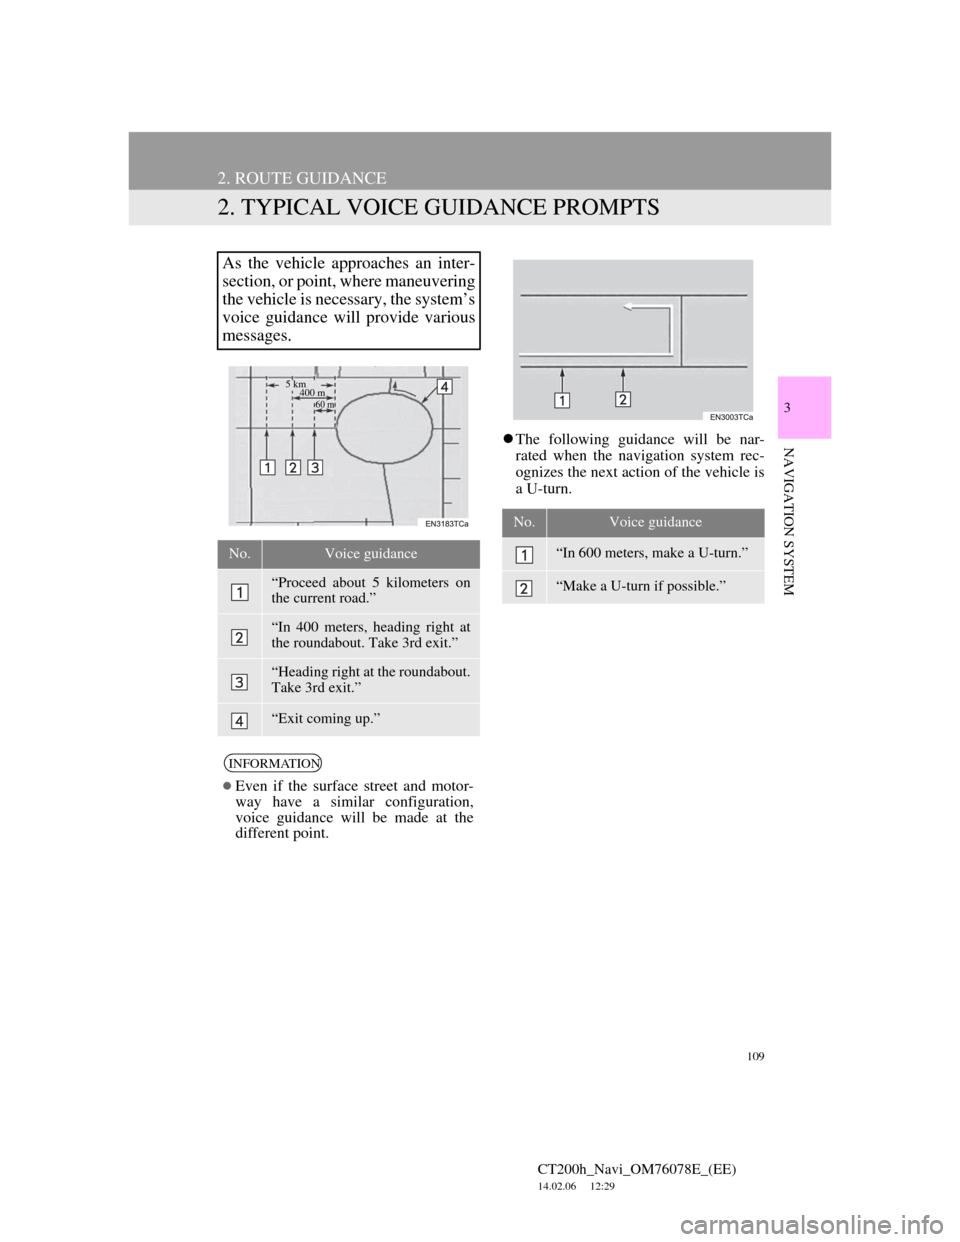
2. TYPICAL VOICE GUIDANCE PROMPTS
The following guidance will be nar-
rated when the navigation system rec-
ognizes the next action of the vehicle is
a U-turn.
As the vehicle approaches an inter-
section, or point, where maneuvering
the vehicle is necessary, the system’s
voice guidance will provide various
messages.
No.Voice guidance
“Proceed about 5 kilometers on
the current road.”
“In 400 meters, heading right at
the roundabout. Take 3rd exit.”
“Heading right at the roundabout.
Take 3rd exit.”
“Exit coming up.”
INFORMATION
Even if the surface street and motor-
way have a similar configuration,
voice guidance will be made at the
different point.
5 km
400 m
60 m
No.Voice guidance
“In 600 meters, make a U-turn.”
“Make a U-turn if possible.”
Page 111 of 436
111
2. ROUTE GUIDANCE
CT200h_Navi_OM76078E_(EE)
14.02.06 12:29
3
NAVIGATION SYSTEM
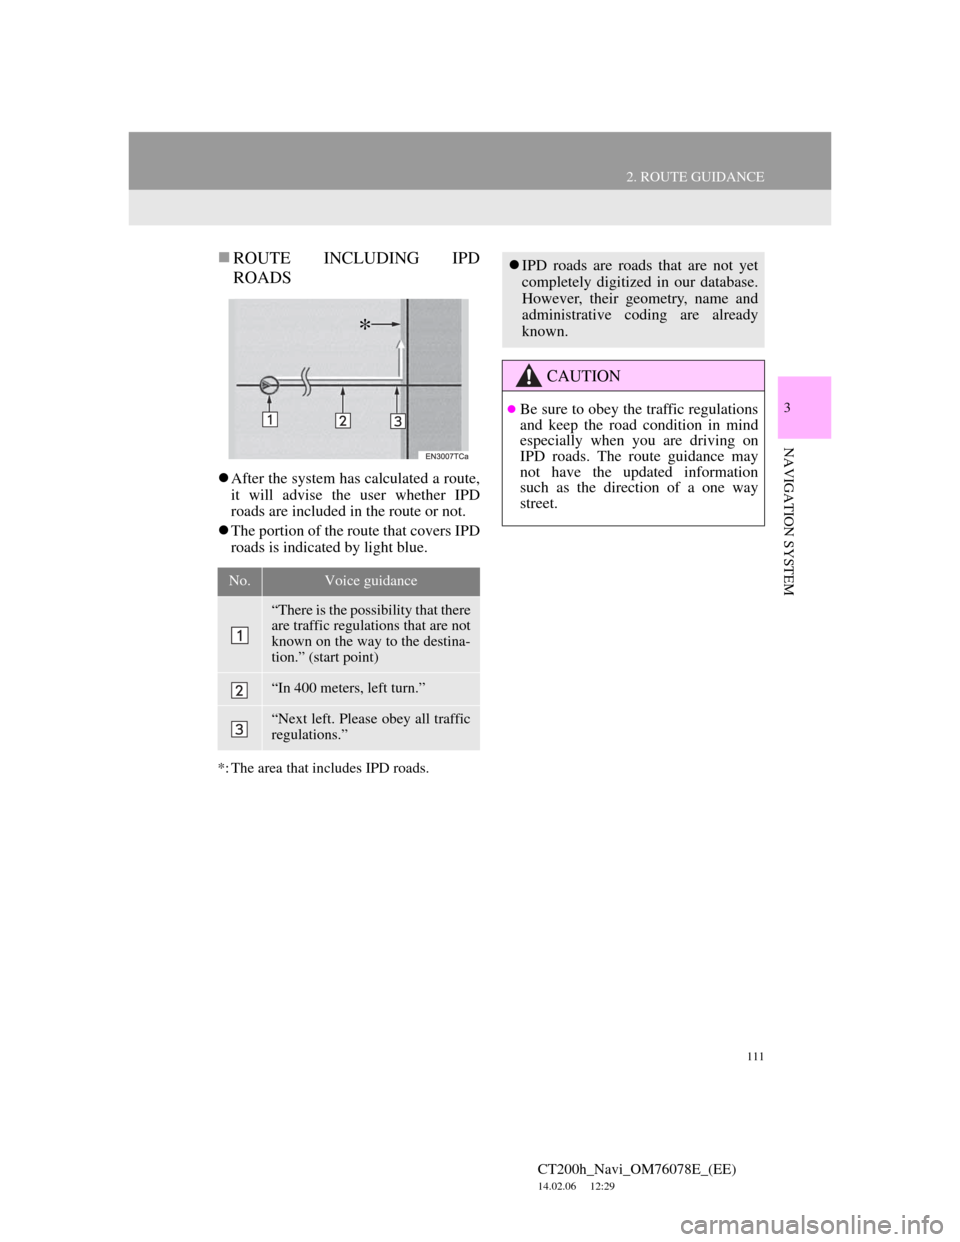
ROUTE INCLUDING IPD
ROADS
After the system has calculated a route,
it will advise the user whether IPD
roads are included in the route or not.
The portion of the route that covers IPD
roads is indicated by light blue.
*: The area that includes IPD roads.
No.Voice guidance
“There is the possibility that there
are traffic regulations that are not
known on the way to the destina-
tion.” (start point)
“In 400 meters, left turn.”
“Next left. Please obey all traffic
regulations.”
*
IPD roads are roads that are not yet
completely digitized in our database.
However, their geometry, name and
administrative coding are already
known.
CAUTION
Be sure to obey the traffic regulations
and keep the road condition in mind
especially when you are driving on
IPD roads. The route guidance may
not have the updated information
such as the direction of a one way
street.
Page 113 of 436
113
2. ROUTE GUIDANCE
CT200h_Navi_OM76078E_(EE)
14.02.06 12:29
3
NAVIGATION SYSTEM
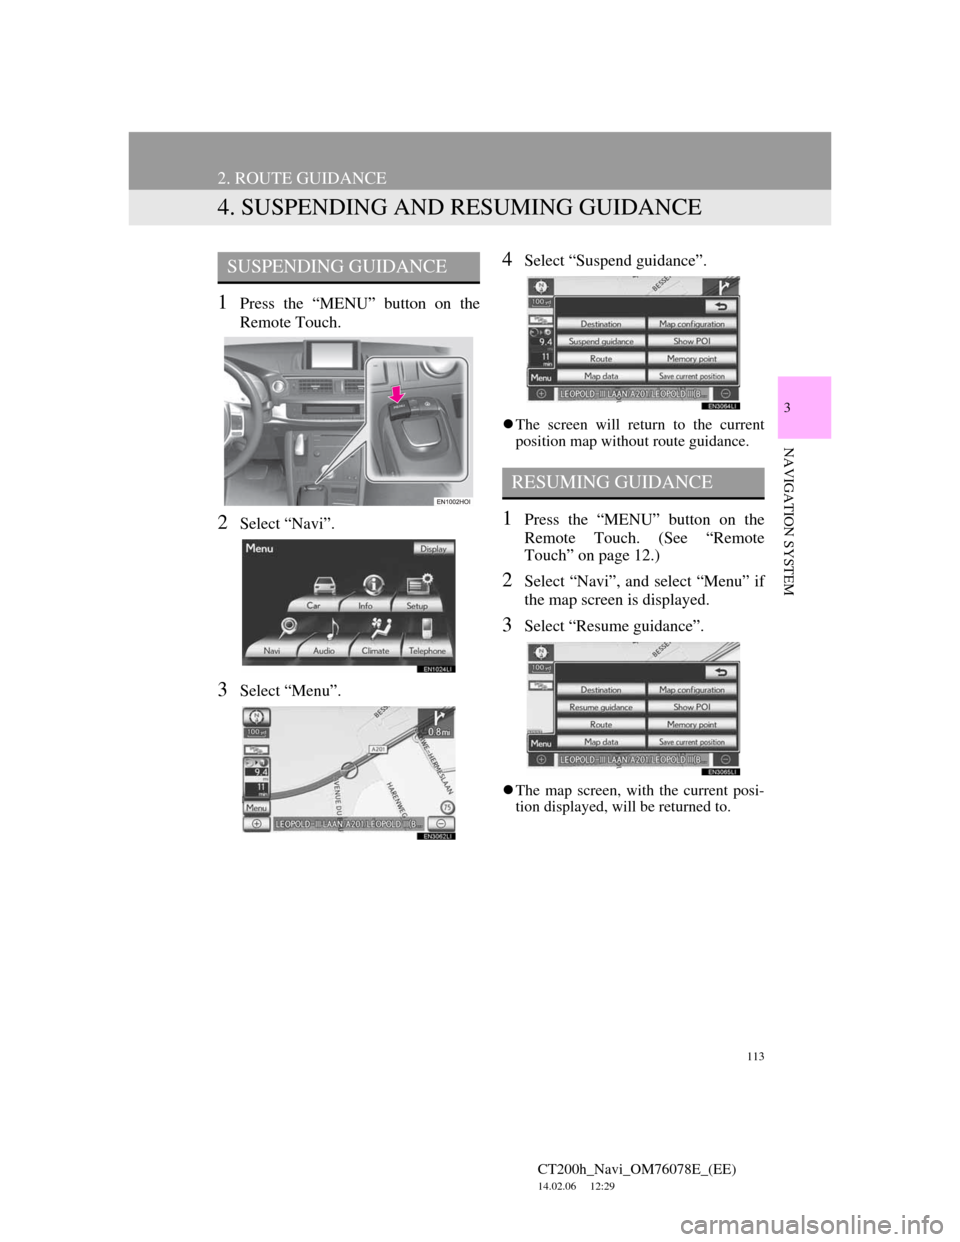
4. SUSPENDING AND RESUMING GUIDANCE
1Press the “MENU” button on the
Remote Touch.
2Select “Navi”.
3Select “Menu”.
4Select “Suspend guidance”.
The screen will return to the current
position map without route guidance.
1Press the “MENU” button on the
Remote Touch. (See “Remote
Touch” on page 12.)
2Select “Navi”, and select “Menu” if
the map screen is displayed.
3Select “Resume guidance”.
The map screen, with the current posi-
tion displayed, will be returned to.
SUSPENDING GUIDANCE
RESUMING GUIDANCE
Page 115 of 436
115
2. ROUTE GUIDANCE
CT200h_Navi_OM76078E_(EE)
14.02.06 12:29
3
NAVIGATION SYSTEM
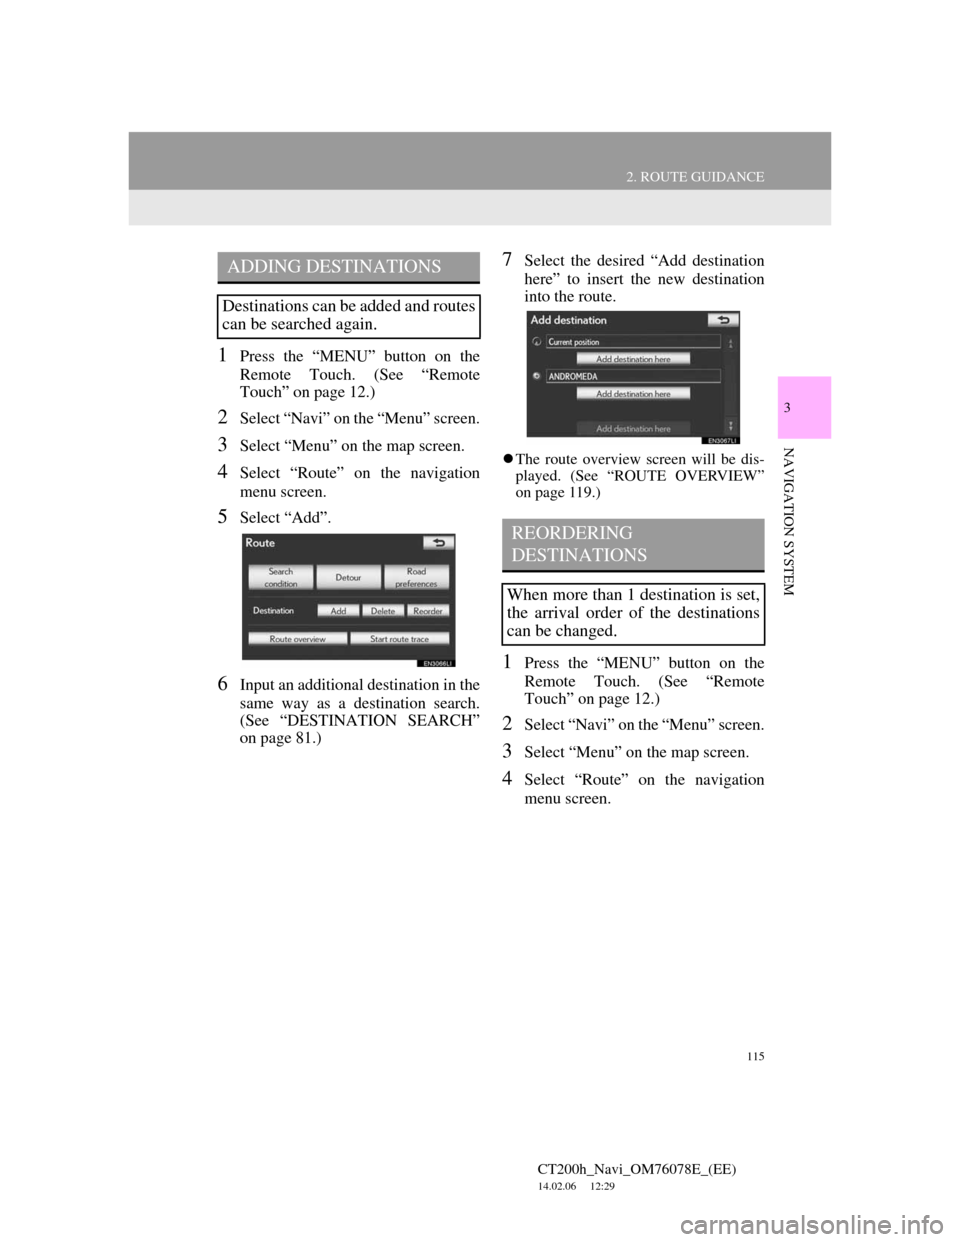
1Press the “MENU” button on the
Remote Touch. (See “Remote
Touch” on page 12.)
2Select “Navi” on the “Menu” screen.
3Select “Menu” on the map screen.
4Select “Route” on the navigation
menu screen.
5Select “Add”.
6Input an additional destination in the
same way as a destination search.
(See “DESTINATION SEARCH”
on page 81.)
7Select the desired “Add destination
here” to insert the new destination
into the route.
The route overview screen will be dis-
played. (See “ROUTE OVERVIEW”
on page 119.)
1Press the “MENU” button on the
Remote Touch. (See “Remote
Touch” on page 12.)
2Select “Navi” on the “Menu” screen.
3Select “Menu” on the map screen.
4Select “Route” on the navigation
menu screen.
ADDING DESTINATIONS
Destinations can be added and routes
can be searched again.
REORDERING
DESTINATIONS
When more than 1 destination is set,
the arrival order of the destinations
can be changed.
Page 116 of 436
116
2. ROUTE GUIDANCE
CT200h_Navi_OM76078E_(EE)
14.02.06 12:29
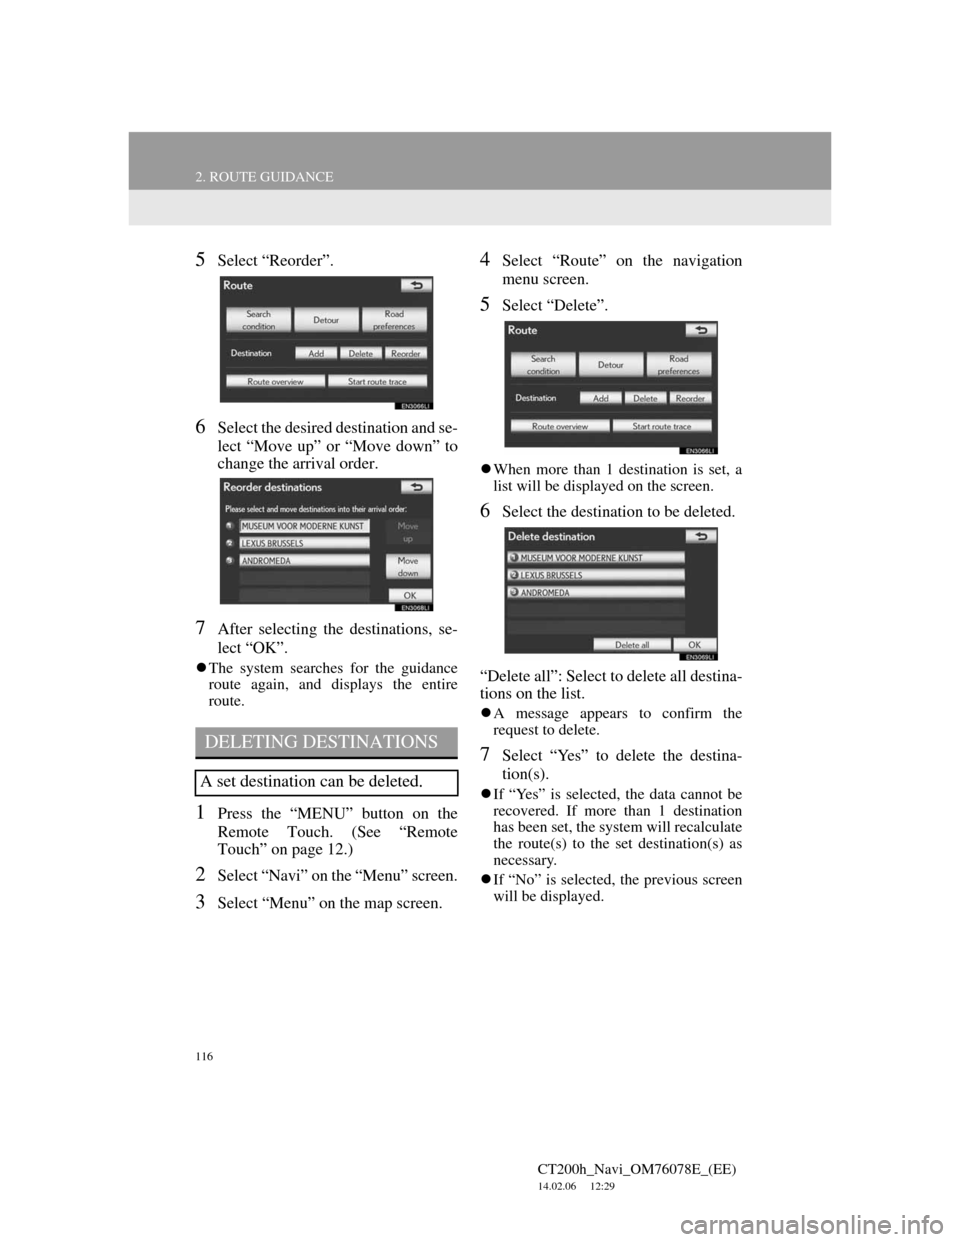
5Select “Reorder”.
6Select the desired destination and se-
lect “Move up” or “Move down” to
change the arrival order.
7After selecting the destinations, se-
lect “OK”.
The system searches for the guidance
route again, and displays the entire
route.
1Press the “MENU” button on the
Remote Touch. (See “Remote
Touch” on page 12.)
2Select “Navi” on the “Menu” screen.
3Select “Menu” on the map screen.
4Select “Route” on the navigation
menu screen.
5Select “Delete”.
When more than 1 destination is set, a
list will be displayed on the screen.
6Select the destination to be deleted.
“Delete all”: Select to delete all destina-
tions on the list.
A message appears to confirm the
request to delete.
7Select “Yes” to delete the destina-
tion(s).
If “Yes” is selected, the data cannot be
recovered. If more than 1 destination
has been set, the system will recalculate
the route(s) to the set destination(s) as
necessary.
If “No” is selected, the previous screen
will be displayed.
DELETING DESTINATIONS
A set destination can be deleted.
Page 117 of 436
117
2. ROUTE GUIDANCE
CT200h_Navi_OM76078E_(EE)
14.02.06 12:29
3
NAVIGATION SYSTEM
1Press the “MENU” button on the
Remote Touch. (See “Remote
Touch” on page 12.)
2Select “Navi” on the “Menu” screen.
3Select “Menu” on the map screen.
4Select “Route” on the navigation
menu screen.
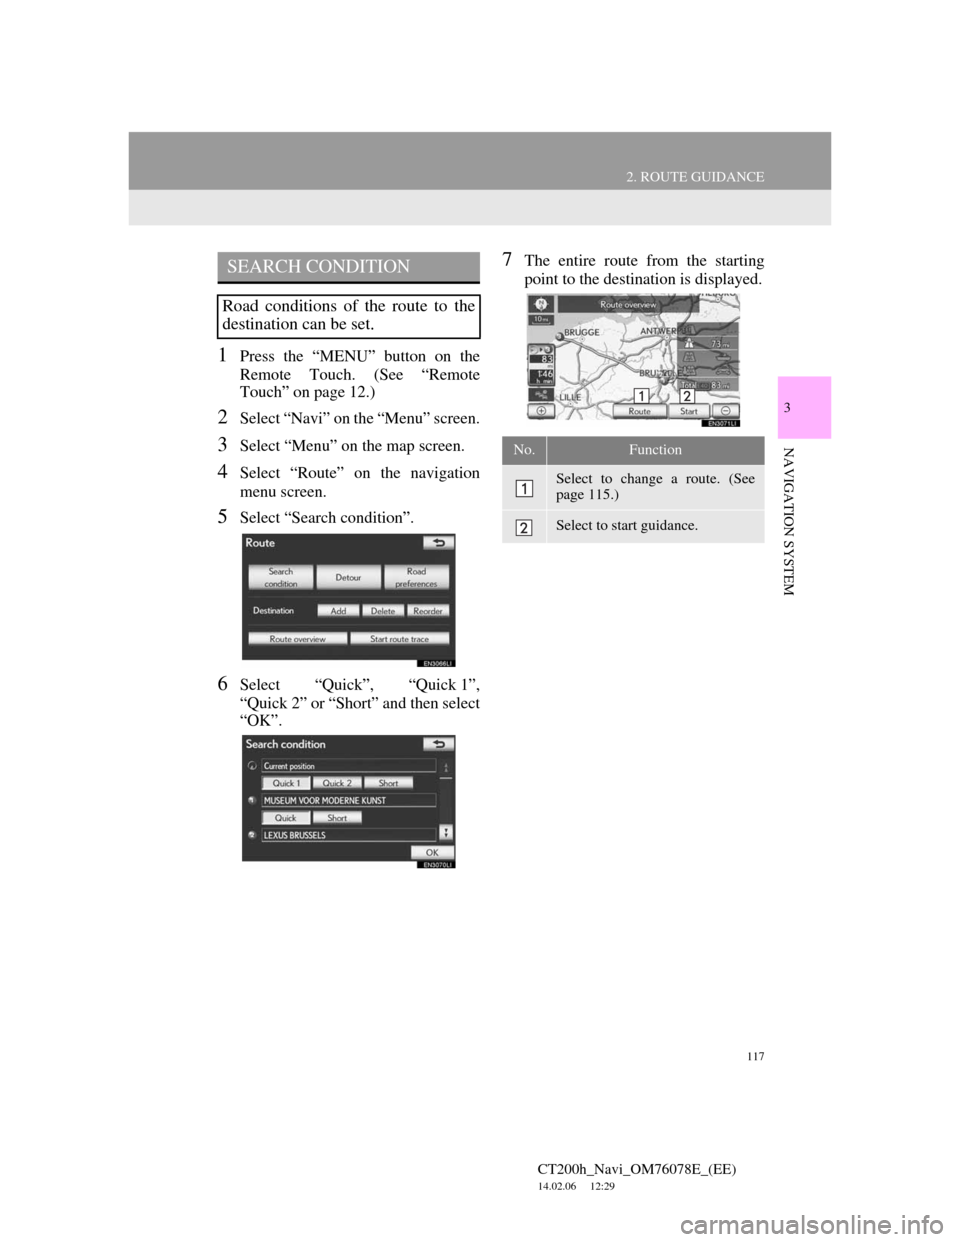
5Select “Search condition”.
6Select “Quick”, “Quick 1”,
“Quick 2” or “Short” and then select
“OK”.
7The entire route from the starting
point to the destination is displayed.SEARCH CONDITION
Road conditions of the route to the
destination can be set.
No.Function
Select to change a route. (See
page 115.)
Select to start guidance.