screen Lexus CT200h 2013 (in English) Owner's Guide
[x] Cancel search | Manufacturer: LEXUS, Model Year: 2013, Model line: CT200h, Model: Lexus CT200h 2013Pages: 688
Page 254 of 688

2544-5. Using the driving support systems
CT200h_OM_OM76102E_(EE)
Rear view monitor system
The rear view image is displayed when the shift position is in R and the
power switch is in ON mode.
The rear view monitor system will be deactivated when the shift position is in
any position other than R.
Lexus Display Audio system type: When the shift position is shifted to R and
any mode button (such as “MENU”) is pressed, the rear view monitor system
is canceled, and the screen is switched to the mode of the button that was
pressed.
: If equipped
The rear view monitor system assists the driver by displaying guide lines
and an image of the view behind the vehicle while backing up, for exam-
ple while parking.
The screen illustrations used in this text are intended as examples, and
may differ from the image that is actually displayed on the screen.
Rear view mirror typeLexus Display Audio system
type
Page 255 of 688

2554-5. Using the driving support systems
4
Driving
CT200h_OM_OM76102E_(EE)
To temporarily turn off the moni-
tor when it is on.
Push the “AUTO” button. The
indicator should turn orange.
The monitor will automatically
turn on again after the power
switch is turned off and ON
mode.
To manually turn on the monitor
when it is turned off.
Push the “AUTO” button. The
indicator should turn green.
When using the rear view monitor system
The anti-glare function of the inside rear view mirror will be canceled.
Automatic shut off
The display will be turned off automatically after 5 minutes.
Switching the screen (rear view mirror type)
Page 257 of 688

2574-5. Using the driving support systems
4
Driving
CT200h_OM_OM76102E_(EE)
Screen description
The rear view monitor system screen will be displayed if the shift posi-
tion is shifted to R while the power switch is in ON mode.
Vehicle width guide line
The line indicates a guide path when the vehicle is being backed straight up.
The displayed width is wider than the actual vehicle width.
Vehicle center guide line
These lines indicate the estimated vehicle center on the ground.
Distance guide line (red)
The line shows distance behind the vehicle, a point approximately 0.5 m (1.5
ft.) from the edge of the bumper.
Distance guide line (blue)
The line shows distance behind the vehicle, a point approximately 1 m (3 ft.)
from the edge of the bumper.
Lexus parking assist-sensor display (if equipped)
Lexus Display Audio system type: If an obstacle is detected while the Lexus
parking assist-sensor is on, a display is shown at the top right corner of the
screen.
Using the rear view monitor system
1
2
3
4
5
Page 258 of 688

2584-5. Using the driving support systems
CT200h_OM_OM76102E_(EE)
Area displayed on screen
The rear view monitor system
displays an image of the view
from the bumper of the rear area
of the vehicle.
The image on the rear view mon-
itor system screen can be
adjusted.
(P. 368)
• The area displayed on the screen
may vary according to vehicle
orientation conditions.
• Objects which are close to either
corner of the bumper or under the
bumper cannot be displayed.
• The camera uses a special lens.
The distance of the image that
appears on the screen differs from
the actual distance.
• Items which are located higher
than the camera may not be dis-
played on the monitor.
• If your vehicle is equipped with a
backlit license plate, it may inter-
fere with the display.
Rear view monitor system precautions
Corners of bumper
Page 259 of 688

2594-5. Using the driving support systems
4
Driving
CT200h_OM_OM76102E_(EE)
Rear view monitor system camera
The camera for the rear view
monitor system is located above
the license plate.
Using the camera
If the camera lens becomes dirty, it cannot transmit a clear image. If
water droplets, snow or mud adhere to the lens, rinse with water and
wipe with a soft cloth. If the lens is extremely dirty, wash it with a
mild cleanser and rinse.
Differences between the screen and the actual road
The distance guide lines and the vehicle width guide lines may not
actually be parallel with the dividing lines of the parking space, even
when they appear to be so. Be sure to check visually.
The distances between the vehicle width guide lines and the left and
right dividing lines of the parking space may not be equal, even when
they appear to be so. Be sure to check visually.
The distance guide lines give a distance guide for flat road surfaces. In
any of the following situations, there is a margin of error between the
fixation guide lines on the screen and the actual distance/course on the
road.
Page 261 of 688

2614-5. Using the driving support systems
4
Driving
CT200h_OM_OM76102E_(EE)
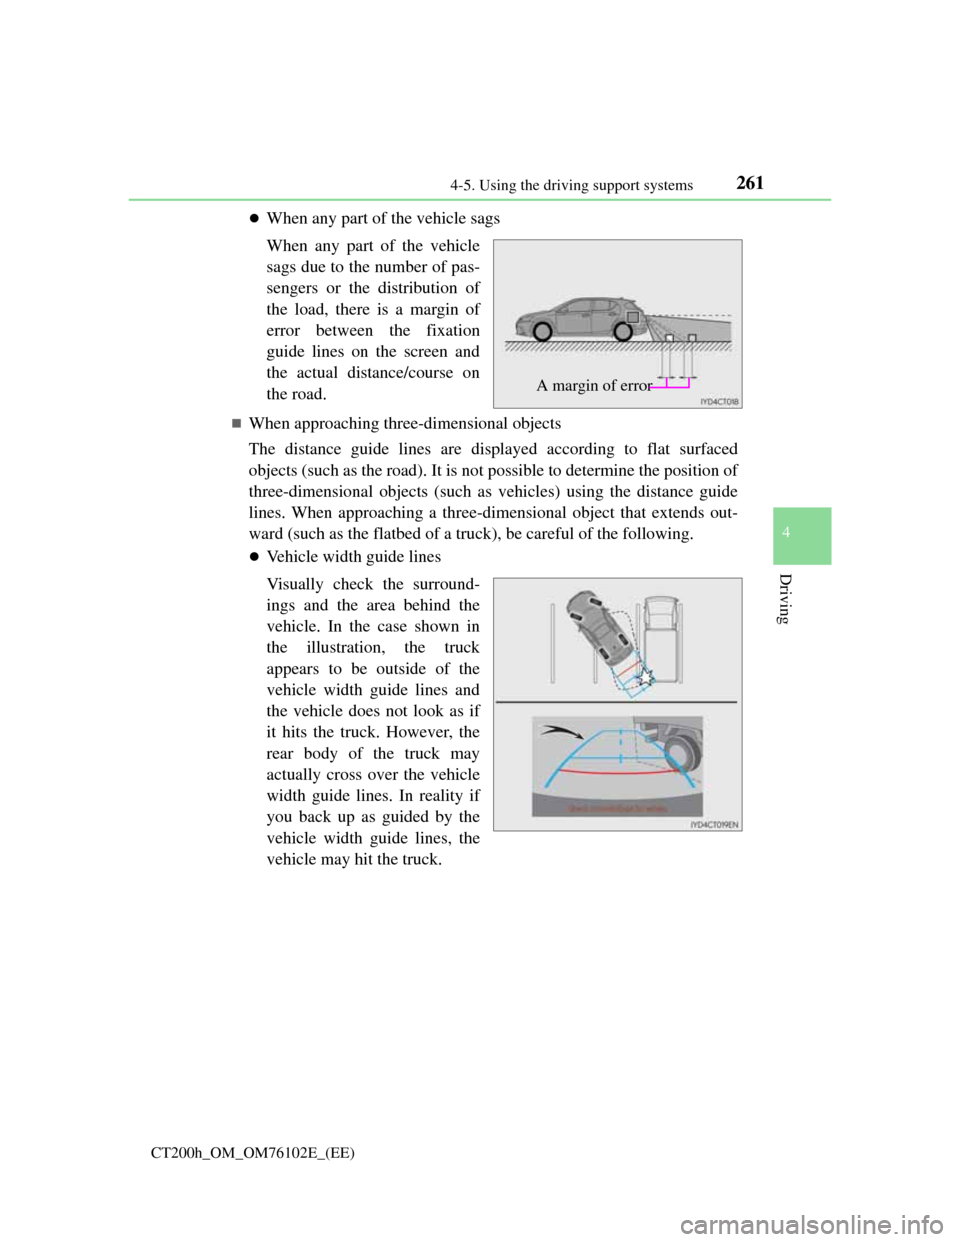
When any part of the vehicle sags
When any part of the vehicle
sags due to the number of pas-
sengers or the distribution of
the load, there is a margin of
error between the fixation
guide lines on the screen and
the actual distance/course on
the road.
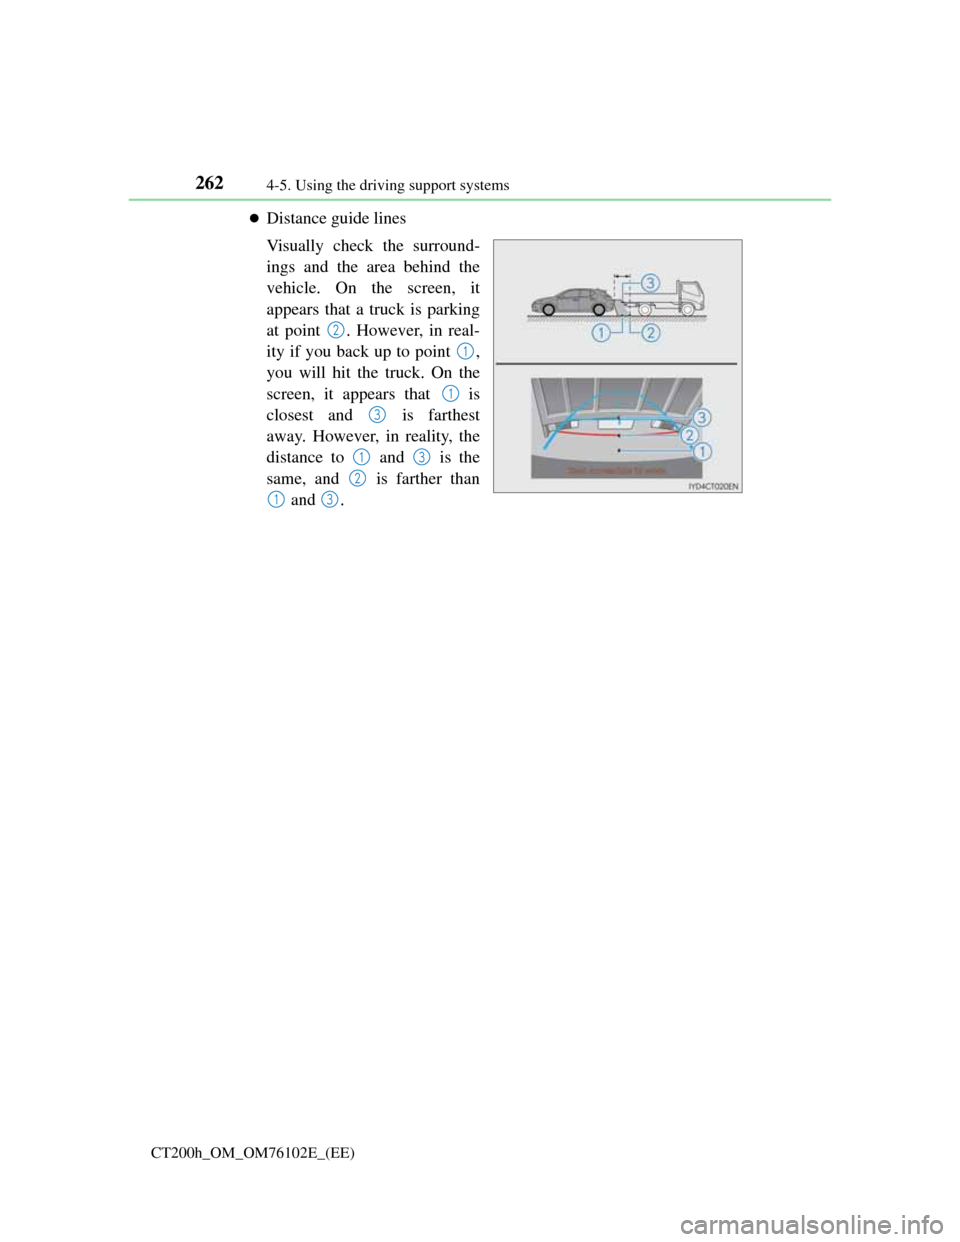
When approaching three-dimensional objects
The distance guide lines are displayed according to flat surfaced
objects (such as the road). It is not possible to determine the position of
three-dimensional objects (such as vehicles) using the distance guide
lines. When approaching a three-dimensional object that extends out-
ward (such as the flatbed of a truck), be careful of the following.
Vehicle width guide lines
Visually check the surround-
ings and the area behind the
vehicle. In the case shown in
the illustration, the truck
appears to be outside of the
vehicle width guide lines and
the vehicle does not look as if
it hits the truck. However, the
rear body of the truck may
actually cross over the vehicle
width guide lines. In reality if
you back up as guided by the
vehicle width guide lines, the
vehicle may hit the truck.
A margin of error
Page 262 of 688

2624-5. Using the driving support systems
CT200h_OM_OM76102E_(EE)
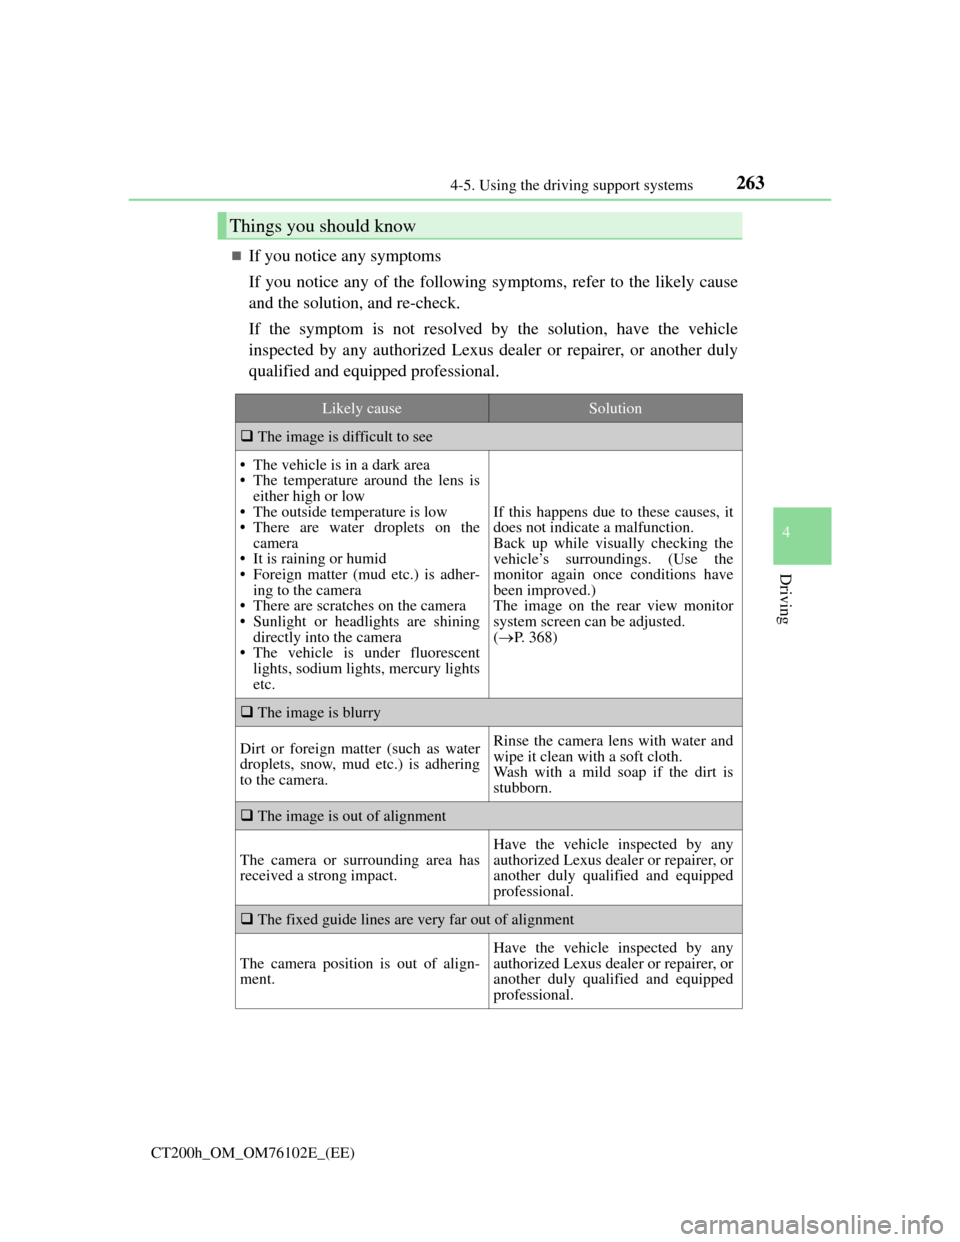
Distance guide lines
Visually check the surround-
ings and the area behind the
vehicle. On the screen, it
appears that a truck is parking
at point . However, in real-
ity if you back up to point ,
you will hit the truck. On the
screen, it appears that is
closest and is farthest
away. However, in reality, the
distance to and is the
same, and is farther than
and .
2
1
1
3
13
2
13
Page 263 of 688

2634-5. Using the driving support systems
4
Driving
CT200h_OM_OM76102E_(EE)
If you notice any symptoms
If you notice any of the following symptoms, refer to the likely cause
and the solution, and re-check.
If the symptom is not resolved by the solution, have the vehicle
inspected by any authorized Lexus dealer or repairer, or another duly
qualified and equipped professional.
Things you should know
Likely causeSolution
The image is difficult to see
• The vehicle is in a dark area
• The temperature around the lens is
either high or low
• The outside temperature is low
• There are water droplets on the
camera
• It is raining or humid
• Foreign matter (mud etc.) is adher-
ing to the camera
• There are scratches on the camera
• Sunlight or headlights are shining
directly into the camera
• The vehicle is under fluorescent
lights, sodium lights, mercury lights
etc.
If this happens due to these causes, it
does not indicate a malfunction.
Back up while visually checking the
vehicle’s surroundings. (Use the
monitor again once conditions have
been improved.)
The image on the rear view monitor
system screen can be adjusted.
(P. 368)
The image is blurry
Dirt or foreign matter (such as water
droplets, snow, mud etc.) is adhering
to the camera.Rinse the camera lens with water and
wipe it clean with a soft cloth.
Wash with a mild soap if the dirt is
stubborn.
The image is out of alignment
The camera or surrounding area has
received a strong impact.
Have the vehicle inspected by any
authorized Lexus dealer or repairer, or
another duly qualified and equipped
professional.
The fixed guide lines are very far out of alignment
The camera position is out of align-
ment.
Have the vehicle inspected by any
authorized Lexus dealer or repairer, or
another duly qualified and equipped
professional.
Page 265 of 688

265
4 4-5. Using the driving support systems
Driving
CT200h_OM_OM76102E_(EE)
WA R N I N G
When using the rear view monitor system
The rear view monitor system is a supplemental device intended to assist the
driver when backing up. When backing up, be sure to check visually behind
and all around the vehicle before proceeding.
Observe the following precautions to avoid an accident that could result in
death or serious injuries.
Never depend on the rear view monitor system entirely when backing up. The
image and the position of the guide lines displayed on the screen may differ
from the actual state.
Use caution, just as you would when backing up any vehicle.
Be sure to back up slowly, depressing the brake pedal to control vehicle
speed.
The instructions given are only guide lines.
When and how much to turn the steering wheel will vary according to traffic
conditions, road surface conditions, vehicle condition, etc. when parking. It is
necessary to be fully aware of this before using the rear view monitor system.
When parking, be sure to check that the parking space will accommodate your
vehicle before maneuvering into it.
Do not use the rear view monitor system in the following cases:
• On icy or slick road surfaces, or in snow
• When using tire chains or emergency tires
• When the back door is not closed completely
• On roads that are not flat or straight, such as curves or slopes.
In low temperatures, the screen may darken or the image may become faint.
The image could distort when the vehicle is moving, or you may become
unable to see the image on the screen. Be sure to check direct visually and
with the mirrors all around the vehicle before proceeding.
If the tire sizes are changed, the position of the fixed guide lines displayed on
the screen may change.
The camera uses a special lens. The distances between objects and pedestrians
that appear in the image displayed on the screen will differ from the actual
distances.
(P. 259)
Page 291 of 688

289
5Audio system
CT200h_OM_OM76102E_(EE)
Optimal use of the audio
system ............................. 371Audio settings ................... 372
Audio menu screen
operation ......................... 376
5-14. Using the radio (Lexus
Display Audio System)
Radio operation................. 379
5-15. Playing an audio CD and
MP3/WMA/AAC discs
(Lexus Display Audio Sys-
tem)
CD player operation.......... 381
5-16. Using an external device
(Lexus Display Audio Sys-
tem)
Listening to an iPod .......... 387
Using USB memory
device.............................. 391
Using the AUX port.......... 396
5-17. Connecting Bluetooth
®
(Lexus Display Audio Sys-
tem)
Steps for using Bluetooth
®
devices ............................ 397
Registering a Bluetooth
®
device.............................. 399
Selecting a Bluetooth
®
device.............................. 400
Connecting a Bluetooth
®
audio player .................... 401
Connecting a Bluetooth
®
phone .............................. 402
Displaying a Bluetooth
®
device details .................. 403