mirror Lexus ES350 2019 / LEXUS 2019 ES350 (OM06130U) User Guide
[x] Cancel search | Manufacturer: LEXUS, Model Year: 2019, Model line: ES350, Model: Lexus ES350 2019Pages: 444, PDF Size: 14.22 MB
Page 110 of 444
1103-3. Adjusting the seats
and then close the driver’s door.
If 2 or more keys are in the vehicle, the
driving position cannot be recorded
properly.
1Check that the shift lever is in P.
2 Turn the engine switch to IGNI-
TION ON mode.
3 Recall the driving position that you
want to record.
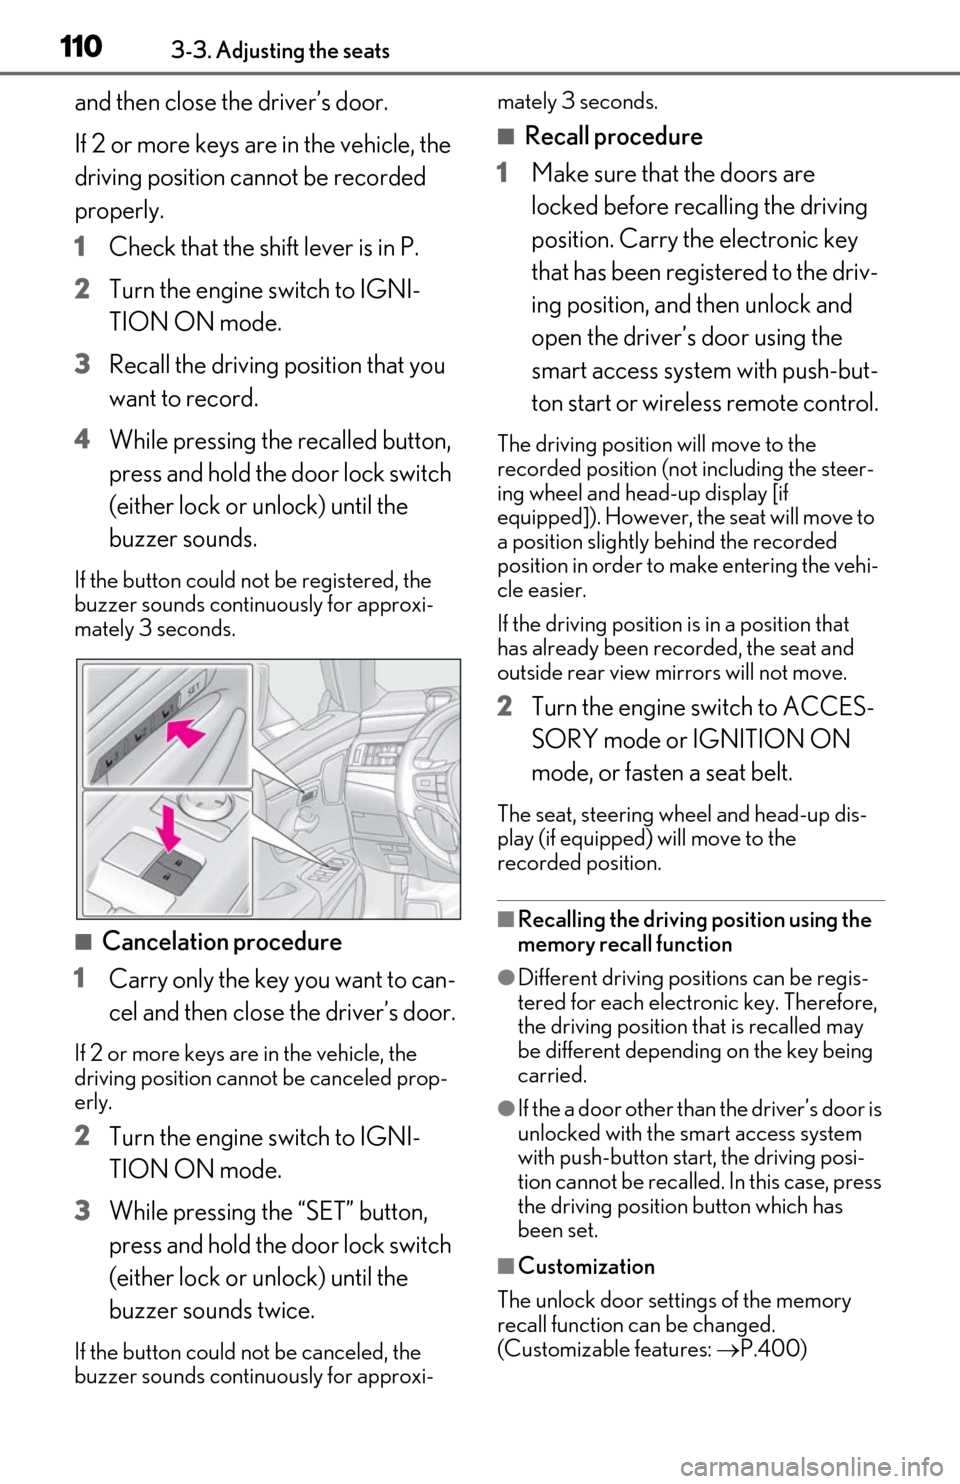
4 While pressing the recalled button,
press and hold the door lock switch
(either lock or unlock) until the
buzzer sounds.
If the button could not be registered, the
buzzer sounds continuously for approxi-
mately 3 seconds.
■Cancelation procedure
1 Carry only the key you want to can-
cel and then close the driver’s door.
If 2 or more keys are in the vehicle, the
driving position cannot be canceled prop-
erly.
2Turn the engine switch to IGNI-
TION ON mode.
3 While pressing the “SET” button,
press and hold the door lock switch
(either lock or unlock) until the
buzzer sounds twice.
If the button could not be canceled, the
buzzer sounds continuously for approxi- mately 3 seconds.
■Recall procedure
1 Make sure that the doors are
locked before recalling the driving
position. Carry the electronic key
that has been registered to the driv-
ing position, and then unlock and
open the driver’s door using the
smart access system with push-but-
ton start or wireless remote control.
The driving position will move to the
recorded position (not including the steer-
ing wheel and head-up display [if
equipped]). However, the seat will move to
a position slightly behind the recorded
position in order to make entering the vehi-
cle easier.
If the driving position is in a position that
has already been recorded, the seat and
outside rear view mirrors will not move.
2Turn the engine switch to ACCES-
SORY mode or IGNITION ON
mode, or fasten a seat belt.
The seat, steering wheel and head-up dis-
play (if equipped) will move to the
recorded position.
■Recalling the driving position using the
memory recall function
●Different driving positions can be regis-
tered for each electronic key. Therefore,
the driving position that is recalled may
be different depending on the key being
carried.
●If the a door other than the driver’s door is
unlocked with the smart access system
with push-button start, the driving posi-
tion cannot be recalled. In this case, press
the driving position button which has
been set.
■Customization
The unlock door sett ings of the memory
recall function can be changed.
(Customizable features: P.400)
Page 113 of 444
1133-4. Adjusting the steering wheel and mirrors
3
Before driving
3-4.Adjusting the steering wheel and mirrors
Manual adjustment type
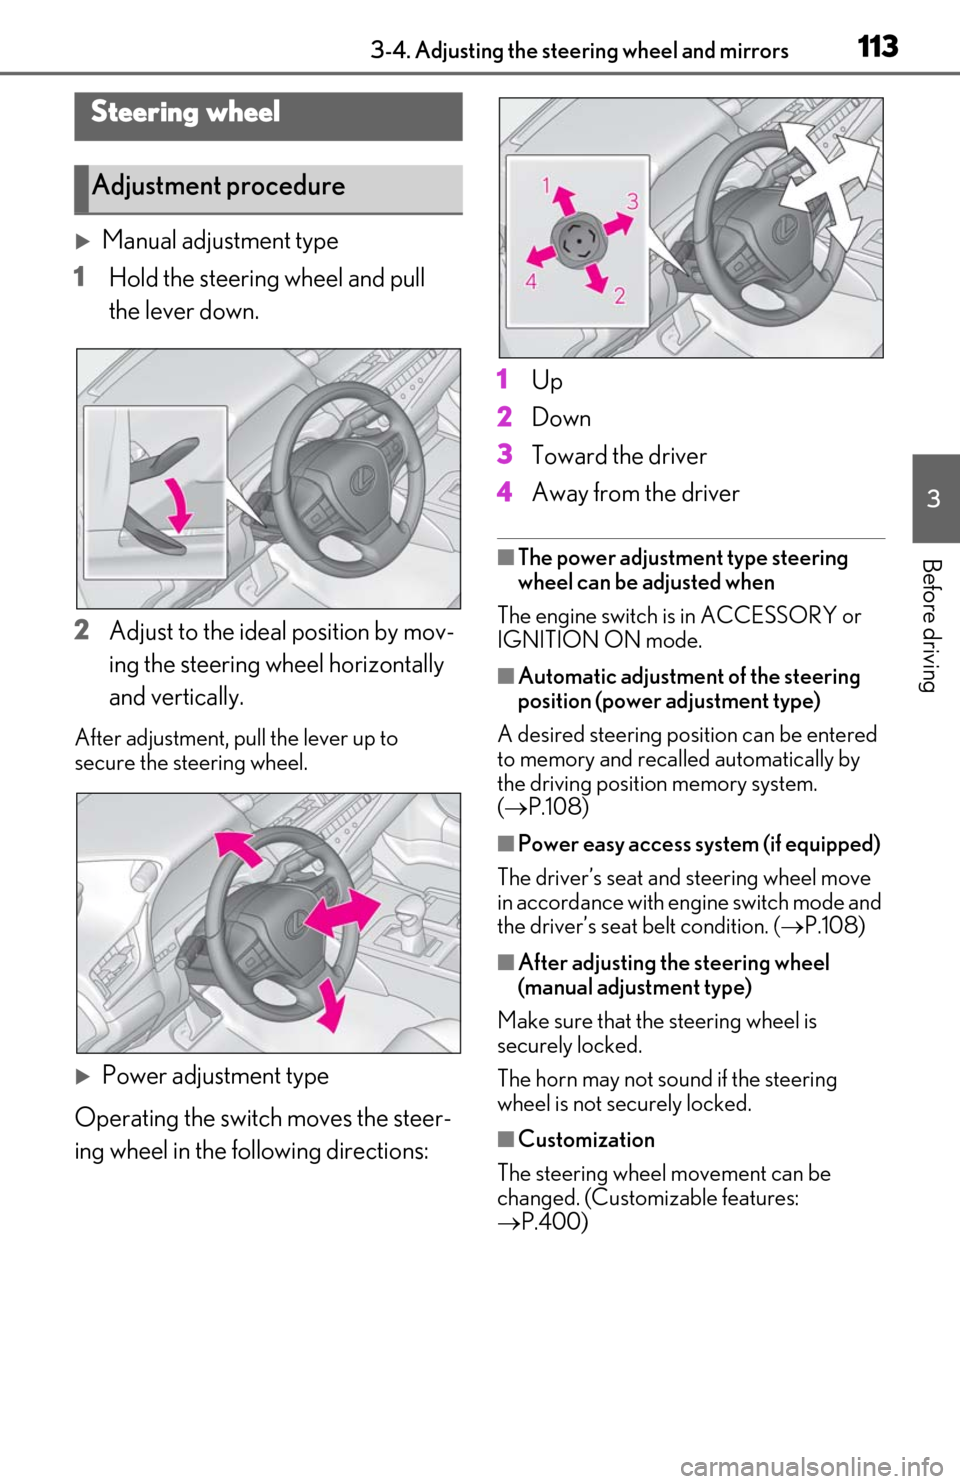
1 Hold the steering wheel and pull
the lever down.
2 Adjust to the ideal position by mov-
ing the steering wheel horizontally
and vertically.
After adjustment, pull the lever up to
secure the steering wheel.
Power adjustment type
Operating the switch moves the steer-
ing wheel in the following directions: 1
Up
2 Down
3 Toward the driver
4 Away from the driver
■The power adjustment type steering
wheel can be adjusted when
The engine switch is in ACCESSORY or
IGNITION ON mode.
■Automatic adjustment of the steering
position (power adjustment type)
A desired steering posi tion can be entered
to memory and recalled automatically by
the driving position memory system.
( P.108)
■Power easy access system (if equipped)
The driver’s seat and steering wheel move
in accordance with engine switch mode and
the driver’s seat belt condition. ( P.108)
■After adjusting the steering wheel
(manual adjustment type)
Make sure that the steering wheel is
securely locked.
The horn may not sound if the steering
wheel is not securely locked.
■Customization
The steering wheel movement can be
changed. (Customizable features:
P.400)
Steering wheel
Adjustment procedure
Page 114 of 444
1143-4. Adjusting the steering wheel and mirrors
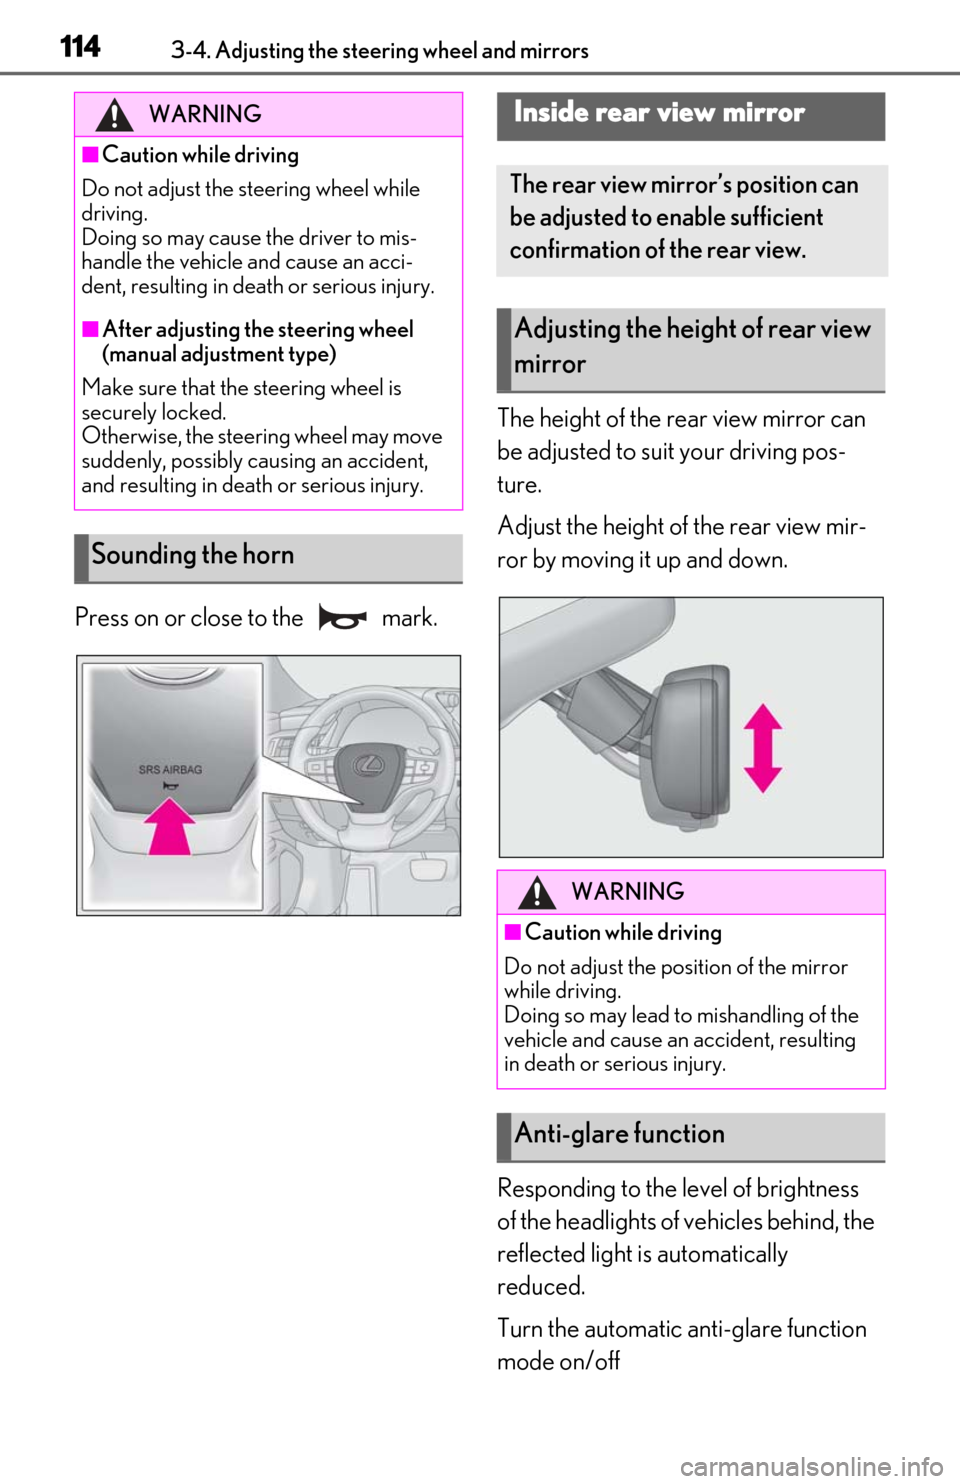
Press on or close to the mark.The height of the rear view mirror can
be adjusted to suit your driving pos-
ture.
Adjust the height of the rear view mir-
ror by moving it up and down.
Responding to the level of brightness
of the headlights of vehicles behind, the
reflected light is automatically
reduced.
Turn the automatic anti-glare function
mode on/off
WARNING
■Caution while driving
Do not adjust the steering wheel while
driving.
Doing so may cause the driver to mis-
handle the vehicle and cause an acci-
dent, resulting in death or serious injury.
■After adjusting the steering wheel
(manual adjustment type)
Make sure that the steering wheel is
securely locked.
Otherwise, the steering wheel may move
suddenly, possibly causing an accident,
and resulting in deat h or serious injury.
Sounding the horn
Inside rear view mirror
The rear view mirror’s position can
be adjusted to enable sufficient
confirmation of the rear view.
Adjusting the height of rear view
mirror
WARNING
■Caution while driving
Do not adjust the position of the mirror
while driving.
Doing so may lead to mishandling of the
vehicle and cause an accident, resulting
in death or serious injury.
Anti-glare function
Page 115 of 444
1153-4. Adjusting the steering wheel and mirrors
3
Before driving
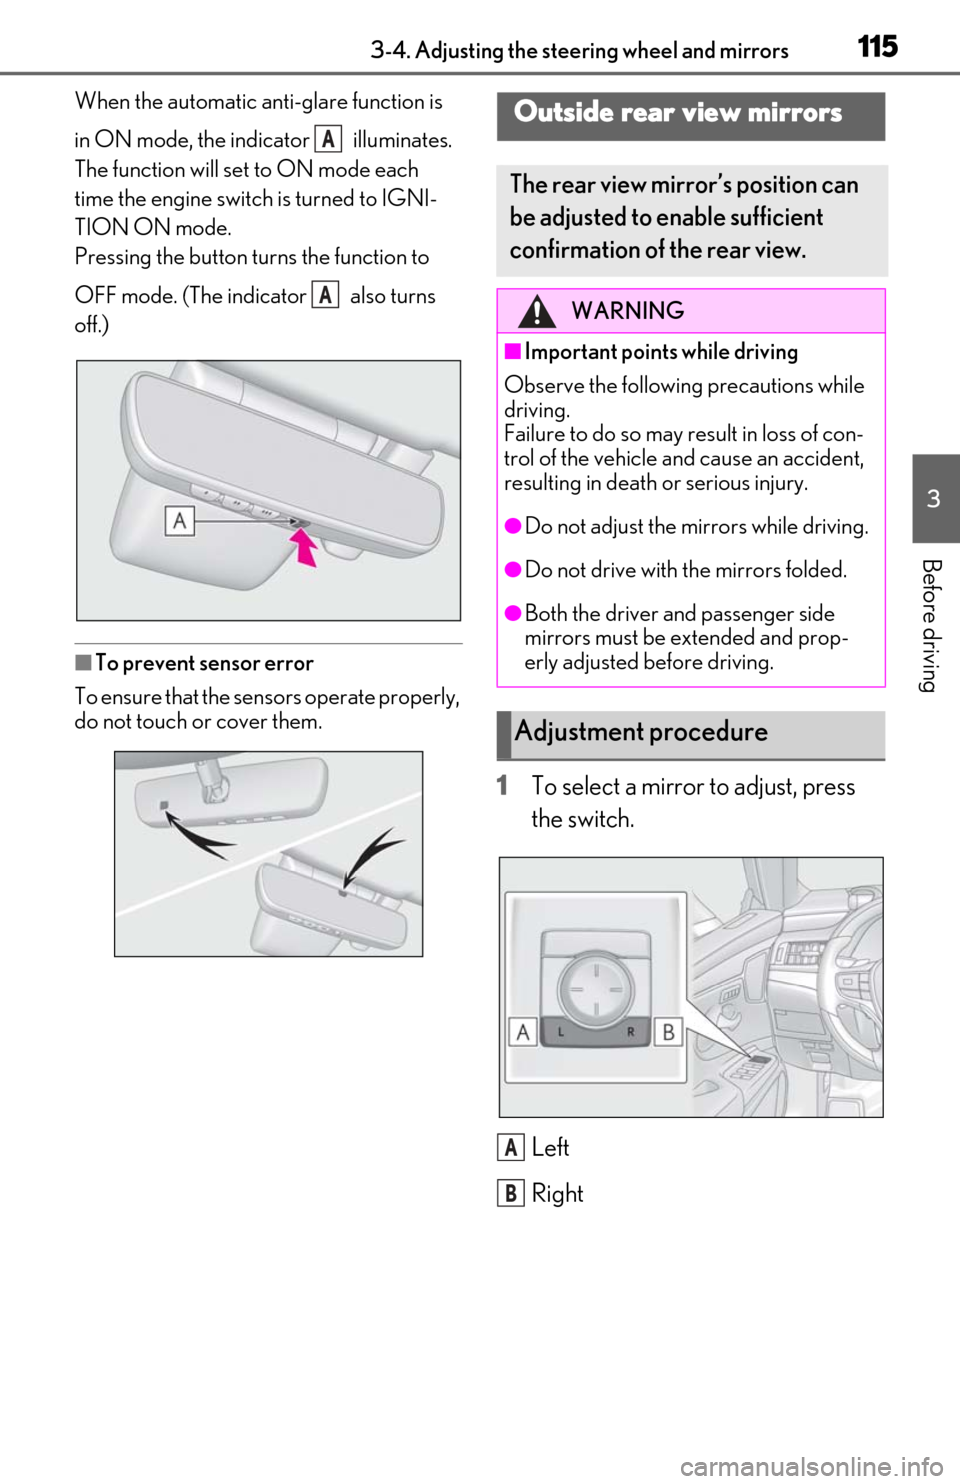
When the automatic anti-glare function is
in ON mode, the indicator illuminates.
The function will set to ON mode each
time the engine switch is turned to IGNI-
TION ON mode.
Pressing the button turns the function to
OFF mode. (The indicator also turns
off.)
■To prevent sensor error
To ensure that the sensors operate properly,
do not touch or cover them.
1 To select a mirror to adjust, press
the switch.
Left
Right
A
A
Outside rear view mirrors
The rear view mirror’s position can
be adjusted to enable sufficient
confirmation of the rear view.
WARNING
■Important points while driving
Observe the following precautions while
driving.
Failure to do so may result in loss of con-
trol of the vehicle and cause an accident,
resulting in death or serious injury.
●Do not adjust the mirrors while driving.
●Do not drive with the mirrors folded.
●Both the driver and passenger side
mirrors must be extended and prop-
erly adjusted before driving.
Adjustment procedure
A
B
Page 116 of 444
1163-4. Adjusting the steering wheel and mirrors
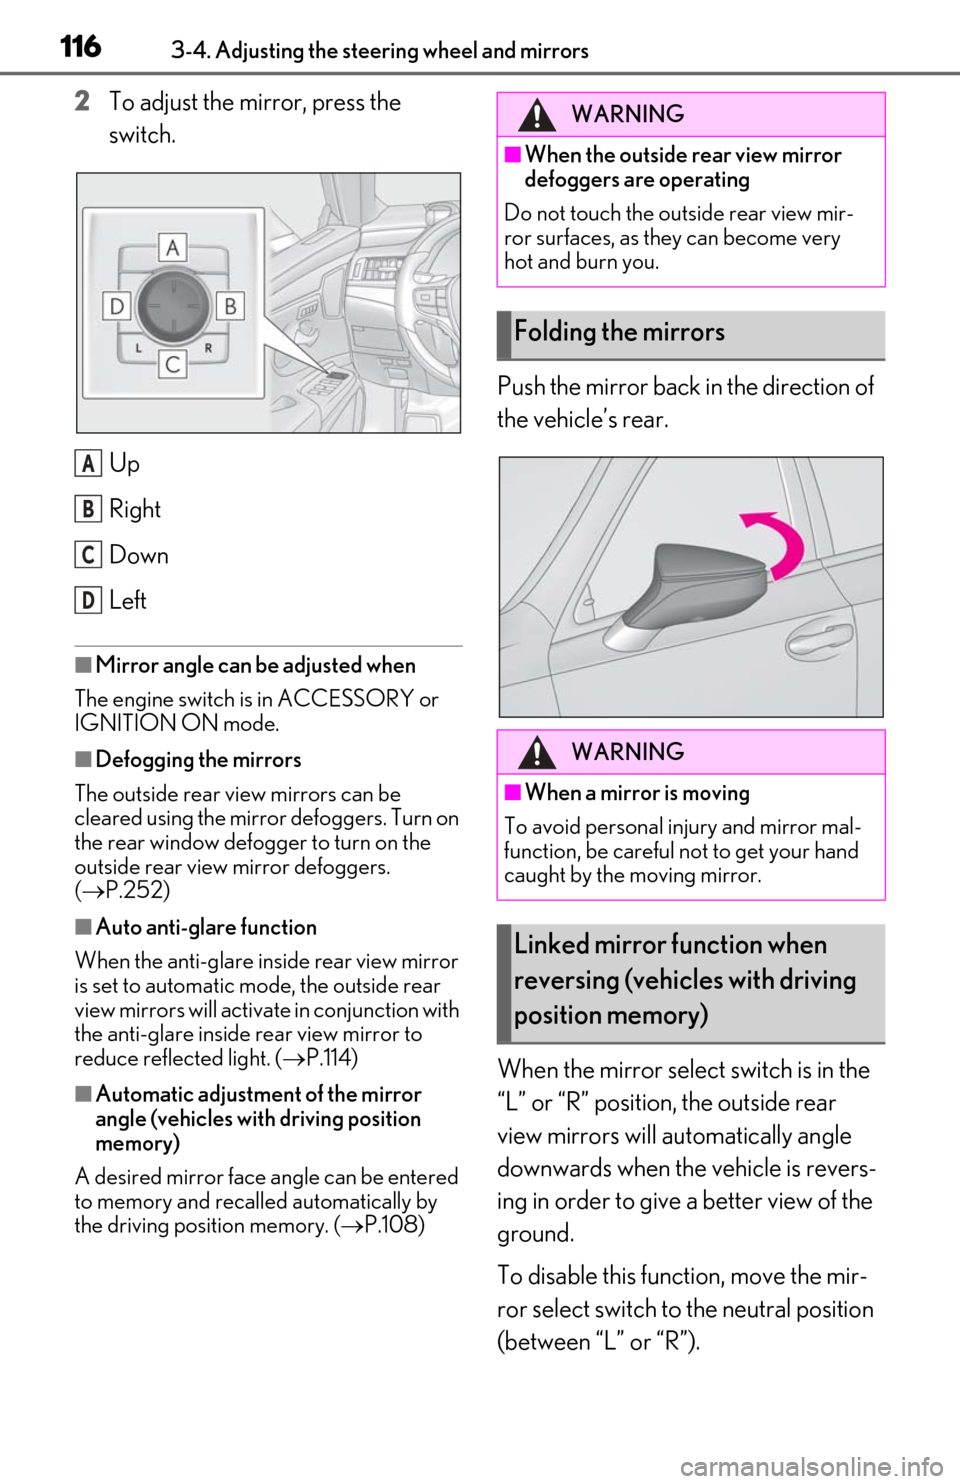
2To adjust the mirror, press the
switch.
Up
Right
Down
Left
■Mirror angle can be adjusted when
The engine switch is in ACCESSORY or
IGNITION ON mode.
■Defogging the mirrors
The outside rear view mirrors can be
cleared using the mirror defoggers. Turn on
the rear window defogger to turn on the
outside rear view mirror defoggers.
( P.252)
■Auto anti-glare function
When the anti-glare insi de rear view mirror
is set to automatic mode, the outside rear
view mirrors will activate in conjunction with
the anti-glare inside rear view mirror to
reduce reflected light. ( P.114)
■Automatic adjustment of the mirror
angle (vehicles with driving position
memory)
A desired mirror face angle can be entered
to memory and recalled automatically by
the driving position memory. ( P.108)
Push the mirror back in the direction of
the vehicle’s rear.
When the mirror select switch is in the
“L” or “R” position, the outside rear
view mirrors will automatically angle
downwards when the vehicle is revers-
ing in order to give a better view of the
ground.
To disable this function, move the mir-
ror select switch to the neutral position
(between “L” or “R”).
A
B
C
D
WARNING
■When the outside rear view mirror
defoggers are operating
Do not touch the outside rear view mir-
ror surfaces, as they can become very
hot and burn you.
Folding the mirrors
WARNING
■When a mirror is moving
To avoid personal injury and mirror mal-
function, be careful not to get your hand
caught by the moving mirror.
Linked mirror function when
reversing (vehicles with driving
position memory)
Page 117 of 444

1173-4. Adjusting the steering wheel and mirrors
3
Before driving
■Adjusting the mirror angle when
the vehicle is reversing
With the shift lever in R, adjust the mir-
ror angle at a desired position. The
adjusted angle will be memorized and
the mirror will automatically tilt to the
memorized angle whenever the shift
lever is shifted to R from next time.
The memorized downward tilt position of
the mirror is linked to the normal position
(angle adjusted with th e shift lever in other
than R). Therefore, if the normal position is
changed after adjustment, the tilt position
will also change.
When the normal position is changed,
readjust the angle in reversing.
Page 130 of 444

1304-1. Before driving
WARNING
●Use engine braking (downshift) to
maintain a safe speed when driving
down a steep hill.
Using the brakes continuously may
cause the brakes to overheat and lose
effectiveness. (P.141)
●Do not adjust the positions of the
steering wheel, the seat, or the inside
or outside rear view mirrors while driv-
ing.
Doing so may result in a loss of vehicle
control.
●Always check that all passengers’
arms, heads or other parts of their
body are not outside the vehicle.
●Do not drive in excess of the speed
limit. Even if the legal speed limit per-
mits it, do not drive over 85 mph (140
km/h) unless your vehicle has high-
speed capability tires. Driving over 85
mph (140 km/h) may result in tire fail-
ure, loss of control and possible injury.
Be sure to consult a tire dealer to
determine whether the tires on your
vehicle are high-speed capability tires
or not before driving at such speeds.
■When driving on slippery road sur-
faces
●Sudden braking, acceleration and
steering may cause tire slippage and
reduce your ability to control the vehi-
cle.
●Sudden acceleration, engine braking
due to shifting, or changes in engine
speed could cause the vehicle to skid,
resulting in an accident.
●After driving through a puddle, lightly
depress the brake pedal to make sure
that the brakes are functioning prop-
erly. Wet brake pads may prevent the
brakes from functioning properly. If the
brakes on only one side are wet and
not functioning properly, steering con-
trol may be affected.
■When shifting the shift lever
●Do not let the vehicle roll backward
while the shift lever is in a driving posi-
tion or roll forward while the shift lever
is in R.
Doing so may cause the engine to stall
or lead to poor brake and steering
performance, resulting in an accident
or damage to the vehicle.
●Do not shift the shif t lever to P while
the vehicle is moving.
Doing so can damage the transmission
and may result in a loss of vehicle con-
trol.
●Do not shift the shift lever to R while
the vehicle is moving forward.
Doing so can damage the transmission
and may result in a loss of vehicle con-
trol.
●Do not shift the shift lever to a driving
position while the vehicle is moving
backward.
Doing so can damage the transmission
and may result in a loss of vehicle con-
trol.
●Shifting the shift lever to N while the
vehicle is moving will disengage the
engine from the transmission. Engine
braking is not available when N is
selected.
●Be careful not to shift the shift lever
with the accelerator pedal depressed.
Shifting the shift lever to a gear other
than P or N may lead to unexpected
rapid acceleration of the vehicle that
may cause an accident and result in
death or serious injury.
■If you hear a squealing or scraping
noise (brake pad wear limit indica-
tors)
Have the brake pads checked and
replaced by your Lexus dealer as soon as
possible. Rotor damage may result if the
pads are not replaced when needed. It is
dangerous to drive the vehicle when the
wear limits of the brake pads and/or
those of the brake discs are exceeded.
Page 154 of 444
1544-3. Operating the lights and wipers
out using the headlights is detected.
●House lights, street lights, traffic signals,
and illuminated billboards or signs may
cause the high beam to switch to the low
beams, or the low beams to remain on.
●The following factors may affect the
amount of time taken to turn the high
beam on or off:
• The brightness of headlights, fog lights, and tail lights of vehicles ahead
• The movement and direction of vehicles
ahead
• When a vehicle ahead only has opera- tional lights on one side
• When a vehicle ahead is a two-wheeled vehicle
• The condition of the road (gradient,
curve, condition of the road surface etc.)
• The number of passengers and amount of luggage
●The high beam may be turned on or off
when the driver does not expect it.
●Bicycles or similar objects may not be
detected.
●In the situations show n below, the system
may not be able to accurately detect sur-
rounding brightness levels. This may
cause the low beams to remain on or the
high beams to cause problems for pedes-
trians, vehicles ahead or other parties. In
these cases, manually switch between the
high and low beams.
• In bad weather (rain, snow, fog, sand-
storms etc.)
• The windshield is obscured by fog, mist, ice, dirt etc.
• The windshield is cracked or damaged.
• The camera sensor is deformed or dirty.
• When the temperature of the camera sensor is extremely high
• Surrounding brightness levels are equal to those of headlights, tail lights or fog
lights.
• When headlights or tail lights of vehicles ahead are turned off, dirty, changing
color, or not aimed properly
• When the vehicle is hit by water, snow, dust, etc. from a preceding vehicle
• When driving through an area of inter-
mittently changing brightness and dark-
ness.
• When frequently and repeatedly driving ascending/descending roads, or roads
with rough, bumpy or uneven surfaces
(such as stone-paved roads, gravel tracks
etc.).
• When frequently and repeatedly taking curves or driving on a winding road.
• There is a highly re flective object ahead
of the vehicle, such as a sign or a mirror.
• The back of a vehicle ahead is highly reflective, such as a container on a truck.
• The vehicle’s headlights are damaged or dirty.
• The vehicle is listing or tilting, due to a flat
tire, a trailer being towed etc.
• The high beam and low beam are repeat- edly being switched between in an
abnormal manner.
• The driver believes that the high beam may be causing problems or distress to
other drivers or pedestrians nearby.
■Temporarily lowering sensor sensitivity
The sensitivity of the sensor can be tempo-
rarily lowered.
1 Turn the engine switch off while the fol-
lowing conditions are met.
• The headlight swit ch is in or .
• The headlight switch lever is in high beam position.
• Automatic High Be am switch is on.
2 Turn the engine switch to IGNITION
ON mode.
3 Within 30 seconds after 2, repeat pull-
ing the headlight switch lever to the
original position then pushing it to the
high beam position quickly 10 times,
then leave the lever in high beam posi-
tion.
4 If the sensitivity is changed, the Auto-
matic High Beam indicator turns on and
off 3 times.
Automatic High Beam (headlights) may
turn on even the vehicle is stopped.
■Switching to low beam
Pull the lever to the original position.
Turning the high beam on/off
manually
Page 165 of 444

1654-5. Using the driving support systems
4
Driving
WARNING
●If the part of the windshield in front of
the front camera is fogged up or cov-
ered with condensation, or ice, use the
windshield defogger to remove the
fog, condensation, or ice. (P.252)
●If water droplets cannot be properly
removed from the area of the wind-
shield in front of the front camera by
the windshield wipers, replace the
wiper insert or wiper blade.
If the wiper inserts or wiper blades
need to be replaced, contact your
Lexus dealer.
●Do not attach window tint to the wind-
shield.
●Replace the windshield if it is damaged
or cracked.
If the windshield needs to be replaced,
contact your Lexus dealer.
●Do not allow liquids to contact the
front camera.
●Do not allow bright lights to shine into
the front camera.
●Do not dirty or damage the front cam-
era.
When cleaning the inside of the wind-
shield, do not allow glass cleaner to
contact the lens of the front camera.
Also, do not touch the lens.
If the lens is dirty or damaged, contact
your Lexus dealer.
●Do not subject the front camera to a
strong impact.
●Do not change the installation position
or direction of the front camera or
remove it.
●Do not disassemble the front camera.
●Do not modify any components of the
vehicle around the front camera
(inside rear view mirror, etc.) or ceiling.
●Do not attach any accessories to the
hood, front grille or front bumper that
may obstruct the front camera. Con-
tact your Lexus dealer for details.
●If a surfboard or other long object is to
be mounted on the roof, make sure
that it will not obstruct the front cam-
era.
●Do not modify the headlights or other
lights.
Page 197 of 444
1974-5. Using the driving support systems
4
Driving
*:If equipped
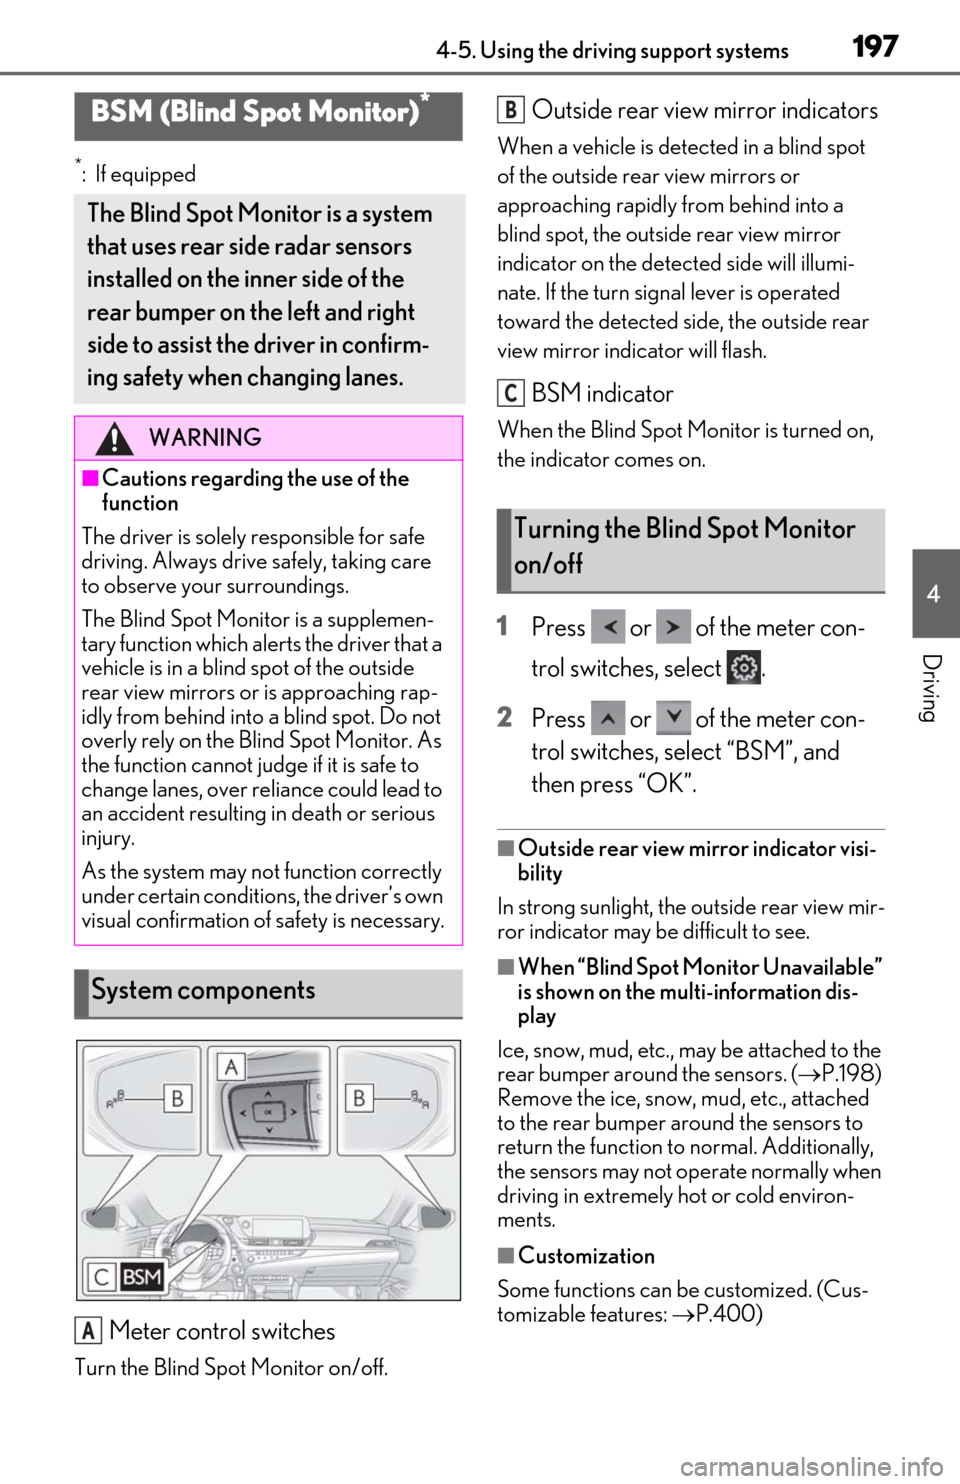
Meter control switches
Turn the Blind Spot Monitor on/off.
Outside rear view mirror indicators
When a vehicle is detected in a blind spot
of the outside rear view mirrors or
approaching rapidly from behind into a
blind spot, the outside rear view mirror
indicator on the detected side will illumi-
nate. If the turn signal lever is operated
toward the detected side, the outside rear
view mirror indicator will flash.
BSM indicator
When the Blind Spot Monitor is turned on,
the indicator comes on.
1 Press or of the meter con-
trol switches, select .
2 Press or of the meter con-
trol switches, select “BSM”, and
then press “OK”.
■Outside rear view mirror indicator visi-
bility
In strong sunlight, the outside rear view mir-
ror indicator may be difficult to see.
■When “Blind Spot Monitor Unavailable”
is shown on the multi-information dis-
play
Ice, snow, mud, etc., may be attached to the
rear bumper around the sensors. ( P.198)
Remove the ice, snow, mud, etc., attached
to the rear bumper around the sensors to
return the function to normal. Additionally,
the sensors may not operate normally when
driving in extremely hot or cold environ-
ments.
■Customization
Some functions can be customized. (Cus-
tomizable features: P.400)
BSM (Blind Spot Monitor)*
The Blind Spot Monitor is a system
that uses rear side radar sensors
installed on the inner side of the
rear bumper on the left and right
side to assist the driver in confirm-
ing safety when changing lanes.
WARNING
■Cautions regarding the use of the
function
The driver is solely responsible for safe
driving. Always driv e safely, taking care
to observe your surroundings.
The Blind Spot Monitor is a supplemen-
tary function which alerts the driver that a
vehicle is in a blind spot of the outside
rear view mirrors or is approaching rap-
idly from behind into a blind spot. Do not
overly rely on the Blind Spot Monitor. As
the function cannot judge if it is safe to
change lanes, over reliance could lead to
an accident resulting in death or serious
injury.
As the system may not function correctly
under certain conditions, the driver’s own
visual confirmation of safety is necessary.
System components
A
Turning the Blind Spot Monitor
on/off
B
C