lights Lexus GX460 2021 / LEXUS 2021 GX460 (OM60T19U) Owner's Guide
[x] Cancel search | Manufacturer: LEXUS, Model Year: 2021, Model line: GX460, Model: Lexus GX460 2021Pages: 628, PDF Size: 12.51 MB
Page 105 of 628
GX460_OM_OM60T19U_(U)
1053-1. Key information
3
Operation of each component
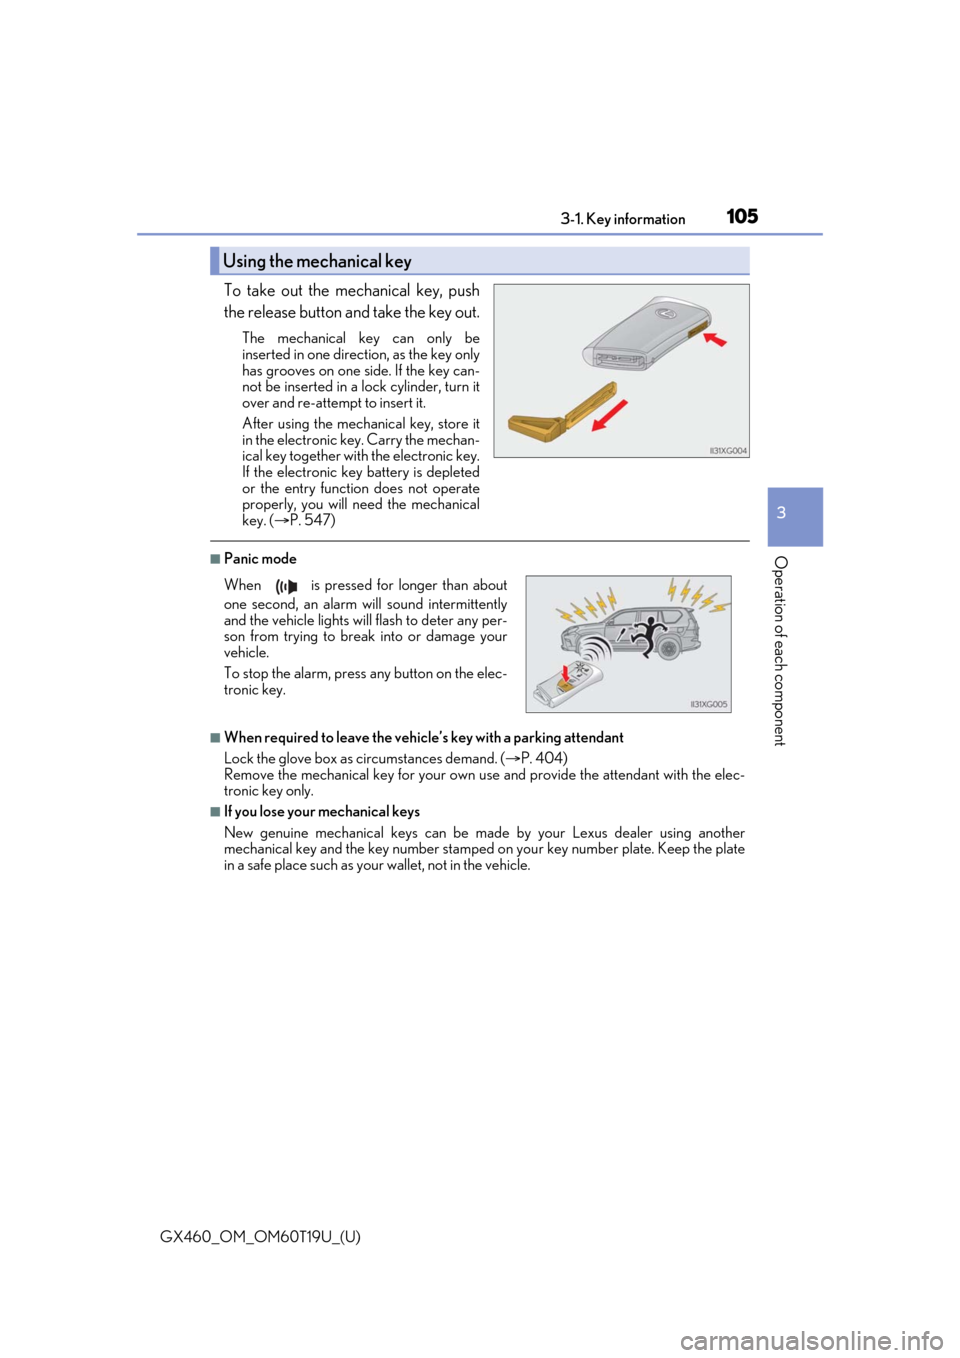
To take out the mechanical key, push
the release button and take the key out.
The mechanical key can only be
inserted in one direction, as the key only
has grooves on one side. If the key can-
not be inserted in a lock cylinder, turn it
over and re-attempt to insert it.
After using the mechanical key, store it
in the electronic key. Carry the mechan-
ical key together with the electronic key.
If the electronic key battery is depleted
or the entry function does not operate
properly, you will need the mechanical
key. ( P. 547)
■Panic mode
■When required to leave the vehicle’s key with a parking attendant
Lock the glove box as circumstances demand. ( P. 404)
Remove the mechanical key for your own use and provide the attendant with the elec-
tronic key only.
■If you lose your mechanical keys
New genuine mechanical keys can be made by your Lexus dealer using another
mechanical key and the key number stamped on your key number plate. Keep the plate
in a safe place such as your wallet, not in the vehicle.
Using the mechanical key
When is pressed for longer than about
one second, an alarm will sound intermittently
and the vehicle lights will flash to deter any per-
son from trying to break into or damage your
vehicle.
To stop the alarm, press any button on the elec-
tronic key.
Page 155 of 628
1553-4. Adjusting the steering wheel and mirrors
3
Operation of each component
GX460_OM_OM60T19U_(U)
Inside rear view mirror
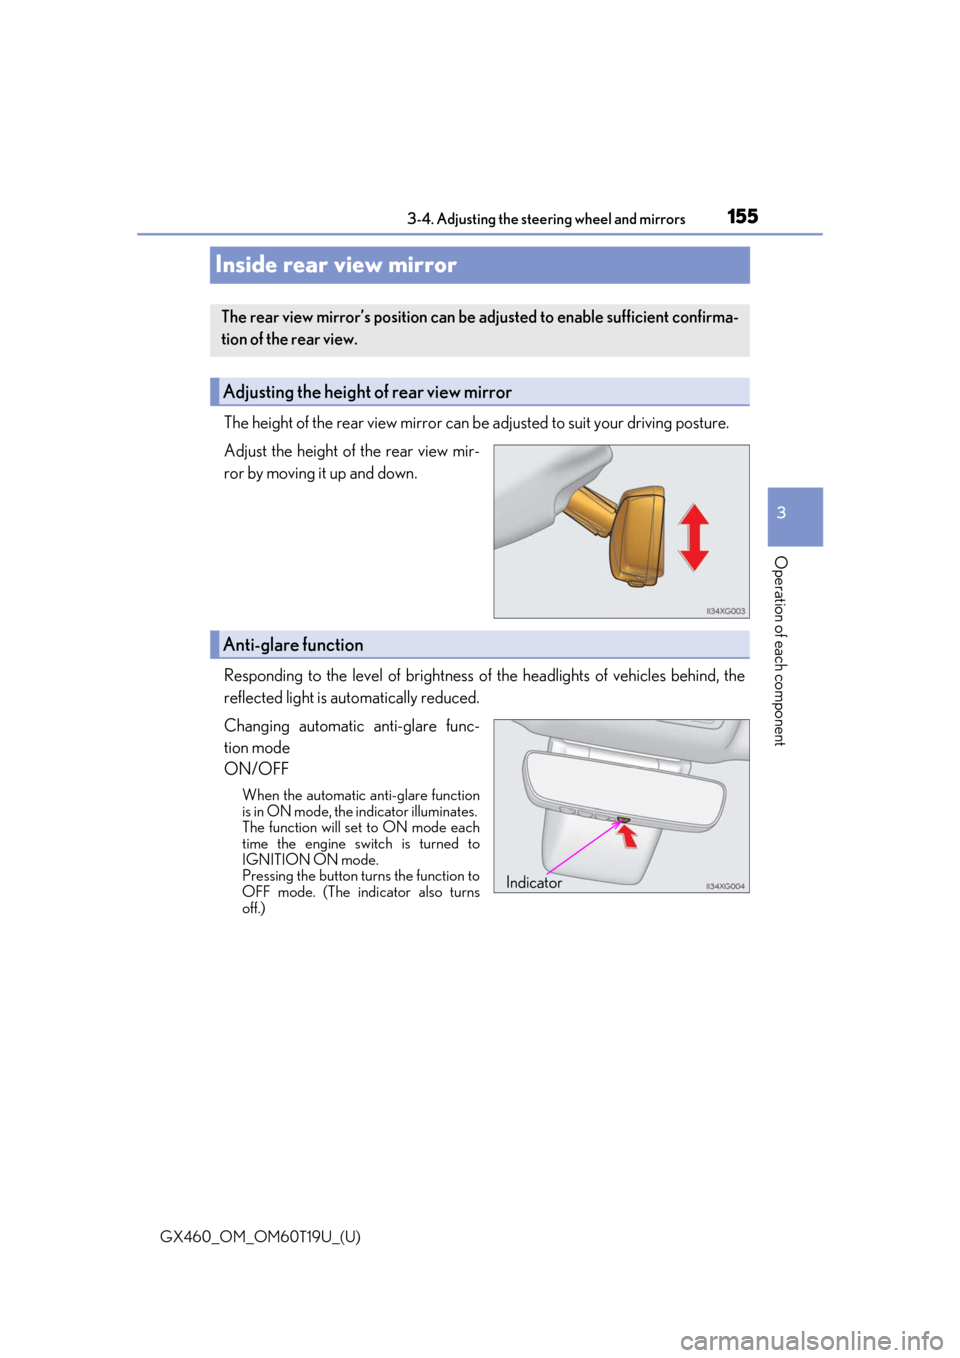
The height of the rear view mirror can be adjusted to suit your driving posture.
Adjust the height of the rear view mir-
ror by moving it up and down.
Responding to the level of brightness of the headlights of vehicles behind, the
reflected light is automatically reduced.
Changing automatic anti-glare func-
tion mode
ON/OFF
When the automatic anti-glare function
is in ON mode, the indicator illuminates.
The function will set to ON mode each
time the engine switch is turned to
IGNITION ON mode.
Pressing the button turns the function to
OFF mode. (The indicator also turns
off.)
The rear view mirror’s position can be adjusted to enable sufficient confirma-
tion of the rear view.
Adjusting the height of rear view mirror
Anti-glare function
Indicator
Page 167 of 628

167
GX460_OM_OM60T19U_(U)
4Driving
4-1. Before drivingDriving the vehicle ...................... 168
Cargo and luggage .................... 176
Vehicle load limits .......................180
Trailer towing (with towing hitch) .................... 181
Dinghy towing .............................. 199
4-2. Driving procedures Engine (ignition) switch .......... 200
Automatic transmission.......... 206
Turn signal lever.............................211
Parking brake ............................... 212
4-3. Operating the lights and wipers
Headlight switch .......................... 213
Automatic High Beam .............. 216
Fog light switch ............................ 221
Windshield wipers and washer.......................................... 222
Rear window wiper and washer.......................................... 226
Headlight cleaner switch ........228
4-4. Refueling Opening the fuel tank cap......229 4-5. Using the driving support
systems
Lexus Safety System + ............. 233
PCS (Pre-Collision System)........................................ 239
LDA (Lane Departure Alert) ............................................250
Dynamic radar cruise control .........................................258
Intuitive parking assist .............. 270
Rear view monitor system ...... 278
Multi-terrain Select .................. 288
Multi-terrain Monitor ............... 292
Rear height control air suspension ................................. 339
AVS (Adaptive Variable Suspension System)............... 343
Four-wheel drive system ........ 344
Crawl Control .............................348
Downhill assist control system .......................................... 352
Driving assist systems ..............355
BSM (Blind Spot Monitor) ...... 361 • The Blind Spot Monitor function .................................... 366
• The Rear Cross Traffic Alert function ......................... 369
4-6. Driving tips Winter driving tips ..................... 374
Off-road precautions ............... 377
Page 189 of 628
GX460_OM_OM60T19U_(U)
1894-1. Before driving
4
Driving
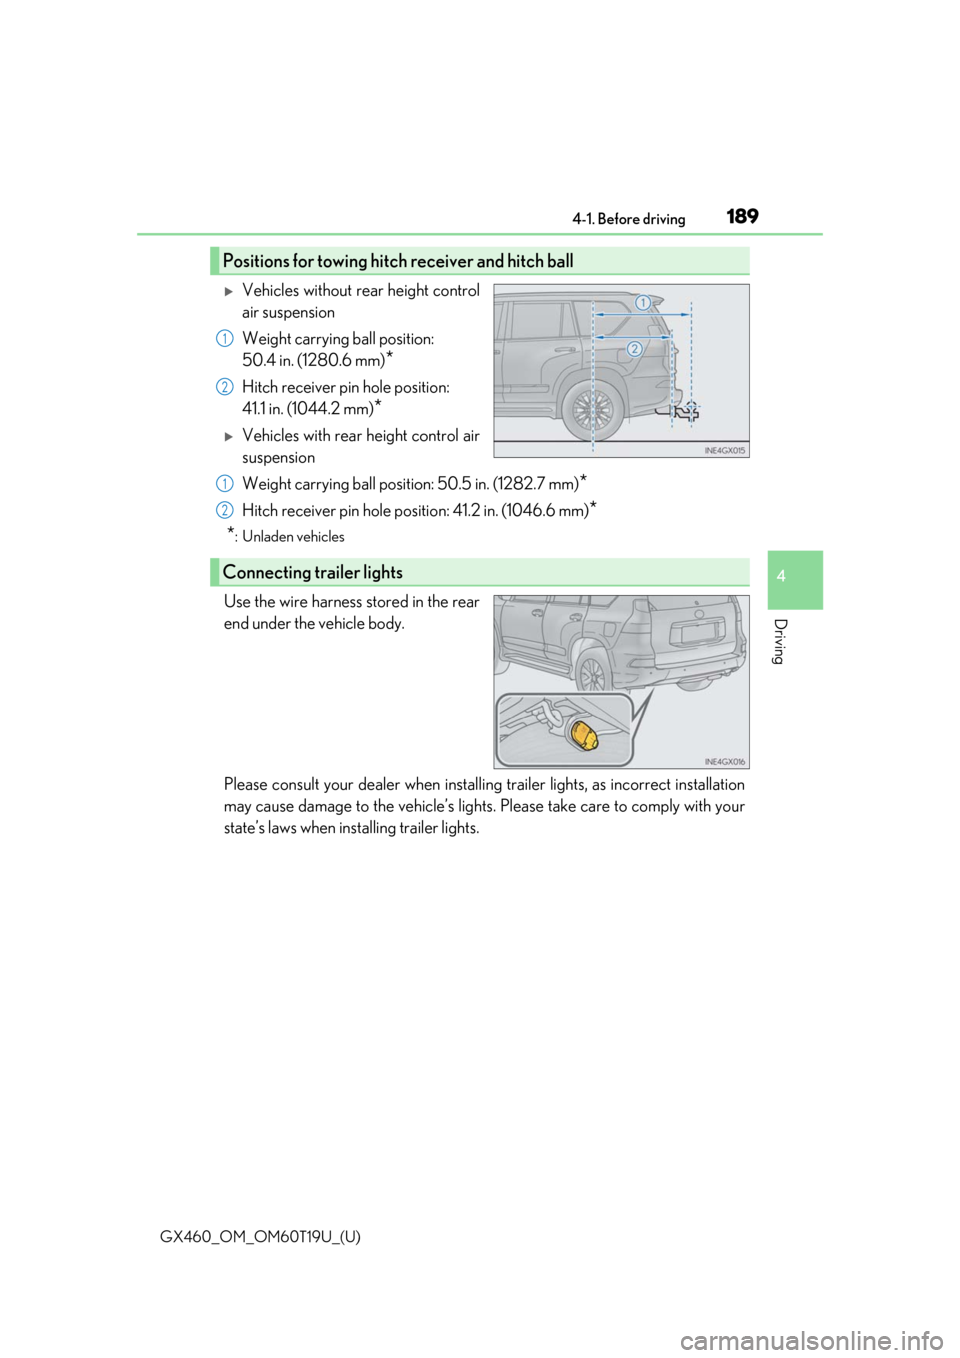
Vehicles without rear height control
air suspension
Weight carrying ball position:
50.4 in. (1280.6 mm)
*
Hitch receiver pin hole position:
41.1 in. (1044.2 mm)
*
Vehicles with rear height control air
suspension
Weight carrying ball position: 50.5 in. (1282.7 mm)
*
Hitch receiver pin hole position: 41.2 in. (1046.6 mm)*
*
: Unladen vehicles
Use the wire harness stored in the rear
end under the vehicle body.
Please consult your dealer when installin g trailer lights, as incorrect installation
may cause damage to the vehicle’s lights. Please take care to comply with your
state’s laws when installing trailer lights.
Positions for towing hitch receiver and hitch ball
1
2
Connecting trailer lights
1
2
Page 191 of 628

GX460_OM_OM60T19U_(U)
1914-1. Before driving
4
Driving
Your vehicle will handle differently when towing a trailer. Help to avoid an acci-
dent, death or serious injury, keep the following in mind when towing:
●Speed limits for towing a trailer vary by state or province. Do not exceed the
posted towing speed limit.
●Lexus recommends that the vehicle-traile r speed limit is 65 mph (104 km/h)
on a flat, straight, dry road. Do not exce ed this limit, the posted towing speed
limit or the speed limit for your trailer as set forth in your trailer owner’s man-
ual, whichever is lowest. Instability of the towing vehicle-trailer combination
(trailer sway) increases as speed increases. Exceeding speed limits may cause
loss of control.
●Before starting out, check the trailer lights, tires and the vehicle-trailer con-
nections. Recheck after driving a short distance.
●Practice turning, stopping and reversing with the trailer attached in an area
away from traffic until you become acc ustomed to the feel of the vehicle-
trailer combination.
●Reversing with a trailer attached is di fficult and requires practice. Grip the
bottom of the steering wheel and move your hand to the left to move the
trailer to the left. Move your hand to the right to move the trailer to the right.
(This is generally opposite to reversing without a trailer attached.) Avoid sharp
or prolonged turning. Have someone gu ide you when reversing to reduce the
risk of an accident.
●As stopping distance is increased when towing a trailer, vehicle-to-vehicle dis-
tance should be increased. For each 10 mph (16 km/h) of speed, allow at least
one vehicle and trailer length.
●Avoid sudden braking as you may skid, re sulting in the trailer jackknifing and
loss of vehicle control. This is especi ally true on wet or slippery surfaces.
Trailer towing tips
Page 194 of 628
194
GX460_OM_OM60T19U_(U)4-1. Before driving
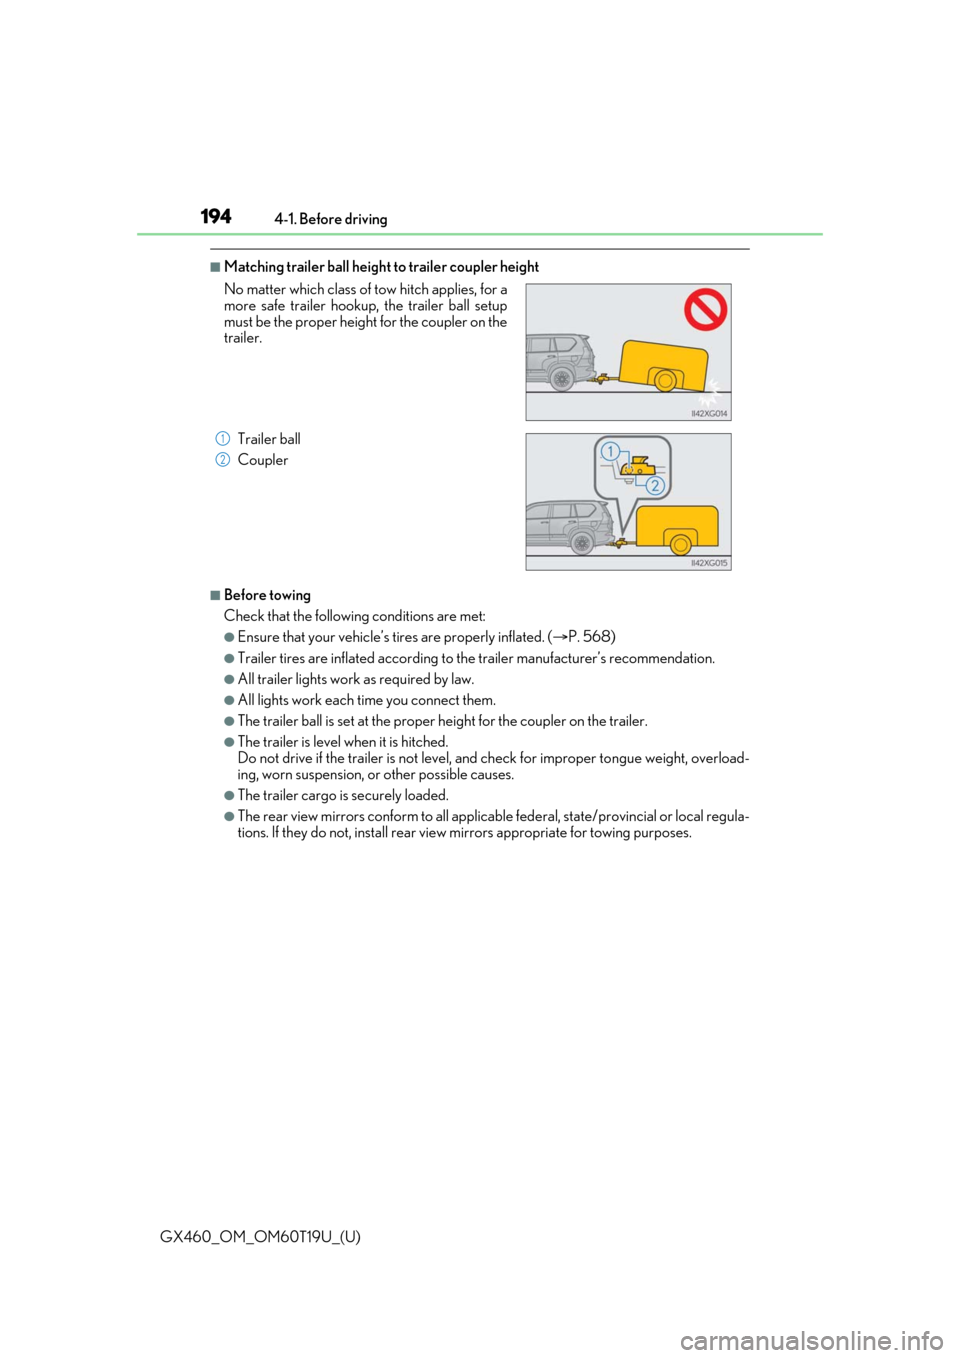
■Matching trailer ball height to trailer coupler height
■Before towing
Check that the followin
g conditions are met:
●Ensure that your vehicle’s tires are properly inflated. ( P. 568)
●Trailer tires are inflated according to the trailer manufacturer’s recommendation.
●All trailer lights work as required by law.
●All lights work each time you connect them.
●The trailer ball is set at the proper height for the coupler on the trailer.
●The trailer is level when it is hitched.
Do not drive if the trailer is not level, and check for improper to ngue weight, overload-
ing, worn suspension, or other possible causes.
●The trailer cargo is securely loaded.
●The rear view mirrors conform to all applicable federal, state/provincial or local regula-
tions. If they do not, install rear view mirrors appropriate for towing purposes.
No matter which class of tow hitch applies, for a
more safe trailer hookup, the trailer ball setup
must be the proper height for the coupler on the
trailer.
Trailer ball
Coupler
1
2
Page 198 of 628

198
GX460_OM_OM60T19U_(U)4-1. Before driving
WARNING
■Hitch
Trailer hitch assemblies have different weight capacities established by the hitch manu-
facturer. Even though the vehicle may be phys
ically capable of towing a higher weight,
the operator must determine the maximum weight rating of the particular hitch assem-
bly and never exceed the maximum weight rating specified for the trailer-hitch.
Exceeding the maximum weight rating set by the trailer-hitch manufacturer can cause
an accident resulting in death or serious personal injuries.
■When towing a trailer
Lexus recommends trailers with brakes that conform to any applicable federal and
state/provincial regulations.
●If the gross trailer weight exceeds unbraked TWR, trailer brakes are required. Lexus
recommends trailers with brakes that conform to all applicable federal and state/pro-
vincial regulations.
●Never tap into your vehicle’s hydraulic system, as this will lower the vehicle’s braking
effectiveness.
●Never tow a trailer without using a safety chain securely attached to both the trailer
and the vehicle. If damage occurs to the co upling unit or hitch ball, there is danger of
the trailer wandering into another lane.
NOTICE
■When installing a trailer hitch
Use only the position recommended by your Lexus dealer. Do not install the trailer
hitch on the bumper; this may cause body damage.
■Do not directly splice trailer lights
Do not directly splic e trailer lights. Directly splicin g trailer lights may damage your
vehicle’s electrical system and cause a malfunction.
Page 211 of 628
211
GX460_OM_OM60T19U_(U)4-2. Driving procedures
4
Driving
Turn signal lever
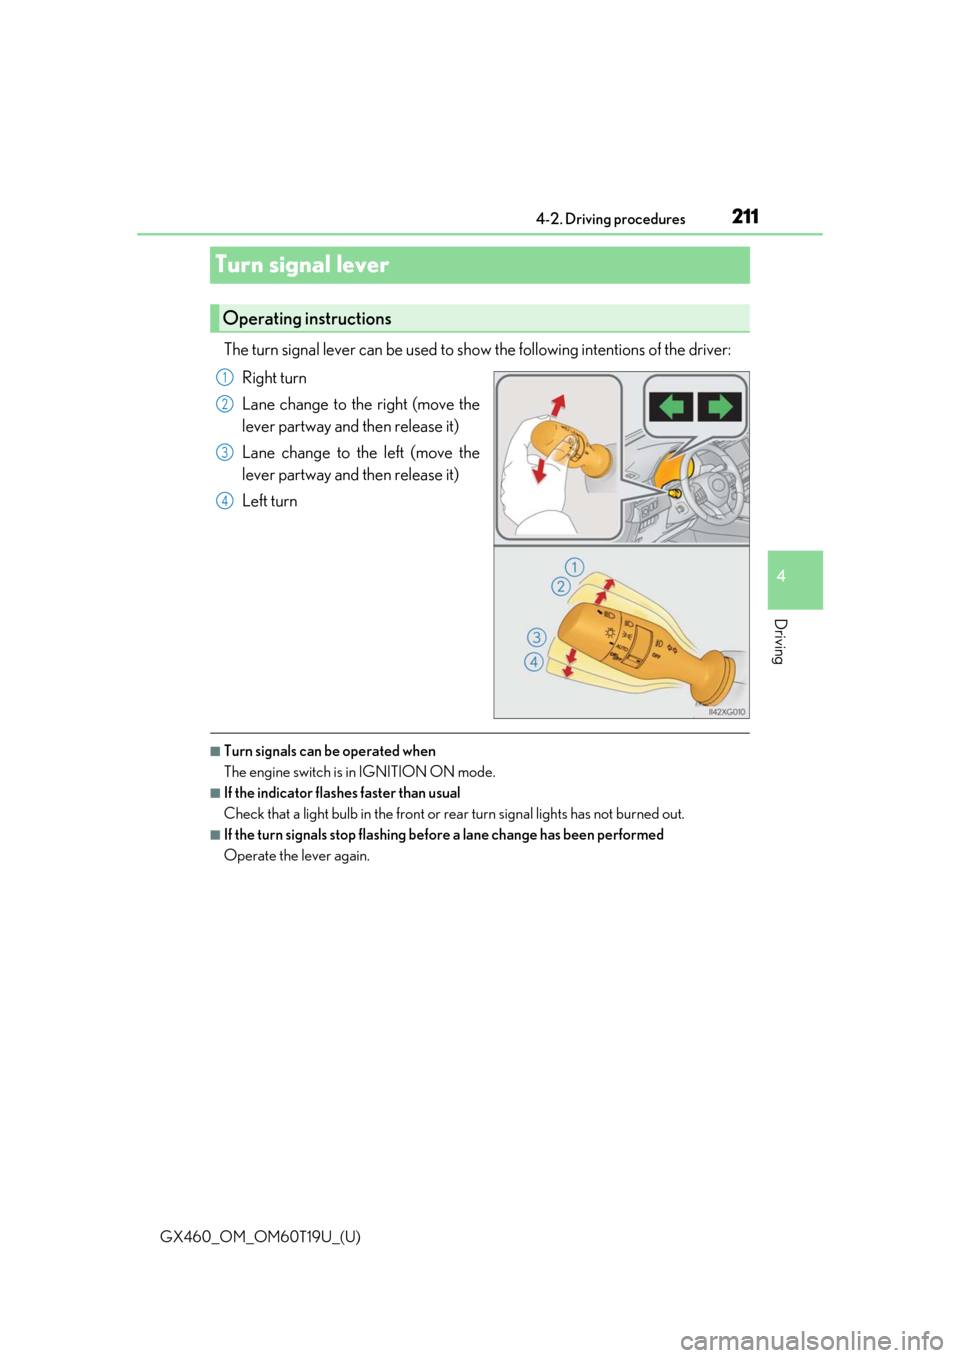
The turn signal lever can be used to show
the following intentions of the driver:
Right turn
Lane change to the right (move the
lever partway and then release it)
Lane change to the left (move the
lever partway and then release it)
Left turn
■Turn signals can be operated when
The engine switch is in IGNITION ON mode.
■If the indicator flashes faster than usual
Check that a light bulb in the front or rear turn signal lights has not burned out.
■If the turn signals stop flashing befo re a lane change has been performed
Operate the lever again.
Operating instructions
1
2
3
4
Page 213 of 628
213
GX460_OM_OM60T19U_(U)4-3. Operating the lights and wipers
4
Driving
Headlight switch
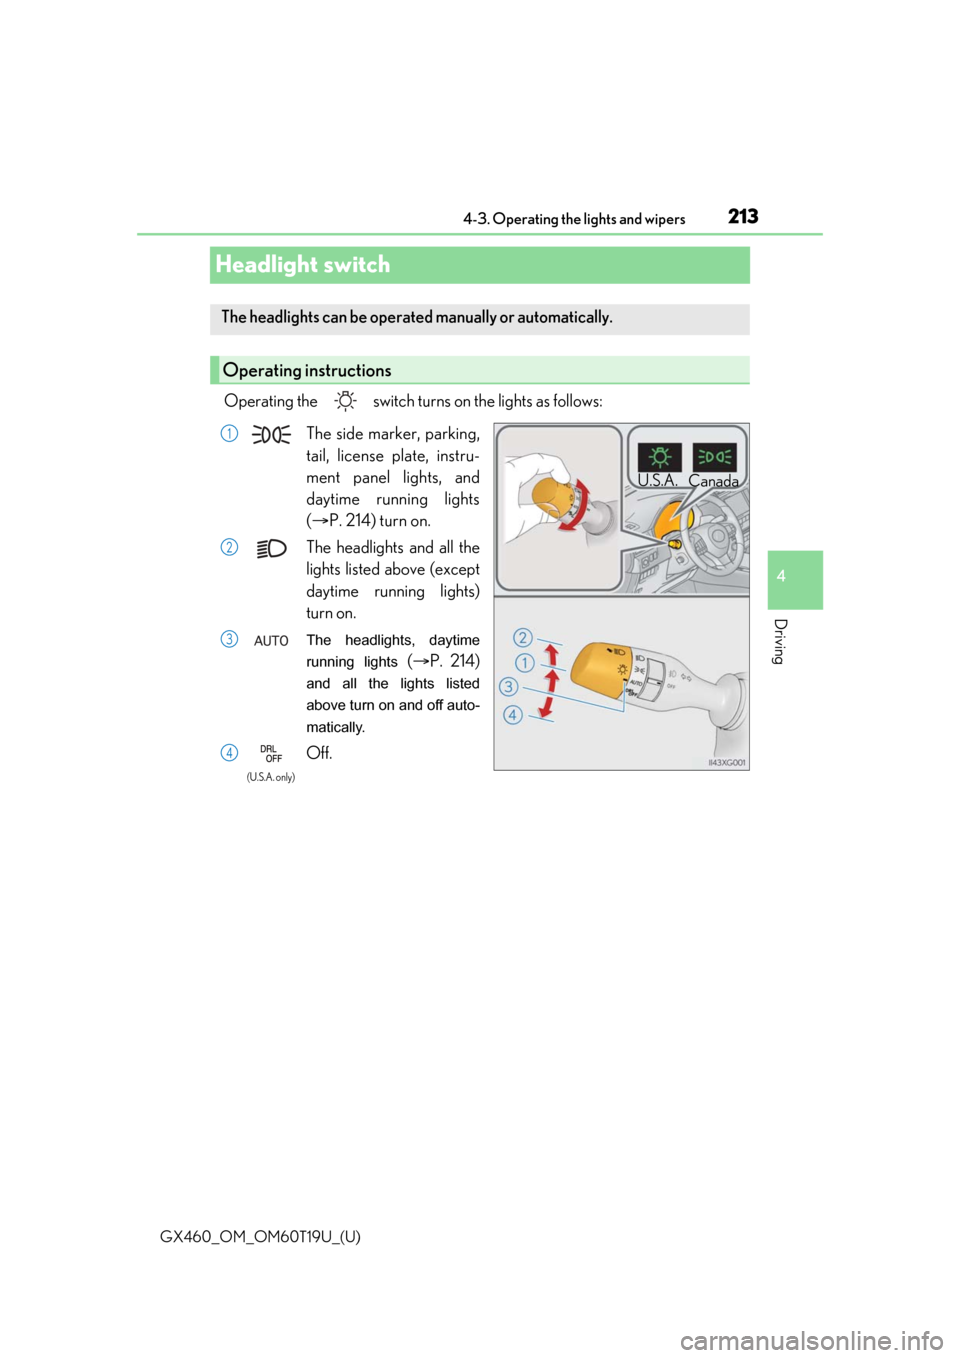
Operating the switch turn
s on the lights as follows:
The headlights can be operated manually or automatically.
Operating instructions
U.S.A.
Canada
The side marker, parking,
tail, license plate, instru-
ment panel lights, and
daytime running lights
( P. 214) turn on.
The headlights and all the
lights listed above (except
daytime running lights)
turn on.
The headlights, daytime
running lights
( P. 214)
and all the lights listed
above turn on and off auto-
matically.
Off.
1
2
3
4
(U.S.A. only)
Page 214 of 628
214
GX460_OM_OM60T19U_(U)4-3. Operating the lights and wipers
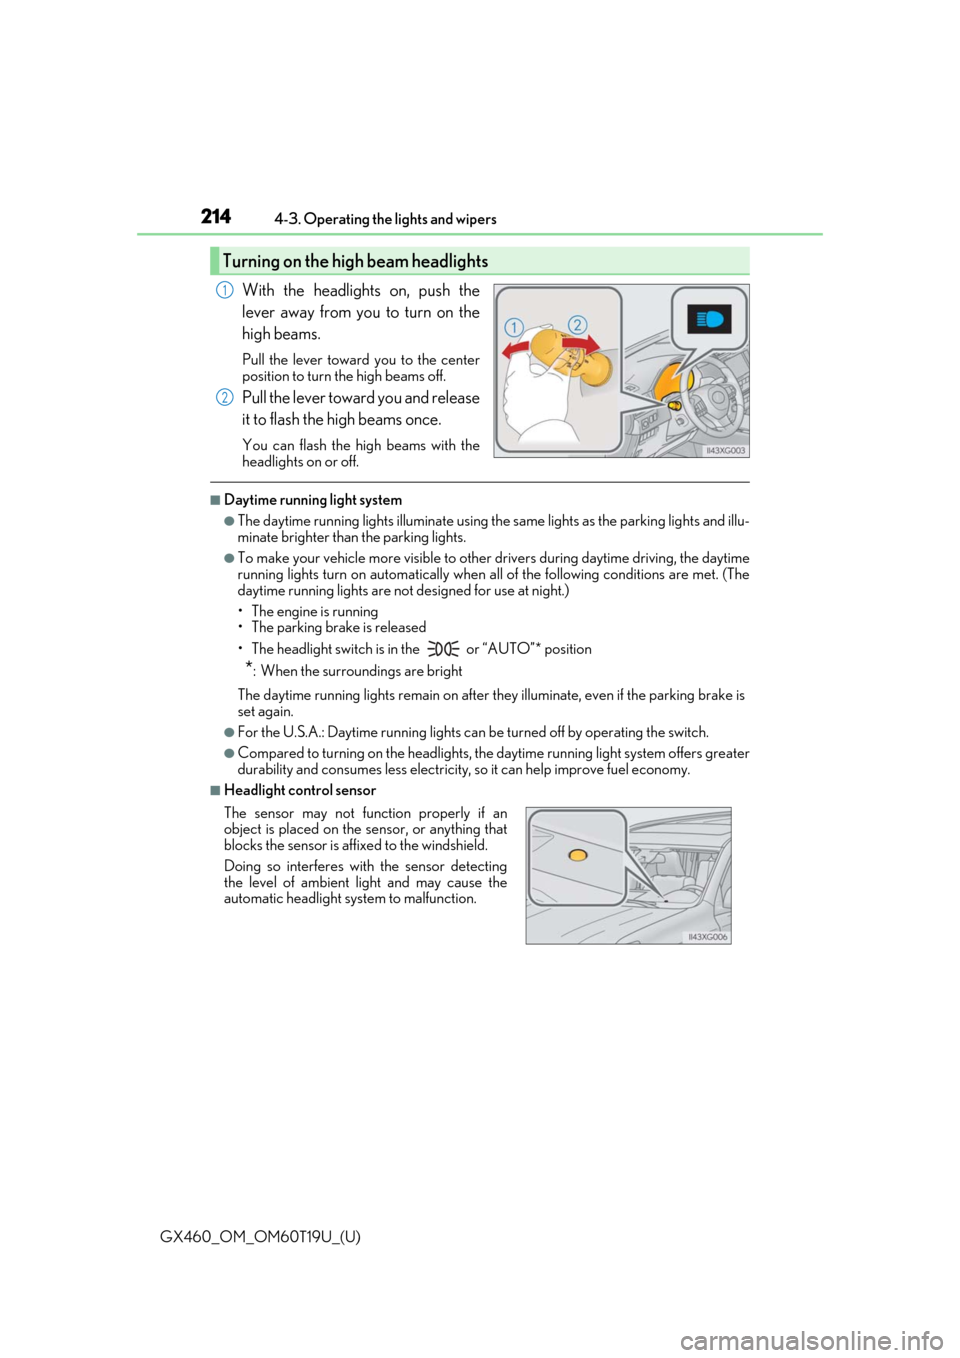
With the headlights on, push the
lever away from you to turn on the
high beams.
Pull the lever toward you to the center
position to turn the high beams off.
Pull the lever toward you and release
it to flash the high beams once.
You can flash the high beams with the
headlights on or off.
■Daytime running light system
●The daytime running lights illuminate using th
e same lights as the parking lights and illu-
minate brighter than the parking lights.
●To make your vehicle more visible to other drivers during daytime driving, the daytime
running lights turn on automatically when a ll of the following conditions are met. (The
daytime running lights are not designed for use at night.)
• The engine is running
• The parking brake is released
• The headlight switch is in the or “AUTO”* position
*: When the surroundings are bright
The daytime running lights remain on after they illuminate, even if the parking brake is
set again.
●For the U.S.A.: Daytime running lights can be turned off by operating the switch.
●Compared to turning on the headlights, the daytime running light system offers greater
durability and consumes less electricity, so it can help improve fuel economy.
■Headlight control sensor
Turning on the high beam headlights
1
2
The sensor may not function properly if an
object is placed on the sensor, or anything that
blocks the sensor is affixed to the windshield.
Doing so interferes with the sensor detecting
the level of ambient light and may cause the
automatic headlight system to malfunction.