audio Lexus IS300h 2013 Navigation manual
[x] Cancel search | Manufacturer: LEXUS, Model Year: 2013, Model line: IS300h, Model: Lexus IS300h 2013Pages: 415, PDF Size: 42.75 MB
Page 243 of 415
243
3. MEDIA OPERATION
4
AUDIO/VIDEO SYSTEM
IS300h/250_Navi_EE
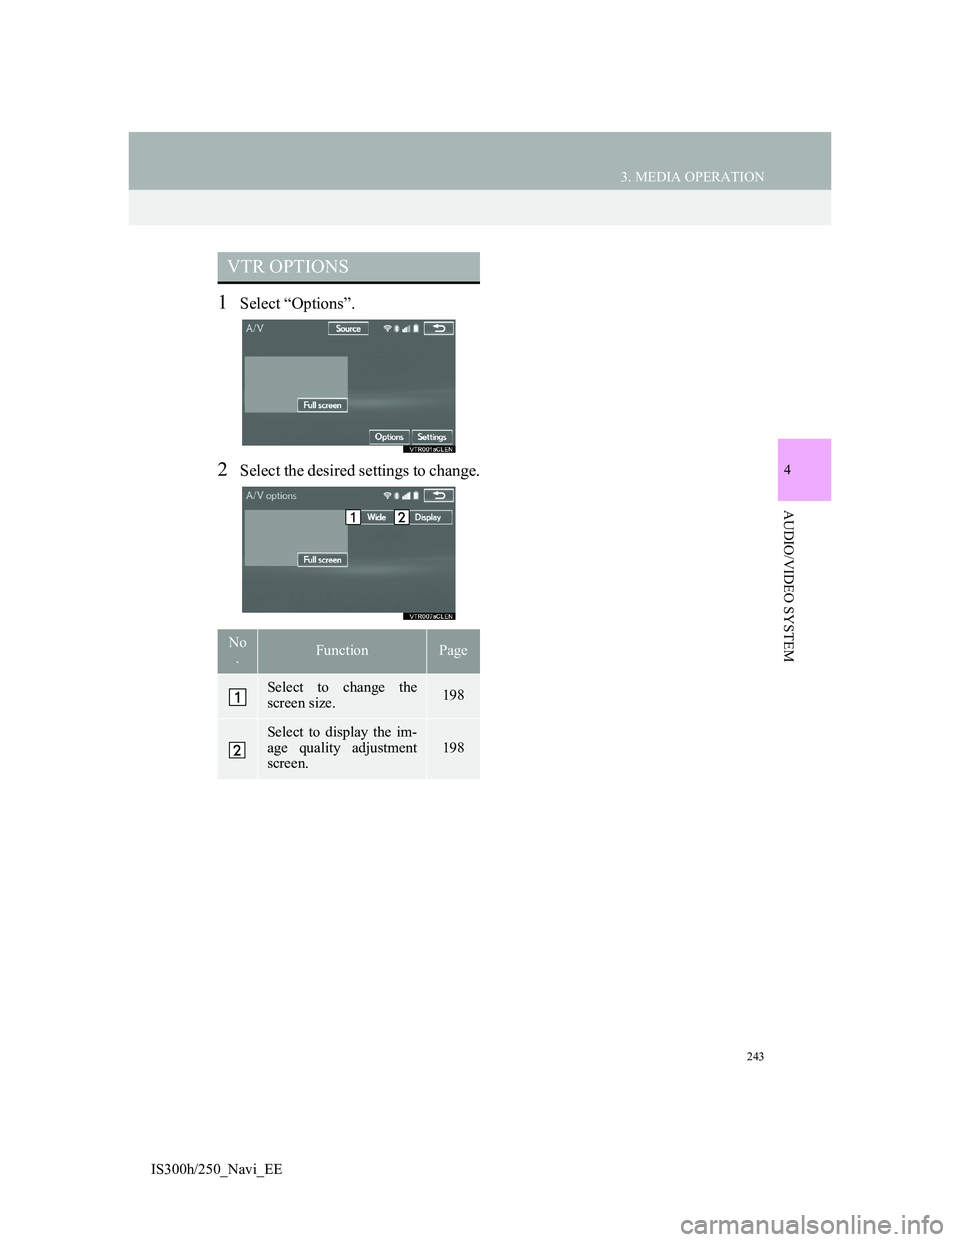
1Select “Options”.
2Select the desired settings to change.
VTR OPTIONS
No
.FunctionPage
Select to change the
screen size.198
Select to display the im-
age quality adjustment
screen.
198
Page 244 of 415
244
IS300h/250_Navi_EE
4. AUDIO/VISUAL REMOTE CONTROLS
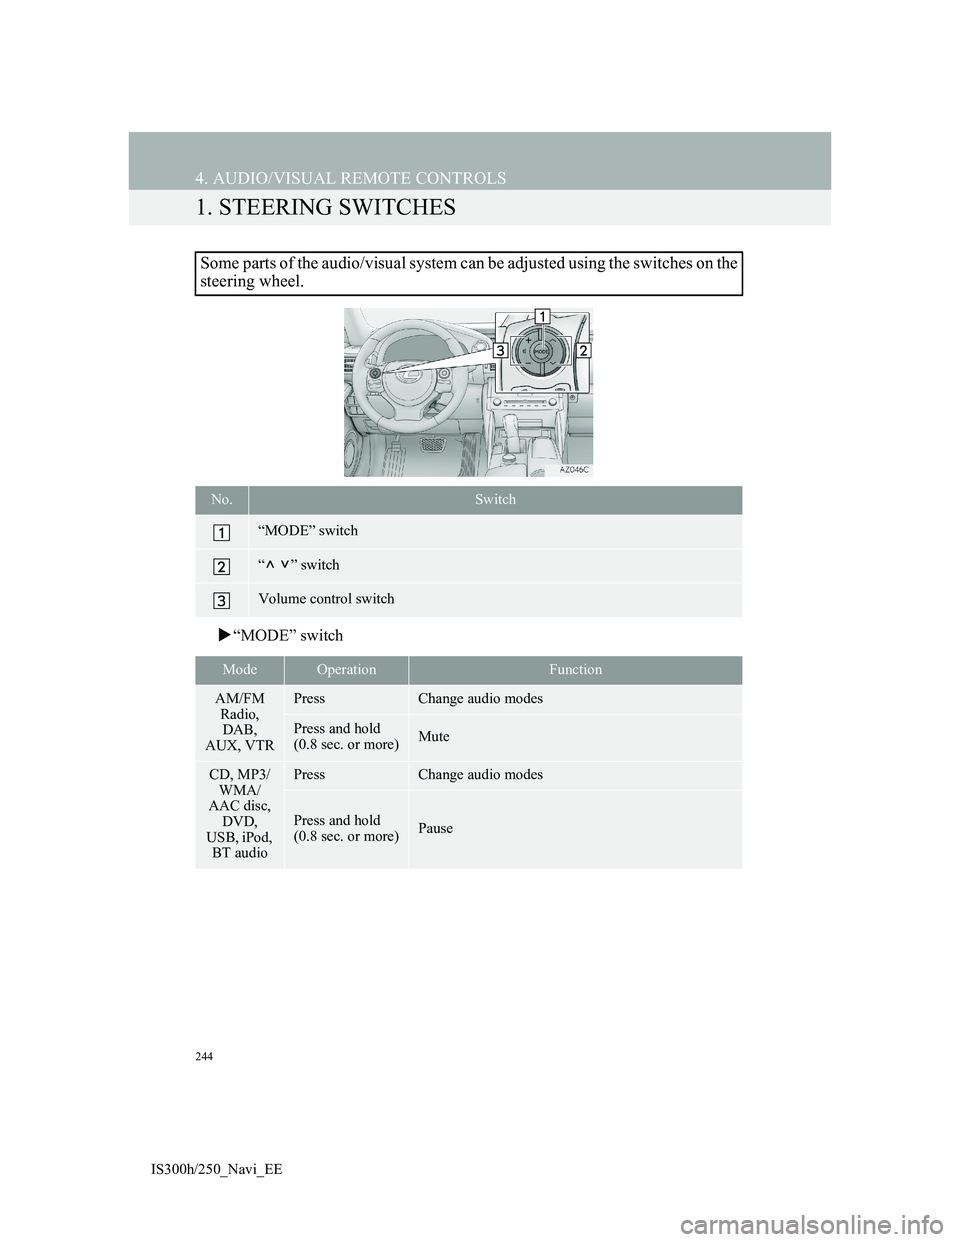
1. STEERING SWITCHES
“MODE” switch
Some parts of the audio/visual system can be adjusted using the switches on the
steering wheel.
No.Switch
“MODE” switch
“” switch
Volume control switch
ModeOperationFunction
AM/FM
Radio,
DAB,
AUX, VTRPressChange audio modes
Press and hold
(0.8 sec. or more)Mute
CD, MP3/
WMA/
AAC disc,
DVD,
USB, iPod,
BT audioPressChange audio modes
Press and hold
(0.8 sec. or more)Pause
Page 245 of 415
245
4. AUDIO/VISUAL REMOTE CONTROLS
4
AUDIO/VIDEO SYSTEM
IS300h/250_Navi_EE
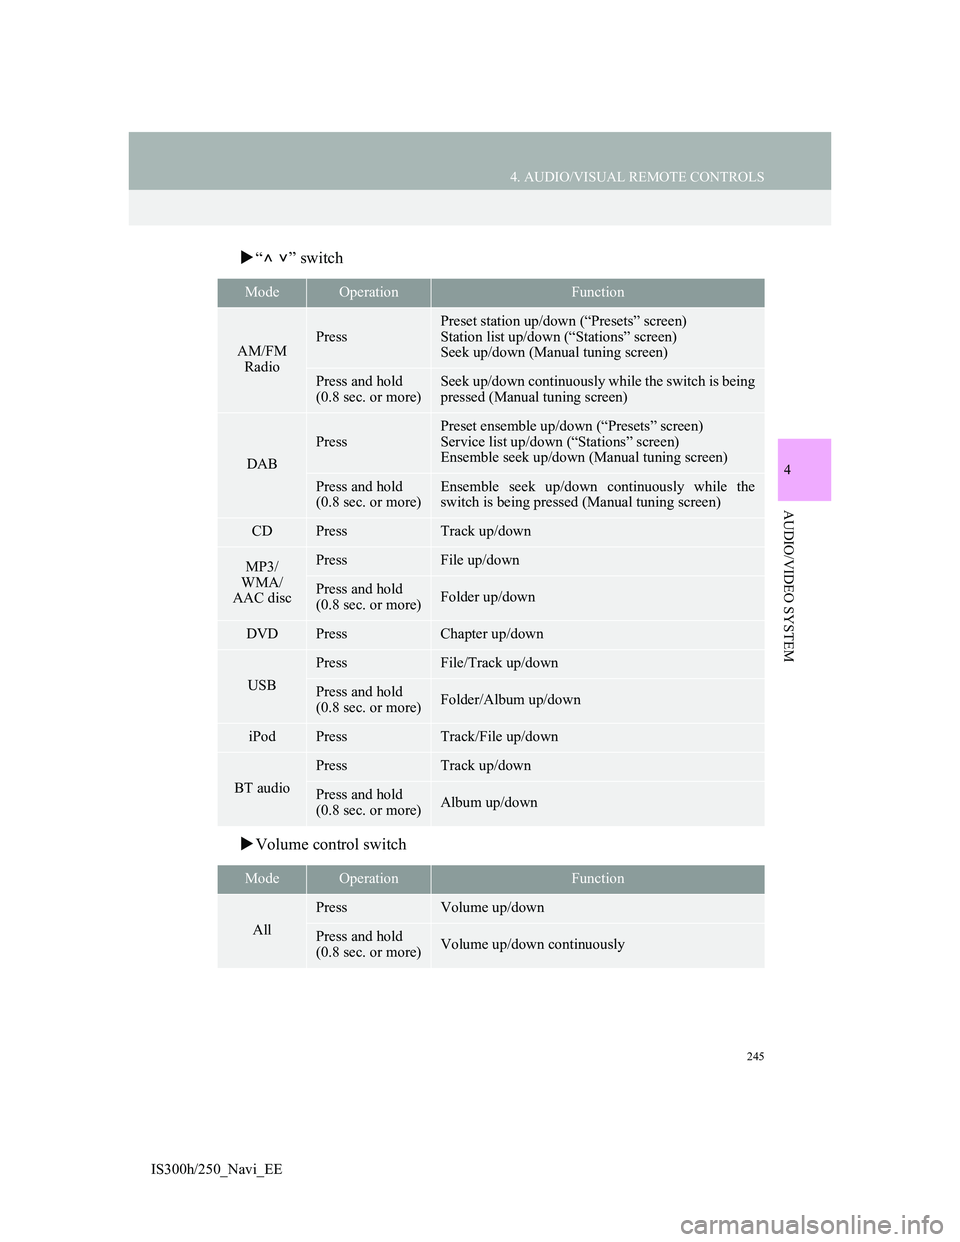
“” switch
Volume control switch
ModeOperationFunction
AM/FM
RadioPress
Preset station up/down (“Presets” screen)
Station list up/down (“Stations” screen)
Seek up/down (Manual tuning screen)
Press and hold
(0.8 sec. or more)Seek up/down continuously while the switch is being
pressed (Manual tuning screen)
DAB
Press
Preset ensemble up/down (“Presets” screen)
Service list up/down (“Stations” screen)
Ensemble seek up/down (Manual tuning screen)
Press and hold
(0.8 sec. or more)Ensemble seek up/down continuously while the
switch is being pressed (Manual tuning screen)
CDPressTrack up/down
MP3/
WMA/
AAC discPressFile up/down
Press and hold
(0.8 sec. or more)Folder up/down
DVDPressChapter up/down
USB
PressFile/Track up/down
Press and hold
(0.8 sec. or more)Folder/Album up/down
iPodPressTrack/File up/down
BT audio
PressTrack up/down
Press and hold
(0.8 sec. or more)Album up/down
ModeOperationFunction
All
PressVolume up/down
Press and hold
(0.8 sec. or more)Volume up/down continuously
Page 246 of 415
246
IS300h/250_Navi_EE
5. SETUP
1. AUDIO SETTINGS
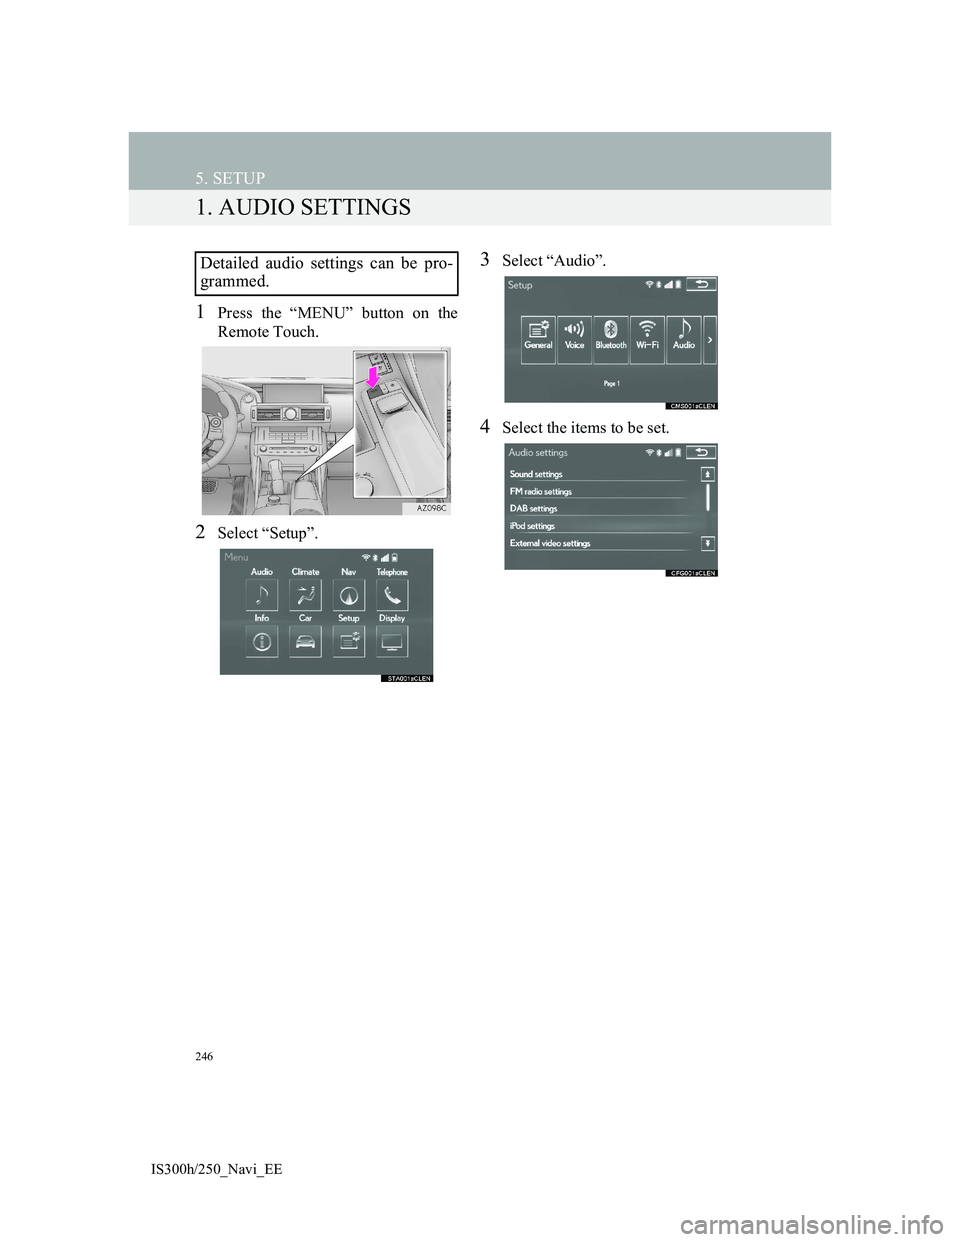
1Press the “MENU” button on the
Remote Touch.
2Select “Setup”.
3Select “Audio”.
4Select the items to be set.
Detailed audio settings can be pro-
grammed.
Page 247 of 415
247
5. SETUP
4
AUDIO/VIDEO SYSTEM
IS300h/250_Navi_EE
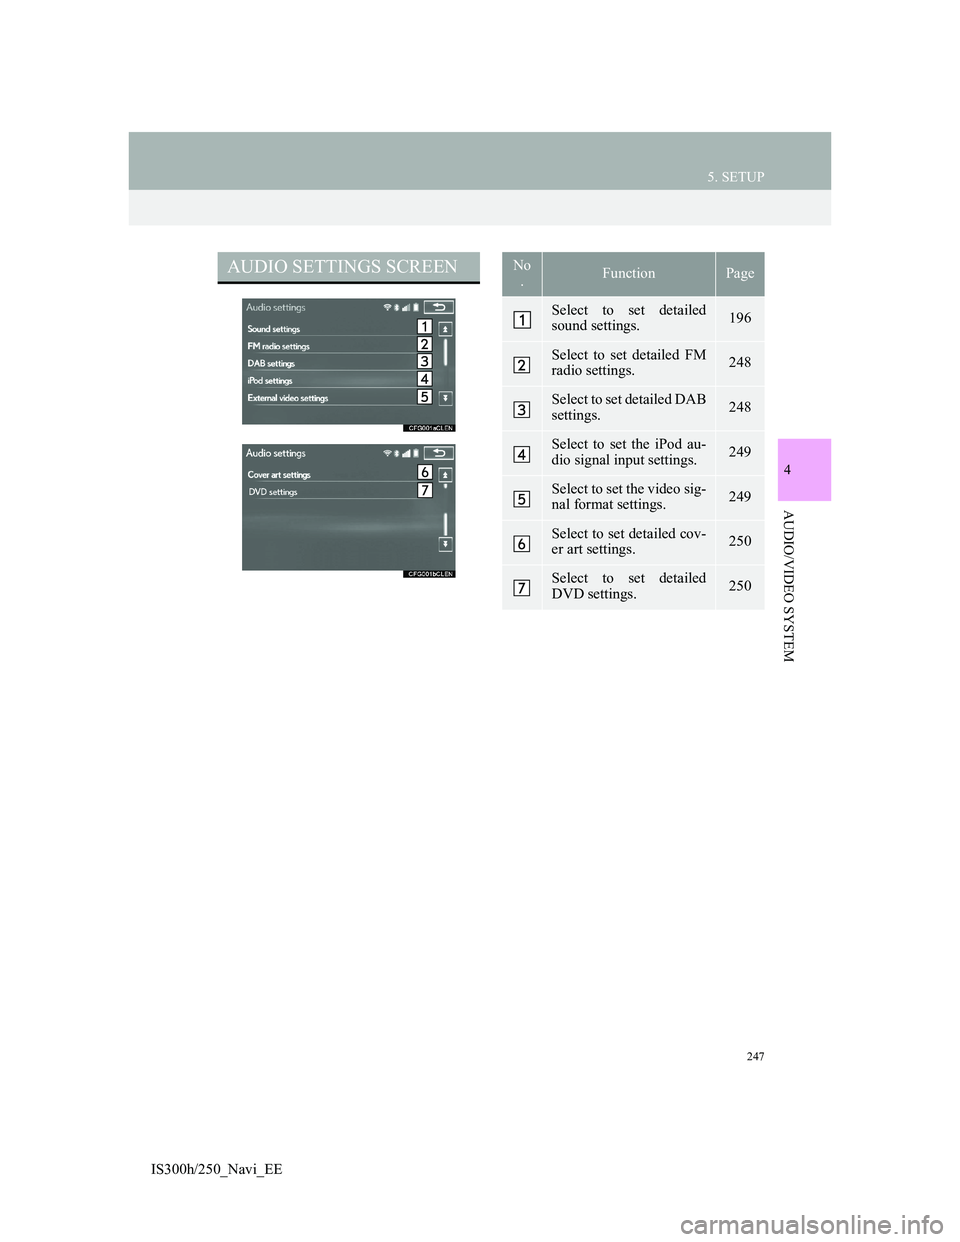
AUDIO SETTINGS SCREENNo
.FunctionPage
Select to set detailed
sound settings.196
Select to set detailed FM
radio settings.248
Select to set detailed DAB
settings. 248
Select to set the iPod au-
dio signal input settings.249
Select to set the video sig-
nal format settings.249
Select to set detailed cov-
er art settings.250
Select to set detailed
DVD settings.250
Page 248 of 415
248
5. SETUP
IS300h/250_Navi_EE
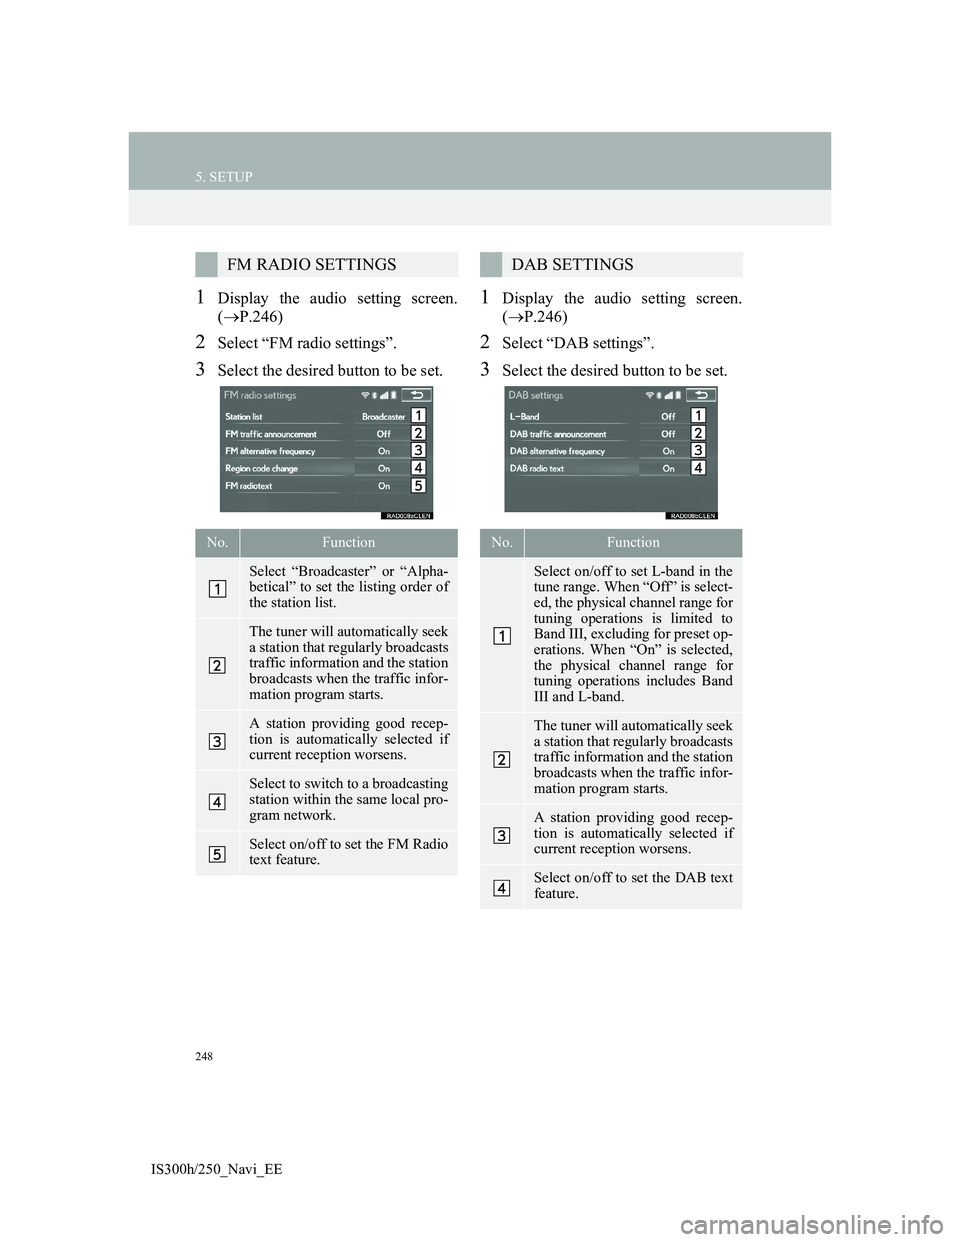
1Display the audio setting screen.
(P.246)
2Select “FM radio settings”.
3Select the desired button to be set.
1Display the audio setting screen.
(P.246)
2Select “DAB settings”.
3Select the desired button to be set.
FM RADIO SETTINGS
No.Function
Select “Broadcaster” or “Alpha-
betical” to set the listing order of
the station list.
The tuner will automatically seek
a station that regularly broadcasts
traffic information and the station
broadcasts when the traffic infor-
mation program starts.
A station providing good recep-
tion is automatically selected if
current reception worsens.
Select to switch to a broadcasting
station within the same local pro-
gram network.
Select on/off to set the FM Radio
text feature.
DAB SETTINGS
No.Function
Select on/off to set L-band in the
tune range. When “Off” is select-
ed, the physical channel range for
tuning operations is limited to
Band III, excluding for preset op-
erations. When “On” is selected,
the physical channel range for
tuning operations includes Band
III and L-band.
The tuner will automatically seek
a station that regularly broadcasts
traffic information and the station
broadcasts when the traffic infor-
mation program starts.
A station providing good recep-
tion is automatically selected if
current reception worsens.
Select on/off to set the DAB text
feature.
Page 249 of 415
249
5. SETUP
4
AUDIO/VIDEO SYSTEM
IS300h/250_Navi_EE
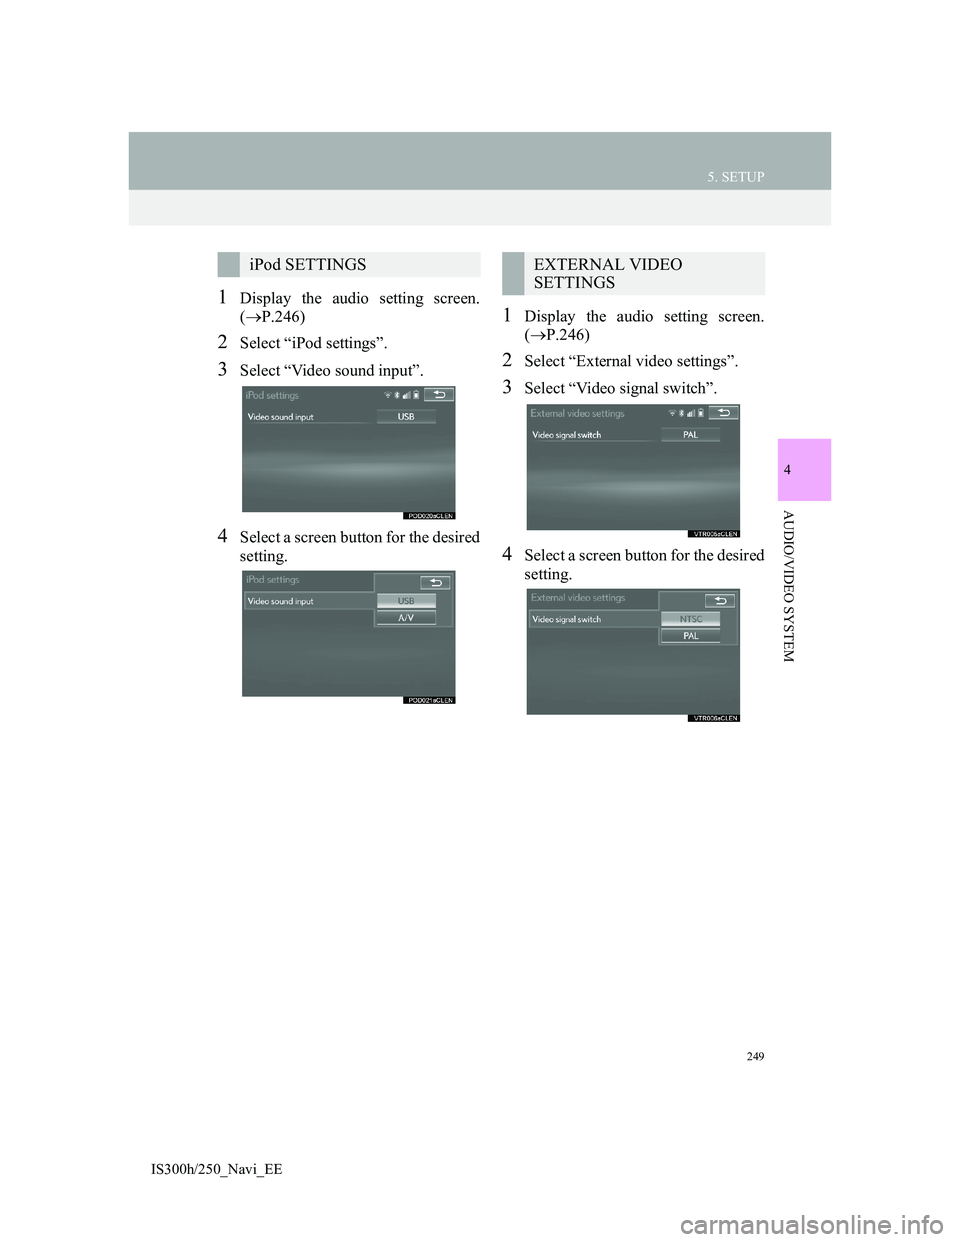
1Display the audio setting screen.
(P.246)
2Select “iPod settings”.
3Select “Video sound input”.
4Select a screen button for the desired
setting.
1Display the audio setting screen.
(P.246)
2Select “External video settings”.
3Select “Video signal switch”.
4Select a screen button for the desired
setting.
iPod SETTINGSEXTERNAL VIDEO
SETTINGS
Page 250 of 415
250
5. SETUP
IS300h/250_Navi_EE
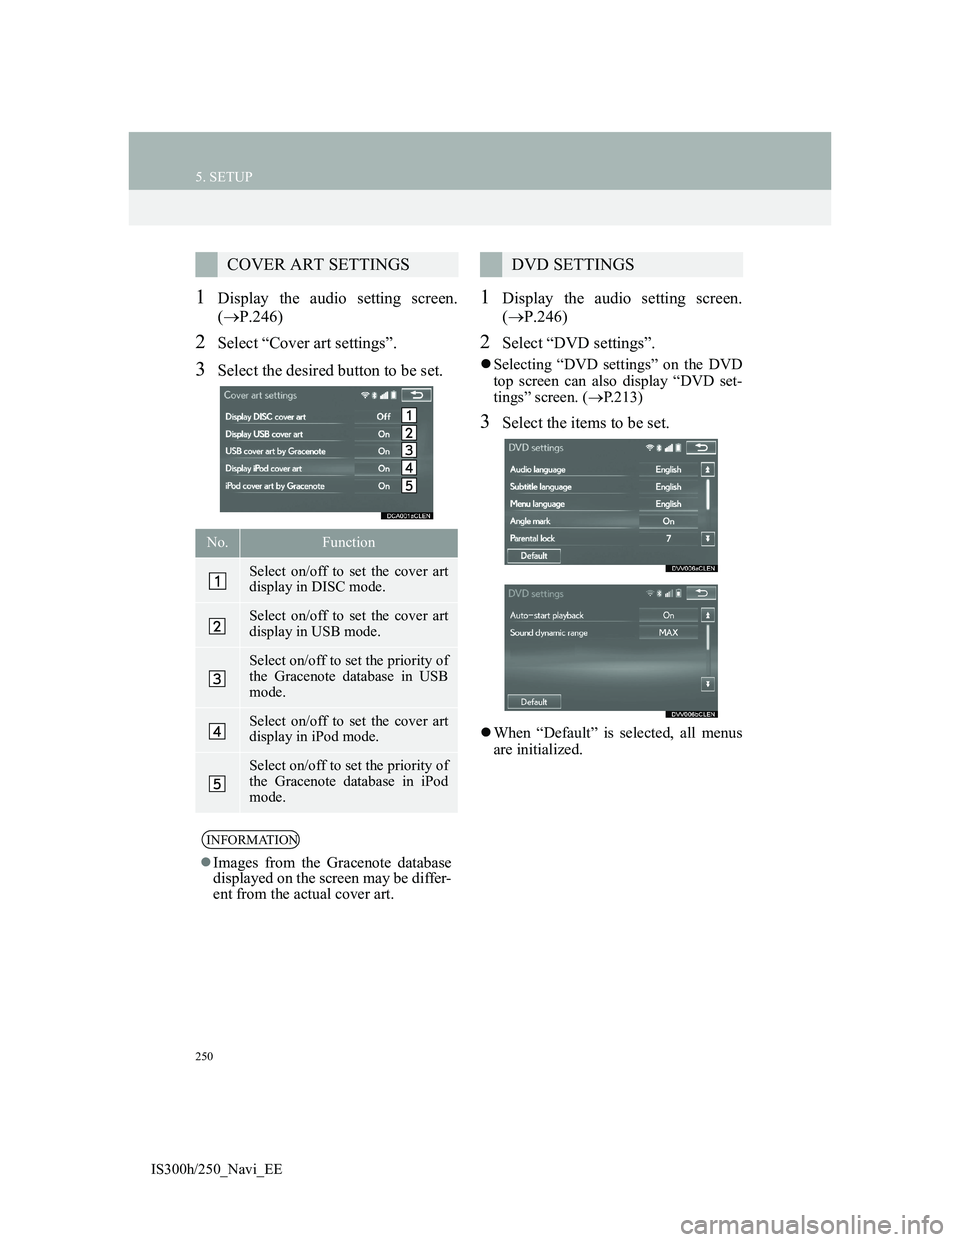
1Display the audio setting screen.
(P.246)
2Select “Cover art settings”.
3Select the desired button to be set.
1Display the audio setting screen.
(P.246)
2Select “DVD settings”.
Selecting “DVD settings” on the DVD
top screen can also display “DVD set-
tings” screen. (P.213)
3Select the items to be set.
When “Default” is selected, all menus
are initialized.
COVER ART SETTINGS
No.Function
Select on/off to set the cover art
display in DISC mode.
Select on/off to set the cover art
display in USB mode.
Select on/off to set the priority of
the Gracenote database in USB
mode.
Select on/off to set the cover art
display in iPod mode.
Select on/off to set the priority of
the Gracenote database in iPod
mode.
INFORMATION
Images from the Gracenote database
displayed on the screen may be differ-
ent from the actual cover art.
DVD SETTINGS
Page 251 of 415
251
5. SETUP
4
AUDIO/VIDEO SYSTEM
IS300h/250_Navi_EE
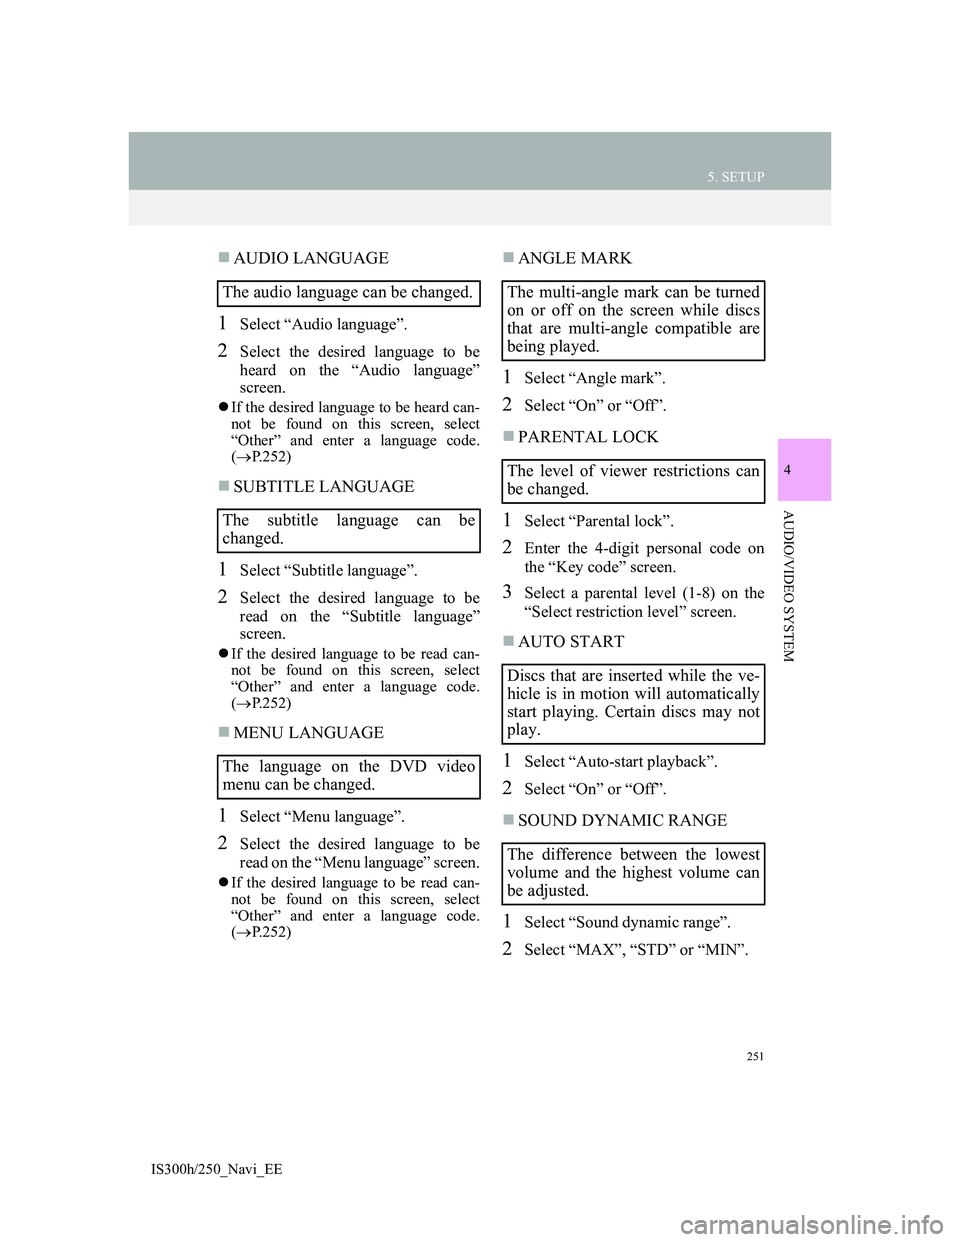
AUDIO LANGUAGE
1Select “Audio language”.
2Select the desired language to be
heard on the “Audio language”
screen.
If the desired language to be heard can-
not be found on this screen, select
“Other” and enter a language code.
(P.252)
SUBTITLE LANGUAGE
1Select “Subtitle language”.
2Select the desired language to be
read on the “Subtitle language”
screen.
If the desired language to be read can-
not be found on this screen, select
“Other” and enter a language code.
(P.252)
MENU LANGUAGE
1Select “Menu language”.
2Select the desired language to be
read on the “Menu language” screen.
If the desired language to be read can-
not be found on this screen, select
“Other” and enter a language code.
(P.252)
ANGLE MARK
1Select “Angle mark”.
2Select “On” or “Off”.
PARENTAL LOCK
1Select “Parental lock”.
2Enter the 4-digit personal code on
the “Key code” screen.
3Select a parental level (1-8) on the
“Select restriction level” screen.
AUTO START
1Select “Auto-start playback”.
2Select “On” or “Off”.
SOUND DYNAMIC RANGE
1Select “Sound dynamic range”.
2Select “MAX”, “STD” or “MIN”.
The audio language can be changed.
The subtitle language can be
changed.
The language on the DVD video
menu can be changed.The multi-angle mark can be turned
on or off on the screen while discs
that are multi-angle compatible are
being played.
The level of viewer restrictions can
be changed.
Discs that are inserted while the ve-
hicle is in motion will automatically
start playing. Certain discs may not
play.
The difference between the lowest
volume and the highest volume can
be adjusted.
Page 252 of 415
252
5. SETUP
IS300h/250_Navi_EE
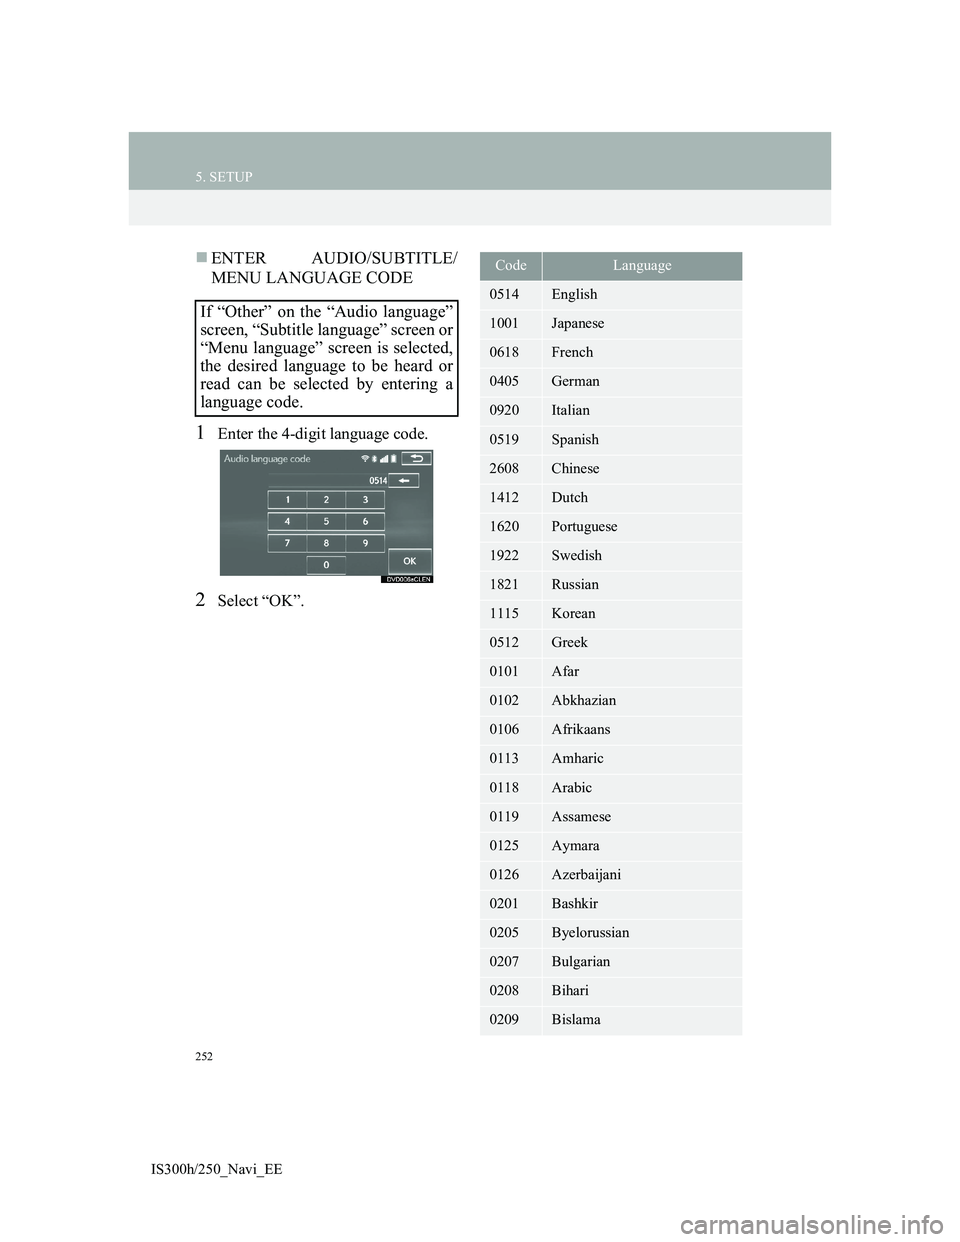
ENTER AUDIO/SUBTITLE/
MENU LANGUAGE CODE
1Enter the 4-digit language code.
2Select “OK”.
If “Other” on the “Audio language”
screen, “Subtitle language” screen or
“Menu language” screen is selected,
the desired language to be heard or
read can be selected by entering a
language code.
CodeLanguage
0514English
1001Japanese
0618French
0405German
0920Italian
0519Spanish
2608Chinese
1412Dutch
1620Portuguese
1922Swedish
1821Russian
1115Korean
0512Greek
0101Afar
0102Abkhazian
0106Afrikaans
0113Amharic
0118Arabic
0119Assamese
0125Aymara
0126Azerbaijani
0201Bashkir
0205Byelorussian
0207Bulgarian
0208Bihari
0209Bislama