check engine lexus LFA 2012 Technical Information / LEXUS 2012 LFA (OM77006U) User Guide
[x] Cancel search | Manufacturer: LEXUS, Model Year: 2012, Model line: LFA, Model: Lexus LFA 2012Pages: 420, PDF Size: 5.02 MB
Page 116 of 420

114
2-1. Driving procedures
■When there is a malfunction in the system
Warning lights and/or warning messages will turn on or flash. (P. 325, 327)
Depending on the condition, the parking brake indicator light may flash.
NOTICE
■When parking the vehicle
Before you leave the vehicle, set the parking brake, select 1st gear or Reverse, and
stop the engine. Make sure that the vehicle does not move.
■When the system malfunctions
Stop the vehicle in a safe place and check the warning messages.
■When the parking brake cannot be released due to a malfunction
Use the parking brake release tool to manually release the parking brake.
( P. 3 4 5 )
Driving the vehicle with the parking brake set will lead to brake components over-
heating, which may affect braking performance and increase brake wear.
Page 119 of 420

117
2-2. Instrument cluster
2
When driving
Speedometer
Tachometer
Gear indicator (P. 1 0 4 )
Driving mode indicator ( P. 1 0 4 )
Trip information display
Displays trip meter, fuel economy and other driving information ( P. 118)
Odometer
Engine oil temperature gauge
Displays the engine oil temperature. If the engine oil temperature becomes
284 F (140 C) or higher, a buzzer will sound and this display will flash.
( P. 313)
Clock ( P. 1 4 8 )
Engine oil pressure gauge
Displays the pressure of the engine oil in the engine. If the oil pressure drops,
a buzzer will sound and a warning message will be displayed. ( P. 3 2 4 )
Fuel gauge
Displays remaining fuel quantity an d reminds the driver to refuel. (P. 3 1 5 )
Outside temperature display
Engine coolant temperature gauge
Displays engine coolant temperature. If the engine coolant temperature
exceeds 244 F (118 C), a buzzer will sound and this display will flash.
( P. 313)
Menu
Allows driver to set various functions and check vehicle status. ( P. 1 2 4 )
Displays warning messages in case of a malfunction. ( P. 3 2 2 )
Page 124 of 420
122
2-2. Instrument cluster
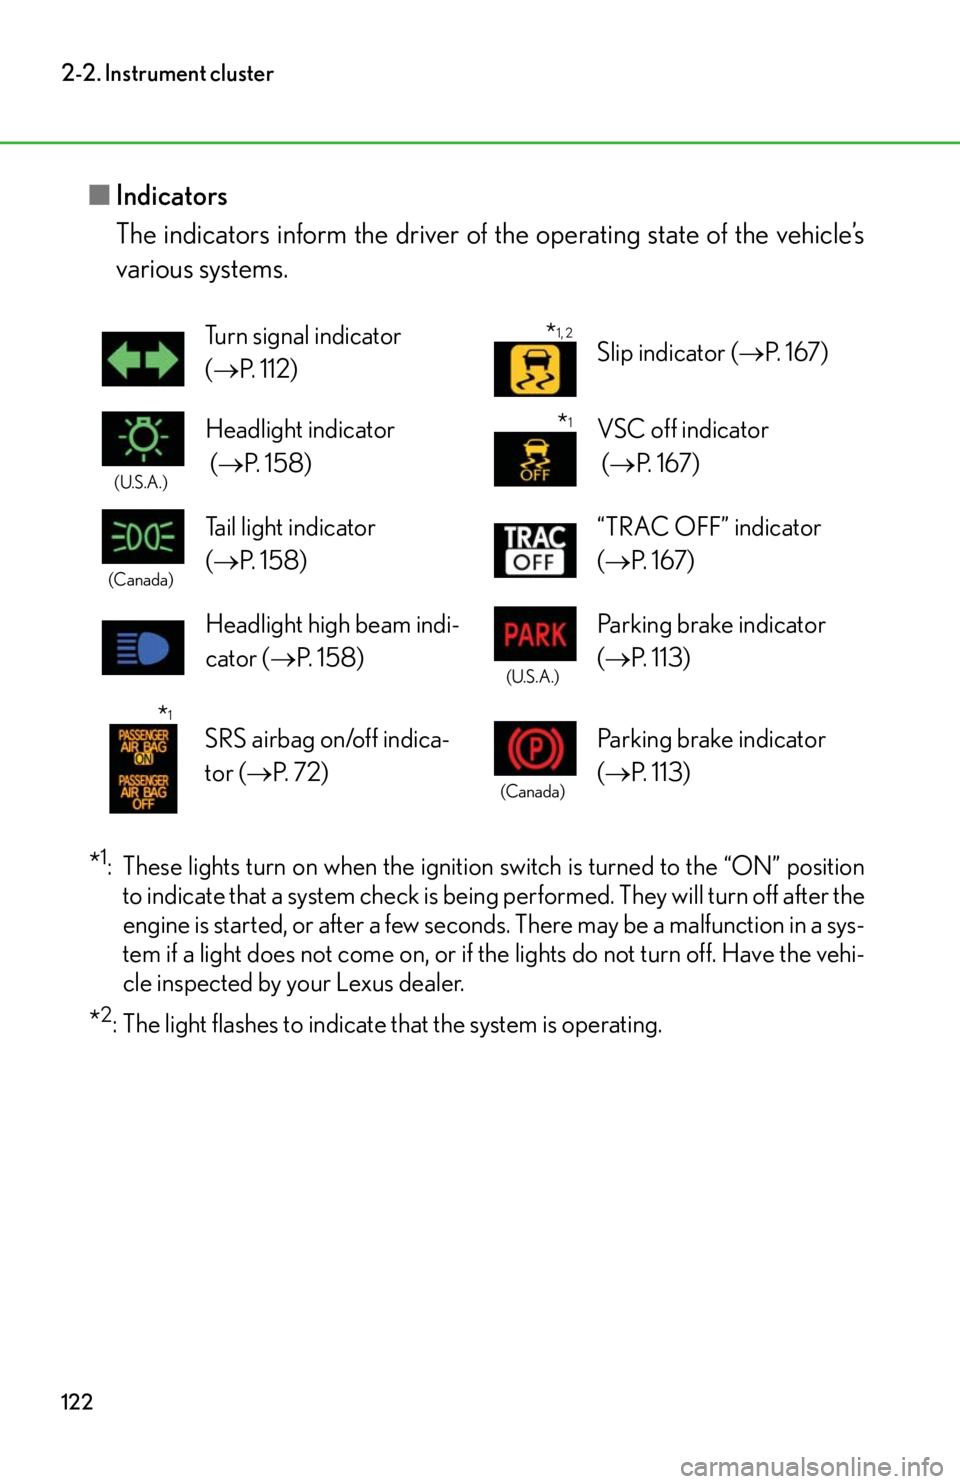
■Indicators
The indicators inform the driver of th e operating state of the vehicle’s
various systems.
*1: These lights turn on when the ignition switch is turned to the “ON” position to indicate that a system check is being performed. They will turn off after the
engine is started, or after a few seconds. There may be a malfunction in a sys-
tem if a light does not come on, or if th e lights do not turn off. Have the vehi-
cle inspected by your Lexus dealer.
*2: The light flashes to indicate that the system is operating. Turn signal indicator
(
P. 1 1 2 ) Slip indicator (
P. 1 6 7 )
(U.S.A.)
Headlight indicator
( P. 1 5 8 ) VSC off indicator
(
P. 1 6 7 )
(Canada)
Tail light indicator
( P. 1 5 8 ) “TRAC OFF” indicator
(
P. 1 6 7 )
Headlight high beam indi-
cator ( P. 1 5 8 )
(U.S.A.)
Parking brake indicator
( P. 1 1 3 )
SRS airbag on/off indica-
tor ( P. 7 2 )
(Canada)
Parking brake indicator
( P. 1 1 3 )
*1, 2
*1
*1
Page 125 of 420
123
2-2. Instrument cluster
2
When driving
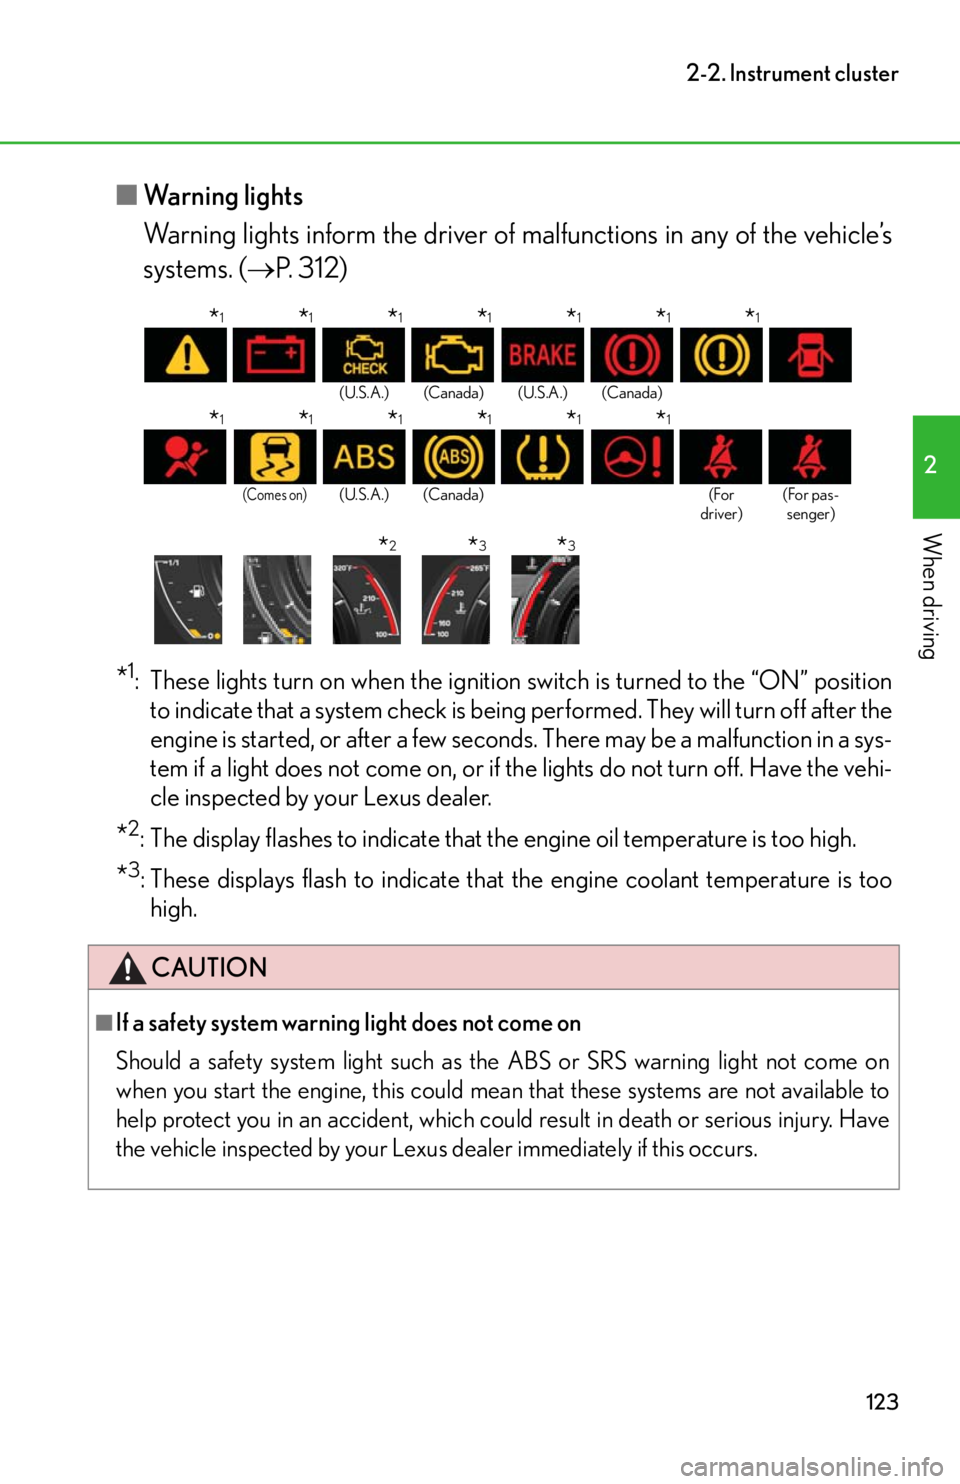
■Warning lights
Warning lights inform the driver of ma lfunctions in any of the vehicle’s
systems. ( P. 312)
*1: These lights turn on when the ignition switch is turned to the “ON” position
to indicate that a system check is being performed. They will turn off after the
engine is started, or after a few seconds. There may be a malfunction in a sys-
tem if a light does not come on, or if th e lights do not turn off. Have the vehi-
cle inspected by your Lexus dealer.
*2: The display flashes to indicate that the engine oil temperature is too high.
*3: These displays flash to indicate that the engine coolant temperature is too
high.
(U.S.A.) (Canada) (U.S.A.) (Canada)
(Comes on)(U.S.A.) (Canada) (For
driver) (For pas-
senger)
CAUTION
■If a safety system warning light does not come on
Should a safety system lig ht such as the ABS or SRS warning light not come on
when you start the engine, this could mean that these systems are not available to
help protect you in an accident, which could result in death or serious injury. Have
the vehicle inspected by your Lexus dealer immediately if this occurs.
*1*1*1*1*1*1*1
*1*1*1*1*1*1
*2*3*3
Page 126 of 420
124
2-2. Instrument cluster
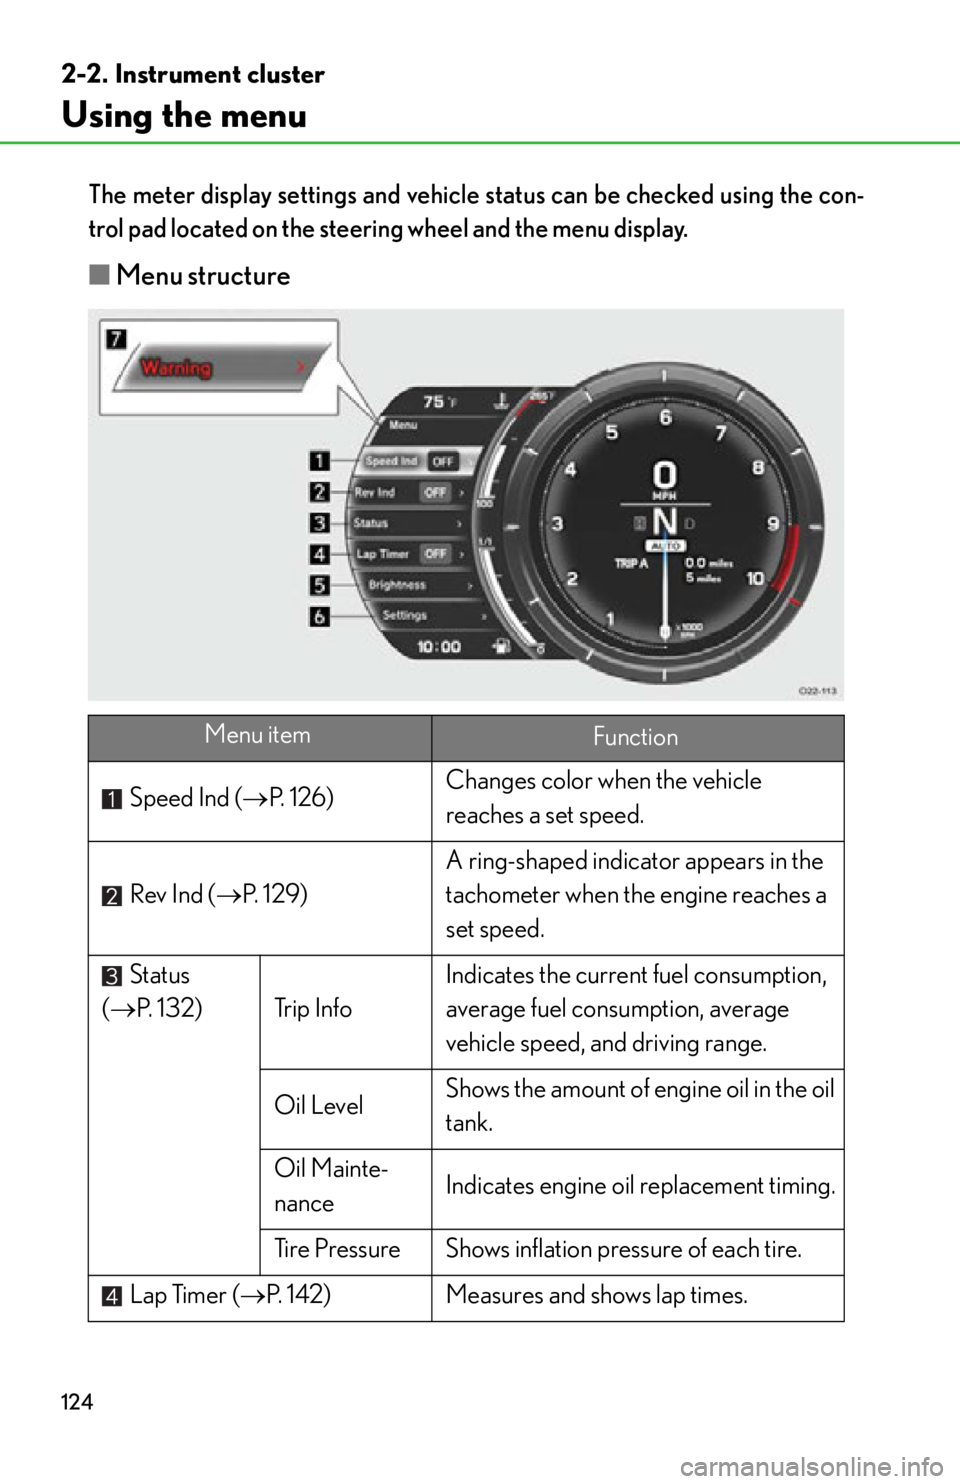
Using the menu
The meter display settings and vehicle status can be checked using the con-
trol pad located on the steer ing wheel and the menu display.
■Menu structure
Menu itemFunction
Speed Ind ( P. 1 2 6 ) Changes color when the vehicle
reaches a set speed.
Rev Ind ( P. 1 2 9 ) A ring-shaped indicat
or appears in the
tachometer when the engine reaches a
set speed.
Status
( P. 132) Trip Info Indicates the current fuel consumption,
average fuel consumption, average
vehicle speed, and driving range.
Oil Level Shows the amount of engine oil in the oil
tank.
Oil Mainte-
nance Indicates engine oil replacement timing.
Tire Pressure Shows inflation pressure of each tire.
Lap Timer ( P. 142) Measures and shows lap times.
Page 138 of 420
136
2-2. Instrument cluster
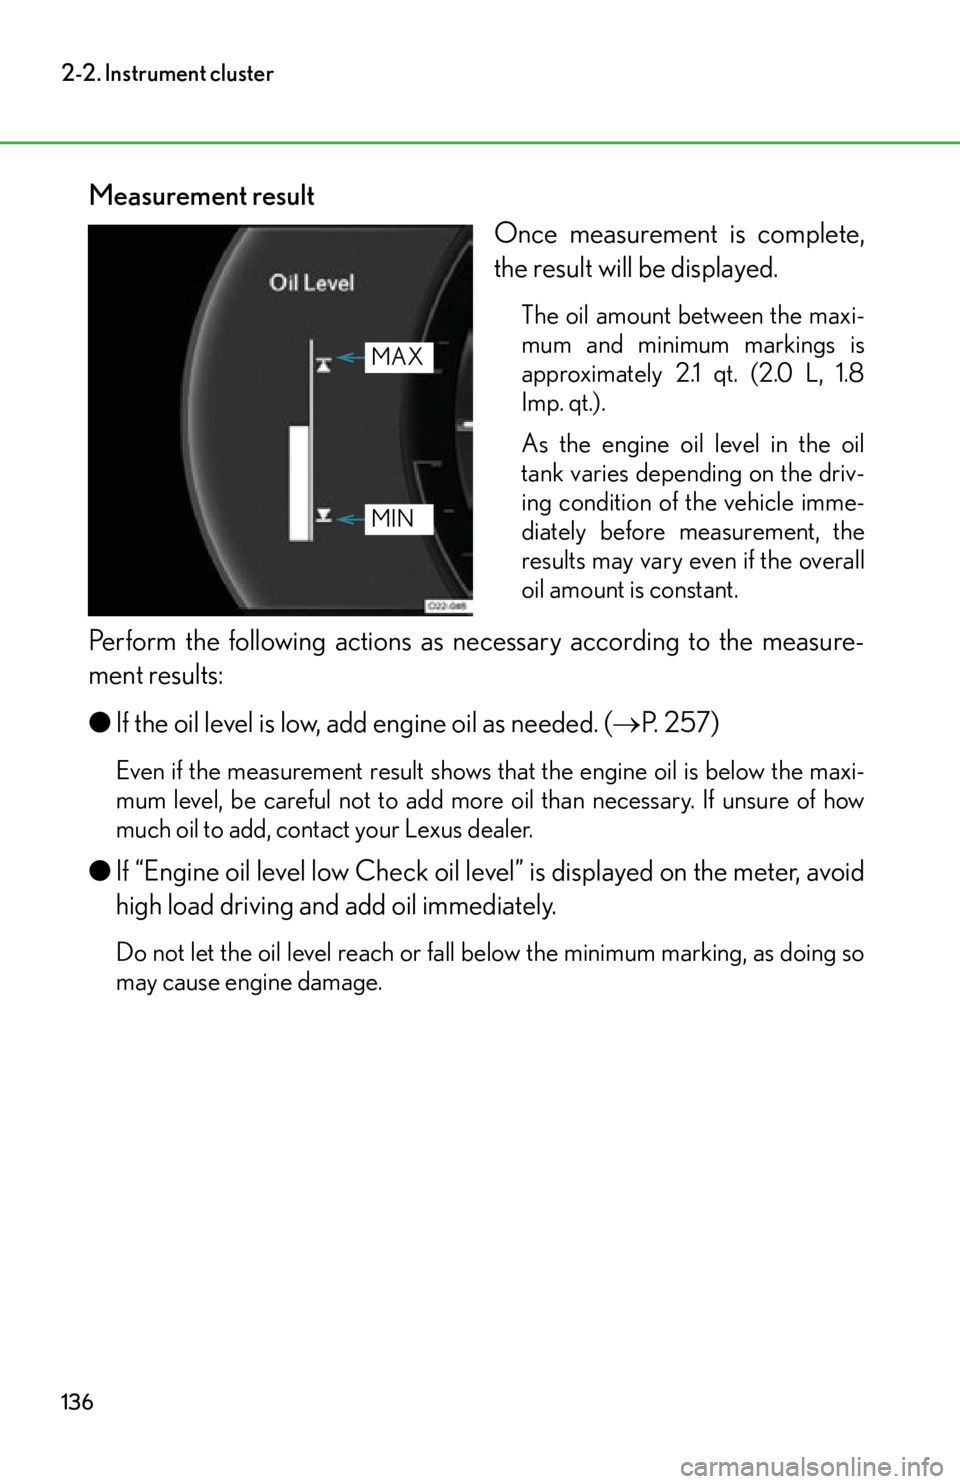
Measurement resultOnce measurement is complete,
the result will be displayed.
The oil amount between the maxi-
mum and minimum markings is
approximately 2.1 qt. (2.0 L, 1.8
Imp. qt.).
As the engine oil level in the oil
tank varies depending on the driv-
ing condition of the vehicle imme-
diately before measurement, the
results may vary even if the overall
oil amount is constant.
Perform the following actions as necessary according to the measure-
ment results:
● If the oil level is low, add engine oil as needed. ( P. 257)
Even if the measurement result shows th at the engine oil is below the maxi-
mum level, be careful not to add more oil than necessary. If unsure of how
much oil to add, contact your Lexus dealer.
● If “Engine oil level low Check oil le vel” is displayed on the meter, avoid
high load driving and add oil immediately.
Do not let the oil level reach or fall below the minimum marking, as doing so
may cause engine damage.
MAX
MIN
Page 139 of 420
137
2-2. Instrument cluster
2
When driving
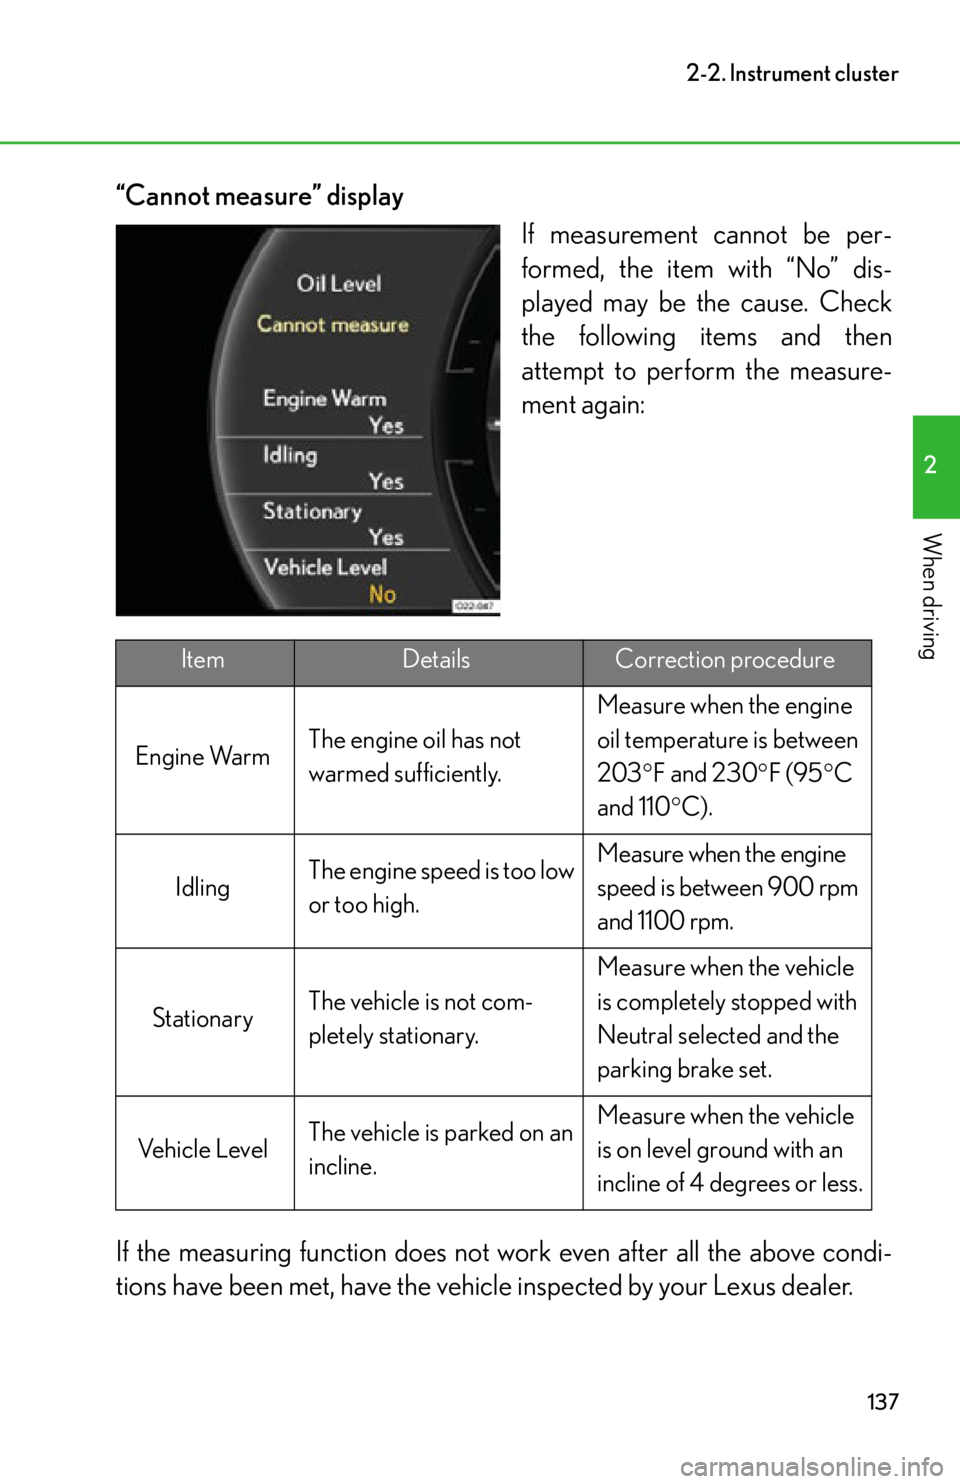
“Cannot measure” displayIf measurement cannot be per-
formed, the item with “No” dis-
played may be the cause. Check
the following items and then
attempt to perform the measure-
ment again:
If the measuring function does not work even after all the above condi-
tions have been met, have the vehicle inspected by your Lexus dealer.
ItemDetailsCorrection procedure
Engine Warm The engine oil has not
warmed sufficiently. Measure when the engine
oil temperature is between
203
F and 230 F (95 C
and 110 C).
Idling The engine speed is too low
or too high. Measure when the engine
speed is between 900 rpm
and 1100 rpm.
Stationary The vehicle is not com-
pletely stationary. Measure when the vehicle
is completely stopped with
Neutral selected and the
parking brake set.
Vehicle Level The vehicle is parked on an
incline. Measure when the vehicle
is on level ground with an
incline of 4 degrees or less.
Page 177 of 420
175
2-4. Using other driving systems
2
When driving
■Start-off acceleration
Start-off acceleration depends on how much the accelerator pedal is depressed.
■Usage restrictions
●Launch control cannot be set if the total mileage shown on the odometer is less
than 310 miles (500 km).
●Launch control cannot be set until the engine and transmission are fully warmed
up. Before using launch control, warm up the vehicle by driving it.
●Launch control cannot be set if there is a malfunction in the engine, transmis-
sion, drive control system or other relevant systems.
●As launch control places a significant load on the vehicle's mechanisms, it can-
not be used two or more times in succes sion. After using launch control, cruise
at a normal speed for approximately 10 minutes to allow vehicle mechanisms to
cool down.
●To protect the systems, the number of times that launch control can be used is
limited. To check how many times launch control has been used on your vehicle,
contact your Lexus dealer.
CAUTION
■Launch control precautions
●Do not use on public roads.
●Use only when road and ambient conditions are safe.
●Before use, ensure that no people or obstructions are nearby.
●Proper use of launch control requires a professional level of driving skill. When
driving, always check track conditions and the surrounding area.
NOTICE
■To prevent system damage
●Always follow the correct operation procedures as described in this manual.
●Only use launch control on dry, paved ro ad surfaces, as slippery or loose road
surfaces may cause damage to the vehicle's mechanisms.
Page 182 of 420

180
2-5. Driving information
Winter driving tips
Carry out the necessary preparations and inspections before driving the
vehicle in winter. Always drive the vehicle in a manner appropriate to the pre-
vailing weather conditions.
■ Pre-winter preparations
●Use fluids that are appropriate to the prevailing outside tempera-
tures.
• Engine coolant
• Washer fluid
● Have the vehicle fitted with four snow tires.
Ensure that all tires are the specified size and the same brand.
■Before driving the vehicle
Perform the following according to the driving conditions.
● Do not try to forcibly open a window or move a wiper that is frozen.
Pour warm water over the frozen area to melt the ice. Wipe away
the water immediately to prevent it from freezing.
● To ensure proper operation of the climate control system fan,
remove any snow that has accumulated on the air inlet vents in front
of the windshield.
● Remove any ice that has accumu lated on the vehicle chassis.
● Periodically check for and remove any excess ice or snow that may
have accumulated in the wheel well or on the brakes.
■ When driving the vehicle
Accelerate the vehicle slowly and driv e at a reduced speed suitable to
road conditions.
Page 229 of 420

Maintenance and care4
227
4-1. Maintenance and careCleaning and protecting the vehicle exterior............ 228
Cleaning and protecting the vehicle interior .............. 235
4-2. Maintenance Maintenance requirements ........................ 240
General maintenance .......... 242
Emission inspection and maintenance (I/M)
programs................................ 246 4-3. Do-it-yourself
maintenance
Do-it-yourself service precautions ............................ 247
Hood .......................................... 250
Positioning a floor jack ......... 253
Engine compartment ........... 256
Adding washer fluid .............. 264
Battery ...................................... 265
Tires............................................ 270
Tire inflation pressure............ 277
Wheels ....................................... 281
Air conditioning filter ........... 283
Wireless remote control battery .................................... 285
Checking and replacing fuses ........................................ 287
Light bulbs ................................ 299