ignition LINCOLN MKC 2018 Owners Manual
[x] Cancel search | Manufacturer: LINCOLN, Model Year: 2018, Model line: MKC, Model: LINCOLN MKC 2018Pages: 571, PDF Size: 4.39 MB
Page 40 of 571
How to Disengage the Automatic LockingMode
Unbuckle the combination lap and shoulderbelt and allow it to retract completely todisengage the automatic locking mode andturn on the vehicle sensitive (emergency)locking mode.
How to Extract Seatbelts in the RearOutermost Positions
Seatbelts in the rear outermost positions canlock if you firmly return the seat backrest toits upright position. You can unlock theseatbelts using the following procedures.
For vehicles where the rear seats recline:
1. Recline the seat to its full rear reclineposition.
2. The seatbelt should then unlock.
3.Return the seat backrest to your desiredupright position.
For vehicles with rear seats that do notrecline or are locked with the seat in its fullrear recline position:
1.Grasp the seatbelt webbing at the top ofthe seat backrest.
2.Pull the seatbelt webbing forward, firmly.
3. After pulling the seatbelt forward, allowthe seatbelt to feed back into the seatbeltretractor as much as possible. Ifnecessary, press the seat backrest downto allow the seatbelt webbing to retractfurther.
4. The seatbelt should then unlock.
5. If the seatbelt does not unlock, repeatsteps 1-3.
SEATBELT HEIGHT ADJUSTMENT
WARNING
Position the seatbelt height adjusterso that the belt rests across the middleof your shoulder. Failure to adjust theseatbelt properly could reduce theeffectiveness of the seatbelt and increasethe risk of injury in a crash.
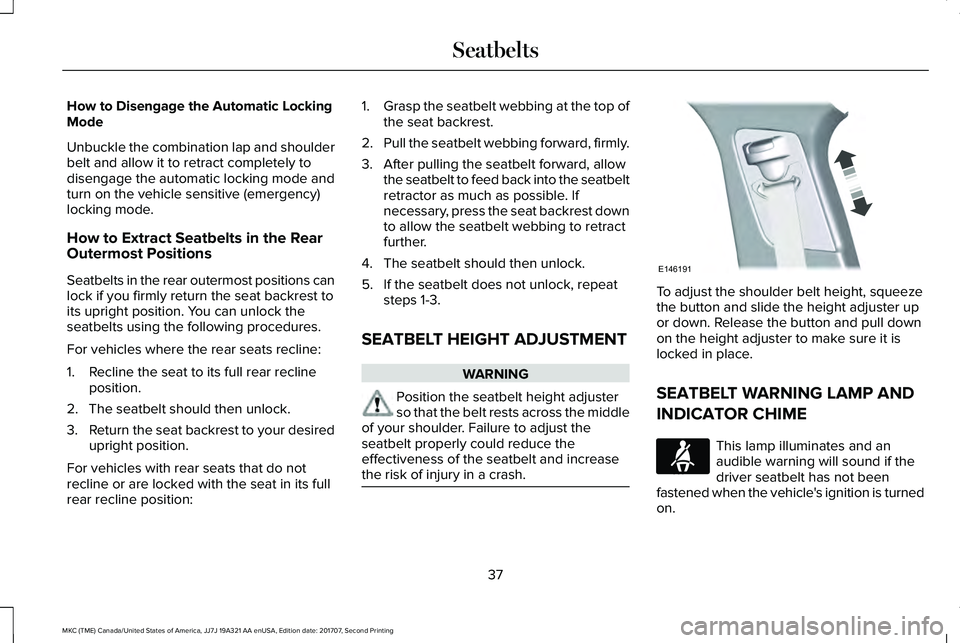
To adjust the shoulder belt height, squeezethe button and slide the height adjuster upor down. Release the button and pull downon the height adjuster to make sure it islocked in place.
SEATBELT WARNING LAMP AND
INDICATOR CHIME
This lamp illuminates and anaudible warning will sound if thedriver seatbelt has not beenfastened when the vehicle's ignition is turnedon.
37
MKC (TME) Canada/United States of America, JJ7J 19A321 AA enUSA, Edition date: 201707, Second Printing
SeatbeltsE146191 E71880
Page 41 of 571
Conditions of operation
ThenIf
The seatbelt warning light illuminates and the warning chime soundsfor a few seconds.The driver seatbelt is not buckled before the ignition switch is turnedto the on position...
The seatbelt warning light and warning chime turn off.The driver seatbelt is buckled while the indicator light is illuminatedand the warning chime is sounding...
The seatbelt warning light and indicator chime remain off.The driver seatbelt is buckled before the ignition switch is turned tothe on position...
SEATBELT REMINDER
Belt-Minder™
This feature supplements the safety beltwarning function by providing additionalreminders that intermittently sound a toneand illuminate the safety belt warning lightwhen you are in the driver seat or you havea front seat passenger and a safety belt isunbuckled.
The system uses information from the frontpassenger sensing system to determine if afront seat passenger is present and thereforepotentially in need of a warning. To avoidactivating the Belt-Minder feature for objectsyou place in the front passenger seat, onlythe front seat passengers receive warningsas determined by the front passengersensing system.
If the Belt-Minder warnings expire (warningsfor about five minutes) for one passenger(driver or front passenger), the otherpassenger can still cause the Belt-Minderfeature to turn on.
38
MKC (TME) Canada/United States of America, JJ7J 19A321 AA enUSA, Edition date: 201707, Second Printing
Seatbelts
Page 42 of 571
Then...If...
The Belt-Minder feature will not activate.You and the front seat passenger buckle your safety belts before youswitch the ignition on or less than 1-2 minutes elapse after you switchthe ignition on...
The Belt-Minder feature activates, the safety belt warning light illumin-ates and a warning tone sounds for 6 seconds every 25 seconds,repeating for about 5 minutes or until you and the front seat passengerbuckle your safety belts.
You or the front seat passenger do not buckle your safety belts beforeyour vehicle reaches at least 6 mph (9.7 km/h) and 1-2 minutes elapseafter you switch the ignition on...
The Belt-Minder feature activates, the safety belt warning light illumin-ates and a warning tone sounds for 6 seconds every 25 seconds,repeating for about 5 minutes or until you and the front seat passengerbuckle your safety belts.
The safety belt for the driver or front passenger is unbuckled for about1 minute while the vehicle is traveling at least 6 mph (9.7 km/h) andmore than 1-2 minutes elapse after you switch the ignition on...
39
MKC (TME) Canada/United States of America, JJ7J 19A321 AA enUSA, Edition date: 201707, Second Printing
Seatbelts
Page 43 of 571
Deactivating and Activating the Belt-MinderFeature
WARNING
While the system allows you todeactivate it, this system is designedto improve your chances of being safelybelted and surviving an accident. Werecommend you leave the system activatedfor yourself and others who may use thevehicle.
Note:The driver and front passengerwarnings switch on and off independently.When you perform this procedure for oneseating position, do not buckle the otherposition as this will terminate the process.
Read Steps 1 - 4 thoroughly beforeproceeding with the programmingprocedure.
Before following the procedure, make surethat:
•The parking brake is set.
•The transmission is in park (P) or neutral(N).
•The ignition is off.
•The driver and front passenger safetybelts are unbuckled.
1. Switch the ignition on. Do not start thevehicle.
2. Wait until the safety belt warning lightturns off (about one minute). After Step2, wait an additional 5 seconds beforeproceeding with Step 3. Once you startStep 3, you must complete the procedurewithin 30 seconds.
3.For the seating position you are switchingoff, buckle then unbuckle the safety beltthree times at a moderate speed, endingin the unbuckled state. After Step 3, thesafety belt warning light turns on.
4. While the safety belt warning light is on,buckle and then unbuckle the safety belt.After Step 4, the safety belt warning lightflashes for confirmation.
•This will switch the feature off for thatseating position if it is currently on.
•This will switch the feature on for thatseating position if it is currently off.
CHILD RESTRAINT AND SEATBELT
MAINTENANCE
Inspect the vehicle seatbelts and child safetyseat systems periodically to make sure theywork properly and are not damaged. Inspectthe vehicle and child restraint seatbelts tomake sure there are no nicks, tears or cuts.Replace if necessary. All vehicle seatbeltassemblies, including retractors, buckles,front seatbelt buckle assemblies, bucklesupport assemblies (slide bar-if equipped),shoulder belt height adjusters (if equipped),shoulder belt guide on seat backrest (ifequipped), child safety seat LATCH andtether anchors, and attaching hardware,should be inspected after a crash. Read thechild restraint manufacturer's instructions foradditional inspection and maintenanceinformation specific to the child restraint.
40
MKC (TME) Canada/United States of America, JJ7J 19A321 AA enUSA, Edition date: 201707, Second Printing
Seatbelts
Page 49 of 571
FRONT PASSENGER SENSING
SYSTEM
WARNINGS
Even with advanced restraints systems,properly restrain children 12 and underin a rear seating position. Failure to followthis could seriously increase the risk of injuryor death.
Sitting improperly, out of position orwith the seatback reclined too far cantake weight off the seat cushion and affectthe decision of the passenger sensingsystem, resulting in serious injury or deathin the event of a crash. Always sit uprightagainst your seat back, with your feet on thefloor.
Any alteration or modification to thefront passenger seat may affect theperformance of the front passenger sensingsystem. This could seriously increase the riskof injury or death.
This system works with sensors that are partof the front passenger seat and seatbelt todetect the presence of a properly-seatedoccupant and determine if the frontpassenger frontal airbag should be enabled(may inflate) or not.
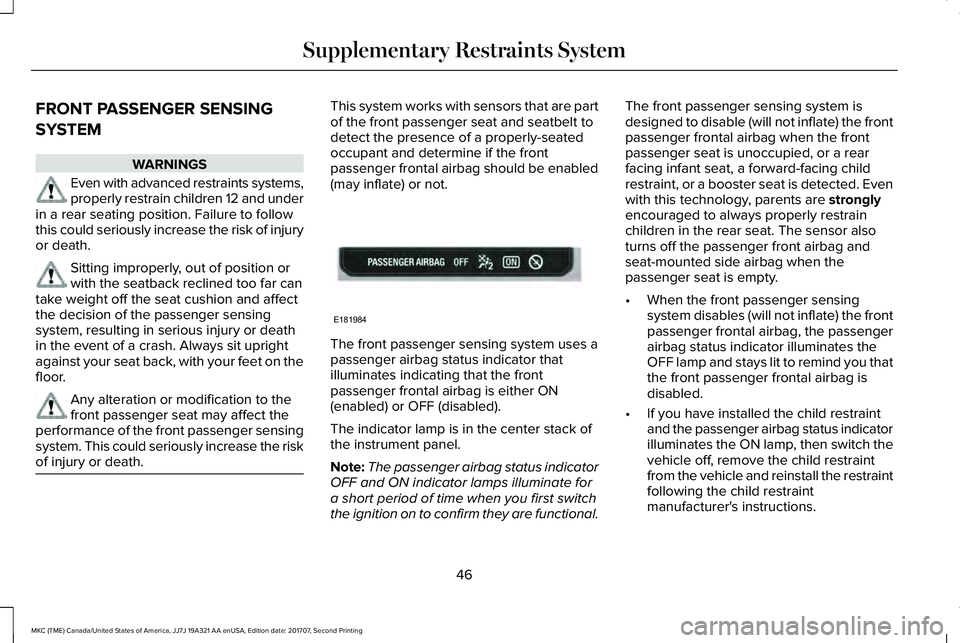
The front passenger sensing system uses apassenger airbag status indicator thatilluminates indicating that the frontpassenger frontal airbag is either ON(enabled) or OFF (disabled).
The indicator lamp is in the center stack ofthe instrument panel.
Note:The passenger airbag status indicatorOFF and ON indicator lamps illuminate fora short period of time when you first switchthe ignition on to confirm they are functional.
The front passenger sensing system isdesigned to disable (will not inflate) the frontpassenger frontal airbag when the frontpassenger seat is unoccupied, or a rearfacing infant seat, a forward-facing childrestraint, or a booster seat is detected. Evenwith this technology, parents are stronglyencouraged to always properly restrainchildren in the rear seat. The sensor alsoturns off the passenger front airbag andseat-mounted side airbag when thepassenger seat is empty.
•When the front passenger sensingsystem disables (will not inflate) the frontpassenger frontal airbag, the passengerairbag status indicator illuminates theOFF lamp and stays lit to remind you thatthe front passenger frontal airbag isdisabled.
•If you have installed the child restraintand the passenger airbag status indicatorilluminates the ON lamp, then switch thevehicle off, remove the child restraintfrom the vehicle and reinstall the restraintfollowing the child restraintmanufacturer's instructions.
46
MKC (TME) Canada/United States of America, JJ7J 19A321 AA enUSA, Edition date: 201707, Second Printing
Supplementary Restraints SystemE181984
Page 55 of 571
The restraints control module also monitorsthe readiness of the above safety devicesplus the crash and occupant sensors. Awarning indicator light in the instrumentcluster indicates the readiness of the safetysystem. If this warning indicator light is notfunctioning and there is another fault withinthe system, the message cluster coulddisplay an airbag failure warning. A tonesounds, a warning indicator light illuminates,or both, until the problem is repaired. Routinemaintenance of the airbag is not required.
A difficulty with the system is indicated byone or more of the following:
The indicator light will notilluminate immediately after youswitch the ignition on.
•The indicator light either flashes or staysilluminated.
•You could hear five tones thatperiodically repeat until the problem isrepaired.
•A message could appear in theinformation display.
If any of these things happen, evenintermittently, have the supplementalrestraint system serviced at an authorizeddealer immediately. Unless serviced, thesystem may not function properly in theevent of a crash.
The seatbelt pretensioners and the airbagsupplemental restraint system are designedto activate when your vehicle sustains frontalor sideways deceleration sufficient to causethe restraints control module to deploy asafety device or when a certain likelihood ofa rollover event is detected by the rolloversensor.
The fact that the seatbelt pretensioners orairbags did not activate for both front seatoccupants in a crash does not mean thatsomething is wrong with the system. Rather,it means the restraints control moduledetermined the crash conditions (forexample, crash severity, belt usage) werenot appropriate to activate these safetydevices.
•The design of the front airbags is toactivate only in frontal and near-frontalcrashes (not rollovers, side impacts orrear impacts) unless the crash causessufficient frontal deceleration.
•The seatbelt pretensioners are designedto activate in frontal, near-frontal, sideand rollover crashes.
•The design of the side airbags is to inflatein certain side crashes. Side airbagscould activate in other types of crashesif the vehicle experiences sufficientsideways motion or deformation.
52
MKC (TME) Canada/United States of America, JJ7J 19A321 AA enUSA, Edition date: 201707, Second Printing
Supplementary Restraints SystemE67017
Page 60 of 571
5. Reinstall the battery housing cover ontothe transmitter and install the key blade.
Car Finder
Press the button twice within threeseconds. A tone sounds and thedirection indicators will flash. Werecommend you use this method to locateyour vehicle, rather than using the panicalarm.
Sounding the Panic Alarm
Note:The panic alarm only operates whenthe ignition is off.
Press the button to sound thepanic alarm. Press the buttonagain or switch the ignition on toturn it off.
Remote Start
WARNING
To avoid exhaust fumes, do not useremote start if your vehicle is parkedindoors or in areas that are not wellventilated.
Note:Do not use remote start if your fuellevel is low.
The remote start button is on thetransmitter.
This feature allows you to start your vehiclefrom the outside. The transmitter has anextended operating range.
You can configure your automatic climatecontrol to operate when you remote startyour vehicle. See Climate Control (page133).
Many states and provinces have restrictionsfor the use of remote start. Check your localand state or provincial laws for specificrequirements regarding remote startsystems.
The remote start system does not work if anyof the following occur:
•The ignition is on.
•The anti-theft alarm triggers.
•You switch the feature off in theinformation display.
•The hood is open.
•The transmission is not in park (P).
•The battery voltage is below theminimum operating voltage.
Remote Control Feedback (If Equipped)
An LED on the remote control provides statusfeedback of remote start or stop commands.
StatusLED
Remote startsuccessfulSolid green
Remote stopsuccessfulSolid red
Request failed orstatus not receivedBlinking red
Status incompleteBlinking green
57
MKC (TME) Canada/United States of America, JJ7J 19A321 AA enUSA, Edition date: 201707, Second Printing
Keys and Remote ControlsE138623 E138624 E138625
Page 61 of 571
Remote Starting Your Vehicle
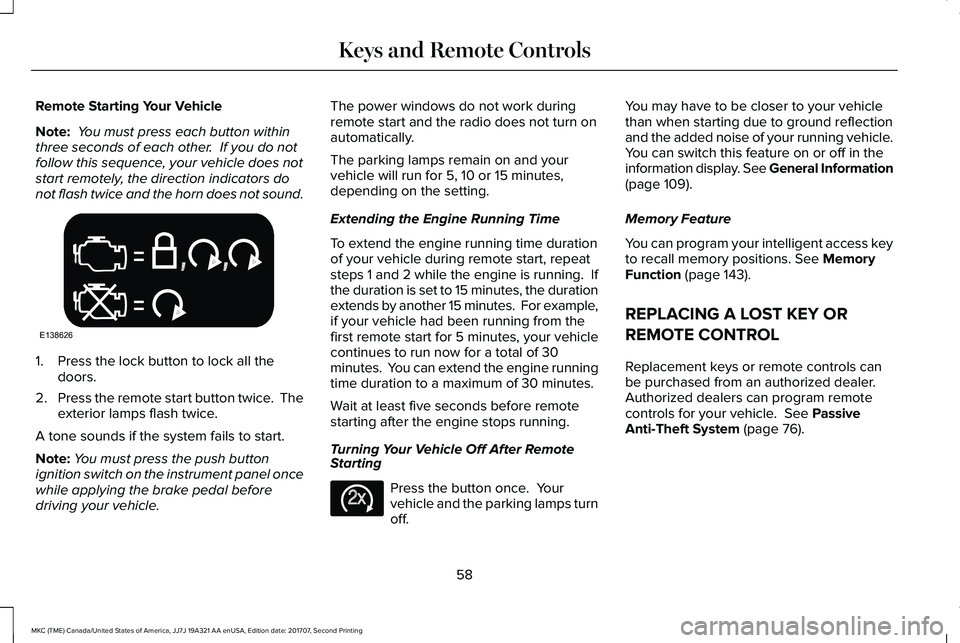
Note: You must press each button withinthree seconds of each other. If you do notfollow this sequence, your vehicle does notstart remotely, the direction indicators donot flash twice and the horn does not sound.
1. Press the lock button to lock all thedoors.
2.Press the remote start button twice. Theexterior lamps flash twice.
A tone sounds if the system fails to start.
Note:You must press the push buttonignition switch on the instrument panel oncewhile applying the brake pedal beforedriving your vehicle.
The power windows do not work duringremote start and the radio does not turn onautomatically.
The parking lamps remain on and yourvehicle will run for 5, 10 or 15 minutes,depending on the setting.
Extending the Engine Running Time
To extend the engine running time durationof your vehicle during remote start, repeatsteps 1 and 2 while the engine is running. Ifthe duration is set to 15 minutes, the durationextends by another 15 minutes. For example,if your vehicle had been running from thefirst remote start for 5 minutes, your vehiclecontinues to run now for a total of 30minutes. You can extend the engine runningtime duration to a maximum of 30 minutes.
Wait at least five seconds before remotestarting after the engine stops running.
Turning Your Vehicle Off After RemoteStarting
Press the button once. Yourvehicle and the parking lamps turnoff.
You may have to be closer to your vehiclethan when starting due to ground reflectionand the added noise of your running vehicle.You can switch this feature on or off in theinformation display. See General Information(page 109).
Memory Feature
You can program your intelligent access keyto recall memory positions. See MemoryFunction (page 143).
REPLACING A LOST KEY OR
REMOTE CONTROL
Replacement keys or remote controls canbe purchased from an authorized dealer.Authorized dealers can program remotecontrols for your vehicle. See PassiveAnti-Theft System (page 76).
58
MKC (TME) Canada/United States of America, JJ7J 19A321 AA enUSA, Edition date: 201707, Second Printing
Keys and Remote ControlsE138626 E138625
Page 63 of 571
Note:Not every feature applies to everyvehicle in every market. When they areavailable for your vehicle, then they appearin your information display, providing choicesto switch them on or off, or to select a morespecific setting.
•Various vehicle speed limits so theMyKey driver cannot exceed certainspeeds. The information display showswarnings followed by an audible tonewhen the MyKey driver reaches the setspeed. You cannot override the setspeed by fully depressing the acceleratorpedal.
WARNING
Do not set MyKey maximum speed limitto a limit that will prevent the driverfrom maintaining a safe speed consideringposted speed limits and prevailing roadconditions. The driver is always responsibleto drive in accordance with local laws andprevailing conditions. Failure to do so couldresult in accident or injury.
•Various vehicle speed reminders soMyKey drivers know when their vehiclespeed approaches the limits. Warningsappear in your information display and atone sounds when the MyKey driversexceed the set vehicle speed.
•The audio system's maximum volumelimits to 45% so MyKey drivers canconcentrate on the road. A messageappears in the information display whenMyKey drivers attempt to exceed thelimited volume. MyKey also disables theautomatic volume control. Note: If yourvehicle includes an AM/FM radio or avery basic audio system, then the radiomay not limit.
•Always on setting. This setting forcescertain features to remain on and activefor MyKey drivers. For example, E911 oremergency assistance and the do notdisturb features stay on even if a MyKeydriver uses the feature's control to switchit off. When you select, you will not beable to turn off Advance Trac or tractioncontrol (if your vehicle has this feature).
CREATING A MYKEY
Use the information display to create aMyKey.
1. Switch the ignition on using the key orthe transmitter you want to program. Ifyour vehicle has a push-button start,place the transmitter into the backup slot.See Passive Anti-Theft System (page76).
2.Access the main menu in the informationdisplay and then scroll through themenus to begin programming yourMyKey. See Information Displays (page109).
3. Follow the instructions in the display.
4. A confirmation message appears in thedisplay after you finish programming yourMyKey. The programmed restrictionsapply when you key off, open and closedriver door and restart your vehicle withthe programmed key or transmitter.
Note:Make sure you label the programmedMyKey so you can distinguish it from theadmin keys.
60
MKC (TME) Canada/United States of America, JJ7J 19A321 AA enUSA, Edition date: 201707, Second Printing
MyKey™
Page 64 of 571
You can also program the optional MyKeysettings.
Programming or ChangingConfigurable Settings
Use the information display to program orchange your optional MyKey settings.
1. Switch the ignition on using the key orthe transmitter you want to program.
2.Access the main menu in the informationdisplay and then scroll through themenus to change the settings of yourMyKey. See Information Displays (page109).
3. Follow the instructions in the display.
4. A confirmation message appears in thedisplay after you finish programming yourMyKey. The programmed restrictionsapply when you key off, open and closethe driver door and restart your vehiclewith the programmed key or transmitter.
Note:You can clear or change your MyKeysettings at any time during the same keycycle as you created the MyKey. If you switchthe engine off, you must use an admin keyto change or clear your optional MyKeysettings.
CLEARING ALL MYKEYS
When you clear your MyKeys, you removeall restrictions and return all MyKeys to theiroriginal admin key status at once. To clearall MyKeys of all MyKey settings, use theinformation display.
1. Switch the ignition on using an adminkey.
2.Access the main menu in the informationdisplay and then scroll through themenus to begin clearing your MyKeyprogramming. See Information Displays(page 109).
3. Follow the instructions in the display.
4. A confirmation message appears in thedisplay after you finish clearing yourMyKeys.
Note:When you clear your MyKeys, youremove all restrictions and return all MyKeysto their original admin key status. You cannotremove the MyKey restrictions individually.
CHECKING MYKEY SYSTEM
STATUS
You can find information about yourprogrammed MyKeys by using theinformation display. See InformationDisplays (page 109).
MyKey Distance
Tracks the distance when drivers use aMyKey. The only way to delete theaccumulated distance is by using an adminkey to clear all MyKeys. If the distance doesnot accumulate as expected, then theintended user is not using the MyKey, or anadmin key user recently cleared and thenrecreated a MyKey.
61
MKC (TME) Canada/United States of America, JJ7J 19A321 AA enUSA, Edition date: 201707, Second Printing
MyKey™