rear drive unit LINCOLN MKZ 2017 User Guide
[x] Cancel search | Manufacturer: LINCOLN, Model Year: 2017, Model line: MKZ, Model: LINCOLN MKZ 2017Pages: 564, PDF Size: 5.54 MB
Page 68 of 564
LOCKING AND UNLOCKING
You can use the power door lock control or
the remote control to lock and unlock your
vehicle.
Power Door Locks
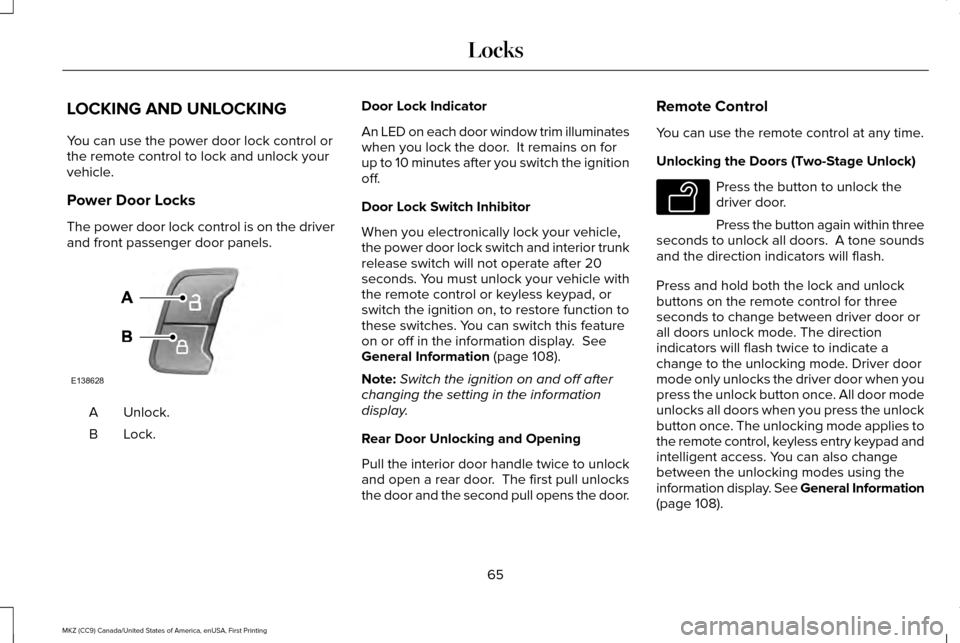
The power door lock control is on the driver
and front passenger door panels.
Unlock.
A
Lock.B Door Lock Indicator
An LED on each door window trim illuminates
when you lock the door. It remains on for
up to 10 minutes after you switch the ignition
off.
Door Lock Switch Inhibitor
When you electronically lock your vehicle,
the power door lock switch and interior trunk
release switch will not operate after 20
seconds. You must unlock your vehicle with
the remote control or keyless keypad, or
switch the ignition on, to restore function to
these switches. You can switch this feature
on or off in the information display. See
General Information (page 108).
Note: Switch the ignition on and off after
changing the setting in the information
display.
Rear Door Unlocking and Opening
Pull the interior door handle twice to unlock
and open a rear door. The first pull unlocks
the door and the second pull opens the door. Remote Control
You can use the remote control at any time.
Unlocking the Doors (Two-Stage Unlock) Press the button to unlock the
driver door.
Press the button again within three
seconds to unlock all doors. A tone sounds
and the direction indicators will flash.
Press and hold both the lock and unlock
buttons on the remote control for three
seconds to change between driver door or
all doors unlock mode. The direction
indicators will flash twice to indicate a
change to the unlocking mode. Driver door
mode only unlocks the driver door when you
press the unlock button once. All door mode
unlocks all doors when you press the unlock
button once. The unlocking mode applies to
the remote control, keyless entry keypad and
intelligent access. You can also change
between the unlocking modes using the
information display. See General Information
(page
108).
65
MKZ (CC9) Canada/United States of America, enUSA, First Printing LocksE138628 E138629
Page 70 of 564
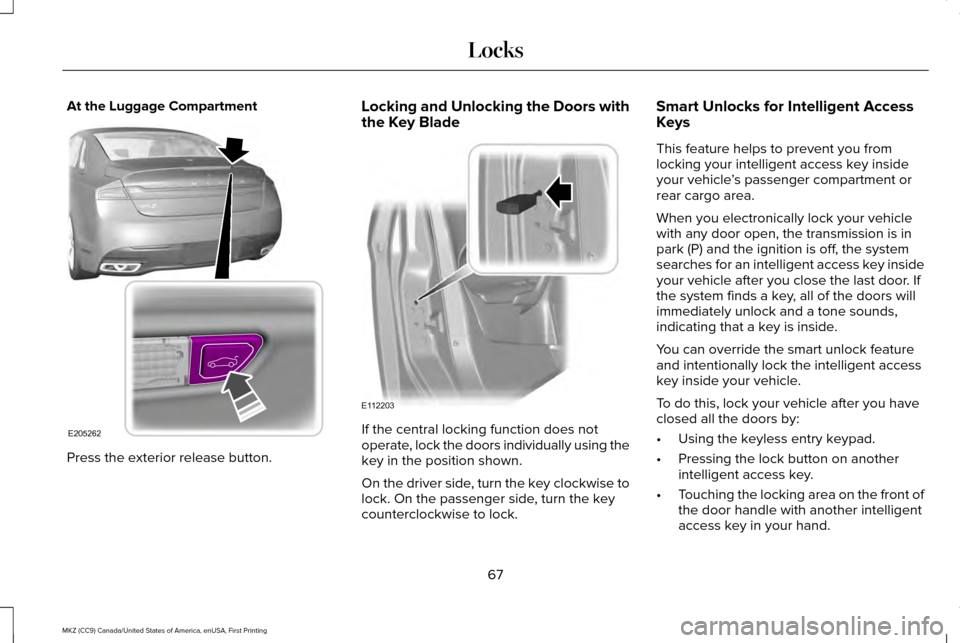
At the Luggage Compartment
Press the exterior release button. Locking and Unlocking the Doors with
the Key Blade
If the central locking function does not
operate, lock the doors individually using the
key in the position shown.
On the driver side, turn the key clockwise to
lock. On the passenger side, turn the key
counterclockwise to lock.Smart Unlocks for Intelligent Access
Keys
This feature helps to prevent you from
locking your intelligent access key inside
your vehicle
’s passenger compartment or
rear cargo area.
When you electronically lock your vehicle
with any door open, the transmission is in
park (P) and the ignition is off, the system
searches for an intelligent access key inside
your vehicle after you close the last door. If
the system finds a key, all of the doors will
immediately unlock and a tone sounds,
indicating that a key is inside.
You can override the smart unlock feature
and intentionally lock the intelligent access
key inside your vehicle.
To do this, lock your vehicle after you have
closed all the doors by:
• Using the keyless entry keypad.
• Pressing the lock button on another
intelligent access key.
• Touching the locking area on the front of
the door handle with another intelligent
access key in your hand.
67
MKZ (CC9) Canada/United States of America, enUSA, First Printing LocksE205262 E112203
Page 114 of 564
Driver Assist
Front Park Aid
Rear Park Aid
Tire Pressure
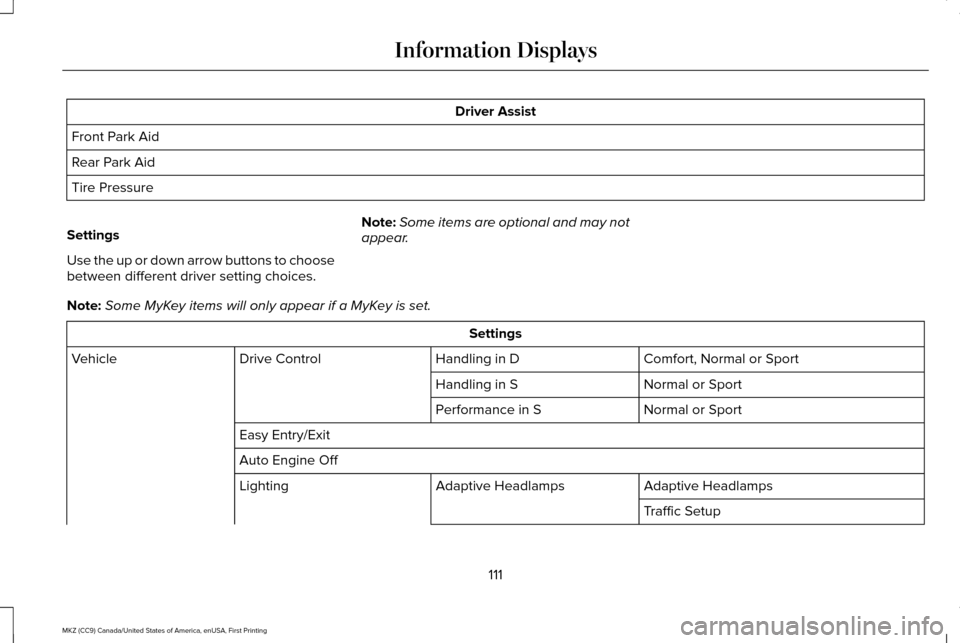
Settings
Use the up or down arrow buttons to choose
between different driver setting choices. Note:
Some items are optional and may not
appear.
Note: Some MyKey items will only appear if a MyKey is set. Settings
Comfort, Normal or Sport
Handling in D
Drive Control
Vehicle
Normal or Sport
Handling in S
Normal or Sport
Performance in S
Easy Entry/Exit
Auto Engine Off Adaptive Headlamps
Adaptive Headlamps
Lighting
Traffic Setup
111
MKZ (CC9) Canada/United States of America, enUSA, First Printing Information Displays
Page 138 of 564
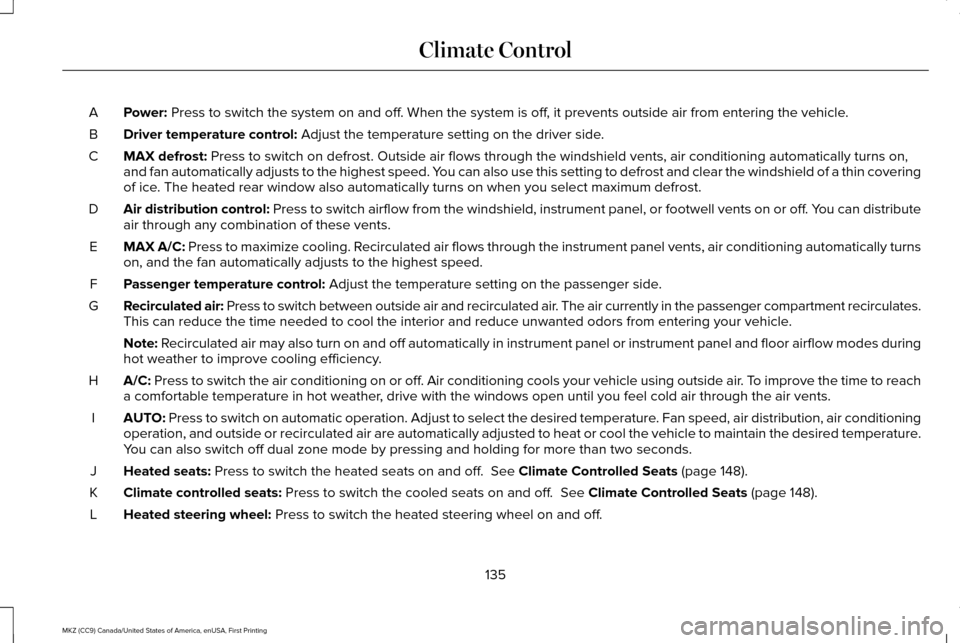
Power: Press to switch the system on and off. When the system is off, it prevents outside air from entering the vehicle.
A
Driver temperature control:
Adjust the temperature setting on the driver side.
B
MAX defrost:
Press to switch on defrost. Outside air flows through the windshield ve\
nts, air conditioning automatically turns on,
and fan automatically adjusts to the highest speed. You can also use this setting to defrost and clear the windshield of a th\
in covering
of ice. The heated rear window also automatically turns on when you select max\
imum defrost.
C
Air distribution control: Press to switch airflow from the windshield, instrument panel, or footw\
ell vents on or off. You can distribute
air through any combination of these vents.
D
MAX A/C:
Press to maximize cooling. Recirculated air flows through the instrument panel vents, air conditioni\
ng automatically turns
on, and the fan automatically adjusts to the highest speed.
E
Passenger temperature control:
Adjust the temperature setting on the passenger side.
F
Recirculated air: Press to switch between outside air and recirculated air. The air currently in the passenger compartment recirculates.
This can reduce the time needed to cool the interior and reduce unwanted\
odors from entering your vehicle.
G
Note:
Recirculated air may also turn on and off automatically in instrument pan\
el or instrument panel and floor airflow modes during
hot weather to improve cooling efficiency.
A/C:
Press to switch the air conditioning on or off. Air conditioning cools your vehicle using outside air. To improve the time to reach
a comfortable temperature in hot weather, drive with the windows open until you feel cold air through the air ve\
nts.
H
AUTO:
Press to switch on automatic operation. Adjust to select the desired te\
mperature. Fan speed, air distribution, air conditioning
operation, and outside or recirculated air are automatically adjusted to\
heat or cool the vehicle to maintain the desired temperature .
You can also switch off dual zone mode by pressing and holding for more t\
han two seconds.
I
Heated seats:
Press to switch the heated seats on and off. See Climate Controlled Seats (page 148).
J
Climate controlled seats:
Press to switch the cooled seats on and off. See Climate Controlled Seats (page 148).
K
Heated steering wheel:
Press to switch the heated steering wheel on and off.
L
135
MKZ (CC9) Canada/United States of America, enUSA, First Printing Climate Control
Page 139 of 564
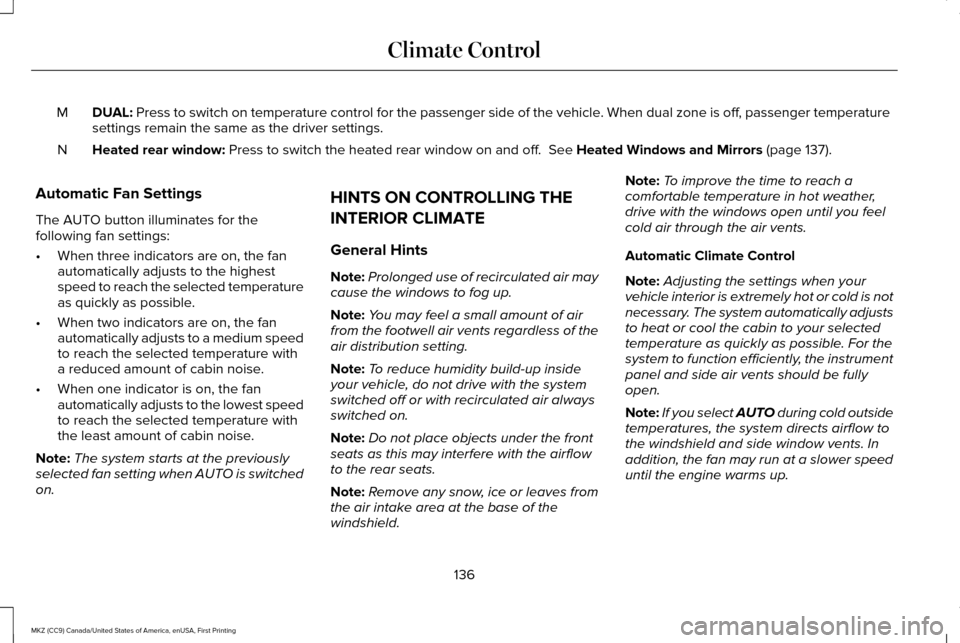
DUAL: Press to switch on temperature control for the passenger side of the ve\
hicle. When dual zone is off, passenger temperature
settings remain the same as the driver settings.
M
Heated rear window:
Press to switch the heated rear window on and off. See Heated Windows and Mirrors (page 137).
N
Automatic Fan Settings
The AUTO button illuminates for the
following fan settings:
• When three indicators are on, the fan
automatically adjusts to the highest
speed to reach the selected temperature
as quickly as possible.
• When two indicators are on, the fan
automatically adjusts to a medium speed
to reach the selected temperature with
a reduced amount of cabin noise.
• When one indicator is on, the fan
automatically adjusts to the lowest speed
to reach the selected temperature with
the least amount of cabin noise.
Note: The system starts at the previously
selected fan setting when AUTO is switched
on. HINTS ON CONTROLLING THE
INTERIOR CLIMATE
General Hints
Note:
Prolonged use of recirculated air may
cause the windows to fog up.
Note: You may feel a small amount of air
from the footwell air vents regardless of the
air distribution setting.
Note: To reduce humidity build-up inside
your vehicle, do not drive with the system
switched off or with recirculated air always
switched on.
Note: Do not place objects under the front
seats as this may interfere with the airflow
to the rear seats.
Note: Remove any snow, ice or leaves from
the air intake area at the base of the
windshield. Note:
To improve the time to reach a
comfortable temperature in hot weather,
drive with the windows open until you feel
cold air through the air vents.
Automatic Climate Control
Note: Adjusting the settings when your
vehicle interior is extremely hot or cold is not
necessary. The system automatically adjusts
to heat or cool the cabin to your selected
temperature as quickly as possible. For the
system to function efficiently, the instrument
panel and side air vents should be fully
open.
Note: If you select
AUTO during cold outside
temperatures, the system directs airflow to
the windshield and side window vents. In
addition, the fan may run at a slower speed
until the engine warms up.
136
MKZ (CC9) Canada/United States of America, enUSA, First Printing Climate Control
Page 149 of 564
Linking a PreSet Position to your
Remote Control or Intelligent Access
Key Fob
Your vehicle can save the preset memory
positions for up to two remote controls or
intelligent access (IA) keys.
After you have saved your desired memory
preset positions:
1.
Press and hold the desired preset button
for about three seconds until you hear a
single tone.
2. Within three seconds, press the lock button on the remote control you are
linking.
To unlink a remote control, follow the same
procedure – except in step 2, press the
unlock button on the remote control.
Note: If more than one linked remote control
or intelligent access key is in range, the
memory function moves to the settings of
the first key to initiate a memory recall. Easy Entry and Exit Feature
If you enable the easy entry and exit feature,
it automatically moves the driver seat
position rearward up to two inches (five
centimeters) when you switch the ignition
off.
The driver seat will return to the previous
position when you switch the ignition on.
You can enable or disable this feature in the
information display. See Information
Displays (page 108).
REAR SEATS
Note: Your vehicle may have split seatbacks
that you must fold individually.
Note: Make sure the center safety belt is
unbuckled before folding the seatback.
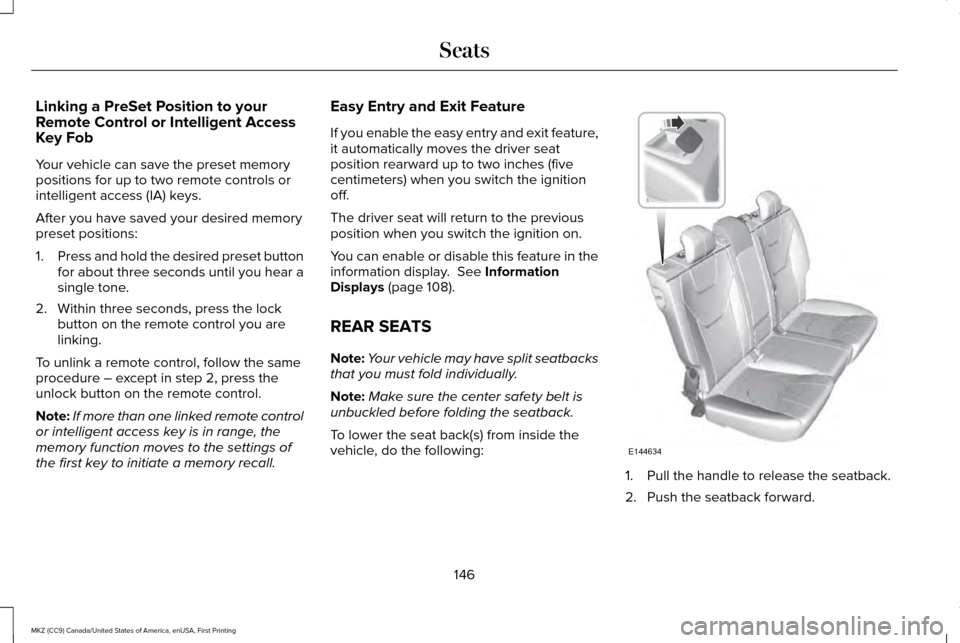
To lower the seat back(s) from inside the
vehicle, do the following: 1. Pull the handle to release the seatback.
2. Push the seatback forward.
146
MKZ (CC9) Canada/United States of America, enUSA, First Printing SeatsE144634
Page 160 of 564
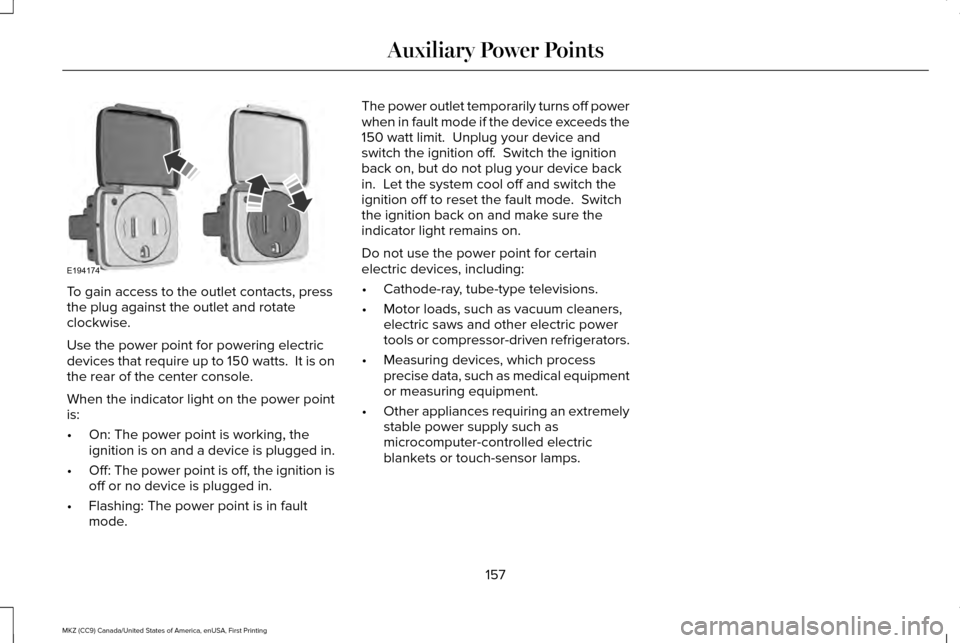
To gain access to the outlet contacts, press
the plug against the outlet and rotate
clockwise.
Use the power point for powering electric
devices that require up to 150 watts. It is on
the rear of the center console.
When the indicator light on the power point
is:
•
On: The power point is working, the
ignition is on and a device is plugged in.
• Off: The power point is off, the ignition is
off or no device is plugged in.
• Flashing: The power point is in fault
mode. The power outlet temporarily turns off power
when in fault mode if the device exceeds the
150 watt limit. Unplug your device and
switch the ignition off. Switch the ignition
back on, but do not plug your device back
in. Let the system cool off and switch the
ignition off to reset the fault mode. Switch
the ignition back on and make sure the
indicator light remains on.
Do not use the power point for certain
electric devices, including:
•
Cathode-ray, tube-type televisions.
• Motor loads, such as vacuum cleaners,
electric saws and other electric power
tools or compressor-driven refrigerators.
• Measuring devices, which process
precise data, such as medical equipment
or measuring equipment.
• Other appliances requiring an extremely
stable power supply such as
microcomputer-controlled electric
blankets or touch-sensor lamps.
157
MKZ (CC9) Canada/United States of America, enUSA, First Printing Auxiliary Power PointsE194174
Page 182 of 564

USING ALL-WHEEL DRIVE (If Equipped)
All-Wheel Drive (AWD) uses all four wheels
to power the vehicle. This increases traction,
enabling you to drive over terrain and road
conditions that a conventional two-wheel
drive vehicle cannot. The AWD system is
active all the time and requires no input from
the operator.
Note: Your vehicle may be equipped with
Dynamic Torque Vectoring. This feature uses
all four wheels to power the vehicle and
independently controls the torque to each
rear wheel. In addition, the system has the
ability to over speed the outside rear wheel
in a turn. This increases traction and
handling performance, allowing the vehicle
to travel through road conditions and have
path following capability superior to
conventional two-wheel drive and AWD
vehicles. The Dynamic Torque Vectoring
system is active all the time and requires no
input from the operator. Note:
Your AWD vehicle is not intended for
off-road use. The AWD feature gives your
vehicle some limited off-road capabilities in
which driving surfaces are relatively level,
obstruction-free and otherwise similar to
normal on-road driving conditions. Operating
your vehicle under other than those
conditions could subject the vehicle to
excessive stress which might result in
damage which is not covered under your
warranty.
Note: When an AWD system fault is present,
the warning
AWD Malfunction Service
Required displays in the information display.
The AWD system is not functioning correctly
and defaulted to front-wheel drive. When
this warning displays, have your vehicle
serviced at an authorized dealer. Note:
The
AWD OFF message may also
appear in the information display if the AWD
system overheats and defaults to front-wheel
drive. This may occur if the vehicle is
operated in extreme conditions with
excessive wheel slip, such as deep sand.
To resume normal AWD function as soon as
possible, stop the vehicle in a safe location
and stop the engine for at least 10 minutes.
After the engine has been restarted and the
AWD system has adequately cooled, the
AWD OFF
message will turn off and normal
AWD function returns. If the engine is not
stopped, the
AWD OFF message turns off
when the system cools and normal AWD
function returns.
179
MKZ (CC9) Canada/United States of America, enUSA, First Printing All-Wheel Drive
(If Equipped)
Page 184 of 564
Operating AWD Vehicles With Spare
or Mismatched Tires
WARNING
Only use replacement tires and wheels
that are the same size, load index,
speed rating and type (such as P-metric
versus LT-metric or all-season versus
all-terrain) as those originally provided by
Ford. The recommended tire and wheel size
may be found on either the Safety
Compliance Certification Label (affixed to
either the door hinge pillar, door-latch post,
or the door edge that meets the door-latch
post, next to the driver’ s seating position), or
the Tire Label which is located on the B-Pillar
or edge of the driver’ s door. If this
information is not found on these labels, then
you should contact your authorized dealer
as soon as possible. Use of any tire or wheel
not recommended by Ford can affect the
safety and performance of your vehicle,
which could result in an increased risk of loss
of vehicle control, vehicle rollover, personal
injury and death. A spare tire of a different size other than the
tire provided should never be used. The
AWD system may disable automatically and
enter front-wheel drive only mode to protect
driveline components if a non-full sized tire
is installed. This condition may display an
AWD OFF message in the information
display. If there is an AWD OFF message in
the information display from using a non-full
sized spare tire, this indicator should turn off
after reinstalling the repaired or replaced
normal road tire and cycling the ignition off
and on. It is recommended to reinstall the
repaired or replaced road tire as soon as
possible.
Major dissimilar tire sizes between the front
and rear axles (for example, 17 inch low
profile tires on the front axle and 22 inch high
profile tires on the rear axle) could cause the
AWD system to stop functioning and default
to front-wheel drive or damage the AWD
system. However, the AWD system is
capable of tolerating any combination of new
and worn tires of the same original tire size.
For example, using 3 worn tread tires and 1
new tread tire all of the same original tire
size, can be tolerated by the AWD system. Driving In Special Conditions With All-
Wheel Drive (AWD)
AWD vehicles are equipped for driving on
sand, snow, mud and rough roads and have
operating characteristics that are somewhat
different from conventional vehicles, both on
and off the highway.
When driving at slow speeds in deep sand
under high outside temperatures, use a low
gear when possible. Lower gear operation
will maximize the engine and transmission
cooling capability.
Under severe operating conditions, the A/C
may cycle on and off to protect overheating
of the engine.
Basic operating principles in special
conditions
•
Drive slower in strong crosswinds which
can affect the normal steering
characteristics of your vehicle.
• Be extremely careful when driving on
pavement made slippery by loose sand,
water, gravel, snow or ice.
181
MKZ (CC9) Canada/United States of America, enUSA, First Printing All-Wheel Drive
(If Equipped)
Page 187 of 564
Once through water, always try the brakes.
Wet brakes do not stop the vehicle as
effectively as dry brakes. Drying can be
improved by moving your vehicle slowly
while applying light pressure on the brake
pedal.
Be cautious of sudden changes in vehicle
speed or direction when you are driving in
mud. Even AWD vehicles can lose traction
in slick mud. As when you are driving over
sand, apply the accelerator slowly and avoid
spinning your wheels. If the vehicle does
slide, steer in the direction of the slide until
you regain control of the vehicle.
After driving through mud, clean off residue
stuck to rotating driveshafts and tires. Excess
mud stuck on tires and rotating driveshafts
causes an imbalance that could damage
drive components.
Note:
Driving through deep water may
damage the transmission.
If the front or rear axle is submerged in water,
have the power transfer unit (PTU) or rear
axle serviced by an authorized dealer. Driving on Hilly or Sloping Terrain
Note:
Avoid driving crosswise or turning on
steep slopes or hills. A danger lies in losing
traction, slipping sideways and possibly
rolling over. Whenever driving on a hill,
determine beforehand the route you will use.
Do not drive over the crest of a hill without
seeing what conditions are on the other side.
Do not drive in reverse over a hill without
the aid of an observer.
Although natural obstacles may make it
necessary to travel diagonally up or down a
hill or steep incline, you should always try to
drive straight up or straight down.
When climbing a steep slope or hill, start in
a lower gear rather than downshifting to a
lower gear from a higher gear once the
ascent has started. This reduces strain on
the engine and the possibility of stalling.
If you do stall out, do not try to turnaround
because you might roll over. It is better to
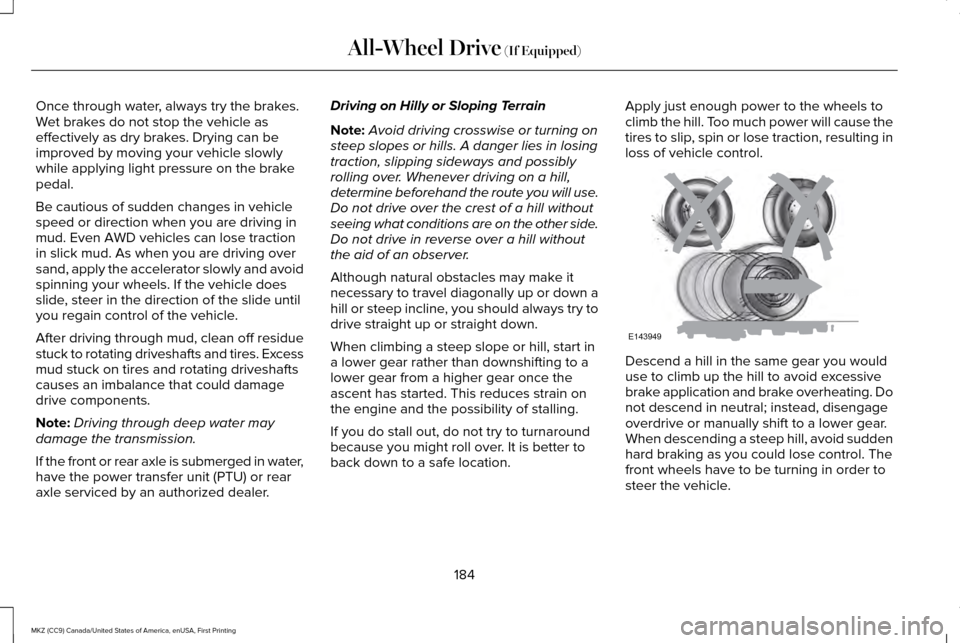
back down to a safe location. Apply just enough power to the wheels to
climb the hill. Too much power will cause the
tires to slip, spin or lose traction, resulting in
loss of vehicle control.
Descend a hill in the same gear you would
use to climb up the hill to avoid excessive
brake application and brake overheating. Do
not descend in neutral; instead, disengage
overdrive or manually shift to a lower gear.
When descending a steep hill, avoid sudden
hard braking as you could lose control. The
front wheels have to be turning in order to
steer the vehicle.
184
MKZ (CC9) Canada/United States of America, enUSA, First Printing All-Wheel Drive (If Equipped)E143949