window LINCOLN NAVIGATOR 2019 Owner's Manual
[x] Cancel search | Manufacturer: LINCOLN, Model Year: 2019, Model line: NAVIGATOR, Model: LINCOLN NAVIGATOR 2019Pages: 645, PDF Size: 5.02 MB
Page 113 of 645
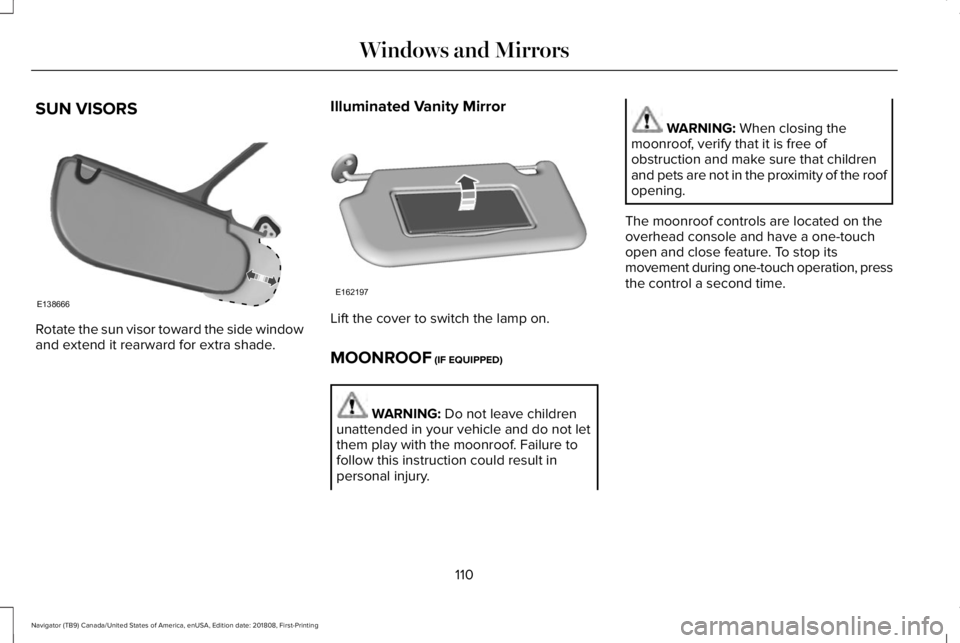
SUN VISORS
Rotate the sun visor toward the side windowand extend it rearward for extra shade.
Illuminated Vanity Mirror
Lift the cover to switch the lamp on.
MOONROOF (IF EQUIPPED)
WARNING: Do not leave childrenunattended in your vehicle and do not letthem play with the moonroof. Failure tofollow this instruction could result inpersonal injury.
WARNING: When closing themoonroof, verify that it is free ofobstruction and make sure that childrenand pets are not in the proximity of the roofopening.
The moonroof controls are located on theoverhead console and have a one-touchopen and close feature. To stop itsmovement during one-touch operation, pressthe control a second time.
110
Navigator (TB9) Canada/United States of America, enUSA, Edition date: 201808, First-Printing
Windows and MirrorsE138666 E162197
Page 114 of 645
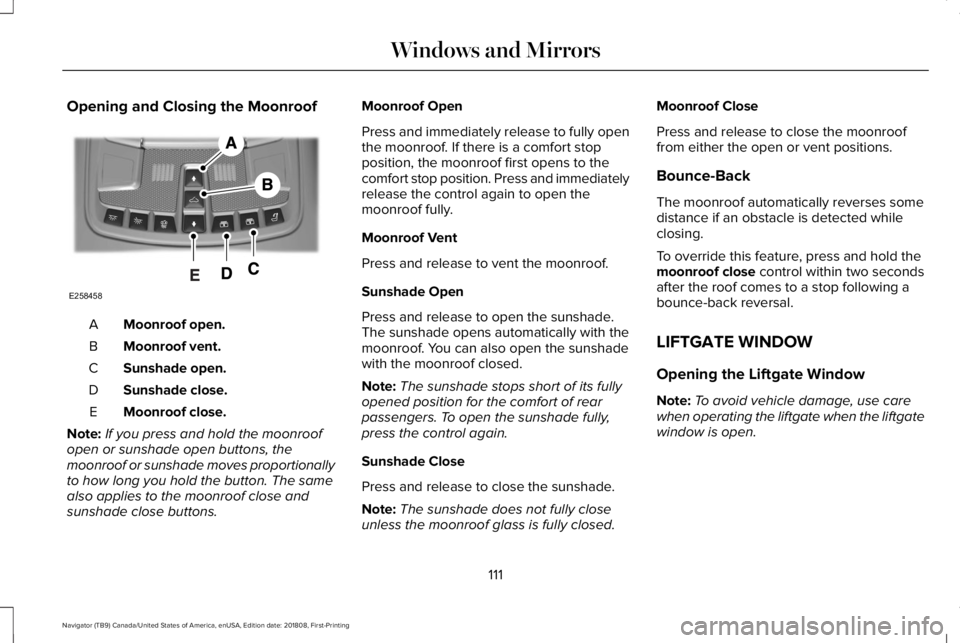
Opening and Closing the Moonroof
Moonroof open.A
Moonroof vent.B
Sunshade open.C
Sunshade close.D
Moonroof close.E
Note:If you press and hold the moonroofopen or sunshade open buttons, themoonroof or sunshade moves proportionallyto how long you hold the button. The samealso applies to the moonroof close andsunshade close buttons.
Moonroof Open
Press and immediately release to fully openthe moonroof. If there is a comfort stopposition, the moonroof first opens to thecomfort stop position. Press and immediatelyrelease the control again to open themoonroof fully.
Moonroof Vent
Press and release to vent the moonroof.
Sunshade Open
Press and release to open the sunshade.The sunshade opens automatically with themoonroof. You can also open the sunshadewith the moonroof closed.
Note:The sunshade stops short of its fullyopened position for the comfort of rearpassengers. To open the sunshade fully,press the control again.
Sunshade Close
Press and release to close the sunshade.
Note:The sunshade does not fully closeunless the moonroof glass is fully closed.
Moonroof Close
Press and release to close the moonrooffrom either the open or vent positions.
Bounce-Back
The moonroof automatically reverses somedistance if an obstacle is detected whileclosing.
To override this feature, press and hold themoonroof close control within two secondsafter the roof comes to a stop following abounce-back reversal.
LIFTGATE WINDOW
Opening the Liftgate Window
Note:To avoid vehicle damage, use carewhen operating the liftgate when the liftgatewindow is open.
111
Navigator (TB9) Canada/United States of America, enUSA, Edition date: 201808, First-Printing
Windows and MirrorsE258458
Page 115 of 645
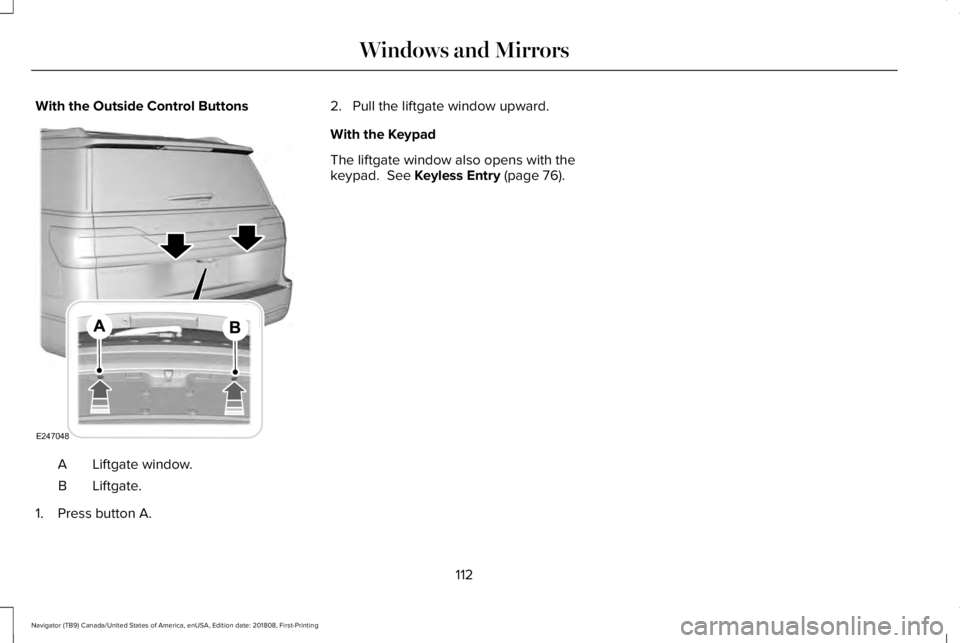
With the Outside Control Buttons
Liftgate window.A
Liftgate.B
1. Press button A.
2. Pull the liftgate window upward.
With the Keypad
The liftgate window also opens with thekeypad. See Keyless Entry (page 76).
112
Navigator (TB9) Canada/United States of America, enUSA, Edition date: 201808, First-Printing
Windows and MirrorsE247048
Page 127 of 645
SETTINGS
POWER RUNNING BOARD
TIRE MONITOR
WINDOWS
WIPERS
Enter the submenu and select your settingMyKey
Note:Once you select a trailer, it remains active until you set it as no longer active. An active trailer still accumulates miles even after youphysically disconnect it from your vehicle.
Note:If your vehicle is not equipped with a head up display, use the DISP button to access your DISPLAY SETUP options.
Information Screens
INFO/TRIP/FUEL On Demand informationappears on the right-hand side of yourinstrument cluster in single gauge view andin the center of your instrument cluster whenADD TACHOMETER TO VIEW is switchedon.
INFO/TRIP/FUEL
NO CONTENT
TRIP 1
TRIP 2
FUEL ECONOMY
SEATBELTS
INFO/TRIP/FUEL
124
Navigator (TB9) Canada/United States of America, enUSA, Edition date: 201808, First-Printing
Information Displays
Page 154 of 645
Maintaining Your Head Up Display
•Do not place objects onto the transparentcover, as they may block you from seeingportions of the image. These objectscould also damage the cover and affectthe quality of the projected image.
•The system uses a special windshielddesigned to provide the optimum imagequality. You must replace the windshieldin a vehicle with this system with acertified original equipmentmanufactured (OEM) head up displaywindshield. Replacing this system'swindshield with a non-head up displaywindshield causes a double image ordistorted image. Have an authorizeddealer or authorized repair facility replacethe windshield.
•Light conditions such as oncomingheadlamps, sunrise, sunset or reflectionsoff of wet road surfaces can affect thedriver's ability to see the HUD image.
•Clean the windshield often for optimalHUD performance. See Cleaning theWindows and Wiper Blades (page 381).
151
Navigator (TB9) Canada/United States of America, enUSA, Edition date: 201808, First-Printing
Information Displays
Page 157 of 645
HINTS ON CONTROLLING THE
INTERIOR CLIMATE
General Hints
Note:Prolonged use of recirculated air maycause the windows to fog up.
Note:You may feel a small amount of airfrom the footwell air vents regardless of theair distribution setting.
Note:To reduce humidity build-up insideyour vehicle, do not drive with the systemswitched off or with recirculated air alwaysswitched on.
Note:Do not place objects under the frontseats as this may interfere with the airflowto the rear seats.
Note:Remove any snow, ice or leaves fromthe air intake area at the base of thewindshield.
Note:To improve the time to reach acomfortable temperature in hot weather,drive with the windows open until you feelcold air through the air vents.
Automatic Climate Control
Note:Adjusting the settings when yourvehicle interior is extremely hot or cold is notnecessary.
Note:The system adjusts to heat or cool theinterior to the temperature you select asquickly as possible.
Note:For the system to function efficiently,the instrument panel and side air ventsshould be fully open.
Note:If you select AUTO during cold outsidetemperatures, the system directs air flow tothe windshield and side window air vents. Inaddition, the blower motor may run at aslower speed until the engine warms up.
Note:If you select AUTO during hottemperatures and the inside of the vehicleis hot, the system uses recirculated air tomaximize interior cooling. Blower motorspeed may also reduce until the air cools.
Quickly Heating the Interior
1. Press and release AUTO.
2. Adjust the temperature function to thesetting you prefer.
Recommended Settings for Heating
1. Press and release AUTO.
2. Adjust the temperature function to thesetting you prefer. Use 72°F (22°C) as astarting point, then adjust the setting asnecessary.
Quickly Cooling the Interior
1. Press and release MAX A/C.
Recommended Settings for Cooling
1. Press and release AUTO.
2. Adjust the temperature function to thesetting you prefer. Use 72°F (22°C) as astarting point, then adjust the setting asnecessary.
Defogging the Side Windows in ColdWeather
1. Press and release defrost.
154
Navigator (TB9) Canada/United States of America, enUSA, Edition date: 201808, First-Printing
Climate Control
Page 159 of 645
Switching the Rear Climate Control Onand Off
Press and release the button.
Switching the Rear Heated Seats Onand Off
Press and release the button tocycle through the various heatsettings and off.
See Heated Seats (page 177).
HEATED WINDSHIELD (IF EQUIPPED)
Windshield Wiper De-Icer
The windshield wiper de-icer turns on in lowtemperatures.
HEATED REAR WINDOW
Press the button to clear the rearwindow of thin ice and fog. Theheated rear window turns off aftera short period of time.
Note:Make sure the engine is on beforeoperating the heated windows.
Note: Do not use razor blades or othersharp objects to clean or remove decals fromthe inside of the heated rear window. Thevehicle Warranty may not cover damagecaused to the heated rear window grid lines.
HEATED EXTERIOR MIRRORS
When you switch the heated rear windowon, the heated exterior mirrors turn on.
Note:Do not remove ice from the mirrorswith a scraper or adjust the mirror glasswhen it is frozen in place.
Note:Do not clean the mirror housing orglass with harsh abrasives, fuel or otherpetroleum-based cleaning products. Thevehicle warranty may not cover damagecaused to the mirror housing or glass.
CABIN AIR FILTER
Your vehicle is equipped with a cabin airfilter, which gives you and your passengersthe following benefits:
•It improves your driving comfort byreducing particle concentration.
•It improves the interior compartmentcleanliness.
•It protects the climate controlcomponents from particle deposits.
You can locate the cabin air filter behind theglove box.
Note:Make sure you have a cabin air filterinstalled at all times. This prevents foreignobjects from entering the system. Runningthe system without a filter in place couldresult in degradation or damage to thesystem.
156
Navigator (TB9) Canada/United States of America, enUSA, Edition date: 201808, First-Printing
Climate Control
Page 160 of 645
Replace the filter at regular intervals. SeeScheduled Maintenance (page 547).
For additional cabin air filter information, orto replace the filter, see an authorized dealer.
REMOTE START
The climate control system adjusts theinterior temperature during remote start.
You can switch this feature on or off andadjust the settings using the informationdisplay controls. See Information Displays(page 120).
You cannot adjust the climate control settingduring remote start operation. Switch theignition on to make adjustments.
Based on your remote start settings, thefollowing vehicle-dependent features mayor may not remain on after remote startingyour vehicle:
•Climate controlled seats.
•Heated steering wheel.
•Heated mirrors.
•Heated rear window.
•Windshield wiper de-icer.
Note:For dual zone climate controlled seats,the passenger seat setting defaults to matchthe driver seat during remote start.
Automatic Settings
If Auto is on, the system sets the interiortemperature to 72°F (22°C) and heats orcools the vehicle interior as required toachieve comfort.
Note:In cold weather, the heated rearwindow and heated mirrors turn on.
Last Settings
If Last Settings is on, the system uses thesettings last selected before you turned offthe vehicle.
Heated and Cooled Features
In Auto mode, certain heated features mayswitch on during cold weather, and cooledfeatures during hot weather.
157
Navigator (TB9) Canada/United States of America, enUSA, Edition date: 201808, First-Printing
Climate Control
Page 190 of 645
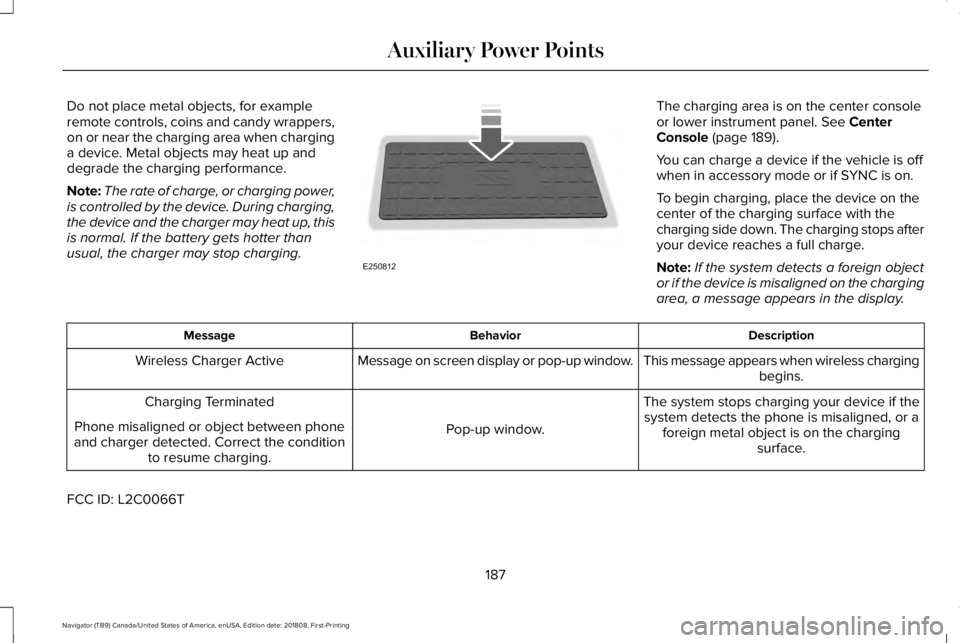
Do not place metal objects, for exampleremote controls, coins and candy wrappers,on or near the charging area when charginga device. Metal objects may heat up anddegrade the charging performance.
Note:The rate of charge, or charging power,is controlled by the device. During charging,the device and the charger may heat up, thisis normal. If the battery gets hotter thanusual, the charger may stop charging.
The charging area is on the center consoleor lower instrument panel. See CenterConsole (page 189).
You can charge a device if the vehicle is offwhen in accessory mode or if SYNC is on.
To begin charging, place the device on thecenter of the charging surface with thecharging side down. The charging stops afteryour device reaches a full charge.
Note:If the system detects a foreign objector if the device is misaligned on the chargingarea, a message appears in the display.
DescriptionBehaviorMessage
This message appears when wireless chargingbegins.Message on screen display or pop-up window.Wireless Charger Active
The system stops charging your device if thesystem detects the phone is misaligned, or aforeign metal object is on the chargingsurface.
Pop-up window.
Charging Terminated
Phone misaligned or object between phoneand charger detected. Correct the conditionto resume charging.
FCC ID: L2C0066T
187
Navigator (TB9) Canada/United States of America, enUSA, Edition date: 201808, First-Printing
Auxiliary Power PointsE250812
Page 192 of 645
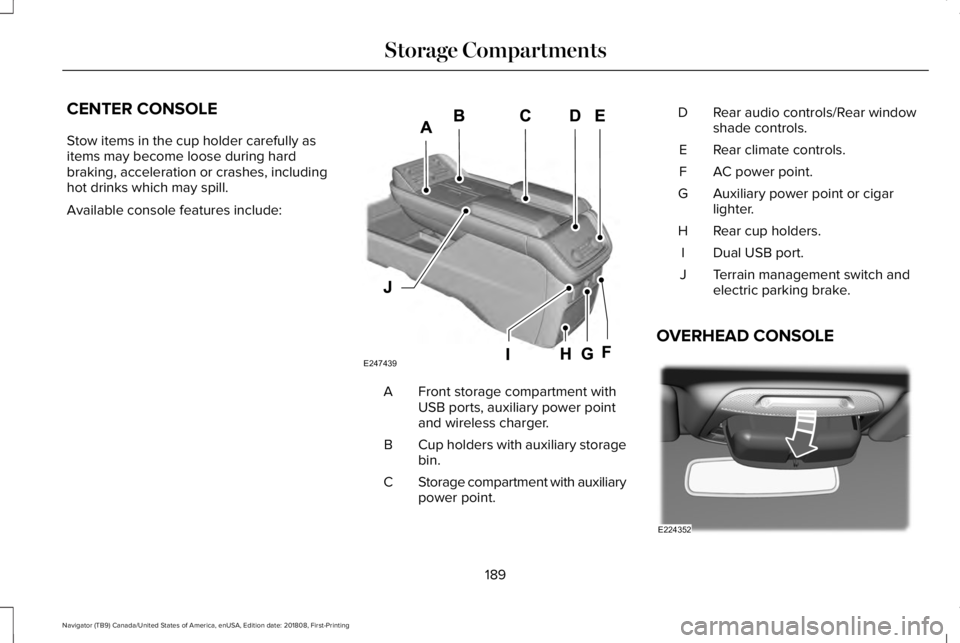
CENTER CONSOLE
Stow items in the cup holder carefully asitems may become loose during hardbraking, acceleration or crashes, includinghot drinks which may spill.
Available console features include:
Front storage compartment withUSB ports, auxiliary power pointand wireless charger.
A
Cup holders with auxiliary storagebin.B
Storage compartment with auxiliarypower point.C
Rear audio controls/Rear windowshade controls.D
Rear climate controls.E
AC power point.F
Auxiliary power point or cigarlighter.G
Rear cup holders.H
Dual USB port.I
Terrain management switch andelectric parking brake.J
OVERHEAD CONSOLE
189
Navigator (TB9) Canada/United States of America, enUSA, Edition date: 201808, First-Printing
Storage CompartmentsE247439 E224352