tow LINCOLN NAVIGATOR 2020 Owners Manual
[x] Cancel search | Manufacturer: LINCOLN, Model Year: 2020, Model line: NAVIGATOR, Model: LINCOLN NAVIGATOR 2020Pages: 622, PDF Size: 6.47 MB
Page 5 of 622
MyKey™
Principle of Operation
...................................78
Creating a MyKey ..........................................
79
Clearing All MyKeys ......................................
80
Checking MyKey System Status ................
80
Using MyKey With Remote Start Systems ........................................................................\
..
81
MyKey – Troubleshooting ............................
81
Doors and Locks
Locking and Unlocking ................................
83
Keyless Entry ...................................................
87
Liftgate
Power Liftgate ................................................
90
Security
Passive Anti-Theft System ...........................
94
Anti-Theft Alarm .............................................
96
Power Running Boards
Using Power Running Boards ....................
98Steering Wheel
Adjusting the Steering Wheel
...................
100
Audio Control .................................................
101
Voice Control .................................................
101
Cruise Control - Vehicles With: Cruise Control ........................................................
102
Cruise Control - Vehicles With: Adaptive Cruise Control ..........................................
102
Information Display Control ......................
102
Heated Steering Wheel ..............................
103
Horn .................................................................
103
Adjustable Pedals
Adjusting the Pedals ...................................
104
Wipers and Washers
Windshield Wipers .......................................
105
Autowipers .....................................................
106
Windshield Washers ....................................
107
Rear Window Wiper and Washers ...........
107
Lighting
General Information ....................................
109Lighting Control
............................................
109
Autolamps .......................................................
110
Instrument Lighting Dimmer ........................
111
Headlamp Exit Delay .....................................
111
Daytime Running Lamps - Vehicles With: Configurable Daytime Running Lamps
........................................................................\
.
111
Daytime Running Lamps - Vehicles With: Daytime Running Lamps (DRL) ...............
111
Front Fog Lamps ...........................................
112
Headlamp Leveling .......................................
112
Adaptive Headlamps ....................................
112
Direction Indicators .......................................
113
Welcome Lighting .........................................
113
Interior Lamps ................................................
113
Ambient Lighting ...........................................
114
Automatic High Beam Control
What Is Automatic High Beam Control ........................................................................\
116
Switching Automatic High Beam Control On and Off ..................................................
116
Automatic High Beam Control Indicators ........................................................................\
117
2
Navigator (TB9) Canada/United States of America, enUSA, Edition date: 201907, Second-Printing Table of Contents
Page 8 of 622
Towing
Towing a Trailer
..............................................311
Trailer Reversing Aids .................................
312
Trailer Sway Control ...................................
323
Recommended Towing Weights .............
323
Essential Towing Checks ..........................
326
Towing the Vehicle on Four Wheels .......
334
Driving Hints
Reduced Engine Performance .................
337
Economical Driving .....................................
337
Breaking-In ....................................................
338
Driving Through Water ...............................
338
Floor Mats .....................................................
338
Roadside Emergencies
Roadside Assistance ..................................
340
Hazard Flashers ............................................
341
Fuel Shutoff ....................................................
341
Jump Starting the Vehicle .........................
342
Post-Crash Alert System ............................
344
Transporting the Vehicle ...........................
345
Towing Points - 4WD ..................................
345Customer Assistance
Getting the Services You Need
...............
347
In California (U.S. Only) ..............................
348
The Better Business Bureau (BBB) Auto Line Program (U.S. Only) .......................
349
Utilizing the Mediation/Arbitration Program (Canada Only) ..........................................
350
Getting Assistance Outside the U.S. and Canada .......................................................
351
Ordering Additional Owner's Literature ......................................................................
353
Reporting Safety Defects (U.S. Only) ......
354
Reporting Safety Defects (Canada Only) ......................................................................
354
Fuses
Fuse Specification Chart ...........................
356
Changing a Fuse .........................................
370
Maintenance
General Information ....................................
373
Opening and Closing the Hood ...............
373
Under Hood Overview ...............................
375
Engine Oil Dipstick ......................................
377Engine Oil Check
.........................................
377
Oil Change Indicator Reset .......................
378
Changing the Engine Air Filter .................
379
Engine Coolant Check ...............................
380
Automatic Transmission Fluid Check ......
384
Transfer Case Fluid Check .......................
385
Brake Fluid Check ......................................
385
Changing the 12V Battery .........................
387
Adjusting the Headlamps .........................
389
Washer Fluid Check ...................................
390
Fuel Filter .......................................................
391
Checking the Wiper Blades .......................
391
Changing the Wiper Blades ......................
391
Changing a Bulb ..........................................
392
Vehicle Care
General Information ....................................
393
Cleaning Products .......................................
393
Cleaning the Exterior .................................
394
Waxing ...........................................................
395
Cleaning the Engine ...................................
396
Cleaning the Windows and Wiper Blades ......................................................................
396
5
Navigator (TB9) Canada/United States of America, enUSA, Edition date: 201907, Second-Printing Table of Contents
Page 18 of 622

Vehicles With a Modem (If Equipped)
The modem has a SIM. The
modem was enabled when your
vehicle was built and periodically
sends messages to stay connected to the
cell phone network, receive automatic
software updates and send vehicle-related
information to us, for example, diagnostic
information. These messages could include
information that identifies your vehicle, the
SIM and the electronic serial number of the
modem. Cell phone network service
providers could have access to additional
information, for example, cell phone network
tower identification. For additional
information about our privacy policy, visit
www .ConnectedLincoln. com or refer to your
local Lincoln website.
Note: The modem continues to send this
information unless you disable the modem
or stop the modem from sharing vehicle data
by changing the modem settings. .
Note: The service can be unavailable or
interrupted for a number of reasons, for
example, environmental or topographical
conditions and data plan coverage. Note:
To find out if your vehicle has a
modem, visit www .ConnectedLincoln. com .
Vehicles With SYNC
Mobile Device Data
If you connect a mobile device to your
vehicle, you can display data from your
device on the touchscreen for example,
music and album art. You can share your
vehicle data with mobile apps on your device
through the system.
See Apps (page 510).
The mobile apps function operates by your
connected device sending data to us in the
United States. The data is encrypted and
includes the vehicle identification number of
your vehicle, the SYNC module serial
number, odometer, enabled apps, usage
statistics and debugging information. We
retain it only as long as necessary to provide
the service, to troubleshoot, for continuous
improvement and to offer you products and
services that may be of interest to you
according to your preferences and where
allowed by law. If you connect a cell phone to the system,
the system creates a profile that links to that
cell phone. The cell phone profile enables
more mobile features and efficient operation.
The profile contains, for example, data from
your phonebook, read and unread text
messages and call history, including history
of calls when your cell phone was not
connected to the system.
If you connect a media device, the system
creates and retains a media device index of
supported media content. The system also
records a short diagnostic log of
approximately 10 minutes of all recent system
activity.
The cell phone profile, media device index
and diagnostic log remain in your vehicle
unless you delete them and are generally
accessible only in your vehicle when you
connect your cell phone or media device. If
you no longer plan to use the system or your
vehicle, we recommend you use the master
reset function to erase the stored
information.
See Settings (page 513).
15
Navigator (TB9) Canada/United States of America, enUSA, Edition date: 201907, Second-Printing Introduction
Page 23 of 622
PROTECTING THE ENVIRONMENT
You should play your part in protecting the
environment. Correct vehicle usage and the
authorized disposal of waste, cleaning and
lubrication materials are significant steps
toward this aim.
For additional information about our
sustainability progress and initiatives, visit
www
.sustainability . ford. com .
20
Navigator (TB9) Canada/United States of America, enUSA, Edition date: 201907, Second-Printing Environment
Page 30 of 622
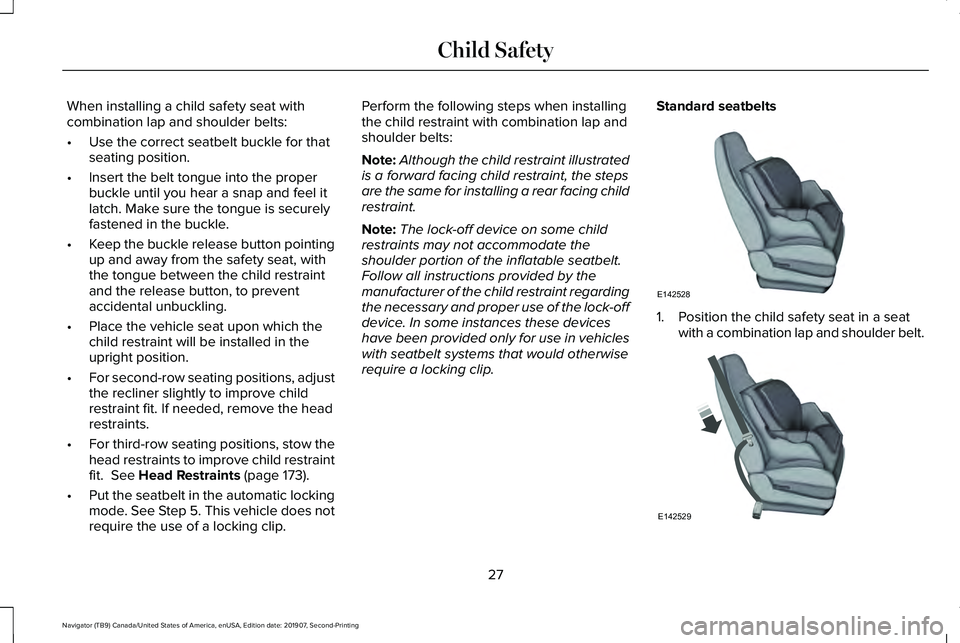
When installing a child safety seat with
combination lap and shoulder belts:
•
Use the correct seatbelt buckle for that
seating position.
• Insert the belt tongue into the proper
buckle until you hear a snap and feel it
latch. Make sure the tongue is securely
fastened in the buckle.
• Keep the buckle release button pointing
up and away from the safety seat, with
the tongue between the child restraint
and the release button, to prevent
accidental unbuckling.
• Place the vehicle seat upon which the
child restraint will be installed in the
upright position.
• For second-row seating positions, adjust
the recliner slightly to improve child
restraint fit. If needed, remove the head
restraints.
• For third-row seating positions, stow the
head restraints to improve child restraint
fit. See Head Restraints (page 173).
• Put the seatbelt in the automatic locking
mode. See Step 5. This vehicle does not
require the use of a locking clip. Perform the following steps when installing
the child restraint with combination lap and
shoulder belts:
Note:
Although the child restraint illustrated
is a forward facing child restraint, the steps
are the same for installing a rear facing child
restraint.
Note: The lock-off device on some child
restraints may not accommodate the
shoulder portion of the inflatable seatbelt.
Follow all instructions provided by the
manufacturer of the child restraint regarding
the necessary and proper use of the lock-off
device. In some instances these devices
have been provided only for use in vehicles
with seatbelt systems that would otherwise
require a locking clip. Standard seatbelts 1. Position the child safety seat in a seat
with a combination lap and shoulder belt. 27
Navigator (TB9) Canada/United States of America, enUSA, Edition date: 201907, Second-Printing Child SafetyE142528 E142529
Page 32 of 622
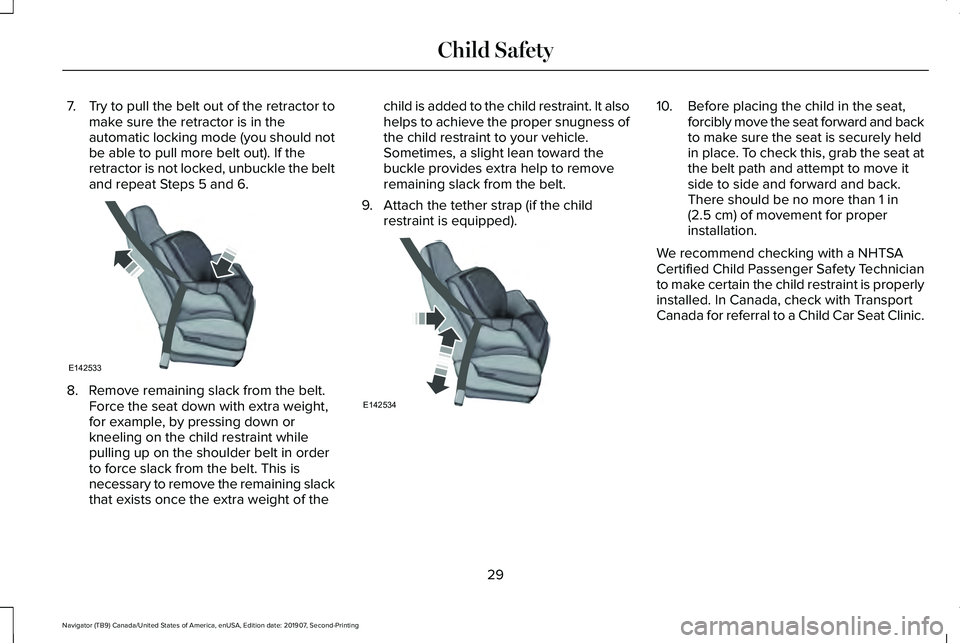
7.
Try to pull the belt out of the retractor to
make sure the retractor is in the
automatic locking mode (you should not
be able to pull more belt out). If the
retractor is not locked, unbuckle the belt
and repeat Steps 5 and 6. 8. Remove remaining slack from the belt.
Force the seat down with extra weight,
for example, by pressing down or
kneeling on the child restraint while
pulling up on the shoulder belt in order
to force slack from the belt. This is
necessary to remove the remaining slack
that exists once the extra weight of the child is added to the child restraint. It also
helps to achieve the proper snugness of
the child restraint to your vehicle.
Sometimes, a slight lean toward the
buckle provides extra help to remove
remaining slack from the belt.
9. Attach the tether strap (if the child restraint is equipped). 10. Before placing the child in the seat,
forcibly move the seat forward and back
to make sure the seat is securely held
in place. To check this, grab the seat at
the belt path and attempt to move it
side to side and forward and back.
There should be no more than 1 in
(2.5 cm) of movement for proper
installation.
We recommend checking with a NHTSA
Certified Child Passenger Safety Technician
to make certain the child restraint is properly
installed. In Canada, check with Transport
Canada for referral to a Child Car Seat Clinic.
29
Navigator (TB9) Canada/United States of America, enUSA, Edition date: 201907, Second-Printing Child SafetyE142533 E142534
Page 35 of 622

8. Remove remaining slack from the belt.
Force the seat down with extra weight,
for example, by pressing down or
kneeling on the child restraint while
pulling down on the lap belt in order to
force slack from the belt. This is
necessary to remove the remaining slack
that exists once the extra weight of the
child is added to the child restraint. It also
helps to achieve the proper snugness of
the child restraint to your vehicle.
Sometimes, a slight lean toward the
buckle will additionally help to remove
remaining slack from the belt. 9. Attach the tether strap (if the child
restraint is equipped). 10. Before placing the child in the seat,
forcibly move the seat forward and back
to make sure the seat is securely held
in place. To check this, grab the seat at
the belt path and attempt to move it
side to side and forward and back.
There should be no more than 1 in
(2.5 cm) of movement for proper
installation. We recommend checking with a NHTSA
Certified Child Passenger Safety Technician
to make certain the child restraint is properly
installed. In Canada, check with Transport
Canada for referral to a Child Car Seat Clinic.
Using Lower Anchors and Tethers for
CHildren (LATCH)
WARNING:
Do not attach two child
safety restraints to the same anchor. In a
crash, one anchor may not be strong
enough to hold two child safety restraint
attachments and may break, causing
serious injury or death.
The LATCH system is composed of three
vehicle anchor points: two lower anchors
where the vehicle seatback and seat cushion
meet (called the seat bight) and one top
tether anchor behind that seating position.
LATCH compatible child safety seats have
two rigid or webbing mounted attachments
that connect to the two lower anchors at the
LATCH equipped seating positions in your
vehicle. This type of attachment method
eliminates the need to use seatbelts to attach
32
Navigator (TB9) Canada/United States of America, enUSA, Edition date: 201907, Second-Printing Child SafetyE146525 E142534
Page 45 of 622
If the booster seat slides on the vehicle seat
upon which it is being used, placing a
rubberized mesh sold as shelf or carpet liner
under the booster seat may improve this
condition. Do not introduce any item thicker
than this under the booster seat. Check with
the booster seat manufacturer's instructions.
CHILD RESTRAINT POSITIONING
WARNING: Do not place a rearward
facing child restraint in front of an active
airbag. Failure to follow this instruction
could result in personal injury or death. WARNING:
Properly secure children
12 years old and under in a rear seating
position whenever possible. If you are
unable to properly secure all children in a
rear seating position, properly secure the
largest child on the front seat. If you must
use a forward facing child restraint on the
front seat, move the seat as far back as
possible. Failure to follow these
instructions could result in personal injury
or death. WARNING:
Always carefully follow
the instructions and warnings provided by
the manufacturer of any child restraint to
determine if the restraint device is
appropriate for your child's size, height,
weight, or age. Follow the child restraint
manufacturer's instructions and warnings
provided for installation and use in
conjunction with the instructions and
warnings provided by your vehicle manufacturer. A safety seat that is
improperly installed or utilized, is
inappropriate for your child's height, age,
or weight or does not properly fit the child
may increase the risk of serious injury or
death.
WARNING: Do not allow a passenger
to hold a child on their lap when your
vehicle is moving. Failure to follow this
instruction could result in personal injury
or death in the event of a sudden stop or
crash. WARNING: Do not use pillows, books
or towels to boost your child's height.
Failure to follow this instruction could result
in personal injury or death. WARNING:
Properly secure child
restraints or booster seats when they are
not in use. They could become projectiles
in a sudden stop or crash. Failure to follow
this instruction could result in personal
injury or death.
42
Navigator (TB9) Canada/United States of America, enUSA, Edition date: 201907, Second-Printing Child Safety
Page 52 of 622
length of webbing back toward the stowed
position. For rear seatbelts, recline the rear
seat backrest or push the seat backrest
cushion away from the seatbelt. Feed a small
length of webbing back toward the stowed
position.
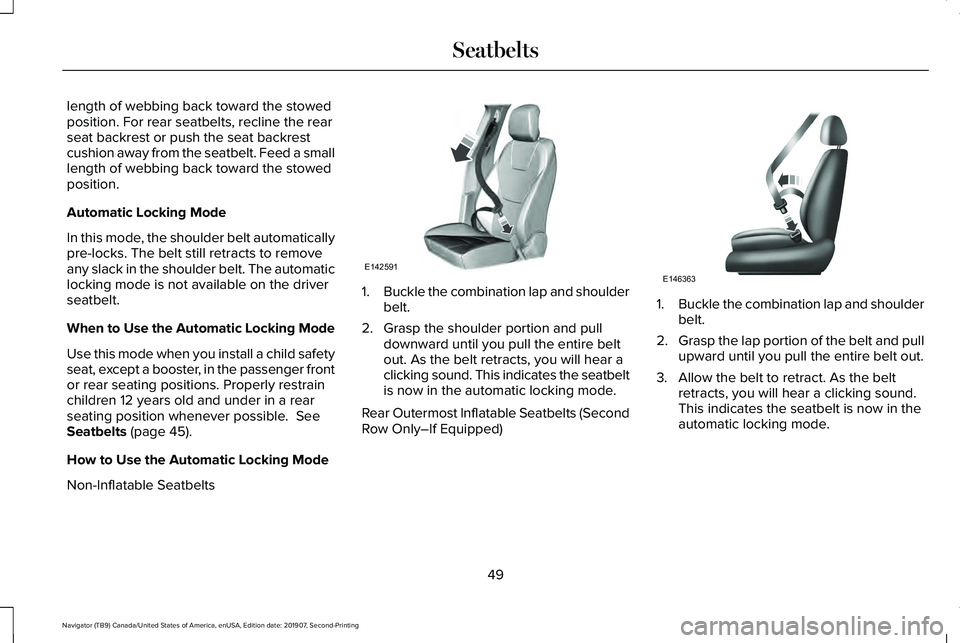
Automatic Locking Mode
In this mode, the shoulder belt automatically
pre-locks. The belt still retracts to remove
any slack in the shoulder belt. The automatic
locking mode is not available on the driver
seatbelt.
When to Use the Automatic Locking Mode
Use this mode when you install a child safety
seat, except a booster, in the passenger front
or rear seating positions. Properly restrain
children 12 years old and under in a rear
seating position whenever possible. See
Seatbelts (page 45).
How to Use the Automatic Locking Mode
Non-Inflatable Seatbelts 1.
Buckle the combination lap and shoulder
belt.
2. Grasp the shoulder portion and pull downward until you pull the entire belt
out. As the belt retracts, you will hear a
clicking sound. This indicates the seatbelt
is now in the automatic locking mode.
Rear Outermost Inflatable Seatbelts (Second
Row Only–If Equipped) 1.
Buckle the combination lap and shoulder
belt.
2. Grasp the lap portion of the belt and pull
upward until you pull the entire belt out.
3. Allow the belt to retract. As the belt retracts, you will hear a clicking sound.
This indicates the seatbelt is now in the
automatic locking mode.
49
Navigator (TB9) Canada/United States of America, enUSA, Edition date: 201907, Second-Printing SeatbeltsE142591 E146363
Page 64 of 622
The front passenger sensing system works
with sensors that are part of the front
passenger seat and seatbelt. The sensors
are designed to detect the presence of a
properly seated occupant and determine if
the front passenger frontal airbag should be
enabled.
•
When the front passenger sensing
system enables the front passenger
frontal airbag (may inflate), the passenger
airbag status indicator illuminates the on
lamp and remains illuminated.
If a person of adult size is sitting in the front
passenger seat, but the passenger airbag
status indicator off lamp is lit, it is possible
that the person is not sitting properly in the
seat. If this happens:
• Switch your vehicle off and ask the
person to place the seat backrest in an
upright position.
• Have the person sit upright in the seat,
centered on the seat cushion, with the
person's legs comfortably extended. •
Restart your vehicle and have the person
remain in this position for about two
minutes. This allows the system to detect
that person and enable the passenger
frontal airbag.
• If the indicator off lamp remains lit even
after this, you should advise the person
to ride in the rear seat.
After all occupants have adjusted their seats
and put on seatbelts, it is very important that
they continue to sit properly. A properly
seated occupant sits upright, leaning against
the seat backrest, and centered on the seat
cushion, with their feet comfortably extended
on the floor. Sitting improperly can increase
the chance of injury in a crash event. For
example, if an occupant slouches, lies down,
turns sideways, sits forward, leans forward
or sideways, or puts one or both feet up, the
chance of injury during a crash greatly
increases. If you think that the state of the passenger
airbag status indicator lamp is incorrect,
check for the following:
•
Objects lodged underneath the seat.
• Objects between the seat cushion and
the center console.
• Objects hanging off the seat backrest.
• Objects stowed in the seat backrest map
pocket.
• Objects placed on the occupant's lap.
• Cargo interference with the seat.
• Other passengers pushing or pulling on
the seat.
• Rear passenger feet and knees resting
or pushing on the seat.
The conditions listed above may cause the
weight of a properly seated occupant to be
incorrectly interpreted by the front passenger
sensing system. The person in the front
passenger seat may appear heavier or lighter
due to the conditions described in the
previous list.
61
Navigator (TB9) Canada/United States of America, enUSA, Edition date: 201907, Second-Printing Supplementary Restraints System